Jump to content


Photo
- - - - -

SS Hatch


  • Please log in to reply
589 replies to this topic

#1 76lxhatch

76lxhatch

    That was easy!

  • Members
  • PipPipPipPipPipPipPip
  • 7,153 posts
  • Location:Unzud
  • Car:SS
  • Joined: 04-August 08
Garage View Garage

Posted 17 March 2009 - 07:16 PM

Hi all

Starting off on another round of improvements, unfortunately a little earlier than anticipated. Some background:

I spent six months last year with the hatch off the road for a diff and brake upgrade all round as well as some new wheels. Finally got everything certified and road legal again around the end of September and have been enjoying it ever since. But it was not to be...

I am involved with a local car show that was held a few weekends ago, and this year we had a reasonable size burnout pad for the first time. The first day it rained so I got out there to put on a bit of a display and pump up some interest which was good at the time but now I'm dealing with the consequences!

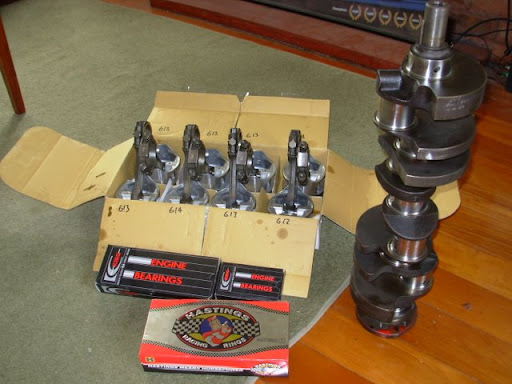
The engine had definitely done a few kms before and developed a bit of a knock after this treatment (a few too many revs I think). I finally pulled it out on Sunday and stripped it down this evening. Spun a big end bearing as suspected and also a bit of damage to the main bearing beside it. Also found that every single top ring was broken, most of them into lots of pieces, I'd say they've been like this for a while. On the up side, the crank has very little bearing smeared over the journals and is standard size. The block is just an early QT with neoprene seal, but is still standard bore so worth keeping I think. I'd love to stroke it but I haven't managed to squeeze the credit card hard enough to make it happen yet, so dunno.

To top it all off the (newly upgraded) diff isn't happy either, there's a lot of movement in the centre that definitely wasn't there before. Of course the centre was the only part that I didn't overhaul before putting it in! (It did survive a few drag races :spoton: ) Haven't pulled this out yet but due to the aforementioned cashflow issue I will most likely just remove the LSD and put in one of the spare open centres for the time being.

Most likely scenario at this stage is that it will be off the road for another six months or more while the funds accumulate. If that's the case I will probably also work on some other bits and pieces that have been waiting for a rainy day, like the replacement rear flares and the drop tank. Other thoughts will probably tempt me as I go along...

Ah well, if it ain't broke I didn't try hard enough! :D

I will try to remember to take some pics, we all know they are more interesting than reading the words

#2 76lxhatch

76lxhatch

    That was easy!

  • Members
  • PipPipPipPipPipPipPip
  • 7,153 posts
  • Location:Unzud
  • Car:SS
  • Joined: 04-August 08
Garage View Garage

Posted 23 March 2009 - 10:39 PM

OK some history. This is the car when I bought it a little over three years ago:
then.jpg
Not bad, but some work to do. Rear wheels and tyres really didn't fill out the guards, wrong (and crooked!) flares on the back. Banjo diff.


I used to have an HZ ute which I built from the ground up, blew up the M20 gearbox on the drag strip which seemed like a perfect opportunity to swap the motor into the Torana, so I did.


I put some slightly bigger tyres on the back and the diff was the first casualty, it actually broke the bearing cap mounts and the crownwheel tried to exit out the rear of the housing. All that could be salvaged was one axle! Sourced another Banjo diff and upgraded front end to UC with new bushes and ball joints while I was at it:
DSCN1040.jpg
Also boxed the rear lower trailing arms.

Edited by 76lxhatch, 21 July 2017 - 10:59 PM.


#3 76lxhatch

76lxhatch

    That was easy!

  • Members
  • PipPipPipPipPipPipPip
  • 7,153 posts
  • Location:Unzud
  • Car:SS
  • Joined: 04-August 08
Garage View Garage

Posted 23 March 2009 - 10:50 PM

Also got a Whiteline front mounted sway bar, its amazing how much better it handled with the UC front end, so much so that I suddenly needed new seats to get around the corners biggrin.gif

Random engine bay pic:
dscn2290.jpg


It stayed like this for quite a while, with several diff rebuilds thrown in for good measure.

Early last year I decided that I needed to pay some attention to braking and the always-broken diff. After lengthy consideration I put my ute up for sale and used the funds for the next stage.

Hoppers 290mm front brakes:
dscn1941.jpg

New rear flares (which still don't fit right) and more guard surgery for tyre clearance:
tmp.jpg

R31 Skyline diff and brakes thanks to Rory's R&D (what a wonderful place the Internet is):
dscn2159.jpg

Edited by 76lxhatch, 21 July 2017 - 11:00 PM.


#4 76lxhatch

76lxhatch

    That was easy!

  • Members
  • PipPipPipPipPipPipPip
  • 7,153 posts
  • Location:Unzud
  • Car:SS
  • Joined: 04-August 08
Garage View Garage

Posted 23 March 2009 - 10:54 PM

And a new set of wheels to suit the change in stud pattern, 15x7 front and 15x10 rear:
dscn2432.jpg
(they need to be 15x8 front really). Tyres are 225/50 and 265/50


I've also changed the rear springs for some King springs which are slightly higher, this has helped the ride a little and evened out the car left to right compared to the old saggy springs.

I have some halfway decent back flares waiting for it, but the shape still needs modifying to fit properly.


And that brings us to today, with the car up on stands and the engine block awaiting machining.

Edited by 76lxhatch, 21 July 2017 - 11:01 PM.


#5 76lxhatch

76lxhatch

    That was easy!

  • Members
  • PipPipPipPipPipPipPip
  • 7,153 posts
  • Location:Unzud
  • Car:SS
  • Joined: 04-August 08
Garage View Garage

Posted 26 March 2009 - 07:00 AM

Took engine block in to be bored yesterday, was offered a set of VN rods and a good price on crank grind and pistons if I want to rebuild it as a 308 reasonably cheap... can't make up my mind...

Also removed the diff and checked that out, LSD is absolutely shagged. I thought it was reasonably tight when I put it in but sure isn't now, heaps of lash in the spider gears and the cones are bottomed out. Could be rebuilt but dunno how long it will last.

#6 _slydog71_

_slydog71_
  • Guests

Posted 26 March 2009 - 07:18 AM

Nice looking ride 76lxhatch.

#7 _Herne_

_Herne_
  • Guests

Posted 26 March 2009 - 08:36 AM

Posted Image


Nice work mate and I love the pair sitting in this photo.

Herne

#8 76lxhatch

76lxhatch

    That was easy!

  • Members
  • PipPipPipPipPipPipPip
  • 7,153 posts
  • Location:Unzud
  • Car:SS
  • Joined: 04-August 08
Garage View Garage

Posted 26 March 2009 - 09:41 AM

Cheers guys, the four door in the pic belongs to a friend who not long finished doing it up, we spent a couple of hours taking some pics

#9 lxsstorana

lxsstorana

    Forum Fixture

  • Members
  • PipPipPipPipPip
  • 2,499 posts
  • Name:Mick
  • Location:Eastwood, Sydney
  • Car:SS Hatchback
  • Joined: 23-March 06

Posted 26 March 2009 - 09:49 AM

Good looking hatch and some very nice improvements. :spoton:

Mick.

#10 _Chamois hatch_

_Chamois hatch_
  • Guests

Posted 27 March 2009 - 10:42 AM

awsome hatch, sits very nicely. just rebuild the motor it'll save you headaches down the track.

#11 76lxhatch

76lxhatch

    That was easy!

  • Members
  • PipPipPipPipPipPipPip
  • 7,153 posts
  • Location:Unzud
  • Car:SS
  • Joined: 04-August 08
Garage View Garage

Posted 27 March 2009 - 03:46 PM

Thanks for the comments guys.

Made a decision on the motor today, had the block bored 30 thou and took the existing crank in to be ground. Ordered new flat top pistons along with rings and bearings and might be able to get hold of some VN rods which would be good.

I'm going to rebuild the LSD but I think I will just sell it, they don't last long enough. Ordered a Lokka :D

I also want to clean up the brake lines and wiring in the engine bay and repaint that, plus install the drop tank and a few other minor items this time around. I've set a goal so it doesn't drag on forever; aiming to have it finished by the end of May for the 10th NZ Holden Nationals which the local club is hosting.

The credit card people are going to love me!

#12 76lxhatch

76lxhatch

    That was easy!

  • Members
  • PipPipPipPipPipPipPip
  • 7,153 posts
  • Location:Unzud
  • Car:SS
  • Joined: 04-August 08
Garage View Garage

Posted 31 March 2009 - 08:04 PM

Well the engine bay cleanup has blown out of proportion already...

decided to hide the wiring
dscn2848.jpg

you can see why it needs repainting, brake fluid has been everywhere
dscn2851.jpg

Plan is to weld up all the holes that are no longer required, along with the ones that never were but someone drilled them anyway. Waiting on getting some paint matched, will hopefully also have a go at tidying up the brake lines.

Edited by 76lxhatch, 21 July 2017 - 11:01 PM.


#13 Heath

Heath

    I like cars.

  • Administrators
  • PipPipPipPipPipPipPip
  • 18,314 posts
  • Name:Heath
  • Location:Eastern Suburbs, Melbourne
  • Car:Heavily Modified UC Sunbird Hatchback
  • Joined: 07-November 05
Garage View Garage

Posted 31 March 2009 - 08:54 PM

decided to hide the wiring
Posted Image

Is that loom cable tied to something at each ~250mm interval? What have you done for it to be supported but not have the supports visible from the inside of the engine bay? Cheers

#14 76lxhatch

76lxhatch

    That was easy!

  • Members
  • PipPipPipPipPipPipPip
  • 7,153 posts
  • Location:Unzud
  • Car:SS
  • Joined: 04-August 08
Garage View Garage

Posted 31 March 2009 - 09:19 PM

Yes, probably a lot less than 250mm intervals. The top one is simply cable tied through the nut thingies for the bolts that hold the guard on. On the bottom one I screwed 3 small clips into the firewall and cable tied to them as well just in case. I enlarged the existing holes in the filler piece of sheet metal in the corner of the inner guard just above where the chassis rail dips downward and fitted grommets - the wiring comes out just below the firewall lip on the inside and is clipped to that. Everything has suitably thick layers of insulation to avoid damage.

#15 Heath

Heath

    I like cars.

  • Administrators
  • PipPipPipPipPipPipPip
  • 18,314 posts
  • Name:Heath
  • Location:Eastern Suburbs, Melbourne
  • Car:Heavily Modified UC Sunbird Hatchback
  • Joined: 07-November 05
Garage View Garage

Posted 01 April 2009 - 07:49 AM

Alright cool. Thanks

#16 76lxhatch

76lxhatch

    That was easy!

  • Members
  • PipPipPipPipPipPipPip
  • 7,153 posts
  • Location:Unzud
  • Car:SS
  • Joined: 04-August 08
Garage View Garage

Posted 03 April 2009 - 09:07 PM

Slow going the last few days but I now have the block and crank back in my possession. Block is 30 thou over, crank mains 20 thou and big ends 10 thou under. Got to clean it up and take some measurements this weekend to make sure that compression ratio isn't too high then send away for balancing next week.

Picked up some paint that has been matched to the car (its an oddball shade of off-white from who knows where) and started filling some of the holes in the engine bay. Hopefully get some paint down this weekend too.

#17 _LJ355_

_LJ355_
  • Guests

Posted 03 April 2009 - 09:37 PM

Nice hatch mate must say i do prefer the first wheels you had on it

#18 76lxhatch

76lxhatch

    That was easy!

  • Members
  • PipPipPipPipPipPipPip
  • 7,153 posts
  • Location:Unzud
  • Car:SS
  • Joined: 04-August 08
Garage View Garage

Posted 04 April 2009 - 06:58 AM

The globe replicas were ok but I changed stud pattern so those no longer fit, plus I wanted to fill out the rear guards. The old wheels are actually on the taxi in the pic above now.

#19 76lxhatch

76lxhatch

    That was easy!

  • Members
  • PipPipPipPipPipPipPip
  • 7,153 posts
  • Location:Unzud
  • Car:SS
  • Joined: 04-August 08
Garage View Garage

Posted 08 April 2009 - 07:10 AM

The Lokka arrived this morning, no more diff problems :)

#20 knoath

knoath

    far.... FAR

  • Members
  • PipPipPipPipPip
  • 2,036 posts
  • Location:Melbourne, Northern Subs
  • Joined: 09-November 05

Posted 08 April 2009 - 07:23 AM

Great story 76.
You must be happy with the piece of mind re. the diff.
I too prefer the first set of wheels, but understand. The chrome splats just don't seem angry enough....

#21 76lxhatch

76lxhatch

    That was easy!

  • Members
  • PipPipPipPipPipPipPip
  • 7,153 posts
  • Location:Unzud
  • Car:SS
  • Joined: 04-August 08
Garage View Garage

Posted 10 April 2009 - 02:43 PM

Lokka is installed, diff is ready to go back in the car. Dummy fitted drop tank, the proportions look pretty good and it seems to fit well enough.

First coat of paint on engine bay this afternoon:
Posted Image

#22 76lxhatch

76lxhatch

    That was easy!

  • Members
  • PipPipPipPipPipPipPip
  • 7,153 posts
  • Location:Unzud
  • Car:SS
  • Joined: 04-August 08
Garage View Garage

Posted 13 April 2009 - 04:57 PM

Brake booster repainted and installed along with master cylinder, line lock and brake valve/pressure switch so I can start running new brake lines:

Posted Image

#23 76lxhatch

76lxhatch

    That was easy!

  • Members
  • PipPipPipPipPipPipPip
  • 7,153 posts
  • Location:Unzud
  • Car:SS
  • Joined: 04-August 08
Garage View Garage

Posted 17 April 2009 - 11:56 AM

Woohoo! Engine parts ready for assembly:

Posted Image

Hyaptec flat top pistons, VT rods, reground crank, Hastings moly rings and King bearings.

Are these pics showing up for everyone else?

#24 _LX77SL_

_LX77SL_
  • Guests

Posted 17 April 2009 - 04:45 PM

na mate i cant see the pics

#25 76lxhatch

76lxhatch

    That was easy!

  • Members
  • PipPipPipPipPipPipPip
  • 7,153 posts
  • Location:Unzud
  • Car:SS
  • Joined: 04-August 08
Garage View Garage

Posted 17 April 2009 - 09:18 PM

Hmm, ok well that sucks, they seem to work intermittently for me for some reason. How about this:

http://lh6.ggpht.com...9Q/dscn0017.jpg
http://lh3.ggpht.com...5c/dscn0018.jpg
http://lh5.ggpht.com...ik/dscn0026.jpg


0 user(s) are reading this topic

0 members, 0 guests, 0 anonymous users