
hi just wondering if any one would have the measurements for a lx/lh rotisarary they have made, that works well, thank you
measurements for lx/lh rotisarary
Started by
_sic slr_
, Oct 29 2009 03:54 PM
40 replies to this topic
#2
 _tubbedlj_
_tubbedlj_
-

- Guests
Posted 19 December 2009 - 02:26 PM
hi just wondering if any one would have the measurements for a lx/lh rotisarary they have made, that works well, thank you
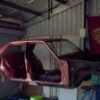
hi mate here is measurments of the the one i built, i have a falcon on it at the moment but it should be universial, it bolts on to where the bumpers bolt to the car hope this helps.
it is on my photobucket page here's the link http://s687.photobuc...ruzzin62falcon/
#3
_Yella SLuR_
_Yella SLuR_
-
- Guests
Posted 20 December 2009 - 09:44 AM
Can do when I get home. I think it was 900mm high posts to the pivot point, then a 200mm offset down to the bumper bar pick ups, but I will check. It works great.
#4
_big chris_
_big chris_
-
- Guests
Posted 14 January 2010 - 01:10 PM
Hey Yella,
can you post the measurements am looking at fabricating a rotisary for a lx hatch,
Cheers
Chris
can you post the measurements am looking at fabricating a rotisary for a lx hatch,
Cheers
Chris
#5
Statler
-

- Administrators
-

- 6,326 posts
Heckler Extraordinaire
- Name:Col
- Location:Mackay Qld. Whitsundays for all you back packers!
- Joined: 20-May 06
Posted 14 January 2010 - 01:17 PM
I am putting another rotisserie together in the next few weeks Kris.
I can give you a look when it's finished.
I can give you a look when it's finished.
#6
_gezza74LH_
_gezza74LH_
-
- Guests
Posted 17 January 2010 - 07:22 PM
this would be very helpfull to me as i am planing to make rotisary for my lh as im planing to do a flat floor tunnel etc full new chasiss with wheel tubs custom smoothed boot underneath fully smoothed rear to front new fire wall etc any help with diagrams would be appreciated
#7
racean69
-
- Members
-
- 782 posts
Forum Fixture
- Name:Rod
- Location:Central QLD
- Car:LH sedan
- Joined: 07-November 05
Posted 17 January 2010 - 08:25 PM
^^ thats abit of work your contemplateing there...good luck
#8
_Yella SLuR_
_Yella SLuR_
-
- Guests
Posted 17 January 2010 - 09:18 PM
Sorry mate, haven't been around. Sure thing. Be back shortly.Hey Yella,
can you post the measurements am looking at fabricating a rotisary for a lx hatch,
Cheers
Chris
#9
_Yella SLuR_
_Yella SLuR_
-
- Guests
Posted 17 January 2010 - 09:45 PM
Hope you can read the dimensions on the picture, but if you can't, it is basically 950 from the floor to the rotating centre tube. Brackets both ends are offset 200mm from the centre to the centre of the bumper bar supports.
This allows you to spin the car within a total height of 2.1m, with the top corner of the turret clearing the ground by about 100mm. The heights also allow you to mount the car onto the rotisserie using a standard hydraulic trolley jack.
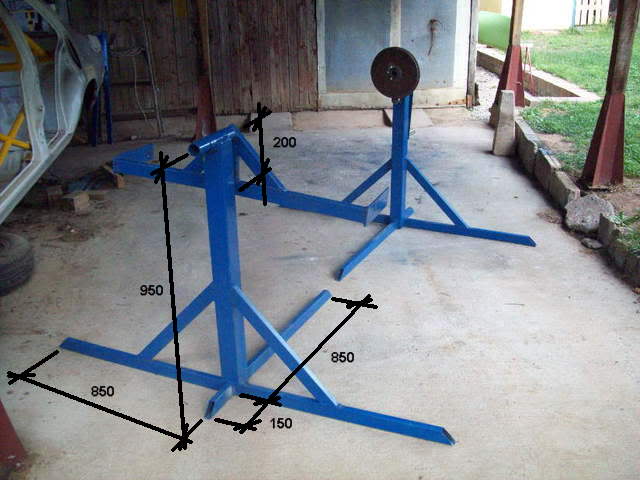
This is the bracket at the other end. It is similarly offset by 200mm, same as the front one. Also Mark 1 posts that got changed to 90x90x3mm wall SHS.
Have fun. They are easy to make, and you'll have it done in a day and a bit.
This allows you to spin the car within a total height of 2.1m, with the top corner of the turret clearing the ground by about 100mm. The heights also allow you to mount the car onto the rotisserie using a standard hydraulic trolley jack.
This is the bracket at the other end. It is similarly offset by 200mm, same as the front one. Also Mark 1 posts that got changed to 90x90x3mm wall SHS.
Have fun. They are easy to make, and you'll have it done in a day and a bit.
#10
_big chris_
_big chris_
-
- Guests
Posted 19 January 2010 - 08:59 AM
Hey Yella,
That is some awesome work,
thanks for posting the pics,
I do have one question,
Why do you have a 200mm drop from
the centreline of the pivot point?
Cheers
Chris.
That is some awesome work,
thanks for posting the pics,
I do have one question,
Why do you have a 200mm drop from
the centreline of the pivot point?
Cheers
Chris.
#11
_Yella SLuR_
_Yella SLuR_
-
- Guests
Posted 19 January 2010 - 06:46 PM
I read somewhere that that is approximately where the centre of gravity is. It's not exactly right, but close enough. Car stays put in just about any location, and no locking mechanism.
#12
_Yella SLuR_
_Yella SLuR_
-
- Guests
Posted 19 January 2010 - 07:19 PM
Believe it or not, the biggest problem with balance is when the car is sitting level. Sorta likes to have the right or the left side sitting a bit low. I just but a small piece of 10mm MS in the end of the shaft for the handle to stop against to keep it level.
Oh, just a tip. If I were doing another one, I'd offset the rear bracket more where it mounts into the rear bumper mounts so you can get in there and paint it while it's on the rotisserie. As it stands at the moment, I'll be painting all but the ass, then filling it in when it comes off the rotisserie. Just something to consider.
Oh, just a tip. If I were doing another one, I'd offset the rear bracket more where it mounts into the rear bumper mounts so you can get in there and paint it while it's on the rotisserie. As it stands at the moment, I'll be painting all but the ass, then filling it in when it comes off the rotisserie. Just something to consider.
Edited by Yella SLuR, 19 January 2010 - 07:23 PM.
#13
_big chris_
_big chris_
-
- Guests
Posted 19 January 2010 - 08:29 PM
Believe it or not, the biggest problem with balance is when the car is sitting level. Sorta likes to have the right or the left side sitting a bit low. I just but a small piece of 10mm MS in the end of the shaft for the handle to stop against to keep it level.
Oh, just a tip. If I were doing another one, I'd offset the rear bracket more where it mounts into the rear bumper mounts so you can get in there and paint it while it's on the rotisserie. As it stands at the moment, I'll be painting all but the ass, then filling it in when it comes off the rotisserie. Just something to consider.
Yella,
thanks again, helps lots to hear the tricks and traps from someone who has do it before,
I am going to refabricate an engine stand I got from work,
has a flaw in the design, has 3 wheels,
I will put a cross bar at the front and will have 4 wheels,
the internal part of the pivot is machined from solid steel
and the turn plate is 15mm steel, overkill yes,
and mine to turn into a rotissery, yes.
The engine stand has a locking device on the edge of the pivot plate,
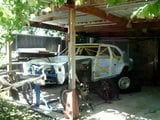
will post pics of the donor item.
What do you mean by "I'd offset the rear bracket more"?
Cheers
Chris.
Another question,
do you have another pic of the flywheel and handle setup.
#14
_big chris_
_big chris_
-
- Guests
Posted 19 January 2010 - 08:38 PM
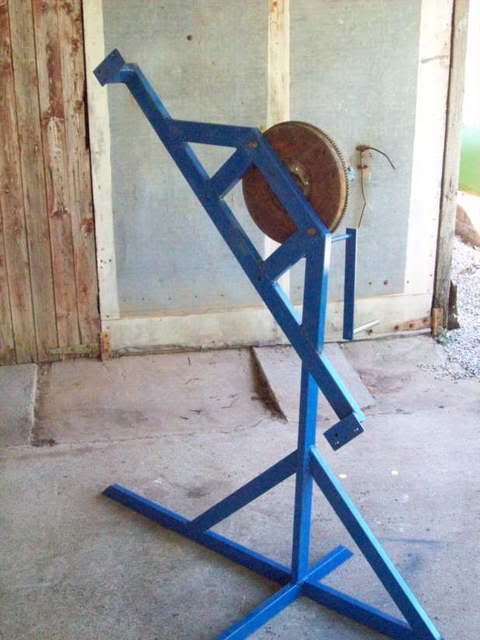
My guess is the stand with the flywheel is the rear one,
and the offset would be from back bar to the front of the flat plates.
and the offset would be from back bar to the front of the flat plates.
#15
_Yella SLuR_
_Yella SLuR_
-
- Guests
Posted 19 January 2010 - 10:07 PM
^ yep just add some length to the arms to put some space between the back of the car and the rotisserie so you can get some paint in there. Will still work doing the ass after though.
I was going to use engine stands and just add material to them, but when it came down to doing it, I realised, all I was using the engine stands for is to get the angles all correct, and it was expensive. If you are getting an engine stand for free, well I spose that changes the equation. I was given an engine stand, and well, it now has an engine on it.
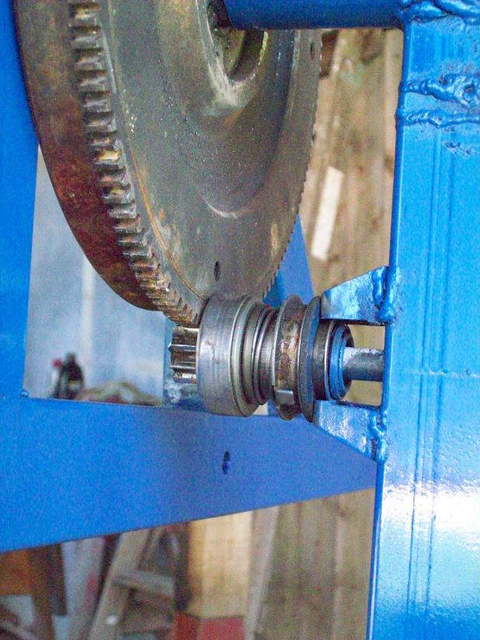
Here is a pick of the flywheel, I'm told your better off using a drive plate, as it is steel, not cast. I just pulled apart the throw out gear from a starter motor, stuck a shaft through it (16mm OD from memory), used the throughout spring, and a bit of 25SHS, and voila, a 16:1 ratio handle.
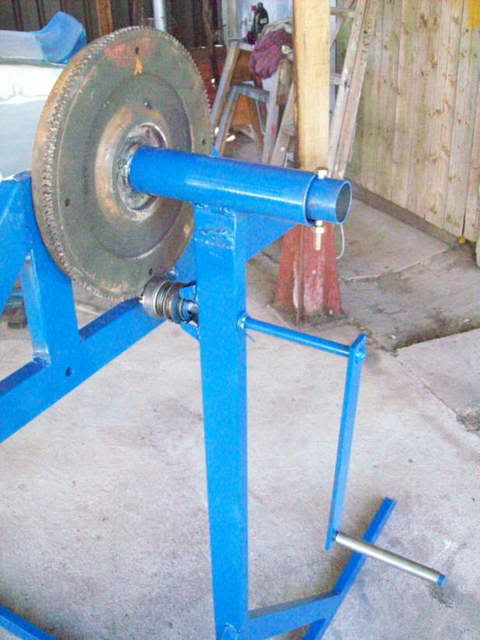
Close up:
And it works like this (not dial-up friendly --> I wonder if dial-up still exists?)
Press Play arrow.
Hope that all helps. It's all child's play really.
Lets you do weird kinky shit like this:

I was going to use engine stands and just add material to them, but when it came down to doing it, I realised, all I was using the engine stands for is to get the angles all correct, and it was expensive. If you are getting an engine stand for free, well I spose that changes the equation. I was given an engine stand, and well, it now has an engine on it.
Here is a pick of the flywheel, I'm told your better off using a drive plate, as it is steel, not cast. I just pulled apart the throw out gear from a starter motor, stuck a shaft through it (16mm OD from memory), used the throughout spring, and a bit of 25SHS, and voila, a 16:1 ratio handle.
Close up:
And it works like this (not dial-up friendly --> I wonder if dial-up still exists?)
Press Play arrow.
Hope that all helps. It's all child's play really.
Lets you do weird kinky shit like this:
Edited by Yella SLuR, 19 January 2010 - 10:11 PM.
#16
_Yella SLuR_
_Yella SLuR_
-
- Guests
Posted 19 January 2010 - 10:25 PM
^ that was a good idea at the time. OMG, did it take some sanding and cleaning up, particularly the oil soaked dirt and grime!!! Glad I did it but.
#17
_big chris_
_big chris_
-
- Guests
Posted 20 January 2010 - 08:42 AM
Wow,
that does look good,
we are planning on having the dirty underside of the LX media blasted,
the leaks from the old auto will ensure that the underside of the car is very messy,
I will post some pics of the construction.
Cheers
Chris
that does look good,
we are planning on having the dirty underside of the LX media blasted,
the leaks from the old auto will ensure that the underside of the car is very messy,
I will post some pics of the construction.
Cheers
Chris
#18
_big chris_
_big chris_
-
- Guests
Posted 01 February 2010 - 08:16 PM
The LX is now on the Rotisserie,
pics link for all of them,
Car Rotisserie Pics
Thanks Yella for the measurements,
work well,
We used a height of 950mm from top of centre bar to centreline of pivot,
Drop from the centre line of pivot to centreline the bumper bar of 200mm,
and the car rotates great,
still am going to add a handle on one end,
and a tie bar from one to the other
to link them for moving the car around the workshop,
it works great.
We built this from 2nd hand steel from the local metal recyclers,
hence the different colours, but was cheap as, 50 cents a kilo for the steel,
instead of $23 to $28 per metre.
Total job cost including wheels at $15 each,
(from a large hardware chain, not because I endose them,
they are cheap and near my workshop)
The 100mm wheels are solid rubber, steel centre load rated 100kg each
We built with materials cost for the job for less than $200.
We used 75mm x 75mm x 3.5mm for modifying the old engine stand,
show as Part 1 in the photos,
Stand 2 is 65mm x 65mm x 3.5mm
The turn head, very 2nd hand flex plate ex V8 auto,
75mm outer tube,
65mm inner stell tube.
Front and rear bar mounts,
50mm x 50mm x 3mm on the front
75mm x 45mm x 4mm on the rear.
these sizes because that was all we could find on the rack of scrap.
Upside Down

Right way up

pics link for all of them,
Car Rotisserie Pics
Thanks Yella for the measurements,
work well,
We used a height of 950mm from top of centre bar to centreline of pivot,
Drop from the centre line of pivot to centreline the bumper bar of 200mm,
and the car rotates great,
still am going to add a handle on one end,
and a tie bar from one to the other
to link them for moving the car around the workshop,
it works great.
We built this from 2nd hand steel from the local metal recyclers,
hence the different colours, but was cheap as, 50 cents a kilo for the steel,
instead of $23 to $28 per metre.
Total job cost including wheels at $15 each,
(from a large hardware chain, not because I endose them,
they are cheap and near my workshop)
The 100mm wheels are solid rubber, steel centre load rated 100kg each
We built with materials cost for the job for less than $200.
We used 75mm x 75mm x 3.5mm for modifying the old engine stand,
show as Part 1 in the photos,
Stand 2 is 65mm x 65mm x 3.5mm
The turn head, very 2nd hand flex plate ex V8 auto,
75mm outer tube,
65mm inner stell tube.
Front and rear bar mounts,
50mm x 50mm x 3mm on the front
75mm x 45mm x 4mm on the rear.
these sizes because that was all we could find on the rack of scrap.
Upside Down
Right way up
#19
_Yella SLuR_
_Yella SLuR_
-
- Guests
Posted 02 February 2010 - 05:04 AM
Told you it was easy, well done. No need to link the two sets of wheels, the car body does that bit for you. Lucky you have a flat concrete floor.
I do like your rear bar better than mine, you have pretty good access there for paint. Take your handbrake cables off, they tend to whip around a bit.
I never realised an SS is still perfectly identifiable on it's roof (SS sticker). How versatile. Just a pity you are short a couple of doors (couldn't resist).
Enjoy.
Edited by Yella SLuR, 02 February 2010 - 05:08 AM.
#20

 View Garage
Posted 02 February 2010 - 05:19 AM
Its not short on doors, there's a third one at the back that's worth two 
Great to see someone asking about this kind of stuff then go straight out and build it, and report back with pics! Nice work
Great to see someone asking about this kind of stuff then go straight out and build it, and report back with pics! Nice work
#21
_big chris_
_big chris_
-
- Guests
Posted 02 February 2010 - 08:23 AM
Thanks guys,
we took nearly 5 days doing the first tower,
then I did the 2nd tower yesterday,
the first one need a minor modification,
the turn plate is not at 90 degrees to the floor,
is a fraction out. Outwise a successful first build.
As for Doors,
We have sedan, hatch and The Doors

we took nearly 5 days doing the first tower,
then I did the 2nd tower yesterday,
the first one need a minor modification,
the turn plate is not at 90 degrees to the floor,
is a fraction out. Outwise a successful first build.
As for Doors,
We have sedan, hatch and The Doors
#22
_Yella SLuR_
_Yella SLuR_
-
- Guests
Posted 06 February 2010 - 08:06 AM
I reckon that's great as well. So often you help peeps out never to hear from them again.Great to see someone asking about this kind of stuff then go straight out and build it, and report back with pics! Nice work
#24
_big chris_
_big chris_
-
- Guests
Posted 01 March 2010 - 06:14 PM
Well we are hoping so,
the purchase price of the car when my brother got it
was $3500.
Will have a diffent asking price when we are done restoring it.
The front end in the last pic has been sand blasted primed and resprayed,
and ready to assemble this week, along with the repainted diff,
and repainted suspension components like the trailing arms, wishbones etc.
Will look and drive like a new one.
#25
_JNR_ATE_
_JNR_ATE_
-
- Guests
Posted 28 August 2011 - 05:41 PM
In the process of building one now, very similar to Big chris, will post pics and my two cents worth .
Great help, thanks guys
Cheers
JNR_ATE
Great help, thanks guys
Cheers
JNR_ATE


0 user(s) are reading this topic
0 members, 0 guests, 0 anonymous users

