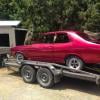
The first pic is the donor car, i drove to sydney to get a round trip of 2066 K's,this supplied me with a rebuilt engine,4 speed gearbox,peddle box,disc brake front end, power booster,dash and a few incidentals.
Pic # 2 is the car that i'm doing up,the interior is pretty good unfortunately the wrong colour so anyone wanting a good interior PM me.
Pic # 3 is the interior.
Pic # 4 is the spare/new parts division.
I have pretty well all i need to do the full resto sitting on the shelf
Shockers all round
balljoints all round
tie rod ends
steering coupling
nolathene front end enhancement kit
new console
air dam front
spoiler rear
gearshift knob
gaurd flutes
steering wheel
alarm and central locking (yeah i know lol)
steering rack boots (might put in a reco/new rack yet)
engine decal kit
trailing arm kits
rear wheel slave cylinders
rear brake shoes
front disc pads
front caliper kits
brake master cylinder (booster to be serviced)
new starter
and last but no least an extreme clutch kit
 100_3626.jpg 649.79K
70 downloads
100_3647.jpg 722.23K
107 downloads
100_3623.jpg 877.24K
104 downloads
100_3625.jpg 758.44K
86 downloads
100_3626.jpg 649.79K
70 downloads
100_3647.jpg 722.23K
107 downloads
100_3623.jpg 877.24K
104 downloads
100_3625.jpg 758.44K
86 downloads