Attached Files
-
 2012-01-26 15.44.22_rsz.jpg 87.36K
7 downloads
2012-01-26 15.44.22_rsz.jpg 87.36K
7 downloads
-
2012-01-04 21.10.39_rsz.jpg 108.63K
7 downloads


Forum Participant

Posted 21 November 2012 - 06:57 PM
2012-01-26 15.44.22_rsz.jpg 87.36K
7 downloads
2012-01-04 21.10.39_rsz.jpg 108.63K
7 downloads
Forum Participant
Posted 21 November 2012 - 08:09 PM
Inner Rear Quarter Repair_rsz.jpg 134.98K
5 downloads
Door Jam repair_rsz.jpg 181.31K
5 downloads
Guard reattached to A Piller_rsz.jpg 152.36K
5 downloads
Forum Participant
Posted 21 November 2012 - 08:18 PM
Rear Quarter to Beaver repair_rsz.jpg 115K
7 downloads
Bottom Spare Wheel Well_rsz.jpg 118.87K
5 downloads
Forum Participant
Posted 21 November 2012 - 08:21 PM
Inner Rear Quarter Repair_rsz.jpg 134.98K
5 downloads
Forum Participant
Posted 21 November 2012 - 08:28 PM
Boot Floor Fuel Tank Repair_rsz.jpg 151.22K
7 downloads
Front Floor Rust Treated_rsz.jpg 116.47K
6 downloads
Boot Floor Rust Treated_rsz.jpg 127.27K
6 downloads
Forum Participant
Posted 21 November 2012 - 08:32 PM
Diff Painted_rsz.jpg 146.7K
9 downloads
Fuel Cap_rsz.jpg 138.01K
6 downloads
Forum Participant
Posted 21 November 2012 - 08:35 PM
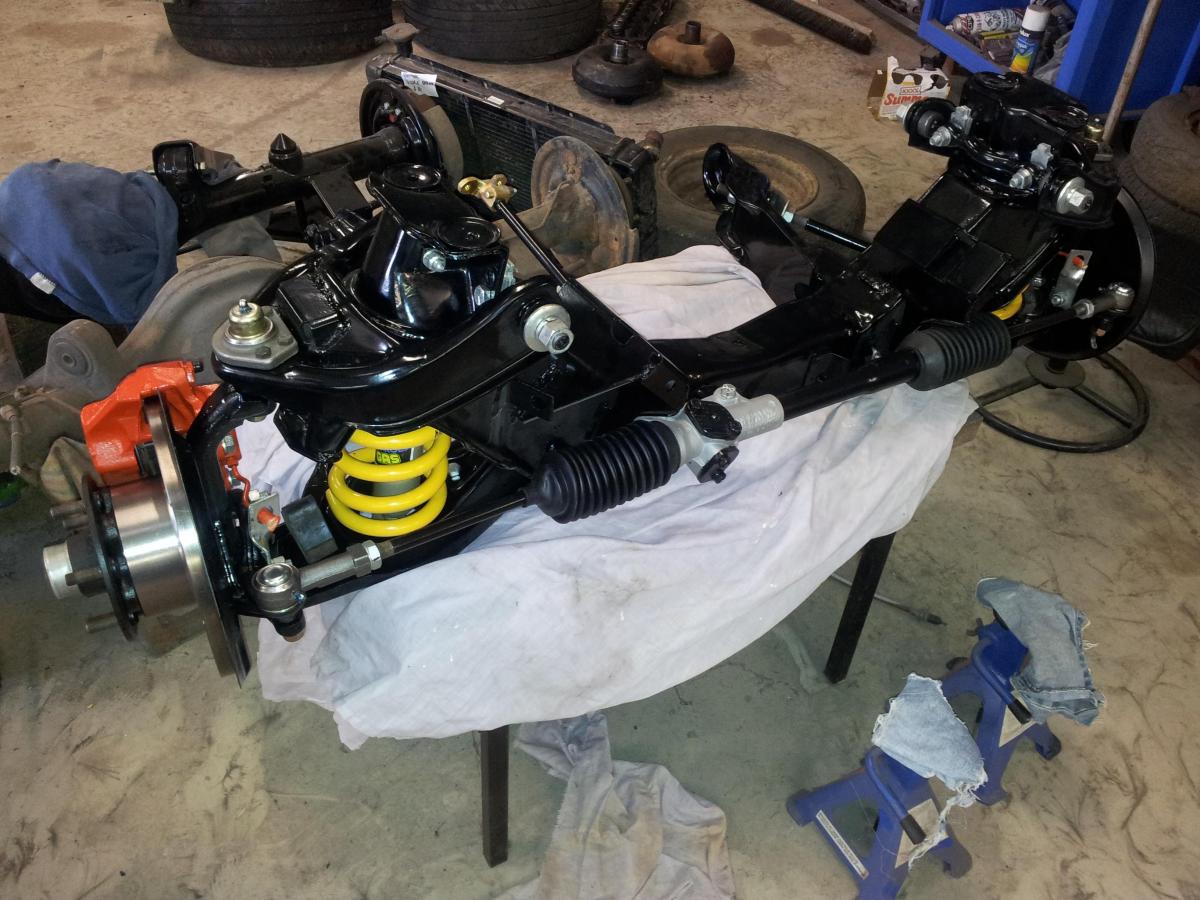
Frontend Painted_rsz.jpg 151.18K
12 downloads
Painted Steering Rack_rsz.jpg 138.03K
7 downloads
Forum Participant
Posted 20 May 2013 - 07:39 PM
Hi Everyone,
Sorry I haven't been in for a while.
Still going on the LC. Sills are all done. Fender panels are done. Rear quarters are done.
Almost have the valance on the front all fittered.
From the firewall to the beaver underneith is all painted in 2K Chassis Black. Car is now off the rotisarie for the first time in 2 and half years.
On a caster frame thanks to Laffo.
Rush of blood on Saturday and did the front window repair and plugges some hole up in the engine bay were someone had decided to pop rivert some flat gal sheet in... Nice !!
Chatch up sooner next time.lol
Cheers,
Dan
Scrivet Counter

Posted 23 May 2013 - 12:19 AM
Hi Dan, just found your build thread. Great job, keep up the good work.
Med Blue and sandalwood mmmmmmmmmmm nice!
BTW, just curious as to why you have the steering tie rod ends installed the wrong way around. Normally they are fitted up from under the steering arm.

Posted 23 May 2013 - 08:40 AM
hi dan 6pack is right there mate, i dont know how original you want this to look but also your front cross member is not 69 or 70 and you also have 69 top wish bones and your diff housing is not 69 or 70 either.
if you need any help sorting things out mate just pm me.
cheers gong
Scrivet Counter
Posted 23 May 2013 - 07:09 PM
Hi Dan, not trying to be picky but for safety sake do yourself a favor and get rid of those ball joints and tie rod ends with the Nylock nuts.
They're not worth the risk of a nut coming loose and falling off. Best to only use joints with the castellated nuts and split pins.
Forum Participant
Posted 10 June 2013 - 08:55 PM
Hi Dave,
Thanks for that. I will change the tie rod ends up the other way. No where near fitting the front end at the moment. Also I'll get some other top and bottom ball joints with the split pins and replace them.
Gong, The other top wish bones I had you said where 73 ones. These ones are ones off a 69 LC. Dodn't t hink there would be a difference with 69 - 70 ones. Is the hump on the 70 ones smaller than the 73 ones ? Also whats the difference with the diff housings. the painged one is the one I was going to use. The unpained one a spare.
I will post some more pics up shortly.
Thanks again guys.
Cheers,
Dan
Forum Participant
Posted 10 June 2013 - 09:15 PM
Underneith all painted in 2Pak Chassis black.
Off the rotisory and on the coaster frame finally.
One of the peices I made for the valance to fill the hole.
Front window holes filled up.
Excessive holes around the heater box from blaning plates.
20130227_175505.jpg 137.83K
8 downloads
20130228_211455.jpg 147.82K
7 downloads
20130428_134708.jpg 166.13K
8 downloads
20130518_183623.jpg 152.34K
7 downloads
20130518_183640.jpg 135.51K
9 downloads
Posted 11 June 2013 - 07:52 AM
Gong, The other top wish bones I had you said where 73 ones. These ones are ones off a 69 LC. Dodn't t hink there would be a difference with 69 - 70 ones. Is the hump on the 70 ones smaller than the 73 ones ? Also whats the difference with the diff housings. the painged one is the one I was going to use. The unpained one a spare.
I will post some more pics up shortly.
Thanks again guys.
Cheers,
there is no diffrence between the 69-70 upper wishbone rod that holds the 2 nuts,,,the diffrence is in the wishbone its self where the upper ball joint is there is a little square pad that is used for the 69 model cars that hold the rubber stop on the inner guard.
also on the front of your cross member where the brake lines go into that little bracket thingy there should be a bit bigger for the 69-70 model as only the 71-72-73 had the one hole
the diff housing has the 71-72-73 little rubber bump stop where the 69-70 had the tall rubber.
i hope i have helped and you can understand the shit i have dribbled
cheers gong
Lotsa Posts!

Posted 12 June 2013 - 11:51 PM
Hi Dan, um excessive holes filled ??????? kinda look's to me like you welded every hole to mount the heater mate. Oh well good practice for you on the drill now to  Better get you heater out young fellow & remark the holes after you flatten welds, bit of a shame because your job looked good. We all have those moments mate, gary.
Forum Participant
Posted 13 June 2013 - 12:29 PM
Gong, Thanks for the info. I do understand your dribble lol :-)
Gary, Some one had blanked off the heater holes with some tin plate. I looksed at a TA torana that I have and took some pictures of the heater. Filles all other non standard holes. A couple of the orginal holes have torn so I built them up and will need to drill those ones out yes.
I am currently on crutches at the moment with a slightly torn cartlidge in my knee. Have to stay off it for approx 2 weeks lol
Haven't been in the shed for over 2 weeks as it is.
Welding the valance on is that last thing I have done. Hope to be back into it sooner rather than later.
Cheers,
Dan
Forum Participant
Posted 24 March 2015 - 09:36 PM
Cool

Posted 24 March 2015 - 11:09 PM
Forum Participant
Posted 10 October 2015 - 08:16 PM
Hi Everyone,
It's been far too long since I was last in here. young Family life, and Work unfortunately has kept me busy.
I still have the car and it's looking bloody great now that it's all in colour, stripes / black outs done and back on it's own wheels again.
Engine has all been built and had the cam ran in. Just need to run the rest in on the Dyno in the car.
Gearbox and Tailshaft all installed. Mechanical clutch and accelerator linkages to the triple Delortoes all connected also.
Radiator installed all heater plumbing connected. Thermo fan installed and wired.
Interior, underlay and all carpet installed, parcel shelf rear door cards and back seat all in.
Tail lights, side indicators, front indicators and head lights all installed.
Just need to sort out the dash wiring to the gauges. Install the console, front seats, seat belts and front door cards and we should be pretty close.
Put a battery in and power it all up and find out what works and what doesn't.
I have posted a few pics on the GMH-Torana Facebook page as it's easier to do it there than have to resize pics etc in here.
Might need to chase up a spare printed circuit that goes around the speedo and tacho. Can't for the life of me find where I put mine, in one of those special places lol
Cheers,
Daniel
Scrivet Counter
Posted 14 October 2015 - 08:09 AM
Might need to chase up a spare printed circuit that goes around the speedo and tacho. Can't for the life of me find where I put mine, in one of those special places lol
Cheers,
Daniel
Daniel, you can't find it because there is no such animal on any GTR instrument panel.
Forum Fixture
Posted 14 October 2015 - 04:28 PM
Scrivet Counter
Posted 14 October 2015 - 05:19 PM
You can just cut a standard one with a pen knife, that's what I did in mine when adding a gtr tacho. Pretty sure they are standard fitment to Lc Gtr's rather than Lj Gtr's which have dedicated gloves/holders.
The printed circuits are only used on the HB & LC (not including the HK Holden in this discussion) warning light instrument panels.
The LC combined/sports/GTR instrument panels do not use a printed circuit.
The HB Brabham/combined/sports instrument panes do not use a printed circuit either.
Edited by S pack, 14 October 2015 - 05:20 PM.
Forum Participant
Posted 14 October 2015 - 11:07 PM
Scrivet Counter
Posted 15 October 2015 - 08:03 AM
There has to be something as the main loom that clips in between the speedo and tacho has approx 12 wires
Cheers,
Daniel
That is the instrument panel connector on a std warning light wiring harness.
Forum Participant
Posted 05 March 2017 - 02:04 PM


0 members, 0 guests, 0 anonymous users

