


Body resto on rusty 1969 Camaro
Started by
dirtbag
, Jun 22 2010 05:28 PM
324 replies to this topic
#51
 _AD_75_
_AD_75_
-

- Guests
Posted 03 July 2010 - 08:46 PM
Holy crap..this one needs the full dirtbag work over! whats with all the crap jammed into that sill!..
#52
dirtbag
-
- Members
-

- 1,927 posts
Street Machines current Biatch!
- Name:Tim
- Location:Sunshine Coast
- Car:1995 V8 2wd hilux, LH torana ute, 1970 Volksrod, MK1 2 door escort, CJ6 Jeep, VX commodore wagon.
- Joined: 29-December 09
Posted 06 July 2010 - 05:49 PM
Hi Aido. The crap in the sill is a giant rats nest. Quite common in old rusty cars. Not pretty huh : )
Well there has been some progress, but not as much as I'd like.
I had to replace a section of the inner sill before the new floor could go in, as it attaches to the inner sill.
This is the old seam at the bottom of the inner sill where the floor, inner and outer sill meets. Beautiful : )

I also had to repair the front leaf spring mount. It wasn't too bad really, but still needed to be fixed.
First step was to fill the hole with new metal.

I then welded the captive nut back in for the front leaf spring mount and rust converted the lot.

Next fun job was to unpick the front of the floor from the support underneath. I hate removing spot welds.

The new floor will be mainly plug welded into place, so I trimmed it to suit and drilled a row of holes around the outside and where the supports are so I can weld through the holes into the joining metal. Basically the same as a spot weld.

Before the floor goes in the inner sill needs to be repaired. I cut the whole lower part of the inner sill off, as the seam was too far gone. Made for an easier repair too. Sometimes more (repair) is less (work).

Plug welds are very hard to undo, so make sure everything is right before you get into it.
I've tacked the new floor into place and have checked that everything lines up.

Here's where the lip on the new floor goes down and joins onto the lip of the inner sill, which I've replaced.

That's it for now. More on thursday.
Well there has been some progress, but not as much as I'd like.
I had to replace a section of the inner sill before the new floor could go in, as it attaches to the inner sill.
This is the old seam at the bottom of the inner sill where the floor, inner and outer sill meets. Beautiful : )
I also had to repair the front leaf spring mount. It wasn't too bad really, but still needed to be fixed.
First step was to fill the hole with new metal.
I then welded the captive nut back in for the front leaf spring mount and rust converted the lot.
Next fun job was to unpick the front of the floor from the support underneath. I hate removing spot welds.
The new floor will be mainly plug welded into place, so I trimmed it to suit and drilled a row of holes around the outside and where the supports are so I can weld through the holes into the joining metal. Basically the same as a spot weld.
Before the floor goes in the inner sill needs to be repaired. I cut the whole lower part of the inner sill off, as the seam was too far gone. Made for an easier repair too. Sometimes more (repair) is less (work).
Plug welds are very hard to undo, so make sure everything is right before you get into it.
I've tacked the new floor into place and have checked that everything lines up.
Here's where the lip on the new floor goes down and joins onto the lip of the inner sill, which I've replaced.
That's it for now. More on thursday.
#53
Potta
-

- Members
-
- 6,026 posts
Oh My, Don't you post alot
- Name:Craig
- Location:Gozzy, WA
- Car:LC GTR, LC 4 door
- Joined: 01-May 09
Posted 06 July 2010 - 06:06 PM
Far out you move fast!!!
Lovin watching your work progress.
Lovin watching your work progress.
#55
dirtbag
-
- Members
-
- 1,927 posts
Street Machines current Biatch!
- Name:Tim
- Location:Sunshine Coast
- Car:1995 V8 2wd hilux, LH torana ute, 1970 Volksrod, MK1 2 door escort, CJ6 Jeep, VX commodore wagon.
- Joined: 29-December 09
Posted 08 July 2010 - 07:54 PM
Well today I did a bit more work. Still a long long long way to go, but you have to start somewhere.
First job was to unpick the old floor section from the seat mount. Lots of spot welds here.

Here's the seat mount with the old floor removed and some rust converter. I'll give it a quick spray with some etch primer before I weld it in.

Once the new floor was partly welded into place I stuck the seat mount in, as the chassis bolt comes through the floor and into the seat mount. I put the bolt in so I knew the seat mount was in the right spot.

Here's the new floor and seat mount all welded in.

I stitch welded the seat mount in rather than plug welding. It's just as strong, and in another 30 years should this floor be rusted out again it will be a lot easier to cut the welds to remove the seat mount rather than drilling out plug welds. Plus it's a bit quicker.

You can see where the new floor is plug welded to the new inner sill. You can also see where the stitch welds from the seat mount have penetrated through.

I hear this guy is a total dirtbag : )

Once it was all cleaned again I gave all the unprimed areas a coat or two of etch primer. I'd previously rust converted and cleaned inside the rear quarter and inner sill, so now it's all sealed and should last a very long time.

I also primed the new floor and seat mount . I was also able to clean and prime a bit further up under the dash now the pedals and steering column are removed.


I've also attached a few bits and pieces to my metal bashing frame. I've added a shoe makers anvil, as it has lots of compound curves on it. I also welded on an old sledge hammer head and a bit of 30mm solid bar and a piece of 8 inch pipe at the end, as it's really handy for dishing sheetmetal before running through the english wheel. I also have a shot bag that does the same sort of thing, but this was there so I'm going to use it : )
I even gave it half a coat of etch primer to make it pretty : )

First job was to unpick the old floor section from the seat mount. Lots of spot welds here.
Here's the seat mount with the old floor removed and some rust converter. I'll give it a quick spray with some etch primer before I weld it in.
Once the new floor was partly welded into place I stuck the seat mount in, as the chassis bolt comes through the floor and into the seat mount. I put the bolt in so I knew the seat mount was in the right spot.
Here's the new floor and seat mount all welded in.
I stitch welded the seat mount in rather than plug welding. It's just as strong, and in another 30 years should this floor be rusted out again it will be a lot easier to cut the welds to remove the seat mount rather than drilling out plug welds. Plus it's a bit quicker.
You can see where the new floor is plug welded to the new inner sill. You can also see where the stitch welds from the seat mount have penetrated through.
I hear this guy is a total dirtbag : )
Once it was all cleaned again I gave all the unprimed areas a coat or two of etch primer. I'd previously rust converted and cleaned inside the rear quarter and inner sill, so now it's all sealed and should last a very long time.
I also primed the new floor and seat mount . I was also able to clean and prime a bit further up under the dash now the pedals and steering column are removed.
I've also attached a few bits and pieces to my metal bashing frame. I've added a shoe makers anvil, as it has lots of compound curves on it. I also welded on an old sledge hammer head and a bit of 30mm solid bar and a piece of 8 inch pipe at the end, as it's really handy for dishing sheetmetal before running through the english wheel. I also have a shot bag that does the same sort of thing, but this was there so I'm going to use it : )
I even gave it half a coat of etch primer to make it pretty : )
#56
_Bomber Watson_
_Bomber Watson_
-
- Guests
Posted 08 July 2010 - 09:17 PM
Im moving to your place.
So many toys.
And i thought i was handy planning my own spray booth in the back yard...
So many toys.
And i thought i was handy planning my own spray booth in the back yard...
#57
_eh-buddy_
_eh-buddy_
-
- Guests
Posted 09 July 2010 - 06:26 AM
tim dont mind if i steel your plan for the frame do you mate?? it may come in handy for a project i have coming up
#58
_LXATIV_
_LXATIV_
-
- Guests
Posted 09 July 2010 - 09:27 AM
You accpeting adopting forms by any chance? Cause ive already got mine ready to send to you
#59
meanmachine72
-

- Members
-
- 2,005 posts
Forum Fixture
- Name:Jono
- Location:Taree Workers club
- Joined: 12-July 06
Posted 09 July 2010 - 11:56 AM
yep i like your work dirtbag.. 
#60
dirtbag
-
- Members
-
- 1,927 posts
Street Machines current Biatch!
- Name:Tim
- Location:Sunshine Coast
- Car:1995 V8 2wd hilux, LH torana ute, 1970 Volksrod, MK1 2 door escort, CJ6 Jeep, VX commodore wagon.
- Joined: 29-December 09
Posted 09 July 2010 - 06:51 PM
tim dont mind if i steel your plan for the frame do you mate?? it may come in handy for a project i have coming up
If you mean the metal bashing frame thingy I made then go for it. It's so handy to have all the different shapes fixed to something rather than hammer and dollying things on the ground or in a vice.
As for the adoption LXATIV - sure, I could always use a slave : ) hahaha
#61
_Kush_
_Kush_
-
- Guests
Posted 10 July 2010 - 08:06 AM
I want to come down with my handycam and film the shenenigans that goes on in that shed, then I'm goin to make DVDs and call them "customs from Dirtbags dungeon". I'm going to make a fortune and SBS will offer a contract for a tv show. Then you can afford to buy your own hatch. Sound like a plan? *snaps out of daydream* urgh! Back to cruel reality :(
#62
_cruiza_
_cruiza_
-
- Guests
Posted 11 July 2010 - 09:35 AM
Hi Tim Serious question for a change
With all the metal cut out of the car like you have isn't there are chance of the body moving / twisting as you weld and grind on it fitting such large panels?
ta muchly
cruiza
With all the metal cut out of the car like you have isn't there are chance of the body moving / twisting as you weld and grind on it fitting such large panels?
ta muchly
cruiza
#63
dirtbag
-
- Members
-
- 1,927 posts
Street Machines current Biatch!
- Name:Tim
- Location:Sunshine Coast
- Car:1995 V8 2wd hilux, LH torana ute, 1970 Volksrod, MK1 2 door escort, CJ6 Jeep, VX commodore wagon.
- Joined: 29-December 09
Posted 11 July 2010 - 10:08 AM
Hey Cruiza. Long time no hear : )
Good question. The answer though is - no. I'm not worried about it twisting. It's not my car hahaha : )
OK, sorry bout that. Because the only panel actually staying on this car is the roof, I knew there was going to be a lot removed. The rear quarter is completely cosmetic. You can see the main support for the rear coming down through the roof pillar onto the tub. If that had to be replaced then I would have to brace the car internally before removing it.
Same can be said about the inner sill. The outer sill is cosmetic, and the inner sill only needed some repairs, so there was enough left to hold it's shape.
Another important factor is how well the car is supported during the process. I have the front and rear of the car supported with stands and a jack under the chassis in the middle, which makes it very hard for the car to sag.
I'd been through basically the same thing with my wife's 68 firebird, so I just did the same as I did then. Plus, ONLY DO ONE SIDE AT A TIME!!!!!
The one and only thing I look at when chopping a car up to this extent, is how much room I need to get at all the inner bits to repair them. In this case, I needed the outer sill and rear quarter off at the same time to fix the outer wheel tub. If the tub was fine I'd have probably done the quarter and sill separately. I know it sounds like I'm talking around in circles, but when it comes to fixing a car like this properly, you just HAVE to keep cutting until you can get to everything that needs fixing, otherwise it wont be fixed.
Does that help??? I really am bad at explainations. It makes sense in my head anyway : )
So, to summarise - support the car evenly, only cut what needs to be cut, add bracing if removing structural pieces and only do one side at a time, so the other side helps hold it in shape.
Oh, I just thought of another thing I do (I know, I'm an idiot). Before I cut any of the panels off I trial fit the rust repair sections (if I'm fabricating panels I generally make the panel first, so it fits, then cut the old panel out to suit the new panel) that way when it's cut apart and the new panel is in place, if it doesn't fit properly anymore you know something is wrong. It's not always possible to trial fit a new panel, but you can get some idea even just by measuring it against the original.
#64
_purpleLC_
_purpleLC_
-
- Guests
Posted 11 July 2010 - 01:38 PM
Tim, can I ask, why when floor pans a changed, the new panel is overlapped onto the
old one and not butt (??) welded?
Many times I have seen repaired cars on the hoist and you can see where the panels have been changed.
Is it done like this because being under the car it is not seen or is it stronger?
Once again fabulous work you are doing and I really look forward to any new updates on your projects.
Cheers Louie.
#65
dirtbag
-
- Members
-
- 1,927 posts
Street Machines current Biatch!
- Name:Tim
- Location:Sunshine Coast
- Car:1995 V8 2wd hilux, LH torana ute, 1970 Volksrod, MK1 2 door escort, CJ6 Jeep, VX commodore wagon.
- Joined: 29-December 09
Posted 11 July 2010 - 04:43 PM
Hi Louie. Floor pans can be butt welded in, but because they get stood on a lot, they move a bit. Mig welds are stronger than mild steel, so in a butt weld situation, if you wiggled the metal where a butt weld is, the mild steel will crack next to the weld, eventually. It's very unlikely this will actually happen, but by plug welding (or spot welding) you're guaranteed it wont happen.
Another reason is the time it takes. I talked to the owner about which way he wanted to go, and he was happy with the plug welding. To be honest, it's how I would do it if it were my own car. Once the repair is finished and sealed (rust converter and etch primer at least), each side of the repair gets some MS sealant to prevent any moisture getting captured in between the two layers.
As far as strength is concerned, I've no problems with it. When I was building hot rods we always plugged welded the floors in, as we fabbed up whole new floors to fit certain chassis and drive lines.
Butt welding looks better, but that's really it's only advantage - when floors are concerned, anyway. Outer panels I always butt weld.
I hope that helps???
Cheers.
Edited by dirtbag, 11 July 2010 - 04:46 PM.
#66
ls2lxhatch
-

- Members
-
- 5,332 posts
- Location:Perth
- Car:LX Hatch
- Joined: 29-May 06
Posted 11 July 2010 - 05:10 PM
I am sure I read somewhere that replacement floor sections must have a minimum of 10 mm overlap and be welded both sides.
#67
Bart
-
- Members
-
- 2,559 posts
Shit a brick
- Location:Sydney
- Car:LJ Torana
- Joined: 20-November 05
Posted 11 July 2010 - 10:06 PM
Very nice work mate.
Um Ill hand this over to ya, Ill have it in red and could you finish it before christmas please
Um Ill hand this over to ya, Ill have it in red and could you finish it before christmas please
Is that a Nissan V8 in there??hahaha Potta. I'd be dumb enough to do that too : )
The hatch is getting 15x8 and 15x10, where those are 18s and 20s for the 68 firebird. Good spotting though : )
They actually look pretty good when they're clean.

#68
dirtbag
-
- Members
-
- 1,927 posts
Street Machines current Biatch!
- Name:Tim
- Location:Sunshine Coast
- Car:1995 V8 2wd hilux, LH torana ute, 1970 Volksrod, MK1 2 door escort, CJ6 Jeep, VX commodore wagon.
- Joined: 29-December 09
Posted 11 July 2010 - 11:16 PM
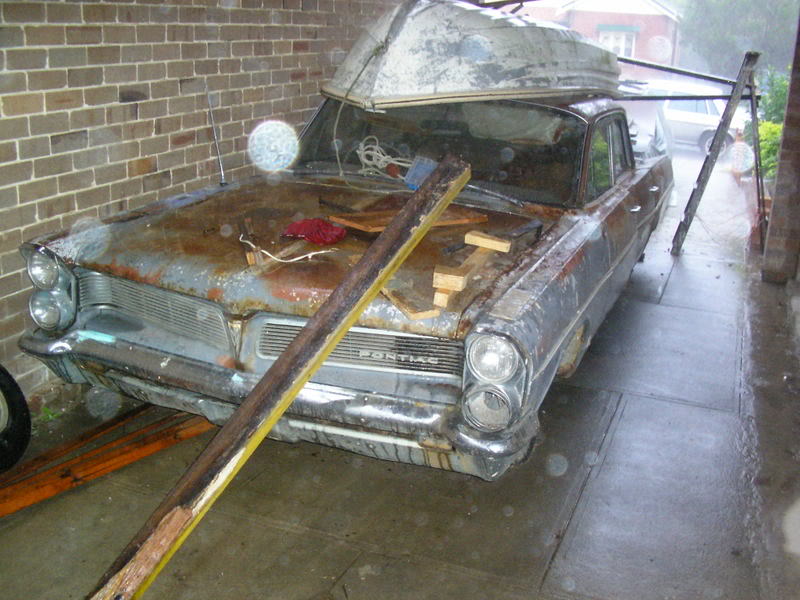
Hey Bart. I've spent a lot of hours in the last year on a friends 1963 pontiac bonneville 2 door hardtop. One of the rustiest cars I've ever worked on, and no replacement panels like the camaro : (
What are your plans for the old beastie?
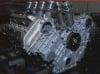
Yes, that's a Nissan Infiniti VH45 all alloy quad cam V8 in my wife's 68 firebird. Just for something a little different. If I ever get a chance to finish it.....
What are your plans for the old beastie?
Yes, that's a Nissan Infiniti VH45 all alloy quad cam V8 in my wife's 68 firebird. Just for something a little different. If I ever get a chance to finish it.....
#69
Bart
-
- Members
-
- 2,559 posts
Shit a brick
- Location:Sydney
- Car:LJ Torana
- Joined: 20-November 05
Posted 12 July 2010 - 12:24 AM
Hey Bart. I've spent a lot of hours in the last year on a friends 1963 pontiac bonneville 2 door hardtop. One of the rustiest cars I've ever worked on, and no replacement panels like the camaro : (
What are your plans for the old beastie?
Yes, that's a Nissan Infiniti VH45 all alloy quad cam V8 in my wife's 68 firebird. Just for something a little different. If I ever get a chance to finish it.....
Plans for the beasty, restore it I hope. Yes the Bonneville is the USA version I think, this is the Canadian version, 1963 Pontiac Laurentian, same panels but different floor/boot pan, Bonneville has the wide track chassis Laurentian has the narrow K frame. You can tell the difference as the Bonneville wheels are closer to the guard arch, fuller wheel arches.
The USA 1962 Chev Bel Air shares the same floor/boot pan and chassis as the 1963 Laurentian but the outer panels are different obviously.
Good old Nissan ay, have you seen my LJ? Just add a couple of turbos as i did and your off

Edited by Bart, 12 July 2010 - 12:26 AM.
#70
dirtbag
-
- Members
-
- 1,927 posts
Street Machines current Biatch!
- Name:Tim
- Location:Sunshine Coast
- Car:1995 V8 2wd hilux, LH torana ute, 1970 Volksrod, MK1 2 door escort, CJ6 Jeep, VX commodore wagon.
- Joined: 29-December 09
Posted 12 July 2010 - 01:29 AM
Hey Bart. Yeah, I've seen your LJ. Nice work.
Unfortunately for the firebird there will be no turbos, and even worse she wants to keep the factory auto ....... YUCK!!!!!!!
Even still, it should be a good little car. I bought a front cut for $1800, put a jerry can and fuel pump to it and away it went. The A/C was still cold : ) Can't argue with that for those kind of dollars.
Did you do all the wiring yourself? It looks like a nightmare. I'm kind of putting it off, but will have to disect the loom soon, as that's what the next step is.
Do you still have the LJ? I bloody hope so!!!!! Will be nice to see it after you've done the cosmetics, but at the same time leaving it looking a little worn and torn makes it even more amusing : )
#71
Bart
-
- Members
-
- 2,559 posts
Shit a brick
- Location:Sydney
- Car:LJ Torana
- Joined: 20-November 05
Posted 12 July 2010 - 10:05 AM
Yep still got the LJ, she does look shagy but will paint her in the future.Hey Bart. Yeah, I've seen your LJ. Nice work.
Unfortunately for the firebird there will be no turbos, and even worse she wants to keep the factory auto ....... YUCK!!!!!!!
Even still, it should be a good little car. I bought a front cut for $1800, put a jerry can and fuel pump to it and away it went. The A/C was still cold : ) Can't argue with that for those kind of dollars.
Did you do all the wiring yourself? It looks like a nightmare. I'm kind of putting it off, but will have to disect the loom soon, as that's what the next step is.
Do you still have the LJ? I bloody hope so!!!!! Will be nice to see it after you've done the cosmetics, but at the same time leaving it looking a little worn and torn makes it even more amusing : )
Do you build Hot rods?
#72
dirtbag
-
- Members
-
- 1,927 posts
Street Machines current Biatch!
- Name:Tim
- Location:Sunshine Coast
- Car:1995 V8 2wd hilux, LH torana ute, 1970 Volksrod, MK1 2 door escort, CJ6 Jeep, VX commodore wagon.
- Joined: 29-December 09
Posted 12 July 2010 - 10:22 AM
Yep still got the LJ, she does look shagy but will paint her in the future.
Hey Bart. Yeah, I've seen your LJ. Nice work.
Unfortunately for the firebird there will be no turbos, and even worse she wants to keep the factory auto ....... YUCK!!!!!!!
Even still, it should be a good little car. I bought a front cut for $1800, put a jerry can and fuel pump to it and away it went. The A/C was still cold : ) Can't argue with that for those kind of dollars.
Did you do all the wiring yourself? It looks like a nightmare. I'm kind of putting it off, but will have to disect the loom soon, as that's what the next step is.
Do you still have the LJ? I bloody hope so!!!!! Will be nice to see it after you've done the cosmetics, but at the same time leaving it looking a little worn and torn makes it even more amusing : )
Do you build Hot rods?
Yes, but I haven't done one for a couple of years. I worked at a couple of local shops for a while, but enjoy working for myself a lot more. Hopefully all these late model (anything after 1948) cars will get finished and I can get back into the old stuff : )
I have to admit though, I do love muscle cars.......mmmmmmm........
#73
Bart
-
- Members
-
- 2,559 posts
Shit a brick
- Location:Sydney
- Car:LJ Torana
- Joined: 20-November 05
Posted 12 July 2010 - 12:38 PM
Definitely, muscle cars like the Camaro are hot, 67/68/71/73 are my favorites.
Yep still got the LJ, she does look shagy but will paint her in the future.
Hey Bart. Yeah, I've seen your LJ. Nice work.
Unfortunately for the firebird there will be no turbos, and even worse she wants to keep the factory auto ....... YUCK!!!!!!!
Even still, it should be a good little car. I bought a front cut for $1800, put a jerry can and fuel pump to it and away it went. The A/C was still cold : ) Can't argue with that for those kind of dollars.
Did you do all the wiring yourself? It looks like a nightmare. I'm kind of putting it off, but will have to disect the loom soon, as that's what the next step is.
Do you still have the LJ? I bloody hope so!!!!! Will be nice to see it after you've done the cosmetics, but at the same time leaving it looking a little worn and torn makes it even more amusing : )
Do you build Hot rods?
Yes, but I haven't done one for a couple of years. I worked at a couple of local shops for a while, but enjoy working for myself a lot more. Hopefully all these late model (anything after 1948) cars will get finished and I can get back into the old stuff : )
I have to admit though, I do love muscle cars.......mmmmmmm........
#74
dirtbag
-
- Members
-
- 1,927 posts
Street Machines current Biatch!
- Name:Tim
- Location:Sunshine Coast
- Car:1995 V8 2wd hilux, LH torana ute, 1970 Volksrod, MK1 2 door escort, CJ6 Jeep, VX commodore wagon.
- Joined: 29-December 09
Posted 12 July 2010 - 07:03 PM
Well today was another fun adventure in camaroland : )
I decided to have a go at the wheel tub. It's not getting enlarged, just repaired.
First thing to do, as always, was chop the crap out of it : )

At least I found heaps of hidden rust too. I would have felt a bit let down otherwise : )

The clump of gunk in the seam is bog. Nice!

And a bit more bog.

With so much needing repairs in such a small area, it was easier to just cut the back of the inner tub section off to make room. I'll just weld it back on later.

With all that metal out of the way I was finally able to keep removing crud until I hit solid steel. I then cleaned and rust converted it.

I'll be doing this repair in several sections, so I can rebuild the seam that was rusted out.
Here's the first piece of the puzzle welded in.


The piece of inner tub I cut out had a bit of rust in it too where the old outer tub was spot welded on. Naturally I had to fix it.

Here's the new piece welded in. None of this stuff ever looks like much, but it's amazing how time can get away from you doing this kind of work.

Here's the tub piece welded back into the car.

Another bit welded in.


Here is the rear part of the inner tub all welded up.

Next step is to fix the front section of the inner tub then I can weld the new outer tub on.
One tiny step at a time......
I decided to have a go at the wheel tub. It's not getting enlarged, just repaired.
First thing to do, as always, was chop the crap out of it : )
At least I found heaps of hidden rust too. I would have felt a bit let down otherwise : )
The clump of gunk in the seam is bog. Nice!
And a bit more bog.
With so much needing repairs in such a small area, it was easier to just cut the back of the inner tub section off to make room. I'll just weld it back on later.
With all that metal out of the way I was finally able to keep removing crud until I hit solid steel. I then cleaned and rust converted it.
I'll be doing this repair in several sections, so I can rebuild the seam that was rusted out.
Here's the first piece of the puzzle welded in.
The piece of inner tub I cut out had a bit of rust in it too where the old outer tub was spot welded on. Naturally I had to fix it.
Here's the new piece welded in. None of this stuff ever looks like much, but it's amazing how time can get away from you doing this kind of work.
Here's the tub piece welded back into the car.
Another bit welded in.
Here is the rear part of the inner tub all welded up.
Next step is to fix the front section of the inner tub then I can weld the new outer tub on.
One tiny step at a time......
#75
_honda400_
_honda400_
-
- Guests
Posted 12 July 2010 - 07:33 PM
Looks like you've got your hands full with this one Tim, the more you cut the more rust you find. But i'm sure the car is in good hands.
Are you going to paint this one?
Are you going to paint this one?


0 user(s) are reading this topic
0 members, 0 guests, 0 anonymous users

