Jump to content


Photo
- - - - -

LX sedan


  • Please log in to reply
192 replies to this topic

#151 76lxhatch

76lxhatch

    That was easy!

  • Members
  • PipPipPipPipPipPipPip
  • 7,153 posts
  • Location:Unzud
  • Car:SS
  • Joined: 04-August 08
Garage View Garage

Posted 30 April 2020 - 01:51 PM

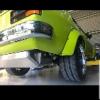
The original D bushings for the front sway bar have definitely seen better days so needed replacement. New ones are available but nearly $50 a pair, and no doubt all ex Aus so would be waiting a while. I've got a small piece of Delrin left over from another job which I thought about using, but I wanted something a bit softer especially when paired with the somewhat ineffective rear bar. Had a hunt through the inventory pile and found a suspension arm bushing that had separated from the metal shell but the polyurethane was still in fairly good nick, that will work.


Not particularly easy to machine as its fairly soft duro but a combination of sharp drill bit and parting blade cut it well enough to get the basic shape.

20200430_104618.jpg


Made a couple of cotton-reel shaped pieces with the right internal and external diameter. I also made them a few mm wider for a bit more surface area as the factory ones are a bit narrower than the universal style ones, might made them last a little longer?

20200430_113721.jpg


Made a little alloy locator plate that centres the shackle in the subframe holes (original style bushings also do this job). The standoffs/locators don't quite protrude through the subframe so it will still bolt in tight. In hindsight I suppose a thin plate and a couple of snug fitting washers would have worked fine but where's the fun in that?

20200430_135541.jpg


Flatted the bottom of the bushing to fit snugly.

20200430_140755.jpg


Splitting the bushings makes them slightly easier to get on and off but can be a compromise especially with this style shackle. Might not work with really small diameter bars but they pushed over the ends of the 22mm bar easy enough, so I left them intact. Will do the trick.

20200430_144136.jpg


#152 76lxhatch

76lxhatch

    That was easy!

  • Members
  • PipPipPipPipPipPipPip
  • 7,153 posts
  • Location:Unzud
  • Car:SS
  • Joined: 04-August 08
Garage View Garage

Posted 05 May 2020 - 01:57 PM

Working towards working on the shifter today. Original four cylinder manual shifter hole does not suit.

20200505_085535.jpg


Cut out a section that gave a nicer edge and included the screw holes, also allowed me to use the old piece as a template to quickly get to the right shape and size. New piece shaped a bit and tacked in.

20200505_101521.jpg


Then fully welded and ground down.

20200505_105910.jpg


Adjusted (bent) the shift rod and lever at the trans end, the trans fits in the factory tunnel but there isn't much room around it so needed to drop the rod down and pull the lever in a bit.

20200505_114359.jpg


I know roughly where the shifter will go but I want it to fit as well as possible into the console. Unfortunately this is an HJ console not a Torana one so it doesn't fit well to begin with.

20200505_124536.jpg

The console will need some work regardless so may as well cut it up :-)


Removed the mounting brackets and trimmed the edges so it sits down reasonably well against the tunnel.

20200505_132506.jpg


Did some measuring, cut and shut the brackets and re-welded them in.

20200505_144200.jpg


Allowed a little extra space for carpet and underlay, it still needs the edges tidying up but the gap is reasonably even all round and it bolts/screws down as it should. Now I know exactly where the shifter needs to go.

20200505_144937.jpg


#153 76lxhatch

76lxhatch

    That was easy!

  • Members
  • PipPipPipPipPipPipPip
  • 7,153 posts
  • Location:Unzud
  • Car:SS
  • Joined: 04-August 08
Garage View Garage

Posted 07 May 2020 - 03:49 PM

The shifter I'm using is early Commodore, I think the T-bar style suits better than the VN one and it will fit in the console nicely and operate the gear position indicator. The VN neutral safety switch screws straight on too.


Cut all the excess bits off and after a lot of measuring, made a new mount that sits nicely on the tunnel with a minimal hole. Those with keen eyes will notice that the shifter gate(?) now suits the four stage auto too.

20200507_165309.jpg


The pivot actually sits above the floor rather than below it like in a Commodore, so to seal everything off I machined a new bushing and an extended nut that goes all the way through the sheet metal mount (which includes a sleeve for the bushing).

20200507_165435.jpg


Fits reasonably well, will drill some holes in the flange and tunnel and probably just screw it down so its easily removable. Need to tweak the lever underneath a little but it should all work.

20200507_171413.jpg


Fits the console and insert as desired.

20200507_171557.jpg


#154 claysummers

claysummers

    Lotsa Posts!

  • Members
  • PipPipPipPipPipPip
  • 3,333 posts
  • Name:Clay
  • Location:Willunga
  • Car:186 FB Ute, 3.3 EK sedan
  • Joined: 13-December 18

Posted 07 May 2020 - 08:18 PM

Nice work fella


Sent from my iPad using Tapatalk

#155 76lxhatch

76lxhatch

    That was easy!

  • Members
  • PipPipPipPipPipPipPip
  • 7,153 posts
  • Location:Unzud
  • Car:SS
  • Joined: 04-August 08
Garage View Garage

Posted 09 May 2020 - 02:24 PM

Park brake mechanism was a bit sticky, no prizes for guessing why.

20200509_105531.jpg


Better.

20200509_145516.jpg


#156 76lxhatch

76lxhatch

    That was easy!

  • Members
  • PipPipPipPipPipPipPip
  • 7,153 posts
  • Location:Unzud
  • Car:SS
  • Joined: 04-August 08
Garage View Garage

Posted 10 May 2020 - 03:17 PM

Trimmed out the brackets for the park brake cables, probably would be secure enough but I think they need something more.

20200510_142803.jpg


Made a couple of these.

20200510_143552.jpg


That's better (paint pending).

20200510_143222.jpg


#157 76lxhatch

76lxhatch

    That was easy!

  • Members
  • PipPipPipPipPipPipPip
  • 7,153 posts
  • Location:Unzud
  • Car:SS
  • Joined: 04-August 08
Garage View Garage

Posted 15 May 2020 - 02:22 PM

Back to the shifter, discovered that running the linkage low wasn't going to work due to the speed sender, it has to go up and over. A spare trans on the floor is quite handy to speed up the re-work.

20200514_154250.jpg


Installed some rivet nuts, painted the bare metal on the tunnel and made a rubber gasket for the shifter to minimise NVH.

20200515_154930.jpg


Cleaned up the shifter with a protective coat of paint and installed.

20200515_155237.jpg


Plenty (just enough) clearance for the linkage and shifter in the tunnel. Got the lever ratios right so the shifter gates/detents are in the right spot.

20200515_155430.jpg


20200515_155331.jpg


And everything fits together as desired, runs through all the stages and the gear indicator on the console works. Will re-letter it somehow to suit the 4 speed at a later date.

20200515_160041.jpg


#158 Cook

Cook

    Forum Fixture

  • Members
  • PipPipPipPipPip
  • 1,504 posts
  • Location:Melbourne
  • Car:LX Hatch
  • Joined: 27-February 15

Posted 15 May 2020 - 04:05 PM

Love your work.  How did you go with the rivnuts.  I did a similar thing in the boot section recently to mount a battery tray but aligning the nuts without having to oversize the holes in the tray were a challenge.  Cheers Ron


#159 76lxhatch

76lxhatch

    That was easy!

  • Members
  • PipPipPipPipPipPipPip
  • 7,153 posts
  • Location:Unzud
  • Car:SS
  • Joined: 04-August 08
Garage View Garage

Posted 15 May 2020 - 11:20 PM

Thanks, yeah the flush mounting ones like to pull sideways a bit sometimes but these squeeze up fairly straight, also have to be very careful with smaller diameters as the tool will easily pull the thread or break the end if you over-do it. The machine screws have fairly large heads so slightly oversizing the holes wouldn't have been an issue if required.


#160 76lxhatch

76lxhatch

    That was easy!

  • Members
  • PipPipPipPipPipPipPip
  • 7,153 posts
  • Location:Unzud
  • Car:SS
  • Joined: 04-August 08
Garage View Garage

Posted 16 May 2020 - 12:34 PM

Cut some rubber strips and glued them to the contact points on top of the fuel tank.

20200516_095340.jpg


Then cut a hole in the tank.

20200516_100711.jpg


Tidied up. The machined support welded inside the tank has a bevel/chamfer where it meets the sheet metal.

20200516_101830.jpg

(Don't mind the big paint sags - I got a bit carried away, will be fixed before final assembly)


The neck from the Commodore tank.

20200516_103438.jpg


Fits like it was designed for it.

20200516_103459.jpg


Slung the tank under the car with a couple of temporary straps positioned so I could work around them.

20200516_105703.jpg


Looks like plenty of space for the filler neck so attaching via a short section of hose should work.

20200516_140454.jpg


The factory mounting straps weren't far off after a little re-contouring.

20200516_110611.jpg


So rather than starting again I just made a couple of these.

20200516_130638.jpg


Fitted up.

20200516_131340.jpg


20200516_140424.jpg


#161 76lxhatch

76lxhatch

    That was easy!

  • Members
  • PipPipPipPipPipPipPip
  • 7,153 posts
  • Location:Unzud
  • Car:SS
  • Joined: 04-August 08
Garage View Garage

Posted 22 May 2020 - 03:00 PM

The wiring to the speed sensor was old and brittle, insulation breaking off and one wire on its last strand hard against the housing. Pretty common and have fixed these before.

20200520_165049.jpg


To get at the connections you have to very carefully dig the red gunk out from around the wiring to get the end off and expose the small circuit board without damaging anything. It looks kind of like this, except I skipped the "carefully" part and damaged it beyond repair despite multiple attempts. Oops.

20200520_173022.jpg


20200520_175304.jpg


When I was looking into speed sender options for the hatch EFI conversion I briefly considered modifying a speedo with a tiny magnet and hall effect sensor so I had a couple of compact ICs lying around. Managed to locate one and a couple of components, epoxied this into the housing instead. Also found some fresher wires that still flex without breaking.

20200522_144729.jpg


Replace original gunk with hot glue to insulate and protect everything.

20200522_145127.jpg


Works when tested on the bench...


#162 76lxhatch

76lxhatch

    That was easy!

  • Members
  • PipPipPipPipPipPipPip
  • 7,153 posts
  • Location:Unzud
  • Car:SS
  • Joined: 04-August 08
Garage View Garage

Posted 31 May 2020 - 03:59 PM

Spent some time in front of the TV thinning out the main wiring loom. These bits are no longer required:

20200527_141540.jpg


Started test fitting it to the car, there's just enough room for the big grommet in the front of the A pillar so the loom can be hidden under the guard.

20200527_150658.jpg


Plenty of room for the under-dash fuse/relay panel and it tucks away nicely.

20200528_175558.jpg


Started pulling parts out of storage to check fitment, and can't say the same for the windscreen demister duct (no surprises there). Some modification required, it'll fit eventually.

20200528_175754.jpg


#163 76lxhatch

76lxhatch

    That was easy!

  • Members
  • PipPipPipPipPipPipPip
  • 7,153 posts
  • Location:Unzud
  • Car:SS
  • Joined: 04-August 08
Garage View Garage

Posted 31 May 2020 - 04:13 PM

Then I got sidetracked with a more interesting modification. Having seen Heath's hidden wiper motor modification I wanted to do something similar using the VN wiper motor.


There's a surprisingly large amount of wasted space inside the plenum.

20200531_172241.jpg


Made these pieces.

20200531_172147.jpg


The wiper motor attaches to one, and the other will be welded into the plenum top.

20200531_172843.jpg


20200531_172512.jpg


This will be recessed a little, so the top piece basically sits flush. Going to use a thick cork gasket and rubber washers on the screws (hence the big holes in the piece above) to provide some level of noise insulation since the motor is no longer rubber mounted.

20200531_173021.jpg


Planning to use the original Torana linkages including the arm attached to the motor to maintain ratios. The pushrod from the motor arm will be shortened a little and will hopefully make something to attach the drive linkage to the passenger side arm, I want to keep the different sweeps as they are (the passenger wide wiper travels a wider arc than the driver side)


#164 76lxhatch

76lxhatch

    That was easy!

  • Members
  • PipPipPipPipPipPipPip
  • 7,153 posts
  • Location:Unzud
  • Car:SS
  • Joined: 04-August 08
Garage View Garage

Posted 01 June 2020 - 02:02 PM

Got the recessed flange welded in.

20200601_122049.jpg

The plenum cover will be removed at some stage to deal with the rust in there, will be able to completely finish and tidy this area at that stage but I wanted to to the bulk of the welding with it still in place.


Cork gasket 4mm thick to help with noise.

20200601_123608.jpg


Small reinforcing plate where the motor bolts to the mounting plate, and a rubber grommet to seal around the spindle.

20200601_131928.jpg


As expected a small amount of additional clearance will be required for the motor arm.

20200601_131935.jpg


Made up another pivot stud with a threaded end for the passenger side arm, drilled and tapped the arm and the original pivot to match.

20200601_144258.jpg


Now permanently attached.

20200601_145432.jpg


Have to find some mounting hardware and make some rubber washers, and modify the linkage from the motor. Will probably use the VN pivot (not shown here) as it is a ball joint which allows for some misalignment. The bend/angle of the linkage will be changed too.

20200601_150751.jpg


#165 Heath

Heath

    I like cars.

  • Administrators
  • PipPipPipPipPipPipPip
  • 18,309 posts
  • Name:Heath
  • Location:Eastern Suburbs, Melbourne
  • Car:Heavily Modified UC Sunbird Hatchback
  • Joined: 07-November 05
Garage View Garage

Posted 01 June 2020 - 03:07 PM

Wow. That makes my version look like a real walk in the park.

I might need to re-visit mine to make it look more complicated and professional now.


Very nice.


#166 76lxhatch

76lxhatch

    That was easy!

  • Members
  • PipPipPipPipPipPipPip
  • 7,153 posts
  • Location:Unzud
  • Car:SS
  • Joined: 04-August 08
Garage View Garage

Posted 02 June 2020 - 07:25 AM

Thanks, makes it a lot easier when I can borrow other people's ideas and tweak to suit! Its a little over-complicated because I decided to go with the larger VN motor but so much of this car is now VN/VP that it keeps things simple for future maintenance, heck even the wiring loom already has the correct plug to match. I was also trying to make it look somewhat like a factory pressed panel rather than pure light weight.


I couldn't figure out how you dealt with the differing sweep left to right though?


#167 76lxhatch

76lxhatch

    That was easy!

  • Members
  • PipPipPipPipPipPipPip
  • 7,153 posts
  • Location:Unzud
  • Car:SS
  • Joined: 04-August 08
Garage View Garage

Posted 03 April 2021 - 10:47 AM

Decided the Torana motor arm was the right length to get the desired sweep, removed the original straight pivot pin and swapped in one of the VN ball studs.

20210401_140626.jpg


Cut and shut the last linkage to the right length with the VN ball end.

20210401_151411.jpg


#168 axistr

axistr

    Forum Fixture

  • Members
  • PipPipPipPipPip
  • 1,169 posts
  • Location:North west sydney
  • Joined: 19-November 05
Garage View Garage

Posted 03 April 2021 - 06:12 PM

Nice work 76lxhatch.


#169 76lxhatch

76lxhatch

    That was easy!

  • Members
  • PipPipPipPipPipPipPip
  • 7,153 posts
  • Location:Unzud
  • Car:SS
  • Joined: 04-August 08
Garage View Garage

Posted 05 April 2021 - 06:42 PM

I was hoping to avoid removing the plenum cover since the windscreen area is so rust free, but it had to be done.


The underside of the cover itself has some scale but is in reasonably good condition

20210405_115430.jpg


The bottom of the plenum chamber not so much

20210405_115409.jpg


You can see the grey areas where I tried to get in there with rust killer but obviously couldn't reach everything and it would have been difficult to fix from the inside even with the rotisserie so feeling a bit better about all the work drilling out spot welds.


#170 Mitchyboy

Mitchyboy

    Forum Fan

  • Members
  • PipPipPipPip
  • 390 posts
  • Name:Mitch
  • Location:Sydney
  • Car:Lh torana
  • Joined: 18-March 18

Posted 05 April 2021 - 09:07 PM

I was hoping to avoid removing the plenum cover since the windscreen area is so rust free, but it had to be done.

The underside of the cover itself has some scale but is in reasonably good condition
20210405_115430.jpg

The bottom of the plenum chamber not so much
20210405_115409.jpg

You can see the grey areas where I tried to get in there with rust killer but obviously couldn't reach everything and it would have been difficult to fix from the inside even with the rotisserie so feeling a bit better about all the work drilling out spot welds.

Gotta be done mate.
Nice work.
Kbs rust seal is your friend

Sent from my SM-G965F using Tapatalk

#171 76lxhatch

76lxhatch

    That was easy!

  • Members
  • PipPipPipPipPipPipPip
  • 7,153 posts
  • Location:Unzud
  • Car:SS
  • Joined: 04-August 08
Garage View Garage

Posted 06 April 2021 - 07:13 PM

May as well keep going... decided it would be easiest to do a nice job if I remove the entire plenum.

20210406_192406.jpg


20210406_192435.jpg


Also gives me good access to under the dash! Will help to sort the tight squeeze with demister duct and dash instruments and wiring.


#172 yel327

yel327

    Oh My, Don't you post alot

  • Members
  • PipPipPipPipPipPipPip
  • 13,082 posts
  • Joined: 10-February 08

Posted 06 April 2021 - 07:30 PM

Long time ago now, but just wondering why the fabricated shifter? A standard HQ-HZ or LH-LX T-bar in the 6cyl location should have bolted straight in, worked the box and fitted the console. Would have had to have been a TH400 one or Trimatic swapped over.

#173 76lxhatch

76lxhatch

    That was easy!

  • Members
  • PipPipPipPipPipPipPip
  • 7,153 posts
  • Location:Unzud
  • Car:SS
  • Joined: 04-August 08
Garage View Garage

Posted 07 April 2021 - 06:11 AM

Yeah a long time ago during lockdown when I was looking for things to do and couldn't buy anything. Was lucky that a mate let me borrow his full welding gas bottle as I ran out just at the wrong time!


Regardless I had all these parts and things like that are getting expensive and hard to find here now, it would have needed modifying to select all four speeds anyway. Making things is all part of the fun.


#174 76lxhatch

76lxhatch

    That was easy!

  • Members
  • PipPipPipPipPipPipPip
  • 7,153 posts
  • Location:Unzud
  • Car:SS
  • Joined: 04-August 08
Garage View Garage

Posted 08 April 2021 - 04:42 PM

Its great being able to access the back of the dash so easily. The demister ducting shouldn't need huge modifications, the driver side inlet clashes with the mounting for the new instrument cluster but since the ashtray is going away there's plenty of room to move it over a little.

20210408_164855.jpg


Will also need to squeeze it up a bit on the driver side but still plenty of volume left. After some trimming it now fits around the instrument cradle, and I think it should be possible to assemble everything from under the dash once the plenum goes back in.

20210408_180501.jpg


#175 Heath

Heath

    I like cars.

  • Administrators
  • PipPipPipPipPipPipPip
  • 18,309 posts
  • Name:Heath
  • Location:Eastern Suburbs, Melbourne
  • Car:Heavily Modified UC Sunbird Hatchback
  • Joined: 07-November 05
Garage View Garage

Posted 09 April 2021 - 10:48 AM

I couldn't figure out how you dealt with the differing sweep left to right though?

I read this yesterday and didn't understand it.

Now I've slept on it.

giphy.gif


0 user(s) are reading this topic

0 members, 0 guests, 0 anonymous users