Dirtbagging a BMW : )
#1
Posted 11 August 2012 - 12:59 AM
The owner is "macca" and has been a pleasure to deal with, so am really looking froward to this project.
The car arrived at my place a little while ago but I've been flat out, and now crook with broncitis to get much done to it. I have made a start on the disassembly though. I'm taking my time and tagging and bagging everything as these aren't exactly a common car.
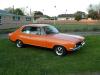
So here's the beast when it arrived at my place. There wasn't really room in the shed so I stored it at the house for a while.
So it eventually found it's way to the shed, after spending half the day getting it going. A new coil and some aero start had it running eventually : )
The cream triangle thingy is a factory fold down tool box. I love it!
OK, so now you get the rough idea of how it looks. It has some nasties hiding in that paint, but as usual it will all come off and the fun can begin from bare steel : )
I started the tear down in the boot, thinking it would be a 20 minute job. hahahaha that's funny : )
Everything in this thing is trimmed. Even the front wall of the boot. And it's glued too. Yay! : )
OK, so getting the carpet out was easy, revealing two vinyl covered panels in the floor. Cool.
Under the two floor sections are the spare wheel, fuel tank and jack. Nice and tidy.
Taking the rubber seal off around the boot opening revealed a bit of rust, but it is a 70's car after all, so nothing too strange about that.
I did notice that the support for the fuel tank has fatigue cracked, so that'll need some blue tac and a rivet later on.
The spare wheel well will need a new base too, but having said that I'm not sure at this stage whether the boot will get redsdigned for a bigger tank or just restored. Either way it'll get done ; )
A couple of very light taps with my small welding hammer made easy work of putting in some "racing" holes : )
#2
Posted 11 August 2012 - 01:10 AM
OK, so I started by pulling the tail lights and centre panel, then went to the rear bumper. Every bolt was a different size, annoying yes, but the biggest pain was getting to the over rider mounts. The over riders are mounted to the bumper from the inside so I had to get the mounts off with the limited room available. I got there, but skinned the odd knuckle or two hahaha!
Getting the tow bar off would have been a breeze had my arms been a foot or two longer, as getting to the nuts and bolts up near the diff on my own was fun. All done though. I'm not sure if the owner wants to re use the tow bar, so like every single other part all the nuts, bolts and washers have been bagged and tagged.
With that done I turned my attention to the wheel tub trims. These are two pieces a side, inner and outer, and totally glued down and made from thin plastic. Again, not sure if the owner would bother re using these parts, but just in case I took my time and got them off without cracking the hell out of them. I also got the panel off the front wall of the boot.
The drivers side outer bumper mount has been damaged at some stage and the bolt has pulled through the panel. At least it meant there was one bolt I didn't have to undo to get the bumper off : ) Plus the panel will be easily fixed.
Then I started removing the side trims. The nuts holding the trims on ranged from 7,9 and 10mm. Not sure why, It was quite annoying, but mainly funny : )
I undid as much of the side trim as I could from inside the boot. The rest of the rear pieces need to be got at through the inner side panels.
They certainly put a lot of effort into the interior. The scuff plates have an inner and outer section, and the rear of the door jam has a stainless cover.
#3
Posted 11 August 2012 - 01:19 AM
On the floor there is carpet, underlay, foam backed rubber then tar sheet on the floor. Serious business!!
It even has retractable rear seat belts. Cool!
This piece of moulded foam was on the floor where the floor pan joins the firewall, under the foam backed rubber. I assume it's to make a smoother transition on the floor for the passengers feet. Odd. It was really degraded though so not really usable again, but I've kept a section in case the owner wants it replicated.
This is where the foam was placed.
The rear window mechs are huge, and this side only wound down a certain way and then died. I tried swapping switches but had no luck. I'll sort it later.
With the flu and a virus kicking my butt I decided to get out of the dusty interior and start on the front.
I started with the side trims, then attacked the side vents. I assumed they'd be bolted on too but they were glued and double sided taped. Damn strong stuff too as I had to be really careful not to damage the vents. They're only flimsy plastic but the glue was strong enough to pull some paint with it : )
Little bit of paint : )
#4
Posted 11 August 2012 - 01:26 AM
I'm really really really hoping macca will give me some free range with these awful front indicators. They're definitely the UC tail light of the BMW world!
Looks better already! At this stage the lights, grillls and bumper have all been removed. Same story, hard to get at, different sized bolts, but all done now : )
Plus the passengers side lense is broken, so I can only hope new ones aren't available ; )
I found a couple of parts on this car that are so awful, so daggy and so stupid that I love them so much I hope macca will let me have them. I'm talking about the rear speaker cover. The main speaker parts themselves are stuffed, and the covers are sun melted, but they're just so damn funny : )
Fully sick tweeters mate : )
#5 _LS1 Hatch_
Posted 11 August 2012 - 01:30 AM
The dash is pretty plain-jane is seems for the somewhat sleek body shape...hmmm..
#6
Posted 11 August 2012 - 01:32 AM
As I backed it out of the shed to take it back up to the house I thought a pic of the new running gear would be appropriate. It's currently being stored in the black clubsport garden shed : )
I like driving this car. Can't wait until the LS1 and 6 speed go in : )
Back at home for now. I need to get over this illness before I can function properly, but I'm hoping to get at least one day in next week on it, between the hatch, camaro and monza.
The interior isn't looking as flash any more.
#7
Posted 11 August 2012 - 01:40 AM
As for the dash I'm not sure on the plans there. To be honest in the flesh it looks pretty cool. I even think a resto interior would be cool in this car but I know the owner has good taste so whatever he decides it'll be classy and suit the car. There'll be no yellow leather and airbrushed snake crap in this car!!!! : )
Here's the motor arriving.
The best bit. 6 speed manual!!! Cars have three pedals, push bikes have two!!!! : )
So that's all I've done so far. I'm hoping the bronchitis and virus nick off soon so I can get back to work as it's driving me insane. But I'll keep the updates coming as they get done, whether you want me to or not hehehe : )
#8 _LS1 Hatch_
Posted 11 August 2012 - 01:48 AM
Smoothing things out on the body sounds like great plans so far, and the bumper mods sound like good thoughts as well. And the steel chin spoiler sounds awesome too, would really lend itself well to the car's shape.
There was a place out this way that had spares for them from memory, so if it needed anything original for it, I might get called into play, who knows..ha ha.
And obviously, the LS1/6 speed is the combo to go with
PS...just saw a new M6 the other day on the freeway...white, black roof and white and black 22" ? or so wheels.. pimptastic.
PS. If you are sick, shouldn't you be in bed what ever odd time of the morning it is there ? lol...
(quarter to 2 in the morning?)
#9
Posted 11 August 2012 - 01:53 AM
#10 _LS1 Hatch_
Posted 11 August 2012 - 02:05 AM
I feel like a zombie ...Shoot me now
I'm all set for the Zombie Apocalypse (plenty more ammo, fear not)
(Chainsaw, etc are out in the back shed...)
Attached Files
#11
Posted 11 August 2012 - 02:07 AM
#12
Posted 11 August 2012 - 02:12 AM
#13 _LS1 Hatch_
Posted 11 August 2012 - 02:37 AM
PS... is the car going to get bigger diameter wheels ? Some big brakes to go under them would be a nice touch..
Attached Files
#14
Posted 11 August 2012 - 03:56 AM
Love the work Dirtbag. Gonna be a beast once it's done.
#15
Posted 11 August 2012 - 07:11 AM
#16 _LS1 Hatch_
Posted 11 August 2012 - 07:42 AM
I could run 20 x 15's on the back of mine...if I was so inclined, ha ha.. (but 18's are plenty for me)
Psst....how about flaring the wheel arches slightly on the BM'er ? Hmmmmm....
#17
Posted 11 August 2012 - 07:47 AM
As for flaring the guards, I'm sure I'll have to roll the lips at least, but not thinking he wants them actually flared. I guess we'll see how we go and see how the wheels he chooses fit.
#18 _Big T_
Posted 11 August 2012 - 08:02 AM
Those indicators would look mega cool on a UC Tim. Chuck 'em on the orange on in the shed LOL !!
#19 _LS1 Hatch_
Posted 11 August 2012 - 08:18 AM
Attached Files
Edited by LS1 Hatch, 11 August 2012 - 08:22 AM.
#20
Posted 11 August 2012 - 01:55 PM
Quite a bit wider than my size 11 : )
Tubs stretched and rear and middle seats narrowed to suit.
Here she is trimmed and painted.
Anyway, enough about that. This is a BMW thread! Geez I get sidetracked easily : )
#21 _LS1 Hatch_
Posted 11 August 2012 - 02:03 PM
The ones we built were a 2 piece billet wheel...same sorta tires though but taller They went onto a '56 ? or so F100... (one of these days I'll get some pics of how it came out)
#22 _LS1 Hatch_
Posted 11 August 2012 - 02:08 PM
Geez I get sidetracked easily : )
It happens easily...ha ha...
Attached Files
#23 _Bomber Watson_
Posted 11 August 2012 - 06:18 PM
Cheers.
#24
Posted 11 August 2012 - 06:26 PM
If my memory serves, those speakers were Pioneers. In their day they were really expensive and actually sounded really good!!!
cheers
Glenn
#25
Posted 11 August 2012 - 07:12 PM
Hey Dirtbag,
If my memory serves, those speakers were Pioneers. In their day they were really expensive and actually sounded really good!!!
cheers
Glenn
Yeah I had a set but they only had one tweeter and set of fins, sounded pretty good for the day, but no doubt crap for today's standard :-)
0 user(s) are reading this topic
0 members, 0 guests, 0 anonymous users