
hi my name is colin im just wondering if you still do power steer kits if so my could i get a price for one for m lx [email protected] thanks colin

Torana power steering kits.
Started by
axistr
, Oct 01 2012 07:20 PM
172 replies to this topic
#77

axistr
 View Garage
-
- Members
-

- 1,169 posts
Forum Fixture
- Location:North west sydney
- Joined: 19-November 05
View Garage
Posted 18 October 2015 - 08:41 AM
G'day Colin,
Yes I still make power steering kits, PM sent.
Thanks Lenny
#78
_sloffador_
_sloffador_
-

- Guests
Posted 18 October 2015 - 03:02 PM
Hi Lenny
Im considering one too could you send me a price please
Cheers Peter
#79
axistr
View Garage
-
- Members
-
- 1,169 posts
Forum Fixture
- Location:North west sydney
- Joined: 19-November 05
View Garage
Posted 19 October 2015 - 08:48 AM
P.M Sent Peter.
#80
mika03au
View Garage
-
- Members
-
- 812 posts
Forum Fixture
- Name:Michael
- Location:Brisbane
- Car:LX hatch
- Joined: 06-July 11
View Garage
Posted 13 April 2016 - 06:54 PM
#81
_RTS Guy_
_RTS Guy_
-
- Guests
Posted 15 April 2016 - 06:00 PM
You might have to ring Lenny.
That email might not get through to him as I think he retired and sold the business.
Regards Darren
#82
axistr
View Garage
-
- Members
-
- 1,169 posts
Forum Fixture
- Location:North west sydney
- Joined: 19-November 05
View Garage
Posted 16 April 2016 - 08:28 AM
Thanks Darren, they call it semi retirement. Phone number and e-mail above is still the best contacts to get me on.
Lenny.
#83
mika03au
View Garage
-
- Members
-
- 812 posts
Forum Fixture
- Name:Michael
- Location:Brisbane
- Car:LX hatch
- Joined: 06-July 11
View Garage
Posted 16 April 2016 - 06:41 PM
Email sent Lenny.
Thanks Darren. Been in contact with Len. All good. Order in.
#84
_devojr62_
_devojr62_
-
- Guests
Posted 17 April 2016 - 12:26 PM
Hi Lenny,
I purchased one of your units a couple of years ago, and now getting ready to have it installed. When I ordered the rack my idea was to use the original rubber coupling, for which you supplied the adaptor to match. I'm now thinking of going to the solid universal joint type as a better option. Do you have a adaptor, or do I just connect the union to the splined end of the steering rack?
Cheers, Brian
#85
UCgazman
-
- Members
-
- 1,342 posts
UC's FTW!
- Name:Garth
- Location:Perth
- Car:UC S̶u̶n̶b̶i̶r̶d̶ 5000!
- Joined: 04-August 11
Posted 17 April 2016 - 12:52 PM
I wondered this too but figured with the steering being so light now there was bugger all load on the rag joint and it should last a lot longer than the originals.
#86
axistr
View Garage
-
- Members
-
- 1,169 posts
Forum Fixture
- Location:North west sydney
- Joined: 19-November 05
View Garage
Posted 18 April 2016 - 09:57 AM
Hi Brian, as Garth has mentioned there is bugger all load on the steering column when using power steering. The original style coupling is the best option and can also eliminate any unwanted harmonics transmitted through to the steering wheel.
Double universals in the column does eliminate the extra flex and movement in the steering only if the rag joint is buggered.
The rag joint is also better in reducing any difference in uni working angles between the rack and steering shaft, and you don't tend to notice the light binding effect during full rotation with rag joints.
The only benefit of using a double universal is when there is no other way of easily obtaining extra clearance from poorly designed or incorrectly manufactured extractors.
#87
Ando
View Garage
-
- Members
-
- 519 posts
Forum Fixture
- Location:Coolangatta
- Car:6/'76 L32 SS white & black. 9/'76 L31 SS gold. 5/'77 L31 SS Chamois. 3/'79 UC SL Deluxe hatch.
- Joined: 10-February 08
View Garage
Posted 18 April 2016 - 04:00 PM
As Lenny said..the rag coupling is there to dampen harmonics. I found that the rubber in the coupling supplied by Rare Spares seems a bit too soft & made the steering reaction a bit delayed. I made up a base plate for the rubber ring support & collared the connection bolts up through the top plate slots. I modified the the coupling with Lenny's adapter when I purchased his power kit. I only have about an inch of steering delay instead of 2-3 inches without the mods. The coupling articulates very well with the mods! The photo shows the rubber coupling a little raise when I initially installed it but it is now flat once settled. Just another idea.. Cheers
Attached Files
-
 IMG_2160.JPG 154.39K
15 downloads
IMG_2160.JPG 154.39K
15 downloads
#88
axistr
View Garage
-
- Members
-
- 1,169 posts
Forum Fixture
- Location:North west sydney
- Joined: 19-November 05
View Garage
Posted 18 April 2016 - 07:48 PM
G'day Ando, thanks for posting up the photo. As you mentioned the coupling better centralized once settled in.
Its not uncommon when removing the rag joint assembly from either the manual or power steering rack input shaft to have some miss alignment when trying to reconnect it. Usually by tapping the rag joint assembly up to get it to disconnect from the rack it can push the collapsible upper steering column shaft up causing a shortness in the length when trying to reconnect. By driving your car the steering column shaft over time due to the load on the rag joint has caused it to pull down and better align the coupling. Once installed if I have any miss alignment I lightly tap the upper section of the rag joint down towards the rack till the rag coupling disc is evenly centralized. I recently had a customer call me saying the rack I supplied him was 1 1/2" too short, this was due to the collapsible column which he didn't realise could move so freely or move so much.
Just one question you mentioned you now only have an inch movement in the steering. I assume this is at the steering wheel. ? my vehicles have none. Even stationary with out the engine running I can move the steering wheel lightly left to right and the front wheel move accordingly with basically no play. Did the Rare Spares rag joint assembly come with crush spacers between the top and bottom column adaptors. If the crush spacers are incorrectly height matched you can get excessive movement in the rag joint. If left out you would get considerable more movement. Or did you make your own? In cases where I make the spacers to slip over the two bolts, I generally make the spacers around 3 mm shorter than the thickness of the flexible disc. This will ensure there is little to none in the way of movement in this area.
Thanks,
Lenny.
#89
Ando
View Garage
-
- Members
-
- 519 posts
Forum Fixture
- Location:Coolangatta
- Car:6/'76 L32 SS white & black. 9/'76 L31 SS gold. 5/'77 L31 SS Chamois. 3/'79 UC SL Deluxe hatch.
- Joined: 10-February 08
View Garage
Posted 19 April 2016 - 10:36 AM
Gday Lenny,
Yes I meant to say it's the slight delay is at the steering wheel. I turn tested it when the car was static & not under power. I've checked the delay again so just to be more precise & it's really only no more than 1/2 inch delay from the steering wheel to the front wheel movement which is a vast improvement before I modified the rag joint.
Yes I installed 2 crush tubes over the 2 bolts about 2mm shorter than the disc thickness. I made sure the crush tubes were snug fitting into the rubber disc holes before assembly. I thought the rubber disc was too flexible with the steering torque twist..(seemed too soft & compressed too easily). I decided to reduce it more & support the disc at the base as it drooped past flat when I pulled the steering shaft down by hand. The collars on the bolt shafts have about 1mm space either side of the top plate slots which basically restricts the rubber flexing when under torque twist. I made sure there was enough collar above & below the plate slots to allow for steering articulation. This was a weekend idea & I was running out of time ( & patience lol ) before my motor was going back in for the second time! It works for me so I'm happy with it.
cheers Ando
#90
_devojr62_
_devojr62_
-
- Guests
Posted 20 April 2016 - 08:39 PM
Thank you very much for your comments.
Cheers Brian
Cheers Brian
#91
axistr
View Garage
-
- Members
-
- 1,169 posts
Forum Fixture
- Location:North west sydney
- Joined: 19-November 05
View Garage
Posted 21 April 2016 - 10:27 AM
No worries Ando sounds like its all sorted. I haven't had any problems in the past with the Rare Spares coupling assemblies but there is always a first, and something I will keep in the back of my mind for future reference.
#92
axistr
View Garage
-
- Members
-
- 1,169 posts
Forum Fixture
- Location:North west sydney
- Joined: 19-November 05
View Garage
Posted 12 May 2016 - 05:29 PM
Just letting everyone know I now keep in stock a pair of A9X steering arms. When running A9X/HQ stub axles these arms will keep the steering geometry correct and should always be used when fitting the above stubs, with either manual or my power steering rack kit.
Lenny.
#93
mika03au
View Garage
-
- Members
-
- 812 posts
Forum Fixture
- Name:Michael
- Location:Brisbane
- Car:LX hatch
- Joined: 06-July 11
View Garage
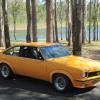
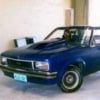
Posted 21 May 2016 - 04:47 PM
Just finished my installation Lenny. I would recommend your kit to other Torana owners.
Everything fitted perfect (only the issue I called about with the adapter install, which was due to a brain fade moment on my behalf).
Clearances all good. I have proper Torana V8 engine mounts and Pacemaker headers.
Sourcing a pump proved a little pricey but have a fully guaranteed reco unit.
And to save issues and running around had mobile hoses and pipes guy come around and plumb it all up.
I have run the fixed lines forward and under the radiator out of sight as you recommended.
Final engine bay look is "factory" (if that is all possible for a car that was never designed to have power steer).
Took the opportunity to replace the steering column lower bearing with a decent NSK 6205DDU-25.4 unit which is explained in another thread.
Access was a little trying but working from the right hand wheel well with the splash trays removed all went together fine (including doing the lower bearing mod with the column still in the car).
So off for a wheel alignment tomorrow.
Quick round the block and the car is a different animal. Turning the 245 front tyres is effortless but the steering isnt too light so am very happy. Cheers.
(these pic are prior to plumbing and everything located to check fit and clearances.)
IMG_0670.JPG 122.15K
35 downloads
IMG_0673.JPG 163.02K
31 downloads
Edited by mika03au, 21 May 2016 - 04:51 PM.
#94
axistr
View Garage
-
- Members
-
- 1,169 posts
Forum Fixture
- Location:North west sydney
- Joined: 19-November 05
View Garage
Posted 23 May 2016 - 08:45 AM
Well done Michael. Love your Torana very tidy car and nice job, hope you enjoy the drive.
#95
_Darklord_
_Darklord_
-
- Guests
Posted 04 June 2016 - 03:30 PM
Hi Lenny, do you still have these available? Sent you a pm and a text msg (didn't want to call on a Saturday). Pretty keen to put one in my LH with a LS2
#96
axistr
View Garage
-
- Members
-
- 1,169 posts
Forum Fixture
- Location:North west sydney
- Joined: 19-November 05
View Garage
Posted 04 June 2016 - 05:17 PM
G'day Darklord currently have variable and standard ratio rack kits in stock..
PM sent.
Lenny.
#97
axistr
View Garage
-
- Members
-
- 1,169 posts
Forum Fixture
- Location:North west sydney
- Joined: 19-November 05
View Garage
Posted 13 July 2016 - 05:06 PM
Hi guys, Just finished doing some more power rack kits. It seams every time I do a batch of racks all but one of my parts suppliers have increased their prices to the point I cannot keep doing them at the current price, I have been absorbing these costs over the past three years.
I only have two kits left at the current price, both kits are variable ratio kits and once they are gone further variable ratio kits will have to increase to $2,995.00 Sorry for the increase but I have to pass it on to insure only quality parts are used in the assembly of the product.
Many thanks,
Lenny.
#98
purrlx
View Garage
-

- Members
-
- 1,330 posts
Forum Fixture
- Name:Danny
- Location:Gladstone
- Car:LX hatch
- Joined: 23-December 11
View Garage
Posted 13 July 2016 - 07:43 PM
I think people will pay for a quality product if they want it. Prices on everything goes up over time.
#99
_devojr62_
_devojr62_
-
- Guests
Posted 01 September 2016 - 06:27 PM
Hey Lenny, finally got my power steering installed. BLOODY BRILLIANT modification. I never thought it would be so different to drive the old girl. I get the wheel alignment done on next Tuesday. Do I need to tell them any specific info when doing it.
If anyone is in two minds about this, don't be. No regrets here. Had a mechanic do the job, and he had no issues at all. I also used the Harrop arms as recommended.
Thanks again Lenny.
If anyone is in two minds about this, don't be. No regrets here. Had a mechanic do the job, and he had no issues at all. I also used the Harrop arms as recommended.
Thanks again Lenny.
#100
axistr
View Garage
-
- Members
-
- 1,169 posts
Forum Fixture
- Location:North west sydney
- Joined: 19-November 05
View Garage
Posted 02 September 2016 - 12:01 PM
Hi Brian, good to hear your now enjoying power steering and all went well with the installation.
In the fitting instructions I included my preferred wheel alignment settings in detail, however I have posted a shorter version although hard to do when your talking good wheel alignment practice, for you and other members to use as a base line for your Torana alignment.
The recommendations below are for general street use. Readings are static. Tyre pressures set.
When carrying out wheel alignments on Torana's caster & camber is adjusted simultaneously. Try and add as much caster as reasonably possible without buggering up the camber. I start by removing all the shims from the front control arm mounts and keep adding shims to the rear of the control arms till I achieve target cambers numbers. Then check to ensure casters are basically even and trim them to suit. I regularly set an extra 1/4 degree more positive caster on the left side to off set some road camber pull. Most wheel aligners now have four head alignment machines so you can see what the rear end is doing and any set back of control arms. The thrust angle is important and caster may need to be compensated for diff thrust misalignments. Good clued up alignment places will correctly align the diff thrust angle first which is preferred. if not,
Example:
( Any vehicle will pull to the side of the shortest wheel base) = thrust angle and pulls either left or right. Adding more caster to the side of shortest wheel base will offset the pull and will ensure the car drives straight down the road on the average road camber.
Camber,
Example: Left side 1/4 - 1/2 degrees' negative camber.
Right " 0 - 1/4 " positive " .
Caster,
Example: Left side 2 1/2 degrees' positive caster.
Right " 2 1/2 " " " .
Note; 1 1/2 - 3 degrees' positive caster should be achievable in a Torana but can depend on tyre clearance, upper control arm type and position, vehicle ride height, stiffness of suspension and various front end components condition ( if worn, twisted or bent) .
The higher the positive caster set the better the camber gain will be during cornering = better handling and a more weighted feel, increased feed back through the steering wheel, better tyre life and grip through hard cornering.
Toe in: Static 2 - 4 mm in This number is very vague, see below.
After caster, camber and diff thrust angles have been aligned I always set the toe in by pushing on both front tyres at the front with both my hands with approximately 5kg of pressure on each hand and set the toe in at zero - 1mm in. This simulates the drag of the wheel against the road surface, this is why the manufactures static toe settings are always listed at mm in.
Hope the above alignment information helps, and if carried out correctly will give you good road handling and feel with good all round tyre ware if your driving like Miss daisy or giving it the beans through the bends occasionally. Most customers tell me they drive their cars hard all the time but in reality you just cant dive the car hard enough on the road often enough to benefit from setting loads of negative caster which many people think will improve handling, it can have the opposite effect. You can only do so much with the Torana steering geometry but taking the time and setting the wheel alignment angles correctly you can really make these old cars handle quite well. I often spend 2 - 3 hours setting up wheel alignments on old cars, but that's what is need some times to get it perfect.
It really bugs me when owners tell me their local tyre shop did a full alignment in twenty minutes and tell the owner its all good. In that short time they would only be able to change toe in, in most cases this isn't the problem why the car doesn't handle correctly, and they charge $80 - $120 for the privilege of doing half a job.
Lenny.


1 user(s) are reading this topic
0 members, 1 guests, 0 anonymous users

