
Nice work Burty. Looking good.
I am also originally a Darwin boy. How do you go with flash panel rust with the extra humidity?
The Torrie is looking great.
I have done the UC to LX conversion my too. Hard work but worth it!
Well done cant wait to see updates.

Burtys UC To LX Conversion
Started by
burty
, Oct 28 2012 07:27 PM
134 replies to this topic
#27

burty
 View Garage
-
- Members
-

- 153 posts
Forum Member
- Name:BURTY
- Location:Darwin
- Car:UC torana
- Joined: 19-October 10
View Garage
Posted 02 November 2012 - 08:18 AM
My neighbour and workmate franky also has a couple of cars he is doing up and he put me onto lanolin spray that does the trick. Puts a coating on the bare metal so far no surface rust and unlike other sprays doesnt have silicones in it that absorb into the metal that might stuff up the paint work later. Also cleans off easily.
I picked up the lanolin at a bearing shop.
I picked up the lanolin at a bearing shop.
#28
_berro59_
_berro59_
-

- Guests
Posted 02 November 2012 - 11:13 AM
Cool.
I will look into that myself.
I put a phosphoric acid over the panel. But it is a lot dryer here.
I will look into that myself.
I put a phosphoric acid over the panel. But it is a lot dryer here.
#29
burty
View Garage
-
- Members
-
- 153 posts
Forum Member
- Name:BURTY
- Location:Darwin
- Car:UC torana
- Joined: 19-October 10
View Garage
Posted 02 November 2012 - 10:00 PM
Berro,
Just been looking through you thread, much bigger job than I have to do. Realised as I got to the pages with photos of the rear end that I had looked through it before.
You can tell I used your method for the tail lights! Dirtbags was a lot more involved drilling out the spot welds and replacing the whole rear panel. I must thank you for providing the method. I went with it as seemed simpler and my UC was in very good condition so the least amount of cutting the better.
Thats the cool thing about this site, without it I either would not have attempted the conversion or tried it and made a big f****n mess!
I will take a photo of the lanolin can soon, it is also available at Landmark (the old westfarmers shops)
#30
_berro59_
_berro59_
-
- Guests
Posted 03 November 2012 - 09:45 AM
Hi Burty,
Dirtbag was the reason I had a crack at the grafts too. GMH is awesome for info like that.
Yes unpicking and removing the whole rear panel is hard work but a lot easier to get the tail lights to be symmetrical. You will also get better access to hidden rust areas.
I laughed when you wrote about being scared to get the grinder in to the car for the first cut.I was the same! It takes big balls to do it. Especially as your UC it looked decent before the graft.
Mine conversion was hard work removing the inner guards and dash but I wanted it to look like LX/A9X
keep up the good work.
Berro
#31
burty
View Garage
-
- Members
-
- 153 posts
Forum Member
- Name:BURTY
- Location:Darwin
- Car:UC torana
- Joined: 19-October 10
View Garage
Posted 04 November 2012 - 01:17 PM
About to start on the interior of the Torrie. Any recommendations with sound deadening materials? Im sure there is pleanty of threads and I am about to start searching.
Just thought I could shortcut the process! Dynamat etc and the like, have also seen foil backed foam with adhesive about 10mm thick. First hand report would be good.
Just thought I could shortcut the process! Dynamat etc and the like, have also seen foil backed foam with adhesive about 10mm thick. First hand report would be good.
#33
_sjp67m_
_sjp67m_
-
- Guests
Posted 04 November 2012 - 06:55 PM
About to start on the interior of the Torrie. Any recommendations with sound deadening materials? Im sure there is pleanty of threads and I am about to start searching.
Just thought I could shortcut the process! Dynamat etc and the like, have also seen foil backed foam with adhesive about 10mm thick. First hand report would be good.
Seen dynamat on a few customers cars they swear by it but I've never actually applied it
Locally cool drive are the stockists
#34
Mort
View Garage
-

- Members
-
- 2,760 posts
Lotsa Posts!
- Name:Mort
- Location:Moranbah, QLD.
- Car:74 LH SL/R 4.2, 75 LH 4 door 186
- Joined: 16-December 07
View Garage
Posted 04 November 2012 - 07:52 PM
I've had Dynamat put in Tracie's car from firewall to parcel shelf but don't have the car to drive yet so i can't comment on it at the moment.
I do know it's expensive and there is a cheaper alternative that looks the same.
I do know it's expensive and there is a cheaper alternative that looks the same.
#35
dirtbag
-

- Members
-
- 1,927 posts
Street Machines current Biatch!
- Name:Tim
- Location:Sunshine Coast
- Car:1995 V8 2wd hilux, LH torana ute, 1970 Volksrod, MK1 2 door escort, CJ6 Jeep, VX commodore wagon.
- Joined: 29-December 09
Posted 05 November 2012 - 07:13 AM
I used the Lite dynamat in my brothers car and it makes a huge difference. Plus being the lite version it's only a few mm thick so easier to apply and doesn't interfere with how anything mounts.
#36
burty
View Garage
-
- Members
-
- 153 posts
Forum Member
- Name:BURTY
- Location:Darwin
- Car:UC torana
- Joined: 19-October 10
View Garage
Posted 05 November 2012 - 05:53 PM
Going to give dynamat extreme a go. Also going to use 10mm adhesive foam with foil backing instead of carpet underlay. I will take pleanty of pics as I go.
#37
_sjp67m_
_sjp67m_
-
- Guests
Posted 05 November 2012 - 06:03 PM
Going to give dynamat extreme a go. Also going to use 10mm adhesive foam with foil backing instead of carpet underlay. I will take pleanty of pics as I go.
If you want give me a call 0451171575 I'll get you trade price
#38
burty
View Garage
-
- Members
-
- 153 posts
Forum Member
- Name:BURTY
- Location:Darwin
- Car:UC torana
- Joined: 19-October 10
View Garage
Posted 05 November 2012 - 07:48 PM
Bugger! Got too keen and ordered what I needed off ebay. Thanks for the offer anyhow.
#39
_sjp67m_
_sjp67m_
-
- Guests
Posted 05 November 2012 - 09:42 PM
Bugger! Got too keen and ordered what I needed off ebay. Thanks for the offer anyhow.
Lol ok it's just I know they actually keep it Im stock surprising for Darwin !
#40
burty
View Garage
-
- Members
-
- 153 posts
Forum Member
- Name:BURTY
- Location:Darwin
- Car:UC torana
- Joined: 19-October 10
View Garage
Posted 08 November 2012 - 08:13 PM
Berro, This is the Lanolin I used to protect the bare metal from our dreaded humidity
Attached Files
-
 373.JPG 84.76K
7 downloads
373.JPG 84.76K
7 downloads
#41
burty
View Garage
-
- Members
-
- 153 posts
Forum Member
- Name:BURTY
- Location:Darwin
- Car:UC torana
- Joined: 19-October 10
View Garage
Posted 08 November 2012 - 08:15 PM
Busy weekend coming up. Dynamat extreme and 10mm adhesive foil backed sound deadening.
Attached Files
-
374.JPG 105.14K
13 downloads
#42
burty
View Garage
-
- Members
-
- 153 posts
Forum Member
- Name:BURTY
- Location:Darwin
- Car:UC torana
- Joined: 19-October 10
View Garage
Posted 08 November 2012 - 08:19 PM
Lucky for me the floor was in very good condition once pulling out the old carpet and underlay. Wont be blue for much longer.
Attached Files
-
Pic_0215_103.jpg 12.94K
9 downloads
-
375.JPG 83.99K
11 downloads
#43
_sjp67m_
_sjp67m_
-
- Guests
Posted 08 November 2012 - 08:31 PM
So dynomat Aswell as the foil ?
Also are you using anything to seal after ? Ie seam sealing the edges ?
Got a seam sealer gun was thinking of laying all the sound deadner down them sealing it in ?
Also are you using anything to seal after ? Ie seam sealing the edges ?
Got a seam sealer gun was thinking of laying all the sound deadner down them sealing it in ?
#44
burty
View Garage
-
- Members
-
- 153 posts
Forum Member
- Name:BURTY
- Location:Darwin
- Car:UC torana
- Joined: 19-October 10
View Garage
Posted 08 November 2012 - 08:39 PM
mmm? Not sure I follow, new to this and havnt laid dynamat before. TIPS would be great.
#45
_sjp67m_
_sjp67m_
-
- Guests
Posted 08 November 2012 - 09:14 PM
Have to check out a few forums I'm guessing dynamat is American ?
#46
burty
View Garage
-
- Members
-
- 153 posts
Forum Member
- Name:BURTY
- Location:Darwin
- Car:UC torana
- Joined: 19-October 10
View Garage
Posted 20 January 2013 - 07:56 PM
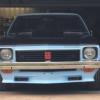
Work on the torrie stalled a bit as of late but finally got back into it over the last two weekends. Had to see what the bonnet scoop looked like while the lx bits and pieces were bolted on.
IMG_0065.JPG 96.06K
16 downloads
Time to start some more work on the front end. You can see where the front scoop meets the flares I had to cut a small wedge out.
While the scoop was bolted on I fibreglassed the seam from behind.
IMG_0086.JPG 65.47K
9 downloads
IMG_0089.JPG 54.9K
9 downloads
I put about four layers on the back of the flare to keep it rigid. Once dried the flares are now fixed in the position I wanted and the front scoop lines up with them nicely.
IMG_0065.JPG 96.06K
16 downloadsTime to start some more work on the front end. You can see where the front scoop meets the flares I had to cut a small wedge out.
While the scoop was bolted on I fibreglassed the seam from behind.
IMG_0086.JPG 65.47K
9 downloads
IMG_0089.JPG 54.9K
9 downloadsI put about four layers on the back of the flare to keep it rigid. Once dried the flares are now fixed in the position I wanted and the front scoop lines up with them nicely.
#47
burty
View Garage
-
- Members
-
- 153 posts
Forum Member
- Name:BURTY
- Location:Darwin
- Car:UC torana
- Joined: 19-October 10
View Garage
Posted 20 January 2013 - 08:10 PM
I also cut a small wedge of metal to fill the gap in the front gaurd created from getting the UC gaurd to match up with the LX nosecone.
It was a pain in the arse to weld in but we got there.
IMG_0097.JPG 93.38K
9 downloads
Also removed the old mounts for the UC headlights, hopefully I will start on the new mounts this week ( Thanks Franky!)
IMG_0105.JPG 89.76K
10 downloads
It was a pain in the arse to weld in but we got there.
IMG_0097.JPG 93.38K
9 downloadsAlso removed the old mounts for the UC headlights, hopefully I will start on the new mounts this week ( Thanks Franky!)
IMG_0105.JPG 89.76K
10 downloads
#48
burty
View Garage
-
- Members
-
- 153 posts
Forum Member
- Name:BURTY
- Location:Darwin
- Car:UC torana
- Joined: 19-October 10
View Garage
Posted 21 January 2013 - 07:38 PM
Also got on with soundproofing the interior. Used Dynamat Extreme 9 piece pack. I thought it might go a bit further but not to be, will probably buy another pack to do the hatch area to stop a bit of noise coming from the diff!
Attached Files
-
Pic_0215_103.jpg 12.94K
9 downloads
-
IMG_0102.JPG 100.41K
10 downloads
#49
burty
View Garage
-
- Members
-
- 153 posts
Forum Member
- Name:BURTY
- Location:Darwin
- Car:UC torana
- Joined: 19-October 10
View Garage
Posted 21 January 2013 - 07:51 PM
More fibreglassing ahead! Decided to make te two piece front spoiler a one piece. I roughly fibreglassed the overlap on the top and bottom and cut out the front overlap while it was bolted to the car. Probably just created more work with out much gain but too late now the cut is done.
Once the fibreglass was set I removed the spoiler. It now fits nicely back onto the flares and nosecone.
Once the fibreglass was set I removed the spoiler. It now fits nicely back onto the flares and nosecone.
Attached Files
-
IMG_0090.JPG 104.57K
10 downloads
#50
UCgazman
-
- Members
-
- 1,342 posts
UC's FTW!
- Name:Garth
- Location:Perth
- Car:UC S̶u̶n̶b̶i̶r̶d̶ 5000!
- Joined: 04-August 11
Posted 21 January 2013 - 09:17 PM
Looking good man, be interesting to hear the difference with the Dynamat.


0 user(s) are reading this topic
0 members, 0 guests, 0 anonymous users

