Jump to content


Photo

I will show you how to build a dolly to roll a Torana body shell around.


  • Please log in to reply
19 replies to this topic

#1 Ruts

Ruts

    How Fast!?

  • Moderators
  • PipPipPipPipPip
  • 1,118 posts
  • Location:Bargo, NSW
  • Car:Blown A9X replica, Black SS hatchback, LH SLR5000
  • Joined: 23-December 06

Posted 05 February 2013 - 10:39 PM

Well as some may know I have started a build thread on a car I'm building for myself. I took all the running gear out of it in preparation to start paint stripping it. The problem I have is that the car is on the hoist and at present there is no way of moving it around the workshop unless I put it on my rotisserie that I built. So what I thought I needed is what they call a 'dolly' to make it easy to move the car and also do some repairs. A dolly is a frame that has wheels that you sit the body shell on which makes it easy to move around. So what I wanted to do was try to make a dolly out of some scrap steel that I had lying around the yard. I wanted to try and build it on a small budget and I think I achieved that. The biggest expense for this project was the wheels. I got them from BCF (boating camping & fishing) for $25 each. The steel that I used were beams from some old pallet racking I had lying around. Anyway follow the build and see what you think. If anyone is thinking of building one for themselves after reading this thread then just let know if you need and measurements I would be glad to throw a tape around it.

Here we go.

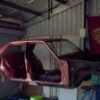
As the car was already on the hoist I had to make it where it was. The first thing I had to do was make sure the body was sitting level.
Posted Image

I used a spirit level to get the shell level and I did this by screwing the pads on the hoist arms up or down as required.
Posted Image

Posted Image

Posted Image

You can see in this picture how far out the shell is from level.
Posted Image

I decided to attach the dolly at the front at the front rail where the bumper bar bracket mount attaches to the rail.
Posted Image

Posted Image

The rear is attached to the exhaust tail pipe mount on the rear chassis rails next to fuel tank.
Posted Image

Posted Image

As stated earlier I made the dolly out of some scrap steel I had lying around around. These orange beams are left over pallet racket beams. The length silver C channel was leftover steel from the mezzanine level that I built in the shed.
Posted Image

Posted Image

Posted Image

The wheels I got from BCF and are small trailer jockey wheels.
Posted Image

Posted Image

I needed to make brackets to mount the front legs to the chassis rails so I used the C channel. I cut out some small plates.
Posted Image

Posted Image

Posted Image

Posted Image

Posted Image

I then measured the distance between the holes and then drilled plates to suit.
Posted Image

Posted Image

Posted Image

Posted Image

I then worked out where the front legs are going to placed on the rails but first I had to cut the ends of the pallet rack beams.
Posted Image

Posted Image

This made it easy to work out where the legs need to go.
Posted Image

Posted Image

Posted Image

Before cutting the legs to length I had to work out what finished height I wanted it to be.
Posted Image

Posted Image

While working out the finished height I had to take into account the size of the wheels which were 200mm from the bottom of the bracket to the bottom of the wheel.
Posted Image

Front legs cut to length with the paint cleaned off reading for welding.
Posted Image

Posted Image

#2 Ice

Ice

    Cool

  • Members
  • PipPipPipPipPipPipPip
  • 15,119 posts
  • Name:Gene
  • Location:Galaxy's away from Ipswich
  • Car:77 HZ Sandman Van
  • Joined: 03-January 07

Posted 05 February 2013 - 10:53 PM

Gee your a clever bugger dennis i need to make one of them but not for a torana just a van cab

#3 Ruts

Ruts

    How Fast!?

  • Moderators
  • PipPipPipPipPip
  • 1,118 posts
  • Location:Bargo, NSW
  • Car:Blown A9X replica, Black SS hatchback, LH SLR5000
  • Joined: 23-December 06

Posted 05 February 2013 - 11:47 PM

Once the legs were welded to the plates I bolted them back on the rails.
Posted Image

Posted Image

Posted Image

I then welded in a cross beam between the front legs.
Posted Image

Posted Image

Once the front was finished and I was happy with it I then went to the rear. I decided to use the end brackets from the racking beams but first I had to cut the mounting tabs from the brackets.
Posted Image

Posted Image

Posted Image

When the tabs were removed it was easy to hold them up on the rear rails as they would now sit flat.
Posted Image

I then drilled holes in the brackets and then screwed them to the rear rails.
Posted Image

Posted Image

Once the brackets were in place I held the rear legs up in place and then marked where they had to go.
Posted Image

Posted Image

Now something I forgot to mention when doing the front legs is that I put the legs in place and then lowered the car down so that it was just sitting on the front legs. I then took a spirit level to make sure the legs were straight. i could do it this way as the car was already sitting level on the hoist.
Posted Image

Posted Image

Once the rear legs were welded and were bolted on the rails I then measured the rear legs so that they were the same length FROM THE GROUND as the end of the front legs. This should give us the same length of the 4 legs from the ground.
Posted Image

Posted Image

Posted Image

Once the legs were cut to length I lowered the car down to make sure the legs were straight, again with the spirit level.
Posted Image

Posted Image

I then welded in the rear cross beam between the rear legs.
Posted Image

In this picture you can see the front and rear legs and the cross beams looking form the front towards the back.
Posted Image

To help keep the legs steady while moving around I decided to join the front and rear cross beams with a single beam bolted between the two. I used another pallet beam with some brackets welded to the ends and then drilled bolt holes through the beams which allowed me to bolt the beam to the cross beams. As the length of the beam needed to be extra long I had to join a long and short beam together.
Posted Image

Posted Image

Posted Image

Posted Image

I then welded some brackets on the end of the beams.
Posted Image

Posted Image

Posted Image

Posted Image

Before I welded the brackets to the long beam I marked and drilled the cross beams where the brackets need to go.
Posted Image

Posted Image

Posted Image

Posted Image

I then bolted the long beam to the front and rear cross beams.
Front
Posted Image

Rear
Posted Image

Posted Image

Posted Image

#4 Ruts

Ruts

    How Fast!?

  • Moderators
  • PipPipPipPipPip
  • 1,118 posts
  • Location:Bargo, NSW
  • Car:Blown A9X replica, Black SS hatchback, LH SLR5000
  • Joined: 23-December 06

Posted 05 February 2013 - 11:51 PM

I then had to weld the wheels to the frame. With the front wheels I felt that I had to widen the front so that the car would be more sturdy on the ground. I decided to weld some blocks to the side of the front legs. What this did was not only widen the front but it lined the front and rear wheels up with each other. Follow the pictures front first.
Posted Image

Posted Image

Posted Image

Posted Image

Posted Image

Posted Image

Posted Image

Edited by Ruts, 05 February 2013 - 11:52 PM.


#5 Ruts

Ruts

    How Fast!?

  • Moderators
  • PipPipPipPipPip
  • 1,118 posts
  • Location:Bargo, NSW
  • Car:Blown A9X replica, Black SS hatchback, LH SLR5000
  • Joined: 23-December 06

Posted 06 February 2013 - 12:02 AM

Rears
Posted Image

Posted Image

Posted Image

Both front and rears all done ready to sit on the ground.
Posted Image

Once lowered on the ground all looked good.
Posted Image

Posted Image

Posted Image

Not only did it look level.
Posted Image

It was
Posted Image

There you have it, a quick throw together dolly fabricated over two days. I am more than happy with the way it turned out and it only owes me about $150 in materials. I have 4 torana's to build over the next few years so it will be used a fair bit.

Ruts.

#6 _Quagmire_

_Quagmire_
  • Guests

Posted 06 February 2013 - 02:31 AM

should have gone to coles/wollies and "acquired" a shopping trolley for your wheels :)

#7 Struggler

Struggler

    Forum Fixture

  • Members
  • PipPipPipPipPip
  • 2,426 posts
  • Name:Andrew or AJ
  • Location:Canberra A.C.T.
  • Car:UC Sedan
  • Joined: 08-November 05

Posted 06 February 2013 - 07:25 AM

Nice work Ruts, it feels good to recycle :D

Those wheels are a great find, I'm off to get some now !

I like your welder too, same as mine.

#8 racean69

racean69

    Forum Fixture

  • Members
  • PipPipPipPipPip
  • 781 posts
  • Name:Rod
  • Location:Central QLD
  • Car:LH sedan
  • Joined: 07-November 05

Posted 06 February 2013 - 07:50 AM

top stuff ruts.

#9 _434LX_

_434LX_
  • Guests

Posted 06 February 2013 - 09:34 AM

Nice idea, thanks for taking the time to post :spoton:

#10 Tyre biter

Tyre biter

    Forum Fixture

  • Members
  • PipPipPipPipPip
  • 982 posts
  • Name:Craig
  • Location:Canberra
  • Car:Should have gone with Palais...
  • Joined: 08-December 10

Posted 06 February 2013 - 04:57 PM

Fantastic Ruts.
I borrowed a trolley at the later stages of and following during the body work on my hatch and it was fantastic because there is so much you just cannot do on when it is on a rotisserie.
Wish I still had it because nowadays the car is on four axle stands and the wobbling about is very disconcerting at times, especially when underneath the car and levering a spanner!
Wish I had the wherewithal and raw materials lying about (unlike you) to knock something like this up.
Maybe next time (if there ever is a next time)... but regardless I very much recommend anyone else considering doing what you are - Jeepers you how to' threads are useful - don't have one for how to build a car down to ever nut and bolt going where following paint by any chance...
Cheers, TB

#11 _Yella Fella_

_Yella Fella_
  • Guests

Posted 06 February 2013 - 07:03 PM

Better change your sig - Cops do chops!!!!

Nice job.

#12 _cruiza_

_cruiza_
  • Guests

Posted 07 February 2013 - 05:08 PM

Nice work Dennis, a good mate of mine made up something very similar for working on his mini which I then used on my mini, one difference was our wheels had locking tabs so once car was where you wanted it you could lock the wheels so it would not move, hope you do not mind the suggestion

#13 _Yella Fella_

_Yella Fella_
  • Guests

Posted 07 February 2013 - 09:23 PM

Cruiza in a mini? Get out of here.

#14 _cruiza_

_cruiza_
  • Guests

Posted 07 February 2013 - 09:32 PM

Cruiza in a mini? Get out of here.

:driving:

#15 Ruts

Ruts

    How Fast!?

  • Moderators
  • PipPipPipPipPip
  • 1,118 posts
  • Location:Bargo, NSW
  • Car:Blown A9X replica, Black SS hatchback, LH SLR5000
  • Joined: 23-December 06

Posted 08 February 2013 - 02:33 AM

Nice work Dennis, a good mate of mine made up something very similar for working on his mini which I then used on my mini, one difference was our wheels had locking tabs so once car was where you wanted it you could lock the wheels so it would not move, hope you do not mind the suggestion

Not at all mate that's a good idea thanks. What I did find with this dolly is that it takes a fair bit to move it.

Edited by Ruts, 08 February 2013 - 02:38 AM.


#16 StephenSLR

StephenSLR

    Oh My, Don't you post alot

  • Members
  • PipPipPipPipPipPipPip
  • 6,707 posts
  • Name:Stephen
  • Location:Sydney
  • Car:1976 LX SL/R
  • Joined: 12-November 05

Posted 08 February 2013 - 02:19 PM

Not at all mate that's a good idea thanks. What I did find with this dolly is that it takes a fair bit to move it.


They showed how to build one on Dream Car Garage and their advice was to get large wheels, the larger they are the easier it is to move around. Pneumatic ones would be better too.

s

Edited by StephenSLR, 08 February 2013 - 02:19 PM.


#17 _Yella Fella_

_Yella Fella_
  • Guests

Posted 09 February 2013 - 08:42 AM

Pneumatic wheels suck, always need to pump them up.

#18 StephenSLR

StephenSLR

    Oh My, Don't you post alot

  • Members
  • PipPipPipPipPipPipPip
  • 6,707 posts
  • Name:Stephen
  • Location:Sydney
  • Car:1976 LX SL/R
  • Joined: 12-November 05

Posted 09 February 2013 - 09:22 AM

Pneumatic wheels suck, always need to pump them up.


Yeah, the ones on my trolley don't last too long inflated but they are very smooth over bumps

s

Edited by StephenSLR, 09 February 2013 - 09:22 AM.


#19 roxiedog

roxiedog

    Forum Participant

  • Members
  • PipPip
  • 20 posts
  • Name:terry
  • Location:melbourne
  • Car:LX
  • Joined: 22-May 14

Posted 05 August 2014 - 11:46 PM

awesome job mate, im gonna copy your design if you dont mind thanks 


#20 N/A-PWR

N/A-PWR

    CABIN ENGINE CONTROLS GALORE

  • Members
  • PipPipPipPipPipPipPip
  • 9,595 posts
  • Name:Dave I
  • Location:Wooroloo, 65km's East of Perth
  • Car:'1969' LC RAT TORANA
  • Joined: 08-December 12

Posted 05 August 2014 - 11:54 PM

Must say Ruts did a very informative Build


0 user(s) are reading this topic

0 members, 0 guests, 0 anonymous users