
Anyone able to photograph and measure the positions of the clips that hold the stainless top of door trim. The exterior ones. Stud to stud would be great.
Cheers
Marty

GTR door trim clip positions
Started by
sibhs
, Jan 03 2014 11:34 PM
34 replies to this topic
#1

sibhs
-
- Members
-

- 2,703 posts
Lotsa Posts!
- Name:Martin
- Location:Perth
- Car:LJ Coupe S
- Joined: 27-July 12
Posted 03 January 2014 - 11:34 PM
#2
sibhs
-
- Members
-
- 2,703 posts
Lotsa Posts!
- Name:Martin
- Location:Perth
- Car:LJ Coupe S
- Joined: 27-July 12
Posted 04 January 2014 - 07:38 PM
Look..... I realise it's a hassle, but you'd be doing me a great favour. You're holding up the colour going on my car.
So if you have a GTR in bits, instead of being on the computer/phone, just walk out to the garage, take your camera, ruler, pen and paper and make me happy.
Thanks Champ...
Marty
#3
RallyRed
-
- Members
-
- 7,843 posts
Oh My, Don't you post alot
- Name:Col
- Location:NSW
- Car:LC GTR etc
- Joined: 02-October 11
Posted 04 January 2014 - 07:41 PM
Hi Marty...I'd be happy to help mate...but I'm assuming that the measurements would involve stripping the door trim etc?
#4
sibhs
-
- Members
-
- 2,703 posts
Lotsa Posts!
- Name:Martin
- Location:Perth
- Car:LJ Coupe S
- Joined: 27-July 12
Posted 04 January 2014 - 07:44 PM
Hi Col, yeah that's right. I don't want anyone going to those lengths. I know there are a few cars without trims on, hopefully they can help.
Cheers
Marty
#5
RallyRed
-
- Members
-
- 7,843 posts
Oh My, Don't you post alot
- Name:Col
- Location:NSW
- Car:LC GTR etc
- Joined: 02-October 11
Posted 04 January 2014 - 07:50 PM
...if you get stuck......
#6
Ice
-

- Members
-
- 15,126 posts
Cool
- Name:Gene
- Location:Galaxy's away from Ipswich
- Car:77 HZ Sandman Van
- Joined: 03-January 07
Posted 04 January 2014 - 08:25 PM
Ive got those red doors here do you want me to measure them for you and take some pics
#7
sibhs
-
- Members
-
- 2,703 posts
Lotsa Posts!
- Name:Martin
- Location:Perth
- Car:LJ Coupe S
- Joined: 27-July 12
Posted 04 January 2014 - 09:02 PM
Hi Gene, I'd still need the positions of the ones under rear side window so I'll hope someone else comes good.
Thanks mate.
Thanks mate.
#8
sibhs
-
- Members
-
- 2,703 posts
Lotsa Posts!
- Name:Martin
- Location:Perth
- Car:LJ Coupe S
- Joined: 27-July 12
Posted 04 January 2014 - 10:26 PM
Hi Matt, that is perfect, now all i need is the ones under back window...hint hint.
Thanks
Marty
I can measure my battery tray but not to the cylinder head - no engine.
Mine is a 72 LJ and the tray has been removed before so not 100% sure it's correct.
#9
looznugtr
-

- Members
-
- 528 posts
Forum Fixture
- Name:Matthew
- Location:Vic / Werribee
- Car:2/70 LC gtr 2600s
- Joined: 26-November 12
Posted 04 January 2014 - 10:36 PM
head to rail will do fine but you have no engine.
#10
sibhs
-
- Members
-
- 2,703 posts
Lotsa Posts!
- Name:Martin
- Location:Perth
- Car:LJ Coupe S
- Joined: 27-July 12
Posted 07 January 2014 - 06:55 PM
Ok, I have half the information, can anyone photo and measure the studs under the rear side windows. Also pic of screw hole hidden in door jamb.
Total thanks in advance.
Marty
#11
_Agent 34_
_Agent 34_
-

- Guests
Posted 07 January 2014 - 08:26 PM
Marty,
this is what you do;
1) get the stainless mould
2) put it in position on the car
3) get a pencil and scribe a line top and bottom
4) from memory they are about 7mm down from the top or 7mm up from the bottom - eg center
5) the spacings of the clip points are about 150mm apart
6) it's all pretty easy APART from the last one which curls up the or near the rear quarter window , this one NEEDS careful consideration in it's position as it will effect the mould moving back and forward based on the clip position
i did mine after the car was painted, but if I did it again i would do it first.
to get the best outcome on the rear mould, you really need to put the gutter moulds on.
give me a call but the above is as close as i can explain on how to do it, if you F@#%kup a straight one , don't worry just drill another one and don't put a clip on the out of line one. I would also if your a fussy bastard, screw the quarter windows in place to ensure that the gap is parallel,
Keep Calm and Carry on !!!
G
give me a call if you need a pre drill support partner LOL 0401816661
#12
Potta
-

- Members
-
- 6,026 posts
Oh My, Don't you post alot
- Name:Craig
- Location:Gozzy, WA
- Car:LC GTR, LC 4 door
- Joined: 01-May 09
Posted 08 January 2014 - 01:04 AM
Do these help mate?
Just realised I forgot to get a pick of the screw hole inside the door.
I will get it tomorrow for you.
 IMG_1175 (Medium).JPG 113.57K
11 downloads
IMG_1175 (Medium).JPG 113.57K
11 downloads
IMG_1176 (Medium).JPG 159.32K
10 downloads
IMG_1177 (Medium).JPG 185.01K
5 downloads
IMG_1178 (Medium).JPG 174.35K
4 downloads
Remember mine is an LC too though, I assume they are the same but you never know.
If you can't tell from those pics I will get some with my camera after the batteries are charged, the phone isn't great in low light/flash conditions but I'm hoping this will at least get you started.
#13
_Agent 34_
_Agent 34_
-
- Guests
Posted 08 January 2014 - 05:29 PM
Craig,
Nice pic's for marty, Can you take a close up and measurement of the last one near the dog leg. A bit down from the dog ear and in from the end.
Marty, i replaced my rear bits, dog ear ( behind the windows) and it sat a bit different to the bottom, if you want the best fit then put the SS molds on and then position the lower ones..
ALL torana's i have seen since have some difference in the meeting of these two SS molds ( top vs bottom ) , some are good and some are not so good , If you need to bash the dog ear mold forward or back better to do it prior to painting, this will ensure a perfect meeting point.
you can only adjust the dog ear and not the bottom one, the bottom one can only go up and down parallel to the window hing side , based on the front screw being home and not fowling the door close and looking like it needs to sit back.
but No one will really be FULLY looking at the mold when the car is finished.
go bro Go !!!
#14
sibhs
-
- Members
-
- 2,703 posts
Lotsa Posts!
- Name:Martin
- Location:Perth
- Car:LJ Coupe S
- Joined: 27-July 12
Posted 08 January 2014 - 07:29 PM
Hi Guys, thanks for that, I'll chat with you Grant when my head is on the trims. I'm still rubbing.
Yeah Craig if I could read the measurement or type them in. Best if you measure from the door opening. Thanks to the lady holding the tape. Unless they're your fingernails Craig:-)
Marty
Yeah Craig if I could read the measurement or type them in. Best if you measure from the door opening. Thanks to the lady holding the tape. Unless they're your fingernails Craig:-)
Marty
#15
_Agent 34_
_Agent 34_
-
- Guests
Posted 08 January 2014 - 07:43 PM
correction on my advice.
they don't really match up , Repeat , THEY DONT REALLY MATCH UP - roger that !!!
when you are trying to fit the molds on , Don't bash the dog ear one as the SS mold will have a kink in it that is extremely hard to bend and if you bash the dog ear around the SS mold will not match up.
just have 8 scooners at the local pub on friday afternoon, come home and have a go to do it. It will still work out fine. Most Holden workers were having 10 scooners at lunch and this is why the TORANA is so unique , no two are the same for this very reason !!!
#16
sibhs
-
- Members
-
- 2,703 posts
Lotsa Posts!
- Name:Martin
- Location:Perth
- Car:LJ Coupe S
- Joined: 27-July 12
Posted 08 January 2014 - 07:52 PM
Copy that Grant. DON'T bash dog ear.
You're a funny Cunning Stunt Grant.
Marty
You're a funny Cunning Stunt Grant.
Marty
#17
_Agent 34_
_Agent 34_
-
- Guests
Posted 08 January 2014 - 08:00 PM
last bit of advice, use old original stock where possible. The steel in the repo ones is rubbish and just dosen't cut it
#18
Potta
-
- Members
-
- 6,026 posts
Oh My, Don't you post alot
- Name:Craig
- Location:Gozzy, WA
- Car:LC GTR, LC 4 door
- Joined: 01-May 09
Posted 09 January 2014 - 01:37 AM
Hi Marty,
I've taken some more pics, camera batteries are stuffed so only took two with that but got some better ones with my phone.
Also measured from the other end.
Having some problems with my computer and fully knackered but I will get them up asap.
Sorry for the delay mate, had an exhausting couple of days.
#19
sibhs
-
- Members
-
- 2,703 posts
Lotsa Posts!
- Name:Martin
- Location:Perth
- Car:LJ Coupe S
- Joined: 27-July 12
Posted 09 January 2014 - 07:54 AM
Thanks Craig, no rush, the paint can wait. Plenty of rubbing and more priming to do. Marty
#20
Potta
-
- Members
-
- 6,026 posts
Oh My, Don't you post alot
- Name:Craig
- Location:Gozzy, WA
- Car:LC GTR, LC 4 door
- Joined: 01-May 09
Posted 09 January 2014 - 09:48 AM
Thanks Craig, no rush, the paint can wait. Plenty of rubbing and more priming to do. Marty
To be totally honest with you mate, I'm not sure the pics will help that much.
The clips aren't in a straight line, you can't really tell until you put something straight across them, but it is a curved line.
I'll still put the pics up but if I get a chance I'll have a go at doing a template for you.
Still going to be a bit tricky though.
#21
jd lj
-

- Members
-
- 2,100 posts
Forum Fixture
- Name:James D
- Location:in the shed
- Car:LJ SVO
- Joined: 03-December 10
Posted 09 January 2014 - 06:23 PM
Get some 25mm wide masking tape and apply where you think the moulds sit best, hold the rear one in position and check how the rear end matches up with the bottom of the gutter mould and adjust up or down to get the best match.
Using a sharp pencil mark the top and bottom of the mould, this should give you 2 lines about 12mm apart, mark the centre line where you're going to put the clips which should be spaced out evenly with about 5 clips per mould. Try not to put one on the tightest part of the bend or you may have trouble clipping the S/S mould on.
Do the same with the front one, but I'd fit the mirror first so you don't put it to low as it has to go just above the mirror. Check that it matches the rear one you've already marked out (does the door sit at the correct height, because this will affect whether they line up when finished or not).
Mark out the front clips the same as the rear.
Lightly centre punch each hole, be gentle as you don't want to ding the panel, just enough to stop the drill bit from wandering.
Using about a 2mm drill bit to get started hold the drill steady and go for it.
Increase the holes to suit the rivets etc that your going to use
James
#22
sibhs
-
- Members
-
- 2,703 posts
Lotsa Posts!
- Name:Martin
- Location:Perth
- Car:LJ Coupe S
- Joined: 27-July 12
Posted 09 January 2014 - 06:41 PM
Thanks for that James, good tips there. Didn't think of mirror or using the tape.
Craig, not to worried about the curve, that is determined by the curve on quarter panel. Pic is just for my visual confirmation. You can measure in a straight line as long as I know that is so.
If anyone has a pic of the trims in correct positions that would help too. Especially how it should lineup to rear dog ear.
Cheers
Marty
#23
Potta
-
- Members
-
- 6,026 posts
Oh My, Don't you post alot
- Name:Craig
- Location:Gozzy, WA
- Car:LC GTR, LC 4 door
- Joined: 01-May 09
Posted 10 January 2014 - 01:22 AM
Overall shot of how it looks
photo 1.JPG 112.4K
7 downloads
photo 2.JPG 119.67K
4 downloads
photo 3.JPG 123.78K
6 downloads
photo 4.JPG 117.25K
3 downloads
photo 5.JPG 117.43K
7 downloads
#24
Potta
-
- Members
-
- 6,026 posts
Oh My, Don't you post alot
- Name:Craig
- Location:Gozzy, WA
- Car:LC GTR, LC 4 door
- Joined: 01-May 09
Posted 10 January 2014 - 01:25 AM
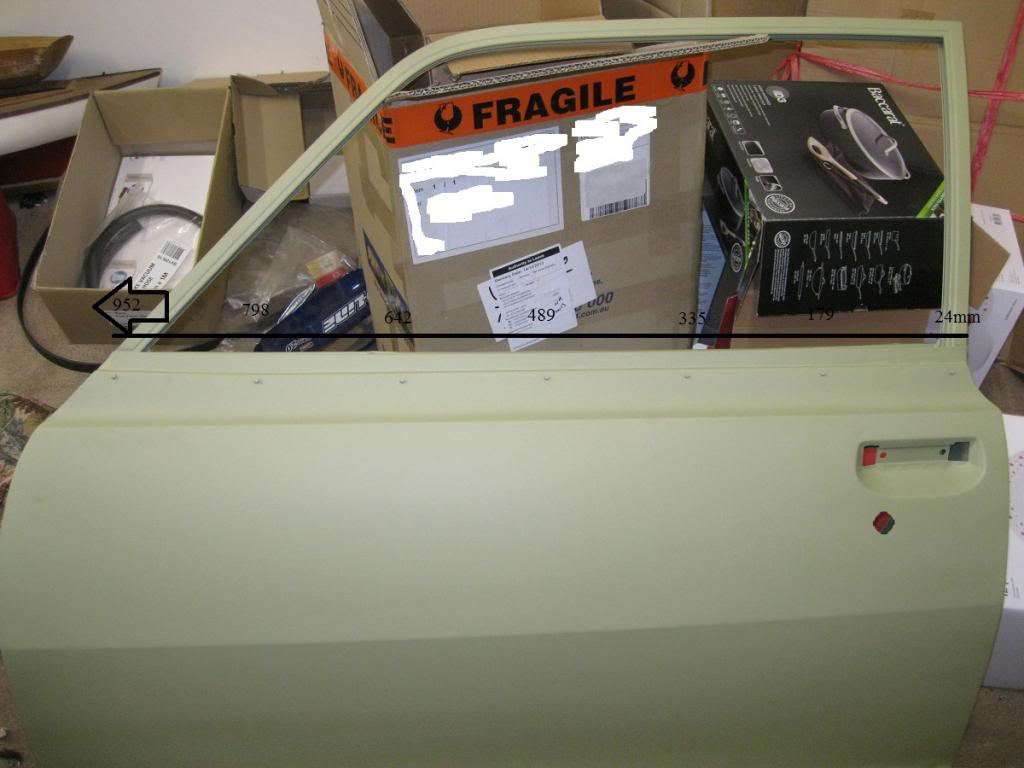
Rear half with measurements
End of tape is on the hole (pics to follow), and sitting on knob 1 and 3 (counting from the right) and was not moved between shots.
Hope these help mate.
photo 6.JPG 99.08K
4 downloads
photo 7.JPG 124.04K
2 downloads
photo 8.JPG 140.79K
3 downloads
photo 9.JPG 133.68K
3 downloads
photo 10.JPG 121.11K
4 downloads


0 user(s) are reading this topic
0 members, 0 guests, 0 anonymous users

