
im considering making completely new door trims. the ones in the car is wrecked. im thinking of making new ones from wood then trim them in material. has anybody done this before? if so anybody had any major dramas? is it too much trouble? Ideas?
door trims
Started by
_dickiep_
, Jul 13 2006 08:33 PM
46 replies to this topic
#2

torry nut
-
- Members
-

- 1,468 posts
Forum Fixture
- Location:Brisbane
- Joined: 14-November 05
Posted 13 July 2006 - 09:15 PM
Hey Dickiep!
I have made numberous trims for my cars over the years! being a cabinetmaker it is a relatively easy task but not that hard for someone handy. All you need to do is trace the outline of the trims you have and drill holes where you need to for both handles, winders and also the fixing clips.
I always have used MDF to make my trims out of rather than the masonite which was commonly used back then. The mdf is far stronger.
If you need anymore help send me a PM
cheers
L
#4
_stinky_
_stinky_
-

- Guests
Posted 14 July 2006 - 11:23 PM
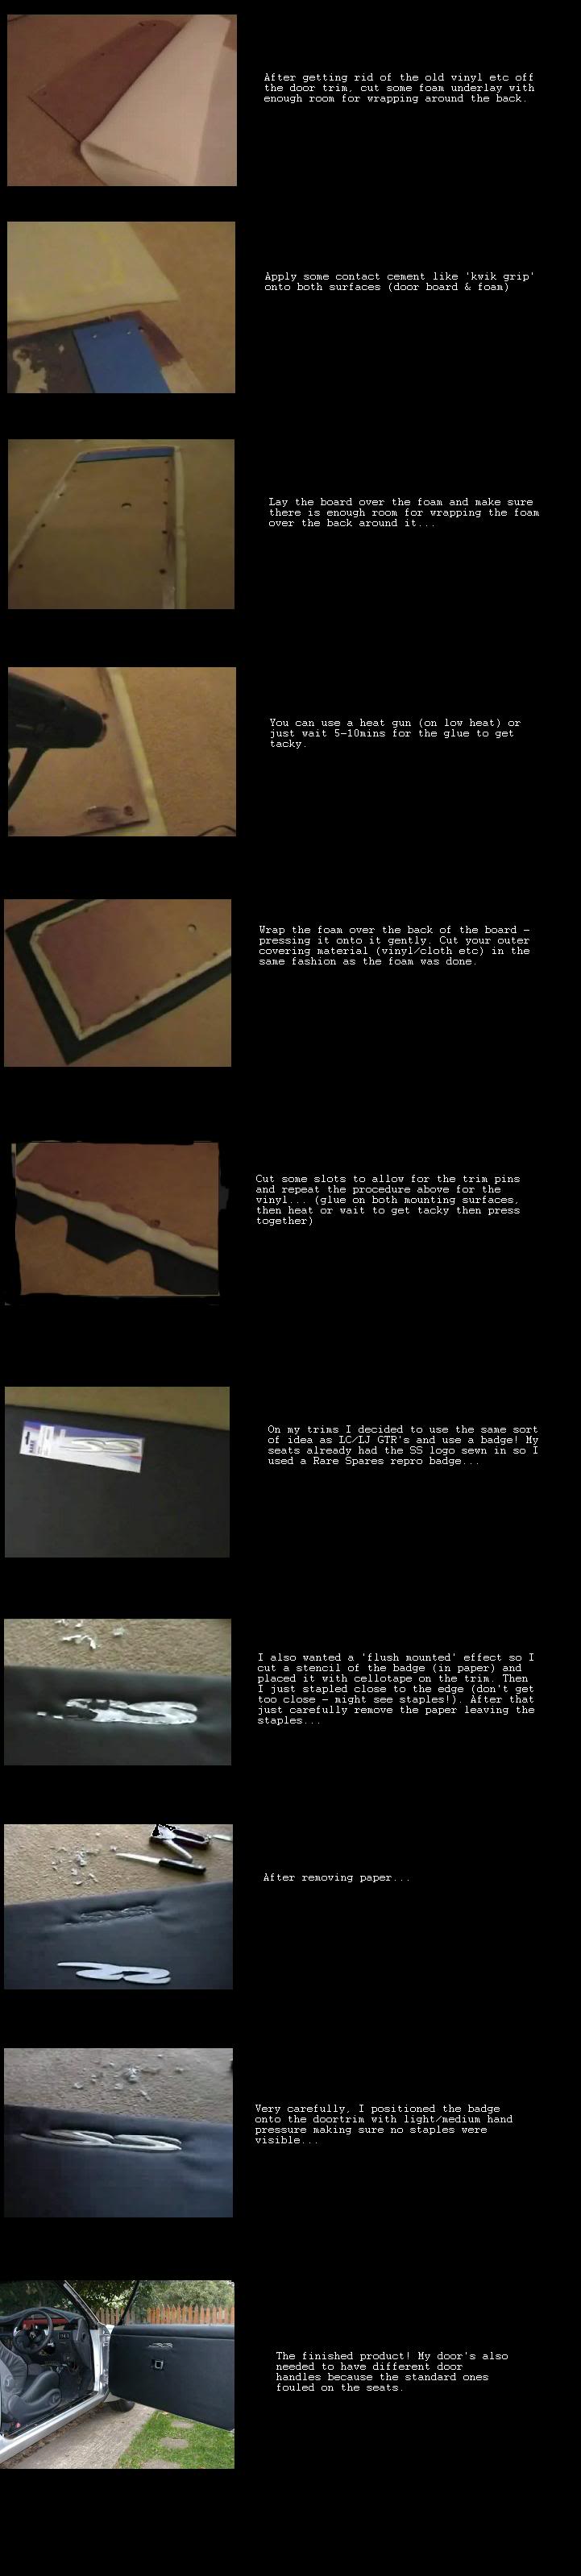
Great tutorial, but ......
Speaking from experience (and a Motor Trimming course) I wouldn't wrap the foam over the board, but cut it flush, it gives a neater appearence and less lumps.
It pays to spend the extra time to get the board right too, good foundations and all that. When cutting the boards use the "factory" edge as your top edge, especially if you are using a jigsaw to cut, this will give a nice straight edge in the place that is going to be seen the most.
The corners of the vinyl will need some "V"s cut into them to stick them down properly without ovelapping the vinyl.
The trade uses contact cement, brush it on both sides, let it tack, then stick together.
HTH
#5
_Flamenco_
_Flamenco_
-
- Guests
Posted 15 July 2006 - 02:09 AM
I forgot to mention cutting the V's in the corners! 
Good points though...
Good points though...
#6
_moot_
_moot_
-
- Guests
Posted 15 July 2006 - 08:41 AM
use 3 mm mdf. buy yourself a 1200x2400 sheet of it for about $15.if you cut it across the centre (so you get 2 bits of 1200x1200mm) then stapple/clamp/screw it together.trace around your original door patterns. you only need to do it once as the front doors are a pair and the rear doors are a pair. you can then cut the panels out and it takes half the time and there both the same  also drill all the holes in your new trims whilst ya pairs are together.alot less work.remember to sand the edges to take the shap edges off.
another tip:trail fit the doors with the clips onto the car BEFORE you cover them.that way you know that they will fit properly.and wont waste time/materials if somethings wrong.
if you want to use foam,use 1/4" (6mm) and wrap it over the edge.
dont use quick grip.its not temp sensative and it always stays a bit tacky.use a contact cement in a SPRAY can.this will be more economical neater,with less chance of 'bleeding'.the glue will also be more consistant.(even)
if ya need any help.just post up here or you can pm me.and just so ya know i am a motor trimmer
also drill all the holes in your new trims whilst ya pairs are together.alot less work.remember to sand the edges to take the shap edges off.another tip:trail fit the doors with the clips onto the car BEFORE you cover them.that way you know that they will fit properly.and wont waste time/materials if somethings wrong.
if you want to use foam,use 1/4" (6mm) and wrap it over the edge.
dont use quick grip.its not temp sensative and it always stays a bit tacky.use a contact cement in a SPRAY can.this will be more economical neater,with less chance of 'bleeding'.the glue will also be more consistant.(even)
if ya need any help.just post up here or you can pm me.and just so ya know i am a motor trimmer
#7
boomfunk
-
- Members
-
- 2,065 posts
Forum Trimmer
- Location:QLD
- Joined: 07-December 05
Posted 15 July 2006 - 10:05 AM
yes as posted above, use the correct glue,
whenever we make trims it is important to use the right glue as is it does tend to bleed thru..and also not go off completly when using quick grip
take your time and plan the job the result will be alot better !!
whenever we make trims it is important to use the right glue as is it does tend to bleed thru..and also not go off completly when using quick grip
take your time and plan the job the result will be alot better !!
#8
_big chris_
_big chris_
-
- Guests
Posted 15 July 2006 - 02:25 PM
Hi all,
The above is great info,
just want to add another idea,
Where I am working (car restoring company) they use a product called foamex,
for interior trim backing, the hard backing not foam padding.
Is produced by LG Chemicals, yes LG.
It is used by the trimmer to replace the carboard or mdf based door cards,
ie the backing for the door trims.
I can't seem to find the off cut that I had, but I will post a picture when I find it.
The advantages are,
Easy to cut and drill,
and can mould it to shape with a heat gun, for curved or odd shaped parts.
is water proof, will not split or break when cut with a jig saw,
is very tough,
the off cut I had, you can twist it and it does not break,
and if you pour hot water over it, returns to original shape.
I will ask the trimmer where it can be purchased.
Just another idea.
Cheers
Chris.
#9
_big chris_
_big chris_
-
- Guests
Posted 15 July 2006 - 02:56 PM
Hey all,
Found the off cut,
pics below,


The Lg phone is just there to hold up the piece of foamex, lol.
That is just a small off cut,
it does not show well in the picture, but is has a textured surface so that the trim glue will stick to it.
Cheers
Chris.
edit, it is 3mm thick.
Found the off cut,
pics below,
The Lg phone is just there to hold up the piece of foamex, lol.
That is just a small off cut,
it does not show well in the picture, but is has a textured surface so that the trim glue will stick to it.
Cheers
Chris.
edit, it is 3mm thick.
Edited by big chris, 15 July 2006 - 02:57 PM.
#10
_Leakey_
_Leakey_
-
- Guests
Posted 16 July 2006 - 10:51 AM
Another 2c worth!!
FOAMEX is the trade name for foamed PVC.
Great material, available in many stock colours.
You can get it in 2, 3, 4, 6 + 10mm.
Easy to cut, machine, with a hard surface and foamed interior,
much like an 'aerobar' (chocolate). Can use a knife to cut it!
Not the best when heated, so careful with a heat gun, but fine
for interior of car. Wont ever absorb water (as is closed cell)
and usually wont ever mould.
I will be using black 4mm when I do my interior.
You can get it from most plastic suppliers, sign makers etc.
The surface has a really nice 'stipple' to it (edm finish) but it
is not durable/scratch/mar resistant when used un covered.
- Spray glue is the go ^^^ I believe you gets what you pays for.
So I use a 3M product. Never had an issue with it letting go.
I think I'll do a pictorial too, as per above examples. This type of thing
will be really handy if we all take the time to do so. (like Herne's electric
window pictorial.)
Good luck with the trimming!
- Leakey
#11
_dickiep_
_dickiep_
-
- Guests
Posted 02 August 2006 - 09:04 PM
thanks for all the replies. i have a greater understanding of what needs to be done. i need to come up with a design for a ek holden. ive been watching this thread and also there has been articles in Street Machine magazine aswell with the comfort cruiser. i should be able to a good job with all the helpful tips, just need to see if my aloud to try it. wish me luck
#12
laspy
-

- Members
-
- 349 posts
Forum Fan
- Location:Melbourne, Victoria
- Joined: 07-November 05
Posted 06 August 2006 - 02:36 AM
hey guys
will contact adhesive in a can be enough? i was thinking to also staple the vynil all the way around,(back of board of coarse). Is there any problem with doing this? i just dont trust the adhesive in the can 100% to hold it nice and tight.
cheers
will contact adhesive in a can be enough? i was thinking to also staple the vynil all the way around,(back of board of coarse). Is there any problem with doing this? i just dont trust the adhesive in the can 100% to hold it nice and tight.
cheers
#13
_stinky_
_stinky_
-
- Guests
Posted 06 August 2006 - 08:44 AM
The stuff in the spray can is expensive for this sort of work, get a normal can (with lid) of the gear from a hardware store and brush it on, this will definately hold. Make sure it tacks before you stick the two pieces together, otherwise you'll have a big mess that looks like shtit.
You can also staple if you like, but you will need to get hold of 3mm staples. Paslode make them for air staplers, not sure if you can get them for normal staplers though.
You can also staple if you like, but you will need to get hold of 3mm staples. Paslode make them for air staplers, not sure if you can get them for normal staplers though.
#14
_KRB88_
_KRB88_
-
- Guests
Posted 21 August 2007 - 02:08 PM
I'm thinking about ripping my grey door trims out with the jelly beans on and going with black... as its abit out dated now.. This was a great help  Just wondering does anyone know how to do the whole raised effect? Like Flamenco has done but its raised from underneath or something... seen it b4, will have a look for a pic to show you..
Just wondering does anyone know how to do the whole raised effect? Like Flamenco has done but its raised from underneath or something... seen it b4, will have a look for a pic to show you..
#15
_stinky_
_stinky_
-
- Guests
Posted 21 August 2007 - 02:23 PM
Embossing? like this?

My favourite subject.
Same as a normal door trim build but you need to make a pattern of what you want under the vinyl. I usually print the design on an A4 sticker and stick that on some lino flooring. I use the lino because it is easy to cut and gives good definition, cardboard works aswell.
The trick (skill) comes into when laying the vinyl down and working it into the shapes. The glue needs to be tacky enough to stick and the vinyl is best worked when it is warm and has more give in it.
#16
_KRB88_
_KRB88_
-
- Guests
Posted 21 August 2007 - 02:26 PM
Thats exactly what I mean... Looks to hard though lol...
#17
RIM-010
 View Garage
-
- Members
-
- 8,075 posts
DON'T PANIC
- Name:Tim
- Location:Cowell, SA
- Car:LJ 2 Door - HQ Premier
- Joined: 01-March 06
View Garage
Posted 21 August 2007 - 02:38 PM
Stinky, that looks awesome.
Tim
Tim
#18
orangeLJ
-

- Members
-
- 10,259 posts
Yes, yes I do post alot!
- Joined: 02-May 06
Posted 21 August 2007 - 02:59 PM
the way ive seen it done was with the pattern cut out into another peice of MDF then stuck ontop and the vinyl glued to it.
I may be wrong. but that seemed to ring a bell.
EDIT: shit, you take the time inbetween people comming into your office to read a thread, and by the time you answer its been answred already!!
I may be wrong. but that seemed to ring a bell.
EDIT: shit, you take the time inbetween people comming into your office to read a thread, and by the time you answer its been answred already!!
Edited by orangeLJ, 21 August 2007 - 03:00 PM.
#19
_stinky_
_stinky_
-
- Guests
Posted 21 August 2007 - 03:41 PM
Thanks Tim.
orangeLJ, you can use almost anything underneath for the pattern, I have just found lino to be the best for cutting shapes into.
KRB88, it can be tricky, but if you have a simple design it's not too hard. The flames were fairly easy. I have found the Holden Lion logos to be the hardest to do and this RX-2 design took three goes, probably harder because it is a negative.

(I am showing off now )
)
orangeLJ, you can use almost anything underneath for the pattern, I have just found lino to be the best for cutting shapes into.
KRB88, it can be tricky, but if you have a simple design it's not too hard. The flames were fairly easy. I have found the Holden Lion logos to be the hardest to do and this RX-2 design took three goes, probably harder because it is a negative.
(I am showing off now
)
#20
orangeLJ
-
- Members
-
- 10,259 posts
Yes, yes I do post alot!
- Joined: 02-May 06
Posted 21 August 2007 - 03:46 PM
You would need to make sure the glue you were using was extremely good quality in that situation would you not?? dont want it to come adrift on a 40 degree day would you.
That does look like it would be a prick of a job though. lino sounds like a good idea, i simply had patterns stitched into my trim, wasnt too keen on the embossed look at that stage, might try it in the boot, if i ever get it finished.
That does look like it would be a prick of a job though. lino sounds like a good idea, i simply had patterns stitched into my trim, wasnt too keen on the embossed look at that stage, might try it in the boot, if i ever get it finished.
#21
_KRB88_
_KRB88_
-
- Guests
Posted 21 August 2007 - 04:15 PM
Might just have a go on something else instead of my door pannel first... can I ask what kinda glue is best?
#22
_stinky_
_stinky_
-
- Guests
Posted 21 August 2007 - 04:48 PM
Contact adhesive, you can get larger quantities from Motor Trimmer suppliers or smaller tins at hardware.
It's a smelly yellow looking glue, apply to both parts and let it "tack" usually 10-20 minutes depending on the temperature.
It's a smelly yellow looking glue, apply to both parts and let it "tack" usually 10-20 minutes depending on the temperature.
#23
boomfunk
-
- Members
-
- 2,065 posts
Forum Trimmer
- Location:QLD
- Joined: 07-December 05
Posted 21 August 2007 - 05:19 PM
can i just add DONT use the stuff from the hardware, go a trimmer
#24
_KRB88_
_KRB88_
-
- Guests
Posted 21 August 2007 - 05:38 PM
Is anyone comming to TSV anytime soon to help? haha
haha
#25
boomfunk
-
- Members
-
- 2,065 posts
Forum Trimmer
- Location:QLD
- Joined: 07-December 05
Posted 21 August 2007 - 05:54 PM
just send all your stuff to stinky and he will make it !


0 user(s) are reading this topic
0 members, 0 guests, 0 anonymous users

