Jump to content


Photo

Prepping panels to bare metal for body work

Lc gtr resto panel work

  • Please log in to reply
37 replies to this topic

#26 S pack

S pack

    Scrivet Counter

  • Members
  • PipPipPipPipPipPipPip
  • 15,535 posts
  • Name:Dave
  • Location:Luggage Point
  • Car:73 LJ
  • Joined: 25-January 10

Posted 15 September 2014 - 02:55 PM

Panels pressed in raw sheet steel, greased or oiled and waterproof wrapped and packed in crates for shipping to assembly plants.

Body shells with hanging panels were submerged in a Zinc Phosphate metal prep and passivating process. Lower portion of body shell and doors then dipped in black primer to a depth of 18" so as to penetrate into all box sections and chassis rails etc etc, then Red Oxide Primer Surfacer applied to all body panels, then a coat of white primer then 3 coats of body colour baked at 275 deg F.


#27 madtoranajzedded

madtoranajzedded

    Sir ask alot

  • Members
  • PipPipPipPipPipPip
  • 2,891 posts
  • Name:Maz
  • Location:Southern Tasmania
  • Car:72 LJ SL SEDAN.
  • Joined: 30-September 13

Posted 15 September 2014 - 03:33 PM

Thats great info Dave.that explains to alot . people saying when they chemical dip their cars to bare metal, that panels where you can't get to

chassis, sills, and everywhere else wernt treated or covered is a myth


#28 slar

slar

    Forum Fan

  • Members
  • PipPipPipPip
  • 498 posts
  • Name:AL
  • Location:Newcastle
  • Car:Rusty the Torana......Nearly complete
  • Joined: 14-September 09
Garage View Garage

Posted 15 September 2014 - 08:47 PM

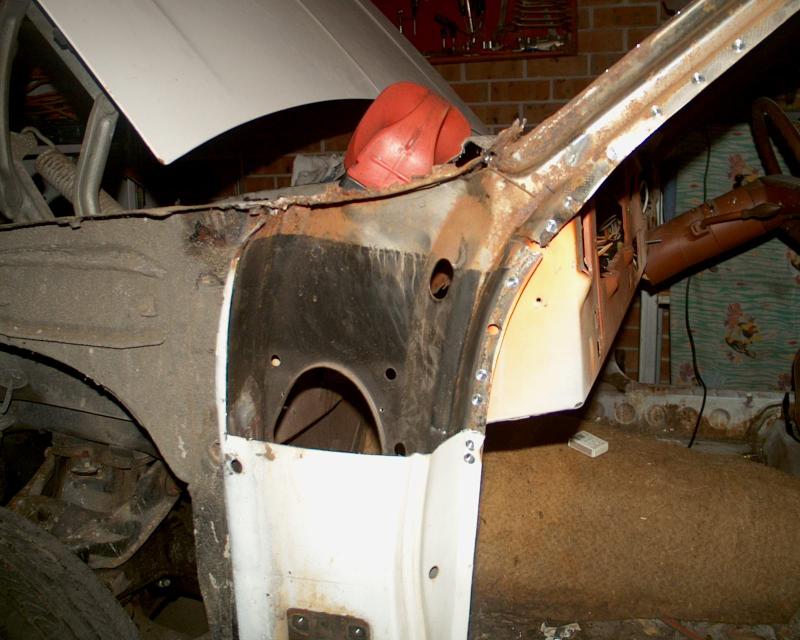
Here just a little proof of the dipping process as explained above.....you can plainly see the hi tide mark left by the black primer  inside the A pillar.....its just a shame they didnt dip the entire shell as it might of helped prevent some of the rust issues around the windscreen and pillars.


CopyofIM000046.jpg


#29 grumpy xu1

grumpy xu1

    Lotsa Posts!

  • Members
  • PipPipPipPipPipPip
  • 2,809 posts
  • Name:Gary
  • Location:Queensland
  • Car:lj xu1
  • Joined: 01-February 10

Posted 15 September 2014 - 10:05 PM

OK guy's let's first of all remember that holden had brand new steel & that these cars are 40 ish in the 70's lead was great & now it kills people ! The water in wet rubbing is like a lubricant & usually there's no need to wet rub until prep time for the top coat. 180 free cut is plenty fine enough. With every stage ie etch, hi fill & colour i was tought (seems like 400 years ago but actually about 20) to put down 3 coats on each just wet enough that it doesn't run. Don't forget that you are going rub a lot of this off & i think he asked what sort of blasting we recommend, personally i like the garnet blasting although it is a absolute bitch to clean up after & epoxy etch it ASAP Gary.

#30 grumpy xu1

grumpy xu1

    Lotsa Posts!

  • Members
  • PipPipPipPipPipPip
  • 2,809 posts
  • Name:Gary
  • Location:Queensland
  • Car:lj xu1
  • Joined: 01-February 10

Posted 15 September 2014 - 10:34 PM

Maz & others, as I'm sure these other guy's would tell you the idea of the sandpaper grade is coarse enough for it to stick but smooth enough for the surface not to show scratch marks, ie 180 dry on the steel then etch primer, then 180 dry before high build then use your wet & dry. If done correctly you will not see any scratch marks & will be good adhesion. & make sure the sandpaper is a quality brand from a paint shop ect. I cannot stress this enough. I would only blast things like window & door jams or the floor pan no flat panels. When using rust converters some have to be applied left for 24 hrs & then completely removed from the surface before etch, read the instructions for your particular rust converter just in case, hope this helps Gary.

#31 tuxedoss

tuxedoss

    Forum Fixture

  • Members
  • PipPipPipPipPip
  • 1,024 posts
  • Name:Brett
  • Location:Sydney
  • Car:ss
  • Joined: 29-July 11

Posted 16 September 2014 - 11:36 AM

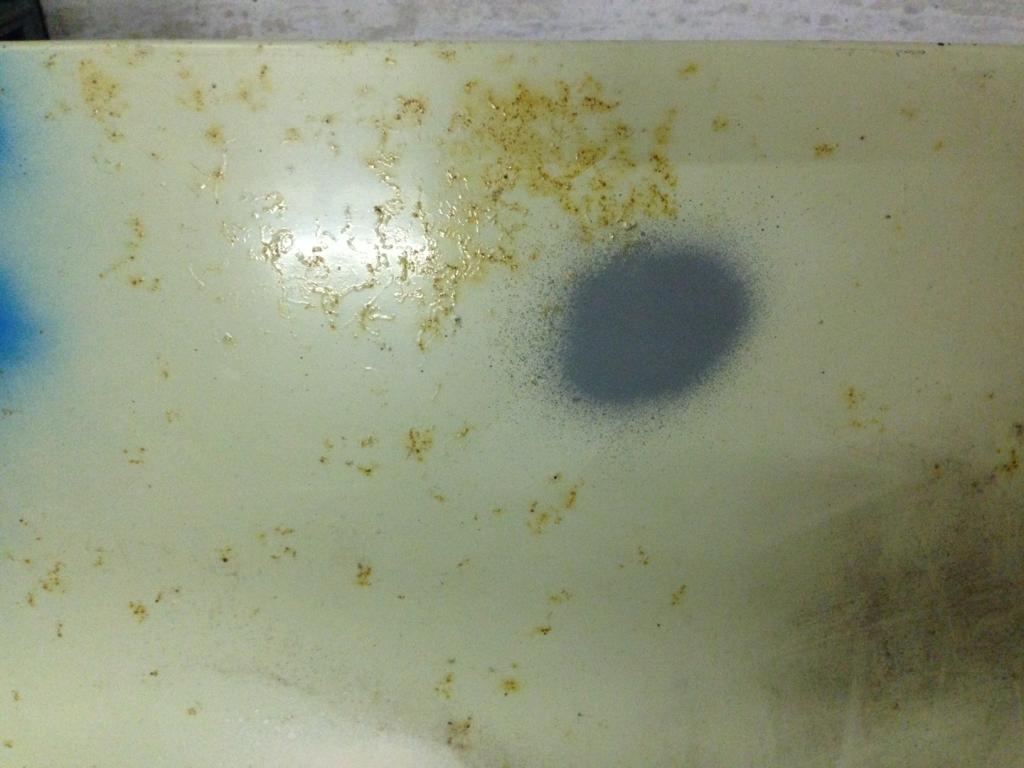
Some good info here so I'll throw another question up, What if the panel has some light surface rust coming through? In my case I have a rear hatch that is in perfect condition apart from bits of surface rust coming through that look like tiny worms under the paint, I've sanded a few spots back and am left with tiny little black marks. I suspect this panel was a spare part as its got that black under the paint that the spare parts panels come in and when it was painted it was not prepped properly. Here's a picture of what im talking about. I hit a bit on the back edge with my small handheld sand blaster and it cleaned it up perfectly but don't want to touch the flat top of the hatch with a sandblaster, far too risky I think.

hatch_zps66b3d8fb.jpg


Edited by tuxedoss, 16 September 2014 - 11:38 AM.


#32 Pop's-SS

Pop's-SS

    Pops

  • Members
  • PipPipPipPipPipPipPip
  • 4,962 posts
  • Name:Barry
  • Location:Riverina South West Slopes
  • Car:1976 Mandarin Red SS Hatchback
  • Joined: 08-November 05

Posted 18 September 2014 - 09:30 PM

This looks OK for small stuff but you would have to have a GIGANTIC  bath to put your panels or a complete car in


http://youtu.be/vq5IUiYMhRM


Barry


#33 evl666

evl666

    Forum Fan

  • Members
  • PipPipPipPip
  • 267 posts
  • Location:Left of centre
  • Car:71 LC 73 LJ
  • Joined: 02-October 13

Posted 19 September 2014 - 07:28 PM

Starting to get some where now fellas, thanks again!

Attached Files


#34 red6

red6

    Forum Fixture

  • Members
  • PipPipPipPipPip
  • 591 posts
  • Location:Melbourne
  • Car:1971 Lc Torana S 2 Door
  • Joined: 11-November 05

Posted 20 September 2014 - 12:28 AM

Looks like a lovely day in Hobart. Is your Gtr originally a Tasmanian Car? Your should start up a build thread on it. I would be interested to follow the build.


#35 evl666

evl666

    Forum Fan

  • Members
  • PipPipPipPip
  • 267 posts
  • Location:Left of centre
  • Car:71 LC 73 LJ
  • Joined: 02-October 13

Posted 20 September 2014 - 08:03 PM

Sold in Adeliade March 71, made it's way here during the late 80's from what I can gather from a few if the previous owners.

#36 grumpy xu1

grumpy xu1

    Lotsa Posts!

  • Members
  • PipPipPipPipPipPip
  • 2,809 posts
  • Name:Gary
  • Location:Queensland
  • Car:lj xu1
  • Joined: 01-February 10

Posted 13 October 2014 - 11:53 PM

Hi Brett, yes mate they are what is called rust worms and need to be fully removed from the surface before etch. If the above mentioned techniques don't work you can just use a fine tipped burr bit for your die grinder go slowly & obviously you will need to fill the hollow where the repair is. Use a 2 pack epoxy etch as stated & your problem should be fixed mate. Hope this helps. Gary.

#37 _sting_

_sting_
  • Guests

Posted 03 November 2014 - 08:00 PM

Hi guys for future paint stripping put your paint stripper on then cover it with plastic over it and leave it for about 1/2 an hour then when you peel the plastic off it comes off with the plastic and if needed do it again , the last thing you do is get a rag with thinners on it and wash all the paint stripper of it then you can sand it with ease


#38 madtoranajzedded

madtoranajzedded

    Sir ask alot

  • Members
  • PipPipPipPipPipPip
  • 2,891 posts
  • Name:Maz
  • Location:Southern Tasmania
  • Car:72 LJ SL SEDAN.
  • Joined: 30-September 13

Posted 03 November 2014 - 11:44 PM

i find using a wet rag is easier as most stripper is water soluble and neuralises the chemicals in it.


makes clean up easy


0 user(s) are reading this topic

0 members, 0 guests, 0 anonymous users