Jump to content


Photo

Torana LX Headlining


  • Please log in to reply
35 replies to this topic

#1 MR77LX

MR77LX

    Forum Fan

  • Members
  • PipPipPipPip
  • 401 posts
  • Name:Rabs
  • Location:Sydney
  • Car:1977 Holden Torana LX
  • Joined: 09-February 09
Garage View Garage

Posted 31 July 2015 - 06:23 PM

Hi Guys, 


Does anyone have any instructions on replacing headlining on a LX torana sedan. 


I have a new headliner ready to go. I have taken out the old rods and put them in the new liner. 


There are 2 holes on each mounting point. Which hole do the rods go into? 


Also in regards to gluing, do you glue all around the liner? 


Thanks 


#2 torana_nick

torana_nick

    Forum Fixture

  • Members
  • PipPipPipPipPip
  • 759 posts
  • Name:Nick
  • Location:victoria
  • Car:LH Torana Project
  • Joined: 11-December 11

Posted 01 August 2015 - 11:53 AM

Hi mate there is a good write up on c&g auto website. I did mine and I had never done one before took some trial and error but got there in the end.

http://cgautoupholst...265531fdf0554c1

#3 Swarbs

Swarbs

    Forum Fixture

  • Members
  • PipPipPipPipPip
  • 1,662 posts
  • Name:Dave
  • Location:North West WA
  • Car:LX 5000
  • Joined: 18-April 07

Posted 01 August 2015 - 03:25 PM

I used old pinchweld to hold things in place as i pulled everything tight


From memory start front and rear then sides


Put the screws for Hand grips, visors, rear vision mirror in first before install  - makes the holes easy to find once it is all tight  and just burn quietly through the lining with a soldering iron on top of the screws and the holes will be in the right place


#4 MR77LX

MR77LX

    Forum Fan

  • Members
  • PipPipPipPip
  • 401 posts
  • Name:Rabs
  • Location:Sydney
  • Car:1977 Holden Torana LX
  • Joined: 09-February 09
Garage View Garage

Posted 01 August 2015 - 08:05 PM

How about the glue bit? Do u put the glue only on the sides and rear? Do u put any glue
On the centre of the roof lining?

#5 Swarbs

Swarbs

    Forum Fixture

  • Members
  • PipPipPipPipPip
  • 1,662 posts
  • Name:Dave
  • Location:North West WA
  • Car:LX 5000
  • Joined: 18-April 07

Posted 02 August 2015 - 01:06 PM

No glue is needed in the middle  - just around the top of both screens and doors

Get it all tiggedy boo before glueing

Top holes BTW from memory


Patience is the key


#6 MR77LX

MR77LX

    Forum Fan

  • Members
  • PipPipPipPip
  • 401 posts
  • Name:Rabs
  • Location:Sydney
  • Car:1977 Holden Torana LX
  • Joined: 09-February 09
Garage View Garage

Posted 02 August 2015 - 03:13 PM

Thanks mate. I will see how i go. 


#7 _uca78t_

_uca78t_
  • Guests

Posted 07 August 2015 - 08:53 AM

Here's a write I did on old holden.

More headlining info
By DR Stitch H.D 16/10/14@11:26 Shed 2176
I must say a headlining is a fairly simple job.
Here's some tips that weren't mention.
1. Make sure the front & rear screens are out & side windows on wagons.
On the H series you don't need to take the screens on sedans BUT IF THEY ARE OUT ALREADY IT WOULD BE EASYER.
2. The holes for the rods you'll notice there's two together WITH A TEXTAR I MARK WHICH THE ROD CAME FROM & NOT ONLY DO I NUMBER THE RODS I ALSO MARK WHICH SIDE OF THE HEADLINING I TAKE THE ROD FROM.
3. With a tape measure I mark the centre on the front & rear screen lips & inside the cabin you can use the interior light as a centre point. I'll would fold the headling in half length ways & with a pair of scissors I cut a small notch at the front & back to mark centre & do the same where the wires each side of the cabin light.
4. Now you can put all the rods & wire back in THERE CORECT POCKETS.
5. Starting with the wire & making sure you central & working from sides of the light & while snapping the wire over the lugs & keeping the headling tort at the same time & once you done both sides. You can work towards the back & then the front always working from the centre out.
6. Once you done all that you pin it in place with your off cut pinch weld & when your happy with the way it looks you can start glueing small sections at again from the centre out.
7 I forgot to mention any screw holes you need put the screws back in before start you it's much easier to find the holes that way.
Ps If forgot anything I'll add to it later.


Cheers Shane

#8 _uca78t_

_uca78t_
  • Guests

Posted 07 August 2015 - 08:56 AM

Here's some I found on it
Hi mate I'm a trimmer in SW SYD & did a wright on oldholden about this here http://oldholden.com/node/127005
Most importantly work from the middle out & then front to back & before you start put all your screws back in & when it's comes to finding them just feel with your finger tips & use a stanly knife to do a tiny criss cross slit.
I hope this helps
Cheers Shane

#9 BENN0

BENN0

    Forum Member

  • Members
  • PipPipPip
  • 80 posts
  • Location:Adelaide
  • Joined: 01-January 10

Posted 27 March 2016 - 07:59 PM

Day two of roof lining shenanigans is not treating me well!


Its an LX 4 door. New black vinyl lining.

Transferred rods/wires from old lining into new lining (Putting them in the same location they came from)

The rods are in a mix of bottom and top holes. Couldnt get the front rods into the top holes. The rod would foul the roof and wouldnt let the liner rotate to where it needed to be. It seems a lot more comfortable in the bottom hole. 

Wires in no problem. 


The issue I have is trying to pull it tight to have the pinch weld hold it in position. I cant seem to get it tight without bunching. The gloss black vinyl is not helping hide anything either. 

Other issue is the sheer amount of extra material on this liner. I dont want to start cutting yet as without having everything in its ideal position, I dont want to risk cutting around curves that are not correct. 


The question: How tight do you pull the liner into position? I started at the front/centre and worked out to the edges. Then did the front doors, rear screen area, then rear doors. Its been in and out a few times and im ready to stick left over carpet to the roof and call it quits!!! :)


Follow up questions relate to the A and B piller. How and where does the liner finish? Again, plenty of excess material making it tricky to work out.


Cheers


#10 BENN0

BENN0

    Forum Member

  • Members
  • PipPipPip
  • 80 posts
  • Location:Adelaide
  • Joined: 01-January 10

Posted 29 March 2016 - 11:51 AM

Another 4 hour attempt yesterday. Ended up in the same position. Rods/wires in place and happy, head liner pulled tight but looking like crap. C piller section is a disaster.....


I think the sheer amount of extra material is hindering the progress. I will take the liner out again, sit the old liner on top of it and cut away the mountains of excess (still leaving enough for plenty of overlap and so it can be pulled tight)

Will take some photos tonight. But when pulled "tight" it looks worse than the "before" pics on the C&G website (before its pulled tight)


#11 Swarbs

Swarbs

    Forum Fixture

  • Members
  • PipPipPipPipPip
  • 1,662 posts
  • Name:Dave
  • Location:North West WA
  • Car:LX 5000
  • Joined: 18-April 07

Posted 30 March 2016 - 01:13 PM

Patience Benno 

Get the main roof section right first  - then worry about the C pillars


Front to rear (or visa vis) and then the sides


Bang some pics up of the prob if need be 


#12 _alkemadea_

_alkemadea_
  • Guests

Posted 30 March 2016 - 04:57 PM

There is another thread for LH Headlining with extracts from manual.  That might help.


#13 BENN0

BENN0

    Forum Member

  • Members
  • PipPipPip
  • 80 posts
  • Location:Adelaide
  • Joined: 01-January 10

Posted 10 April 2016 - 01:43 PM

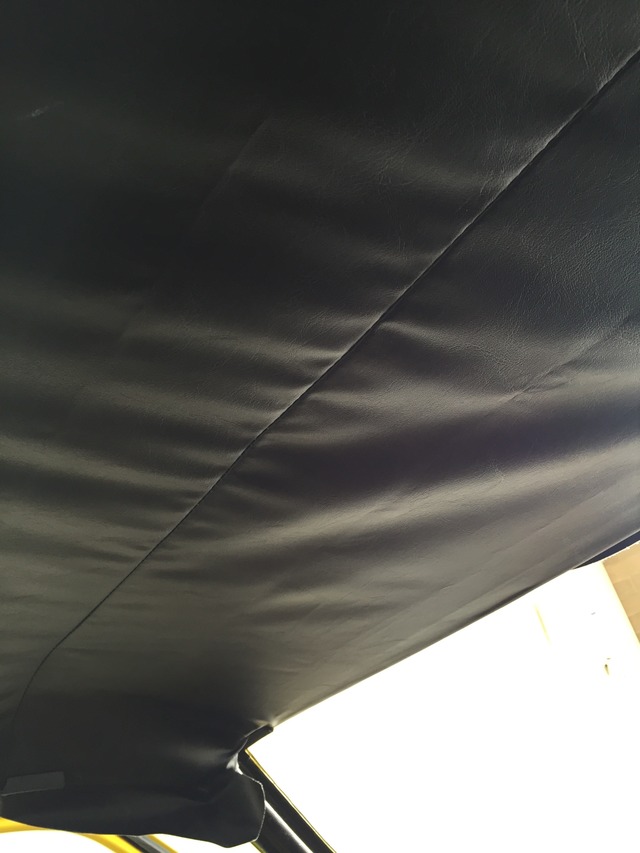
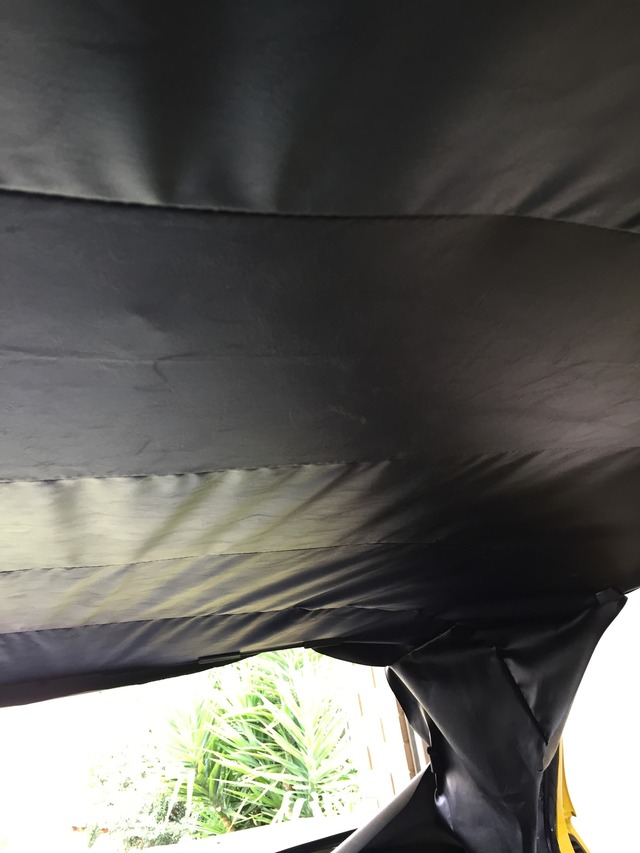
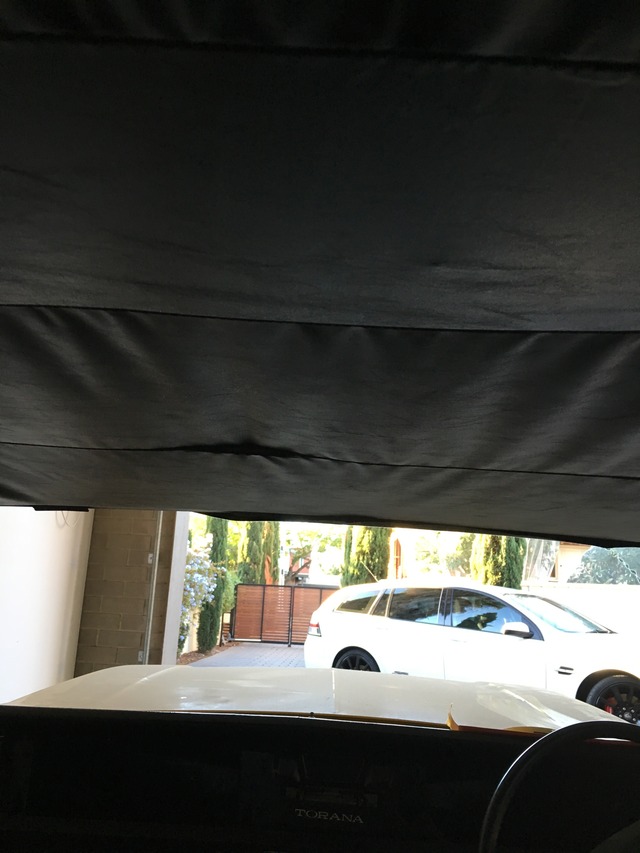
Third weekend of project headliner... Still no luck. Its been in and out a number of times, tried all combinations of top and bottom holes and the best it looks is the photos below. Sub par at best. 


Front  pulled in tight.


8AC38FEA-809A-4E0B-AEDC-446936EA1EDF.jpg


The rear looks like a disaster. Where it wants to run down the C pillar is a nightmare. (Also, that isnt my writing on the centre section of the liner.....)

BA30852E-0889-4BD1-B690-BA631EC78A48.jpg


Im semi convinced this headliner isnt even the right shape. Its nice and tight between the wires (where you can see the written numbers) but it doesnt seem to want to sit right anywhere else.


#14 _LS1 Taxi_

_LS1 Taxi_
  • Guests

Posted 10 April 2016 - 02:19 PM

Wow, that looks like shit.

I've Installed a few over the years but never had the problems you're having.
As above, front to rear then worry about the sides. Use pinch weld to hold it in place after you've pulled it tight.

#15 hanra

hanra

    Oh My, Don't you post alot

  • Members
  • PipPipPipPipPipPipPip
  • 10,832 posts
  • Name:Brad
  • Location:Farrrrrr North Qld
  • Car:1975 LH SL/R 5000, 1967 Morris Cooper S, E36 BMW, Toyota Corolla, Isuzu DMax
  • Joined: 24-March 11

Posted 10 April 2016 - 02:25 PM

Who supplied it?

#16 _Mox_

_Mox_
  • Guests

Posted 10 April 2016 - 02:33 PM

Will be interested to see how to rectify this problem, i will be doing this job soon and it looks like a bloody nightmare, good luck mate


#17 torana_nick

torana_nick

    Forum Fixture

  • Members
  • PipPipPipPipPip
  • 759 posts
  • Name:Nick
  • Location:victoria
  • Car:LH Torana Project
  • Joined: 11-December 11

Posted 10 April 2016 - 06:00 PM

I struggled doing mine as well I had the same issues but you realy need to pull it and use alot of pinch weld around the corners. You can always try a different approach and pull the sides tight first then back and front.

#18 BENN0

BENN0

    Forum Member

  • Members
  • PipPipPip
  • 80 posts
  • Location:Adelaide
  • Joined: 01-January 10

Posted 10 April 2016 - 08:58 PM

Don't want to name the supplier yet. It might be my issue (Not too sure about that)

I will give another go for a day. If its still no good I will try an alternate supplier.


The pics above of the front sections are with it pulled tight. Maybe im not pulling it tight enough? 


#19 _Gaza39_

_Gaza39_
  • Guests

Posted 10 April 2016 - 09:02 PM

Hi. I have just fitted a roof lining in my LC Torana and it looks fine. What I did was insert the rods and fitted them with the new head lining left loose. Glued the sides of the roof lining and left for 20 mins until tacky. Pulled one side over the left two door frames edges with pegs and did the same to the other side. This made the centre and sides tight with no wrinkles. Couple of hours later I  put all the pinch welds on the door frames and then pulled the back of the lining tight and then did the same to the front, only glue around the sides.  not to far in.  There should be a pencil line in the middle of the roof lining as well  If this is not in the centre you will end up with a  badly wrinkled roof lining, this is so important as it won't pull right. Just my way of doing this,  it worked for me, you need lots of patients. Keep trying its sure to work out.


#20 boomfunk

boomfunk

    Forum Trimmer

  • Members
  • PipPipPipPipPip
  • 2,065 posts
  • Location:QLD
  • Joined: 07-December 05

Posted 11 April 2016 - 07:38 AM

woa thats terrible - you should maybe using a pro to fit it - though there are who have never and have fitted one


s said above -also check you have centered the headlining in the car - if its hanging more one side to the other you will never get it to sit right.. dont go by the material hanging down - look on the backside where the calico listing is.. if its equal amount on each side then you know its centred.. go back and check this


hanra do you have any pics of ours when you were fitting it?.. that might help


#21 hanra

hanra

    Oh My, Don't you post alot

  • Members
  • PipPipPipPipPipPipPip
  • 10,832 posts
  • Name:Brad
  • Location:Farrrrrr North Qld
  • Car:1975 LH SL/R 5000, 1967 Morris Cooper S, E36 BMW, Toyota Corolla, Isuzu DMax
  • Joined: 24-March 11

Posted 11 April 2016 - 07:42 AM

Ill have pics somewhere of they one you supplied. It was my first time, patience and plenty of pinch weld off cuts, and fitted perfectly.


#22 boomfunk

boomfunk

    Forum Trimmer

  • Members
  • PipPipPipPipPip
  • 2,065 posts
  • Location:QLD
  • Joined: 07-December 05

Posted 11 April 2016 - 08:18 AM

Hanra - i remember you took a heap of pics when you were installing it.. yours took 2 days on and off or there abouts


just doesnt seem its centered correctly - thats really the only thing will cause it to do what its doing, if its not centered it wont follow the curve of the bow/hence getting wrinkles - more wrinkles that a rolly dog!!


the photo of the front.. you can see it kinda getting there


100% check the back of the headlining to make sure you have equal lengths of the calico listing from one side to other.. i bet you its not centered (for the rear section)


#23 BENN0

BENN0

    Forum Member

  • Members
  • PipPipPip
  • 80 posts
  • Location:Adelaide
  • Joined: 01-January 10

Posted 11 April 2016 - 10:39 AM

Ok. I will pull it all out, measure each wire/rod position and ensure they are all centered, mark the underside of the headliner and ensure it sits in the center of the vehicle at each attachment point. 


Just to confirm installation method: I have been installing the liner from front to back. Front rod in first, then the wire, working toward the back of the car. 

Next steps were to pull the front tight around the windscreen opening (using pinch weld to hold in position)

Pull the rear tight around the rear screen opening (using pinch weld to hold in position)

Lastly working on the sides (starting at the front drivers side, then front passenger, working towards the rear) Plenty of pinch weld used along the way. 


#24 boomfunk

boomfunk

    Forum Trimmer

  • Members
  • PipPipPipPipPip
  • 2,065 posts
  • Location:QLD
  • Joined: 07-December 05

Posted 11 April 2016 - 11:00 AM

another thing to take into consideration.. if its over stretched to the point of nearly tearing- dont over stretch it as it can go  out of shape


the method everyone will use something different - but getting the calico part center (holds the bows) is so important


If you dont center the calico on the bow you be waiting till the cows come home, then you can follow with your eye the shape - you dont even have to have it clamped down just follow the curves with your finger


If it curves around then you know it will work if you have it pulled into shape with equal force from each side


yes i would take the sides / back down to check and possibly re position


you always fit the wires in the center first - thats how i do it and i would imagine most would


wires because they are fixed.. the headlining wont move once the tabs are bent over.. so start there making sure equal amount of calico each side, then go either forward or back.. either way the center section wont move as tabs are holding


you should be able to pull the headlining at the front of the car in the middle with 2 fingers to see how the curve is


different material also varies the fitting - velour easiest by far to fit..it stretches - the herringbone ribbed can be slightly easier also.. a material with no stretch at all makes you work to fit it


#25 BENN0

BENN0

    Forum Member

  • Members
  • PipPipPip
  • 80 posts
  • Location:Adelaide
  • Joined: 01-January 10

Posted 17 April 2016 - 06:01 PM

No luck. Measured everything up, marked the middle of the calico and the middle of the underside of the roof. Installed everything central (wires and rods to calico middle, calico to the middle of the roof). It still looks puss. 

I'm going to chuck this headliner out and try a herringbone ribbed from another supplier. 

This is the best I could get it. You can see that is just doesn't sit right in a few sections. Its bunching around a few of the stitch joins even when the its out of the car. 

DEE8ABEA-B3BF-4C39-89F8-AB5710A30A45.jpg


0 user(s) are reading this topic

0 members, 0 guests, 0 anonymous users