Jump to content


Photo
* * * * * 1 votes

Christo's 76 LX Hatchback Build


  • Please log in to reply
231 replies to this topic

#1 christolx

christolx

    Forum Member

  • Members
  • PipPipPip
  • 184 posts
  • Name:Chris
  • Location:Perth WA
  • Car:1976 LX SL Coupe
  • Joined: 05-December 14

Posted 27 December 2015 - 09:25 PM

Hi Guys/Girls,


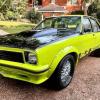
After growing up sitting in a car seat strapped into my Grandad's LH Torana Sedan, (which unfortunatley was stolen and written off when i was 13) I decided i would like to build a Torana of my own. After 12 months searching for a Torana Hatchback i finally found one for sale in Eaton WA that looked promising. After a couple of trips and having the car "sold" from under me...i eventually loaded up my 76 SL LX Hatchback onto a trailer  and took her home at the end of 2014. The body looked average for its age and the car was complete with a 176 with a mild cam and 3 on the floor. My plan for the car is to build a SS replica, as i believe since it is not a genuine SS it leaves me a little room to do things to my own liking; a bit of freedom which i otherwise would not have if it were a genuine SS.


(On the Trailer home and after a good wash down)


Attached File  resized tr.jpg   70.16K   56 downloads


Attached File  20141213_134209.jpg   152.08K   47 downloads


I am very new to the classic car scene and the mechanics of older cars in General. I was previously involved in WARC helping out the GTi Motorsport Team for a few years and developed a love for cars ever since. I built my own Turbocharged Suzuki GTi Street Drag Car with the team and after hours and lots of lessons learnt i am ready to do it all over again with this new project.


I plan to document my build, which will most likely be a slow process (unless i win the lottery), but am hopeful you enjoy following. As i am new to the "old school" cars i may ask stupid questions from time to time, so please bear with me knowing i will appreciate every response. It's great to have a forum of people all willing to help each other out with information, advice, time and support. A few of you (you know who you are) who have already helped me out, i appreciate your knowledge and advice with my project so far.


Thanks.


Christo


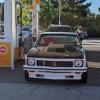
( A Few Photos of the car at first viewing)


Attached File  $_20-4.JPG   66.12K   42 downloads


Attached File  $_20-5.JPG   106.42K   42 downloads


#2 N/A-PWR

N/A-PWR

    CABIN ENGINE CONTROLS GALORE

  • Members
  • PipPipPipPipPipPipPip
  • 9,594 posts
  • Name:Dave I
  • Location:Wooroloo, 65km's East of Perth
  • Car:'1969' LC RAT TORANA
  • Joined: 08-December 12

Posted 27 December 2015 - 09:33 PM

Looks Great Chris,


Well done on your fantastic find,


and look forward to your SS transformation.  :spoton:


Like button for you.


#3 _LS2 Hatch_

_LS2 Hatch_
  • Guests

Posted 27 December 2015 - 10:16 PM

Bring it on. We love a good build.
First things first........................ You won't be needing those flares in the back! Flares are for guys trying to compensate for other short falls ;)

Good luck and enjoy.
There is nothing more rewarding than that first drive out the driveway in your finished project.

#4 christolx

christolx

    Forum Member

  • Members
  • PipPipPip
  • 184 posts
  • Name:Chris
  • Location:Perth WA
  • Car:1976 LX SL Coupe
  • Joined: 05-December 14

Posted 27 December 2015 - 11:42 PM

Thanks guys. Feels like a lot of going backwards at the moment stripping the car back, but it's all coming together. Can't imagine that first drive! 😁

Thanks guys. Feels like a lot of going backwards at the moment stripping the car back, but it's all coming together. Can't imagine that first drive! 😁

#5 christolx

christolx

    Forum Member

  • Members
  • PipPipPip
  • 184 posts
  • Name:Chris
  • Location:Perth WA
  • Car:1976 LX SL Coupe
  • Joined: 05-December 14

Posted 27 December 2015 - 11:44 PM

Thanks guys. Feels like a lot of going backwards at the moment stripping the car back, but it's all coming together. Can't imagine that first drive! 😁

Thanks guys. Feels like a lot of going backwards at the moment stripping the car back, but it's all coming together. Can't imagine that first drive! 😁

#6 _imj411_

_imj411_
  • Guests

Posted 28 December 2015 - 12:29 AM

Looks like a good start. SS don't have flair and yours has not been butchered with flairs so put them on ebay, cheers Aaron.

Edited by imj411, 28 December 2015 - 12:29 AM.


#7 SmacT

SmacT

    Forum Fixture

  • Members
  • PipPipPipPipPip
  • 906 posts
  • Name:Sam
  • Location:Sydney
  • Car:LX 4dr 383, TKX, BW
  • Joined: 24-December 08

Posted 28 December 2015 - 03:46 AM

Never saw a hatch win Bathurst without flares. Just saying... :-)


Look forward to seeing this evolve - be prepared to want to set fire to everything a few times, but it is worth persevering!


#8 BIG KEV

BIG KEV

    Forum Fixture

  • Members
  • PipPipPipPipPip
  • 1,202 posts
  • Name:Kevin
  • Location:SYDNEY
  • Car:LHSLR5000 and The 6LT Project
  • Joined: 02-January 12

Posted 28 December 2015 - 07:19 AM

Looks like a good find Chris ....good luck and enjoy your rebuild

#9 tsn007

tsn007

    Forum Fixture

  • Members
  • PipPipPipPipPip
  • 1,010 posts
  • Name:Tony
  • Location:LIVERPOOL, NSW
  • Car:LX hatch, LX sedan
  • Joined: 25-April 07

Posted 28 December 2015 - 09:02 AM

Good luck mate


and well done finding a Hatchback, they are hard to get, and will only go up in value


what is the body like for rust

what colour combo are you going with


cheers


#10 christolx

christolx

    Forum Member

  • Members
  • PipPipPip
  • 184 posts
  • Name:Chris
  • Location:Perth WA
  • Car:1976 LX SL Coupe
  • Joined: 05-December 14

Posted 28 December 2015 - 12:40 PM

tsn007 Funny you ask about the rust...


As soon as i got the car home, i got to work and spending most of my free time researching/reading forum posts and spending weekends stripping the car down and planning out the restoration process. I set myself a goal of getting the car stripped to see how much work needed to be put into the bodywork. Unfortunately the car, like many 40yo vehicles was very rusty, and previous repairs were done on the cheap with a massive overuse of body filler. I guess i can understand that a car costing only a few thousand dollars from the factory would only have minimal dollars spent on repairs over the years. But i can say, i was extremely happy to own my own Torana Hatchback and view it as an opportunity to give a car (which may have otherwise made it onto the scrap yard) a new lease of life!


I first started asking around about panel beaters who specialized in rust repairs on forums, through friends and members of the Steel Bumper Car Club WA, as i was initially messed around by a panel beater i found off Gumtree in Jandakot, (who will remain un-named) who sold a good story but performed poor quality work (which i will now need to get repaired properly.) Fortunatley i found out about this through anther customer sooner than later and removed my vehicle from the workshop escaping with only a small financial loss which could have potentially ruined the whole build.


Rust was in all the usual places, rad support, both windscreen and hatchback channel, tail light buckets were very rusted out along with the rear beaver panel.


Attached File  tail light1.jpg   74.13K   36 downloads


Attached File  tail light 2.jpg   65.13K   28 downloads


Attached File  beaver.jpg   75.39K   30 downloads


The C pillars…well the left side was just bog attached to a slice of metal coated in a smothering of more bog (what a joke)


Attached File  cpillar bog.png   508.44K   36 downloadsAttached File  cpillar bog.png   508.44K   36 downloads

Attached File  c pillar cut out.jpg   219.39K   34 downloads


#11 christolx

christolx

    Forum Member

  • Members
  • PipPipPip
  • 184 posts
  • Name:Chris
  • Location:Perth WA
  • Car:1976 LX SL Coupe
  • Joined: 05-December 14

Posted 28 December 2015 - 01:15 PM

The Rear Quarters were terrible too, the repair panel they used didn't match the quarter profile at all and was once again all bog!


Attached File  rear quarter.jpg   95.35K   33 downloads


Both doors were covered in a layer of bog and the inner channels were pretty rusted too. so i decided to replace the door skins and hopefully find a donor sedan door that Brad can use to cut up and weld in repair sections.


Attached File  door skin bog .jpg   77.15K   27 downloads


Attached File  door inner .jpg   85.5K   27 downloads


Attached File  r quart.jpg   84.16K   28 downloads


I’ve spoken to a fair few people in the last year about rust repairs and body work and have learnt that putting the money into the right place is what creates the finished result. From what i understand having good panel work being one of the most important aspects of a quality build.


My plan was to attempt some of the repairs myself with my Dad who is a Boilermaker/Welder. We had a go, but to be honest our inexperience led me to seek getting the rust repairs done professionally.


I had many quotes after the dilemma of that "dodgy" panel beater and have been quite cautious in who i trust working on the car from that experience. I got quotes from all the reputable rust repair specialists here in WA. Quotes ranging from 20-25k just for rust. Really set me back, but i realise in viewing a lot of the build posts, the sheer amount of hours put into rust repairs is what really hikes the price up, not to mention the skill of creating patch panels for areas which cannot be purchased.


my Goal for 2015 was have the car stripped bare, be dustless blasted and to have the rust repair process started by the end of this year. I can say that though it has been tight, The car is currently at Stunning FX in Oakford WA under the care of Brad Khose, who is a reputable Panel Beater who had done some panel and paint work for me on my previous Street Drag car build over 10 years ago. He was able to find a middle ground, as many of the high end quotes were all metal finished to perfection. we worked out a middle ground where everything would be metal finished but body filler would be used sparingly to help balance out the time and therefore cost.


I purchased new door skins, new quarters, new tail light buckets (big thanks to Grant aka Torananut) hatch channel pretty much all the panels i could get my hands on. Me & Dad made up a dolly and had the car loaded up onto a flat bed, and the car is currently being dustless blasted inside and out and etch primed ready for repairs to begin. I'm on my way to have a look at the progress now!


Attached File  making dolly.jpg   131.81K   35 downloads


Attached File  car on dolley.png   495.17K   29 downloads


Feels great to be moving forward one step at a time! especially when i thought everything would come to a flying halt over the Christmas period. Whilst the rust repairs are going ahead i plan to make use of the wait time and re build the K Frame.


#12 dattoman

dattoman

    Do I feel lucky? Well, do ya, punk?

  • Administrators
  • PipPipPipPipPipPipPip
  • 16,469 posts
  • Name:Neil
  • Location:Perth Western Australia
  • Car:LX SS , 76 Cadillac , 3 x dattos
  • Joined: 04-February 07

Posted 28 December 2015 - 01:45 PM

I think you'll be OK with Brads work

I'm sure he's the brother of Stan who runs Wheelmodz (haven't seen him for 20 years)

Between the 2 of them they have lots of experience with Toranas


#13 christolx

christolx

    Forum Member

  • Members
  • PipPipPip
  • 184 posts
  • Name:Chris
  • Location:Perth WA
  • Car:1976 LX SL Coupe
  • Joined: 05-December 14

Posted 28 December 2015 - 02:43 PM

Yep Datto he is Stan's brother, very experienced and a good bloke in my books 😊

Yep Datto he is Stan's brother, very experienced and a good bloke in my books 😊

#14 tsn007

tsn007

    Forum Fixture

  • Members
  • PipPipPipPipPip
  • 1,010 posts
  • Name:Tony
  • Location:LIVERPOOL, NSW
  • Car:LX hatch, LX sedan
  • Joined: 25-April 07

Posted 28 December 2015 - 06:34 PM

 Sorry to ask about "RUST", but as you said it is quite common on these cars


I am pretty lucky with my hatch as there really isn't much. It has been garaged and looked after for most of its life


The main thing as you said , is get the rust fixed right then keep it away with fish oil, cavity wax, etc etc


In the end you will have a Hatchback Torana , that not many people have and many more want


The build cost will eventually be forgotten about, but the smile the car will put on your face will be PRICELESS


enjoy the journey 


cheers


#15 tuxedoss

tuxedoss

    Forum Fixture

  • Members
  • PipPipPipPipPip
  • 1,024 posts
  • Name:Brett
  • Location:Sydney
  • Car:ss
  • Joined: 29-July 11

Posted 29 December 2015 - 12:03 AM

While your rust looks bad it's fairly normal for a hatch, and whether there is only a small bit of rust in a spot or a big bit it doesn't make a lot of difference once you start cutting it out and replacing.
I noticed you're getting it dustless blasted, any reason you chose this as opposed to normal abrasive blasting?

#16 christolx

christolx

    Forum Member

  • Members
  • PipPipPip
  • 184 posts
  • Name:Chris
  • Location:Perth WA
  • Car:1976 LX SL Coupe
  • Joined: 05-December 14

Posted 29 December 2015 - 01:32 AM

Thanks tsn007, i really appreciate that feedback. I'm sure the end result will be priceless to me.

Tuxedoss I'm not sure if you have heard of the blaster at Naval Base in WA called stripped bare? Basically i found he was the industry standard and was highly recommended his "diamond blasting process". After looking into it's effectiveness i decided it was the process that would be the most suitable. The blasting method i went with is quite similar using glass beads, and though there is still an extensive clean up processess and quite costly, if done properly does not put as much heat into the panels as some of the other media options. Large panels like the roof i have stripped with paint stripper, it's helped keep the heat out of those more sensitive areas and kept the cost down a tiny bit too.

#17 tuxedoss

tuxedoss

    Forum Fixture

  • Members
  • PipPipPipPipPip
  • 1,024 posts
  • Name:Brett
  • Location:Sydney
  • Car:ss
  • Joined: 29-July 11

Posted 29 December 2015 - 02:52 AM

Checked out their website but didn't have a lot of detail on the process. Reason I asked was dustless normally means it's blasted wet which some don't like as its water on bare metal

#18 christolx

christolx

    Forum Member

  • Members
  • PipPipPip
  • 184 posts
  • Name:Chris
  • Location:Perth WA
  • Car:1976 LX SL Coupe
  • Joined: 05-December 14

Posted 31 December 2015 - 01:28 AM

I guess everyone will have their own opinion on what type of media blasting  is the best. I can only share my opinion, which is i believed it to be the best option for me, firstly because it was the best value due the amount of body filler that had been over used on my car previously ,  which may not have been removed with Soda Blasting and also it is a faster process than Soda Blasting and time is money!. Even though the Dustless Blasting process uses water ( the obvious benefit of that being water reduces friction to prevents heat) from my understanding I believe they add a rust inhibitor to the blast water to prevent flash rust  on the bare metal during/after blasting. I have also heard that some people experience paint adhesion problems caused by soda blasting due to the residue that is left and  that the clean up still involves water to neutralise the Soda. So either way water seems to be involved, but to me it appeared to be a safer option.


Edited by christolx, 31 December 2015 - 01:29 AM.


#19 tuxedoss

tuxedoss

    Forum Fixture

  • Members
  • PipPipPipPipPip
  • 1,024 posts
  • Name:Brett
  • Location:Sydney
  • Car:ss
  • Joined: 29-July 11

Posted 31 December 2015 - 09:37 AM

I wouldn't use soda either for the reasons you said, I think it has its place but not for older cars with a bit of rust,  I've looked into the dustless and people that have had it done seem pretty happy, one advantage of it is they can come to you as while it still makes a mess its all on the ground. And as you say they add something to the water to stop the flash rust.

Just noticed you got new door skins, where did you get them from and how was the fit? I'm still tossing up whether to repair mine or use new but the new ones I have I'm not that happy with when you compare them to original ones.


#20 christolx

christolx

    Forum Member

  • Members
  • PipPipPip
  • 184 posts
  • Name:Chris
  • Location:Perth WA
  • Car:1976 LX SL Coupe
  • Joined: 05-December 14

Posted 03 January 2016 - 01:18 PM

I got them from Rare Spares here in Perth, apparently they get made up locally. There are two types, one with the door handle section pre made or ones without. I'm not too sure of the fit yet, as they have not started working on the doors yet.


#21 christolx

christolx

    Forum Member

  • Members
  • PipPipPip
  • 184 posts
  • Name:Chris
  • Location:Perth WA
  • Car:1976 LX SL Coupe
  • Joined: 05-December 14

Posted 06 January 2016 - 08:35 PM

Hi Guys,


So a quick update on the progress with the hatch. They have started on the rear, un stitching the tail light buckets and are ready to weld in the new buckets Grant fabbed up. They also plan to make a new rear beaver panel as it resembled swiss cheese! 


Just glad to be seeing some progress.

Attached Files


#22 Ice

Ice

    Cool

  • Members
  • PipPipPipPipPipPipPip
  • 15,117 posts
  • Name:Gene
  • Location:Galaxy's away from Ipswich
  • Car:77 HZ Sandman Van
  • Joined: 03-January 07

Posted 06 January 2016 - 08:41 PM

Greg at Stripped Bare is the go know quite a few people that have used him
expensive but good job mine will be going there to one day

#23 christolx

christolx

    Forum Member

  • Members
  • PipPipPip
  • 184 posts
  • Name:Chris
  • Location:Perth WA
  • Car:1976 LX SL Coupe
  • Joined: 05-December 14

Posted 15 January 2016 - 10:33 PM

So they have started work on some of the smaller rust repair sections. They have repaired both the inner and outer skins of the rusted out section where the bonnet hinge's attach. 


BEFORE


Attached File  LHS bonnet hinge rusted.png   817.5K   24 downloads


AFTER


Attached File  LHS Bonnet Hinge.jpg   127.15K   22 downloads


They also repaired a small section near the corner of the windscreen. They cut the top section out, cleaned up the inside and rust converted the section and re welded a repair section in.


BEFORE


Attached File  windscreen corner rusted.png   33.47K   29 downloads


AFTER


Attached File  windscreen corner.jpg   21.83K   27 downloads


Just glad to have some metal behind the repairs, i'm hoping they start the larger repairs soon but i'm happy with the small steps all progress is good progress!


#24 Ice

Ice

    Cool

  • Members
  • PipPipPipPipPipPipPip
  • 15,117 posts
  • Name:Gene
  • Location:Galaxy's away from Ipswich
  • Car:77 HZ Sandman Van
  • Joined: 03-January 07

Posted 15 January 2016 - 10:57 PM

Are you happy with the blasting Greg did Chris

The guy that makes those door skins is very very good at metal work

#25 christolx

christolx

    Forum Member

  • Members
  • PipPipPip
  • 184 posts
  • Name:Chris
  • Location:Perth WA
  • Car:1976 LX SL Coupe
  • Joined: 05-December 14

Posted 16 January 2016 - 09:45 AM

I ended up getting it blasted through my panel beater instead. He gets his own blaser in. I think Greg had a fair bit of work on at the time. The underside is due to be blasted on Monday, very pleased with the blasting.

I ended up getting it blasted through my panel beater instead. He gets his own blaser in. I think Greg had a fair bit of work on at the time. The underside is due to be blasted on Monday, very pleased with the blasting.


0 user(s) are reading this topic

0 members, 0 guests, 0 anonymous users