
Lol thanks.
Yeah i want to make my mezzanine area bigger.
Atm its just above the old air cond office and workshop. The rest of shed is open.
Good for the hoists tho.
Maybe when i re do my workshop area and incŕease mezzanine ill do it then may be easier.
Thanks for the input guys

Shed Insulation
Started by
hanra
, Mar 07 2016 10:12 AM
124 replies to this topic
#26

8BALL
-

- Members
-

- 187 posts
Forum Member
- Name:..
- Location:Australia
- Car:yep
- Joined: 05-August 13
Posted 10 March 2016 - 09:35 AM
#27
_mountainman_
_mountainman_
-

- Guests
Posted 12 March 2016 - 10:27 AM
Hey Brad. I'm in Ingham and just hunted for insulation for my spray booth to be. I found the NQ rep for Fletchers. Tony on 0417 788 529 will sort out all your wants. Cheers
#28
Bernie
-

- Members
-
- 301 posts
Forum Fan
- Location:Base of the Hills Perth WA
- Car:2 lx Hatches and 3 lx 4 doors
- Joined: 10-December 07
Posted 12 March 2016 - 09:40 PM
Do your sides as well and the end result will surprise you.Only real heat into my shed is at the roller doors .Flat style roof venting is the best .No squeaky noises in your shed after a couple of years .Looks better too
.
#29
hanra
-
- Members
-
- 10,831 posts
Oh My, Don't you post alot
- Name:Brad
- Location:Farrrrrr North Qld
- Car:1975 LH SL/R 5000, 1967 Morris Cooper S, E36 BMW, Toyota Corolla, Isuzu DMax
- Joined: 24-March 11
Posted 12 March 2016 - 11:13 PM
Got a hold of two 30sqm rolls of Kingspan Aircell Glareshiled XL. Should do the trick.
Edited by hanra, 12 March 2016 - 11:15 PM.
#30
yel327
-

- Members
-
- 13,072 posts
Oh My, Don't you post alot
- Joined: 10-February 08
Posted 13 March 2016 - 07:19 AM
Mine is 4.2m to eaves. Mezzanine doubles your space.
#31
_Agent 34_
_Agent 34_
-
- Guests
Posted 13 March 2016 - 04:42 PM
Brad,
I deal with this stuff all day long with buildings and there is some golden rules;
1) you need a thermal break between the roof sheeting and the steel structure - King span does this pretty well - also other fletcher insulation products ( glass wool ) do this as well - the foam is better
1a) if your sheets are screwed directly to the steel purlins then the heat sink will be greater - a thermal break of 5mm between the roof sheets and the purlin does this pretty well
1b) radiant heat is the big issues in sheds it's like your car getting upto running temperature - a bigger radiator = less engine temp - a thermal break does the same thing
2) now most people only do the roof - but the walls trap heaps of heat - if you can insulate the walls then your heaps better off as the face of the shed will not heat the air which gets trapped at the top
3) put in a few ventilators - it releases the air - internal air ( shed is heaps hotter ) than outside air.- just make sure that the ventilators are sufficient to keep the hot air outgoing = to the intake area - bit like cars
4) put windows equal around the shed to get rid of dead spots of air draw
5) put in a false ceiling - this further reduces the " radiant heat " - there's it's a hot day and then there's radiant heat - radiant heat is like extractors under the bonnet - insulation is like exhaust wrap
I would do this;
just start at one end of the shed;
MARK THE SHEETS WITH A SINGLE LINE THAT WONT COME OFF - PENCIL WILL DO BEFORE YOU START
get a roll of chicken wire- and once the sheet is removed then roll out the 1200mm wide piece cut teck screw into the purlin and cut off.
then lay your new insulation ontop of the chicken wire - the chicken wire holds the insulation upto the sheet and stops it from sagging
unscrew the sheets TWO ONLY THEN ever sheet after that you need to do the procedure
lay the chicken wire down and screw off tight
then lay the insulation over the top
line up screw holes and then re screw through the old holes
you should not have to go under neath and tape up the insulation sheets as the chicken wire will keep it pretty tight to the underneath side of the sheets.
give us a call if you need any more info
G
#32
hanra
-
- Members
-
- 10,831 posts
Oh My, Don't you post alot
- Name:Brad
- Location:Farrrrrr North Qld
- Car:1975 LH SL/R 5000, 1967 Morris Cooper S, E36 BMW, Toyota Corolla, Isuzu DMax
- Joined: 24-March 11
Posted 15 March 2016 - 02:33 PM
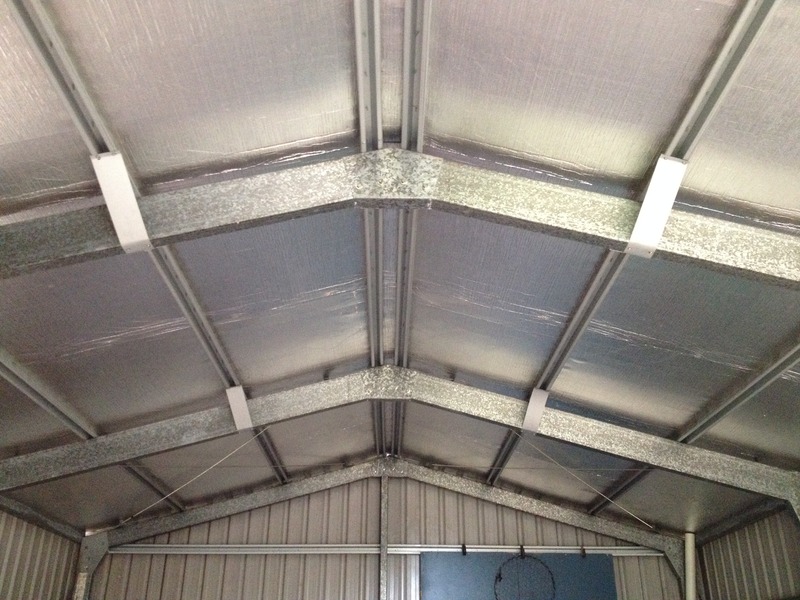
Thanks Grant, I wasnt planning on using chicken wire and the actual install instructions from Kingspan suggest having a 40mm air gap between the insulation and the sheet. They expect it to sag 40mm between the battens...
What I was going to do, was remove 2 sheets off either side of the shed, then tek screw one end of the insulation to the frame at the gutter. Roll the insulation over the battens to the other side. Pull tightish and then tek screw that end down. Puncture the insulation with a sharp rod at every screw hole.... (time consuming.. but may assist with re-lining up roof screws after wards????)
#33
Ice
-

- Members
-
- 15,118 posts
Cool
- Name:Gene
- Location:Galaxy's away from Ipswich
- Car:77 HZ Sandman Van
- Joined: 03-January 07
Posted 15 March 2016 - 02:37 PM
Thats the way to go Brad
#34
hanra
-
- Members
-
- 10,831 posts
Oh My, Don't you post alot
- Name:Brad
- Location:Farrrrrr North Qld
- Car:1975 LH SL/R 5000, 1967 Morris Cooper S, E36 BMW, Toyota Corolla, Isuzu DMax
- Joined: 24-March 11
Posted 25 March 2016 - 07:00 PM
Half way there today. Pretty time consuming. bit knackered after being in the sun all day coping it from top and bottom.

#35
dattoman
-

- Administrators
-
- 16,469 posts
Do I feel lucky? Well, do ya, punk?
- Name:Neil
- Location:Perth Western Australia
- Car:LX SS , 76 Cadillac , 3 x dattos
- Joined: 04-February 07
Posted 25 March 2016 - 08:57 PM
So your lifting sheets... putting it down... then putting the sheets back ?
I really don't want to do it that way so keen to hear if theres another
#36
Ice
-
- Members
-
- 15,118 posts
Cool
- Name:Gene
- Location:Galaxy's away from Ipswich
- Car:77 HZ Sandman Van
- Joined: 03-January 07
Posted 25 March 2016 - 08:59 PM
Start lifting budSo your lifting sheets... putting it down... then putting the sheets back ?
I really don't want to do it that way so keen to hear if theres another
#37
S pack
-

- Members
-
- 15,538 posts
Scrivet Counter
- Name:Dave
- Location:Luggage Point
- Car:73 LJ
- Joined: 25-January 10
Posted 25 March 2016 - 09:00 PM
So your lifting sheets... putting it down... then putting the sheets back ?
I really don't want to do it that way so keen to hear if theres another
Luckily for you there is another way Neil. Pay my travel and accommodation expenses and I'll come and lift the sheets up and install the insulation for you.
#38
hanra
-
- Members
-
- 10,831 posts
Oh My, Don't you post alot
- Name:Brad
- Location:Farrrrrr North Qld
- Car:1975 LH SL/R 5000, 1967 Morris Cooper S, E36 BMW, Toyota Corolla, Isuzu DMax
- Joined: 24-March 11
Posted 25 March 2016 - 09:04 PM
So your lifting sheets... putting it down... then putting the sheets back ?
I really don't want to do it that way so keen to hear if theres another
Yes. Lifting sheets. Binning old screws/washers and fitting new ones and using the original holes which is time consuming to line up etc. I could have screwed it up from underneath to the battens but didn't feel it would look that neat, plus would of been a bit of a dick around getting it around various obstacles.
#39
_dno_
_dno_
-
- Guests
Posted 26 March 2016 - 12:36 PM
Always a good idea to use two different drills when replacing tek screws, one for removing and one for
refitting especially if the old teks have rust on the head of them. Nothing worse than seeing your hard work
rusting months later due to the rust in the socket damaging the paint on the new teks.
#40
hanra
-
- Members
-
- 10,831 posts
Oh My, Don't you post alot
- Name:Brad
- Location:Farrrrrr North Qld
- Car:1975 LH SL/R 5000, 1967 Morris Cooper S, E36 BMW, Toyota Corolla, Isuzu DMax
- Joined: 24-March 11
Posted 03 April 2016 - 10:13 PM
All done. Just waiting on the roof vent to be made. Noticeable temp difference in there already. Sure to improve with the roof vent. Next job, wiring lights/power points.

Edited by hanra, 03 April 2016 - 10:14 PM.
#41
Bernie
-
- Members
-
- 301 posts
Forum Fan
- Location:Base of the Hills Perth WA
- Car:2 lx Hatches and 3 lx 4 doors
- Joined: 10-December 07
Posted 04 April 2016 - 07:44 AM
Hanra ,If you have a side facing the sun it will be a good idea to insulate that .Do the back of your door as well if it is facing the sun .The difference in temp is considerable .Have done my whole shed and the heat that comes through the roller door is significant .Considering a sliding door to eliminate the heat the roller creates .
Bernie
#42
hanra
-
- Members
-
- 10,831 posts
Oh My, Don't you post alot
- Name:Brad
- Location:Farrrrrr North Qld
- Car:1975 LH SL/R 5000, 1967 Morris Cooper S, E36 BMW, Toyota Corolla, Isuzu DMax
- Joined: 24-March 11
Posted 04 April 2016 - 07:51 AM
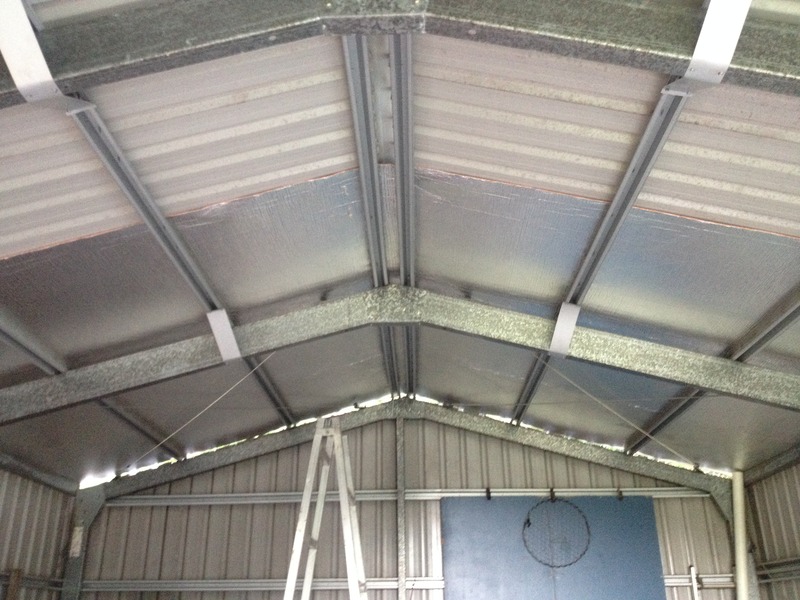
The left side wall in the above pic gets the sun in the mornings through lunchtime. I agree that would be a wise move, but at this stage, not on the radar. But wont rule it out. I dont have roller doors. I have 2 big double barn doors.
Edited by hanra, 04 April 2016 - 08:00 AM.
#43
Bernie
-
- Members
-
- 301 posts
Forum Fan
- Location:Base of the Hills Perth WA
- Car:2 lx Hatches and 3 lx 4 doors
- Joined: 10-December 07
Posted 04 April 2016 - 07:54 AM
Looking good either way .
#44
Ice
-
- Members
-
- 15,118 posts
Cool
- Name:Gene
- Location:Galaxy's away from Ipswich
- Car:77 HZ Sandman Van
- Joined: 03-January 07
Posted 04 April 2016 - 09:19 AM
Top job Brad
#45
yel327
-
- Members
-
- 13,072 posts
Oh My, Don't you post alot
- Joined: 10-February 08
Posted 04 April 2016 - 09:30 AM
All done. Just waiting on the roof vent to be made. Noticeable temp difference in there already. Sure to improve with the roof vent. Next job, wiring lights/power points.
Don't scrimp on cable either. Get the eleco to run bigger cable to the shed than normal - if he whinges remember that Electrician's rarely understand voltage drop etc very well (only the good ones do). Depending upon the run I'd run at least 10sqmm 4C+E for 3phase and 16sqmm 2C+E for single phase - may need bigger if it's a longer run.
For the GPO circuits 2.5sqmm is fine for normal stuff, but if you are installing any 15A outlets for arc welding or for a larger compressor or similar bigger 1phase motor use 4 or 6sqmm. As an example, I did my house in 35sqmm 3phase to the meter board, 10sqmm 3ph to the shed and 6sqmm to the 15A outlets. My next door neighbour (same street pillar and sheds side by side about 3m apart) has 16sqmm 3phase to the house, 6sqmm 3ph to the shed and 4sqmm to the 15A outlets. When arc welding his shed voltage (at the GPO) drops from 242-ish V to about 210V. If I throw him a 10m 15A lead over the fence from my outlets, when welding the GPO voltage drops from 246-ish V (4-5V better off before we even start) to about 237V. Massive difference and the weld quality is better too. And compressor starts at my place see vary little light flicker in the house, but next door the lights flicker slightly with a compressor start - again voltage drop related.
#46
Ice
-
- Members
-
- 15,118 posts
Cool
- Name:Gene
- Location:Galaxy's away from Ipswich
- Car:77 HZ Sandman Van
- Joined: 03-January 07
Posted 04 April 2016 - 09:37 AM
And put double power points on each wall trust me you will use them
#47
_dno_
_dno_
-
- Guests
Posted 04 April 2016 - 09:41 AM
I agree with the above, but firstly check whats coming into the meter box from the street. Most relatively new/modern
homes only have the minimum supplied for the house connection to start with, if this is the case it's of little value to use
any bigger than is already there.
#48
yel327
-
- Members
-
- 13,072 posts
Oh My, Don't you post alot
- Joined: 10-February 08
Posted 04 April 2016 - 10:11 AM
^^That isn't quite right. If the incoming to the house is small, you REALLY want to run extra big to the shed to avoid any further voltage drop issues.
I agree that the minimal is often run to the house in modern times. Energy Australia/Ausgrid reckon 16sqmm 4C+E PVC/PVC is good for 100A 3ph in underground conduit! I installed the smallest possible size by Australian Standards (AS3008.1.1) and it is 25sqmm 4 x 1C PVC or 25sqmm 4C+E XLPE, but I used 35sqmm 4 x 1C XLPE as it was cheaper at the time. The 25sqmm sizes may not be any good either if you put sand around the conduit.
#49
hanra
-
- Members
-
- 10,831 posts
Oh My, Don't you post alot
- Name:Brad
- Location:Farrrrrr North Qld
- Car:1975 LH SL/R 5000, 1967 Morris Cooper S, E36 BMW, Toyota Corolla, Isuzu DMax
- Joined: 24-March 11
Posted 04 April 2016 - 10:25 AM
Yeah Ill be wiring it up myself. Bit of a concern as firstly, the main meter box is 150m away out on the road. We are actually on 2 phase out here in the sticks, so I have two Tariff 11 meters and one Tariff 31 meter for the HWS. I dont know what size has been used up to the house. The shed is then 50m away from the main board at the house. The wiring has already been trenched and run from the house to the shed by the previous owner, just never hooked up. Personally I would have used thicker cabling. But Ill be stuffed if Im going to try and pull through another run of thicker cable. Could end in disaster...... Double GPO's and fluros will be in abundance.
Edited by hanra, 04 April 2016 - 10:27 AM.
#50
yel327
-
- Members
-
- 13,072 posts
Oh My, Don't you post alot
- Joined: 10-February 08
Posted 04 April 2016 - 11:37 AM
Don't do it yourself, you'll stuff it up for sure! And it is illegal, will void insurance etc. ALL electrical work has to have a CCEW provided that shows it was installed to AS/NZS3000 and tested. If you have a fire or someone gets an electric shock and there is no CCEW the Coroner and/or Insurance company will track back to who did the work. Even a changed GPO has to have a CCEW.
To make matters worse, with long cable runs like that, the earth fault loop impedance becomes an issue. Essentially if you get a short circuit (as in A-N) or a fault to earth there isn't enough voltage present to drive the fault current, so the protective device is way slower to operate and doesn't clear the fault inside the required time. This is important for two reasons - firstly the arc blast energy is i2t, reducing the time on an exponential curve is very significant. Secondly the touch voltage present on the earthed device where the fault has occurred has to fall under a certain time-current curve or the risks to persons are magnified hugely. Fitting an RCD with a higher earth fault current (like 100mA or 300mA rather than 30mA) at the supply end of the cable (at your house) is the way to overcome this.
If you want to know what you have get the cable sizes for me, and the lengths. I'll do the calcs for you. Photos of the ends of the cables (the shed one anyway) will help identify its size. Measure the outside diameter of the one at the meter box that feeds the house and we might be able to figure it out too. Get me the C/B size and type (photo) or fuse size at the meter box. Also have a look at how the meter box is fed - how far up the street is the transformer?
Note that in real terms you don't have 2-phase, you have 415V single phase (between the two phases) and 240V single phase (either phase to neutral). There is only 3-phase or single phase. The 415V single phase was probably used by the original cooktop.
If you are having lots of fluoros don't put them all on a standard switch - you'll end up with a boot off the switch. Best bet is to use a heavy duty rotary switch (like a Clipsal 56 series). Shocks from light switches feeding multiple fluoros and shocks from arc welders are probably the most reported shocks we see today, probably combined over 50% of the total.


0 user(s) are reading this topic
0 members, 0 guests, 0 anonymous users

