
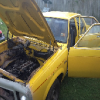
Wondering how I remove this thing? Is it meant to be removed? Trying to get the front end ready to be sandblasted and painted.
Any help thanks
Sent from my iPhone using Tapatalk
How do I take this off?
Started by
Misc
, Aug 17 2017 07:32 PM
16 replies to this topic
#1

Misc
-
- Members
-

- 128 posts
Forum Member
- Name:Dylan
- Location:Brisbane, QLD
- Car:LX Sunbird
- Joined: 10-October 15
Posted 17 August 2017 - 07:32 PM
#2
Bigfella237
-

- Members
-
- 4,369 posts
Socially Distant
- Name:Andrew
- Location:Far South Coast of NSW
- Car:(s) not as many as I'd like but more than I've got space for!
- Joined: 31-October 14
Posted 17 August 2017 - 07:39 PM
Okay I'll bite... what "thing"?
Was there supposed to be a photo Dylan?
#3
Misc
-
- Members
-
- 128 posts
Forum Member
- Name:Dylan
- Location:Brisbane, QLD
- Car:LX Sunbird
- Joined: 10-October 15
Posted 18 August 2017 - 10:38 AM
Ahh shit haha
Sent from my iPhone using Tapatalk

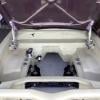
Knobbly but on the left
Sent from my iPhone using Tapatalk
Sent from my iPhone using Tapatalk
Knobbly but on the left
Sent from my iPhone using Tapatalk
#4
hanra
-

- Members
-
- 10,831 posts
Oh My, Don't you post alot
- Name:Brad
- Location:Farrrrrr North Qld
- Car:1975 LH SL/R 5000, 1967 Morris Cooper S, E36 BMW, Toyota Corolla, Isuzu DMax
- Joined: 24-March 11
Posted 18 August 2017 - 10:47 AM
The balljoint?
Grind the rivets off. The new ball joint bolts in.
Grind the rivets off. The new ball joint bolts in.
#5
Bigfella237
-
- Members
-
- 4,369 posts
Socially Distant
- Name:Andrew
- Location:Far South Coast of NSW
- Car:(s) not as many as I'd like but more than I've got space for!
- Joined: 31-October 14
Posted 18 August 2017 - 11:30 AM
Yep, like Brad said, grind the head off all 4 rivets but grind on the top (ball joint) side so you don't damage the control arm (doesn't matter if you damage the ball joint).
Once you've ground the heads off, just knock 'em through with a pin punch (or a big nail will do if you don't have a punch) and the ball joint will just fall out.
As mentioned, the only thing you will keep, and therefore don't want to damage, is the control arm itself.
If I remember correctly you bought the hamburger with the lot kit didn't ya? That should have two new top ball joints in it, supplied with new nuts & bolts.
#6
Pop's-SS
-

- Members
-
- 4,962 posts
Pops
- Name:Barry
- Location:Riverina South West Slopes
- Car:1976 Mandarin Red SS Hatchback
- Joined: 08-November 05
Posted 18 August 2017 - 02:22 PM
Always remember OH&S and use safety goggles/mask as 4 inch angle grinders spin at a zillion rpm
A quick short job without safety goggles could mean a life time of blindness in one or both eyes
RegardSS .... Barry
#7
Misc
-
- Members
-
- 128 posts
Forum Member
- Name:Dylan
- Location:Brisbane, QLD
- Car:LX Sunbird
- Joined: 10-October 15
Posted 18 August 2017 - 03:03 PM
Thanks all, was unsure if the cover for the balljoint was meant to say or not haha,
OH&S for sure, 1st time ever taking apart a front end, learnt not to stand near the spring when loosening haha
thanks guys 
#8
Misc
-
- Members
-
- 128 posts
Forum Member
- Name:Dylan
- Location:Brisbane, QLD
- Car:LX Sunbird
- Joined: 10-October 15
Posted 18 August 2017 - 05:50 PM
Sorry, what about lower ball joints? Doesn't seem to be bolts, are they pressed in? Tips to remove ?
Sent from my iPhone using Tapatalk
Sent from my iPhone using Tapatalk
#9
grumpy xu1
-

- Members
-
- 2,809 posts
Lotsa Posts!
- Name:Gary
- Location:Queensland
- Car:lj xu1
- Joined: 01-February 10
Posted 18 August 2017 - 07:01 PM
Ball joint separation tool repco ect, caution they're only cast & brake easy. My usual trick tighten up till you've just got pressure on it, when i was still smoking, perfect timing was to get a durrie & a drink, about the time you finish, you'll hear a ping, it's separated. Undo nut & job done. Don't forget to leave the gaurd on the grinder & use tight fitters gloves & long sleves & hearing protection. Gary.
Oops yeah pressed in, i was thinking about separation sorry bud. Gary.
Oops yeah pressed in, i was thinking about separation sorry bud. Gary.
#10
madtoranajzedded
-
- Members
-
- 2,891 posts
Sir ask alot
- Name:Maz
- Location:Southern Tasmania
- Car:72 LJ SL SEDAN.
- Joined: 30-September 13
Posted 18 August 2017 - 10:59 PM
Hit head of balljoint with hammer..
#11
Bigfella237
-
- Members
-
- 4,369 posts
Socially Distant
- Name:Andrew
- Location:Far South Coast of NSW
- Car:(s) not as many as I'd like but more than I've got space for!
- Joined: 31-October 14
Posted 19 August 2017 - 12:50 AM
As above, lower ball joints are press-fit.
You can remove them with a lump hammer (a smaller hammer just don't get the job done) by supporting the underside of the LCA on either side of the ball joint and hitting the top of the (threaded) shaft, knocking the BJ out through the bottom of the control arm, but I would recommend using a hydraulic press.
Some of them move easily, some don't. Try to knock it out squarely as it's easy to stretch or distort the control arm making fitment of the new BJ a lot harder... I've actually seen BJs that just slip in & out of the LCA after it's been stretched!
If using a press you need a set of suitably-sized sockets or pipe, one to fit over the base of the BJ to press it out, another to fit over the top of the BJ when pressing it back in, plus another that fits the flat circumference on the bottom of the BJ to press it in evenly.
For the backyard mechanic, I'd suggest maybe knocking it out with a hammer yourself, but paying a local repair shop to press the new ones in, I'm not saying it can't be done at home with a hammer, but it's ten times easier with a press.
Edited by Bigfella237, 19 August 2017 - 12:51 AM.
#12
Bigfella237
-
- Members
-
- 4,369 posts
Socially Distant
- Name:Andrew
- Location:Far South Coast of NSW
- Car:(s) not as many as I'd like but more than I've got space for!
- Joined: 31-October 14
Posted 19 August 2017 - 12:58 AM
I forgot to mention, if having everything powder coated, tell them to go easy on the coating inside the lower BJ hole (and the control arm bush holes too), the thickness of the coating can make it impossible to get the new BJs to press in properly.
Not a big drama as you just need to clean it back out with a file, but it's just one extra hassle that can be avoided.
#13
S pack
-

- Members
-
- 15,538 posts
Scrivet Counter
- Name:Dave
- Location:Luggage Point
- Car:73 LJ
- Joined: 25-January 10
Posted 19 August 2017 - 08:48 AM
I would be wary of using a file to remove powder coating from a bush or ball joint hole. You will inevitably start removing metal from the edges of the holes with the file before all the powder coating is removed from the centre.
#14
Bigfella237
-
- Members
-
- 4,369 posts
Socially Distant
- Name:Andrew
- Location:Far South Coast of NSW
- Car:(s) not as many as I'd like but more than I've got space for!
- Joined: 31-October 14
Posted 19 August 2017 - 08:57 AM
Yep fair point Dave, although removing powder coating will be hard work with sand paper alone! Either way, prevention is better than the cure.
#15
_76lxJAS_
_76lxJAS_
-

- Guests
Posted 19 August 2017 - 10:57 AM
Just tape off the area that the bj seats against? Can just brush sum etch or something on after the powdercoat
#16
rodomo
-

- Members
-
- 17,997 posts
To advertise here, call 13TORANA
- Name:R - O - B Dammit!
- Location:Way out west of Melbourne Awstraylya
- Joined: 10-December 05
Posted 19 August 2017 - 10:38 PM
Real men used to bash em out n bash em in then spit on the ground 
#17
Misc
-
- Members
-
- 128 posts
Forum Member
- Name:Dylan
- Location:Brisbane, QLD
- Car:LX Sunbird
- Joined: 10-October 15
Posted 21 August 2017 - 02:26 PM
bashed out indeed haha, might buy something to put them back in though or go to a mechanic to put them in haha.


0 user(s) are reading this topic
0 members, 0 guests, 0 anonymous users

