 IMG_28Apr2019at72328pm.jpg 248.69K
14 downloads
IMG_28Apr2019at72259pm.jpg 236.21K
10 downloads
IMG_28Apr2019at72428pm.jpg 183.64K
10 downloads
IMG_28Apr2019at72451pm.jpg 170.36K
10 downloads
IMG_28Apr2019at72328pm.jpg 248.69K
14 downloads
IMG_28Apr2019at72259pm.jpg 236.21K
10 downloads
IMG_28Apr2019at72428pm.jpg 183.64K
10 downloads
IMG_28Apr2019at72451pm.jpg 170.36K
10 downloads


Forum Fixture

 View Garage
Posted 28 April 2019 - 07:38 PM
IMG_28Apr2019at72328pm.jpg 248.69K
14 downloads
IMG_28Apr2019at72259pm.jpg 236.21K
10 downloads
IMG_28Apr2019at72428pm.jpg 183.64K
10 downloads
IMG_28Apr2019at72451pm.jpg 170.36K
10 downloads
Lotsa Posts!

Posted 01 May 2019 - 09:26 AM
Have noticed when they get a tap on the rails they end up wih a depression in the roof above the B pillar,
It goes away mostly once the rail is put in is right place.
The seam across the firewall usually opens up a tad as well.
Possibly things to check
Forum Fixture
View Garage
Posted 01 May 2019 - 12:26 PM
Have noticed when they get a tap on the rails they end up wih a depression in the roof above the B pillar,
It goes away mostly once the rail is put in is right place.
The seam across the firewall usually opens up a tad as well.
Possibly things to check
Forum Fixture
View Garage
Posted 13 May 2019 - 10:59 AM
"Have you still got that Torana!"

Posted 13 May 2019 - 06:52 PM
Forum Fixture
View Garage
Posted 13 May 2019 - 07:11 PM
Lotsa Posts!
Posted 14 May 2019 - 12:21 PM
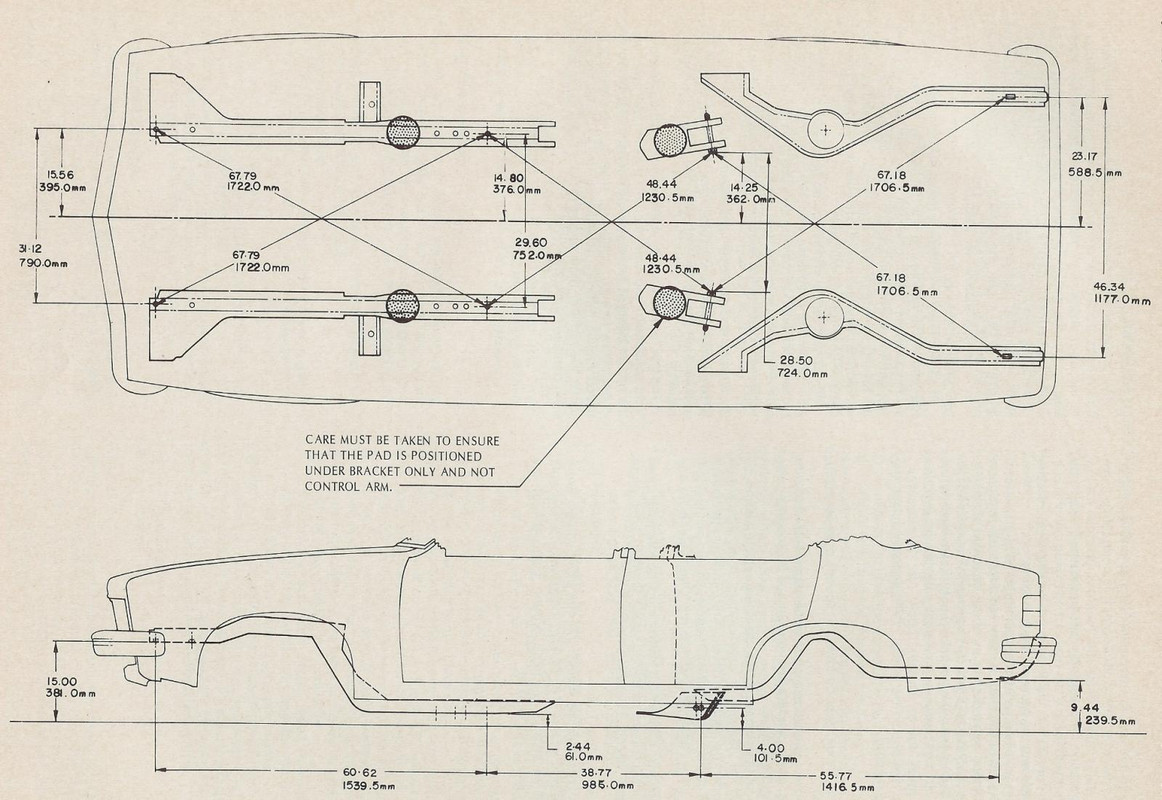
The chassis drawing floating around is all you need to get it right.
A good start would have been the distance between the gearbox crossmember bolt holes.
Then everything else would fall into place fairly easily.
Spirit level, good long straight edge and a tape measure.
My old mate panel beater had a measuring tool that extended equally either side of centre somehow.
Should have paid more attention to it.
Made measurements off the centreline a breeze.
Socially Distant

Posted 14 May 2019 - 12:57 PM
All of the above but with the addition of an absolute must have, being a perfectly flat floor or some other flat, level datum to work from.
You will also need a plumb-bob (or if you want to get fancy, a laser plumb-bob like tilers use will save you a heap of setup time).
Then just put masking tape on your floor so you can mark the centres from the drawing (below) and measure across the floor.
Forum Fixture
View Garage
Posted 14 May 2019 - 01:42 PM
To advertise here, call 13TORANA

Posted 14 May 2019 - 09:01 PM
Weld a bit, measure, measure the measure. Have a beer. Look at it. Measure the tape measure. Weld a bit. Have another beer (or two?). Spot weld another bit, measure, stand back and look at it while having a beer.
Do the next bit tomorrow and good luck! 
Lotsa Posts!
Posted 16 May 2019 - 12:09 PM
Measure, then measure again.
I reckon some clecos would be the best investment you could make to get it right.
Probably go for the bigger ones. The usual size is 1/8th, and I think the bigger ones are 3/16th.
Means that if you need to move things, you only have a small hole to fix up at the end.
They are cheap, and have immense holding power for what they are.
I would reckon perhaps 40 or 50 to help hold things together would make the job so much easier.
Forum Fixture
View Garage
Posted 22 May 2019 - 04:01 PM
To advertise here, call 13TORANA
Posted 22 May 2019 - 09:20 PM
Trial fit everything as you go...……...time consuming but worth it in the end.
Forum Fixture
 View Garage
Posted 24 May 2019 - 08:54 AM
Brings back memories of when I did my car, difference with mine was the tunnel/firewall were pushed back 6 inches from the crash. After we pulled that out, it was very much like your shell. I got a full donor front end with rails intact, stripped the firewall out, cleaned it up and placed it up to the body, and it was crazy close to being an exact match. Just did a couple of tac welds here and there after clamping and measuring, put guards and bonnet on, check gaps and alignment, weld a little bit here and there, more checking, adjusting so on. In the end all good. Just be patient, and double check.

Posted 11 September 2019 - 11:07 AM
hi Dan,
i just spotted your location I'm also in gladstone.
Forum Fixture
View Garage
Posted 12 September 2019 - 07:50 PM
hi Dan,
i just spotted your location I'm also in gladstone.
Forum Fixture
View Garage
Posted 13 April 2020 - 07:46 PM
BB49A028-BDE0-4630-8457-233663A163EF.jpeg 223.04K
14 downloads
446FF39B-AA22-49CE-8B7F-FA6EA1E81C56.jpeg 356.35K
13 downloads
3961848D-4D37-4515-808C-2639CA789A94.jpeg 388.89K
12 downloads
Forum Fixture
View Garage
Posted 13 April 2020 - 07:52 PM
A15C765A-C658-4A43-BF49-35FCD0CEF148.jpeg 244.82K
10 downloads
38E865DA-7B88-471B-B46A-483B3A159B77.jpeg 257.58K
9 downloads
F9A319B5-02C6-4CA9-AE50-549CA217C57E.jpeg 157.69K
9 downloads
73C2346B-61AB-4529-9A3C-9C58281656D6.jpeg 144.43K
9 downloads
Forum Fixture
View Garage
Posted 14 April 2020 - 03:37 PM
E3B8D79A-1884-4E24-BBF3-A5C98B77423B.jpeg 300.13K
8 downloads
704E3469-C45E-4E65-986A-213C40E0A9E9.jpeg 410.23K
8 downloads
Forum Fixture
View Garage
Posted 14 April 2020 - 03:41 PM
3D1F3C67-8E39-4DB5-AC17-22F1C7F6C763.jpeg 307.19K
8 downloads
Forum Fan
Posted 14 April 2020 - 05:26 PM
The only holes should be the 2 big ones for the heater. And then the 2 in the corners that lead to drain it out the side behind the fendersPics are a bit dark. In this next pic there is 2 holes in the back of the phlenum, should they be there or should I weld them up. Behind glovebox area.
3D1F3C67-8E39-4DB5-AC17-22F1C7F6C763.jpeg

Edited by Mitchyboy, 14 April 2020 - 05:27 PM.
Forum Fixture
View Garage
Posted 14 April 2020 - 05:50 PM
Forum Fixture
View Garage
Posted 10 May 2020 - 05:25 PM
31DEE1F2-A3D4-4460-B219-C707E6188B02.jpeg 275.51K
7 downloads
57D5447C-6FF4-4320-B349-965F5A280659.jpeg 324.52K
7 downloads
Forum Fixture
View Garage
Posted 10 May 2020 - 05:29 PM
0C967FEE-0301-4DA3-817C-D3E1DDAF7C86.jpeg 323.23K
10 downloads
Forum Fixture
View Garage
Posted 11 May 2020 - 04:38 PM
370A2A9A-5E4B-4485-BFA8-9E8DE31974BA.jpeg 282.78K
9 downloads


0 members, 0 guests, 0 anonymous users

