


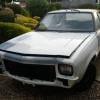
I know it does look wider than the L34 ones but not as wide as the repliglass a9x ones. From photos and pics I've seen anyways.I think that is Greg Manion's car, in which case they are the A9X bolt pattern flare, but they don't look as wide as the original ones.
The colour is Casino Blue.Greg Manion Casino Blue.jpg
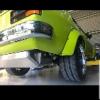
This gives you an idea of the size of the originals. (10 inch rims)
Sent from my SM-G965F using Tapatalk


 View Garage


