Jump to content


- - - - -

My UC Project L98 and TR6060


  • Please log in to reply
35 replies to this topic

#1 _Martin_

_Martin_
  • Guests

Posted 06 April 2018 - 03:37 PM

Hi Everyone,


I’ve had my Torana since I was 17 not long before I originally signed up here, about 5-6 years ago I took it off the road and removed the 202 and 5 speed that was in it in preparation for an engine conversion. The Torana project stopped completely when I discovered a love for motorcycles and moved out of home. No matter how many times my Mum asked me if I wanted to sell the car over the years I would always say no because I knew I had to see it back on the road one day. Unfortunately it took a pretty severe motorcycle accident in May last year to give me a warped opportunity to get the Torana back on the road before buying another bike. :tease:


Before all the plans had stopped I had the front hubs changed to HQ stud pattern and updated the brakes with a Hoppers kit, I had a 9inch installed with disk brakes, HQ Stud pattern and a True Trac centre. It was then parked under cover at my parents and that is where it has sat since. The original plan was a 304 and 5 speed but now changed my mind and recently purchased an L98 and 6 speed conversion with the Tuff mounts conversion kit from Muscle Garage.


I’m going to look at doing as much of the conversion myself with some close friends, none of which are mechanics :D .  I figure we should be able to do some of the conversion before taking it to a workshop for headers, exhaust and tailshaft (among some other things probably).


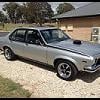
Hopefully I can use the forums and any advice from some of the knowledgeable people here to guide me in the right direction for this project. I’ll try and keep this updated with pictures as I progress, for the opening post I’ll leave you with pictures of its current state as of last weekend after a quick wash.


HSbwnS9.jpg

2reLJ3z.jpg


Plans are from now is to collect parts required from the conversion while cleaning up the engine bay. I need to clear up all the wiring, remove anything that isn't necessary and do some prep for a coat of paint.


Martin


#2 neglectedtorana

neglectedtorana

    Forum Fixture

  • Members
  • PipPipPipPipPip
  • 965 posts
  • Name:Tom
  • Location:Central Coast
  • Car:LX Torana Sunbird
  • Joined: 06-March 12

Posted 06 April 2018 - 06:54 PM

Hi Martin,


Sounds like a big project, have you spoken to an engineer about the L98 and 6 speed? That would be a good place to start.

Hope the project goes well and fun, nice that you have had the car for a long time. Be a great car when you get finished.


Cheers, Tom


#3 Redslur

Redslur

    Has been Torana owner

  • Members
  • PipPipPipPipPipPip
  • 3,532 posts
  • Name:Gerry
  • Location:Canberra
  • Car:HQ GTS Replica 350.
  • Joined: 08-November 05

Posted 06 April 2018 - 10:11 PM

Great to see you take on a UC project.  Not enough peeps have seen the potential in them.  Looking forward to seeing your work progress.  Go for Gold mate!!


#4 Heath

Heath

    I like cars.

  • Administrators
  • PipPipPipPipPipPipPip
  • 18,314 posts
  • Name:Heath
  • Location:Eastern Suburbs, Melbourne
  • Car:Heavily Modified UC Sunbird Hatchback
  • Joined: 07-November 05
Garage View Garage

Posted 08 April 2018 - 08:49 PM

Welcome back Martin.


Cars are better than bikes. Shame you had the recent incident. Look forward to seeing what you come up with on this UC. :)


#5 _Martin_

_Martin_
  • Guests

Posted 09 April 2018 - 06:02 PM

Hi Martin,


Sounds like a big project, have you spoken to an engineer about the L98 and 6 speed? That would be a good place to start.

Hope the project goes well and fun, nice that you have had the car for a long time. Be a great car when you get finished.


Cheers, Tom

Thanks Tom I'm looking forward to learning some new things and getting into it.

Great to see you take on a UC project.  Not enough peeps have seen the potential in them.  Looking forward to seeing your work progress.  Go for Gold mate!!

Thanks mate

Welcome back Martin.


Cars are better than bikes. Shame you had the recent incident. Look forward to seeing what you come up with on this UC. :)

Thanks Heath I remember reading some of your threads back in the day and recently read the UC hatch one, your doing some awesome work on the UC! Don't know if I can agree about the car > bikes though haha.


I'm working on getting things together to prep the engine bay for paint as soon as possible. I have access to all my old mans shed and his tools but unfortunately not the experience to go with them, what's everyone's recommendations for stripping the engine bay back for paint? 


I had a look through the paint and panel section but I can't find anything for what I need, looks like I'll need some strip discs to remove the paint is there anything else for harder to reach places? 


He has a fairly new paint gun (unsure of specs) what type of primer should I be looking to lay down after the paints removed?


Sorry about all the questions, if anyone has a link to relevant guides/info for someone new to panel and paint I'd appreciate it!


#6 _livo74_

_livo74_
  • Guests

Posted 09 April 2018 - 07:58 PM

you are a long way off asking as many questions as i did. 

i long way off. hahahaha


#7 _Lazarus_

_Lazarus_
  • Guests

Posted 10 April 2018 - 09:48 AM

I was going to say have a look at Dirtbag's threads but without the pics it's not the same.


Going to Youtube and watching half a dozen good tutorials is always helpful on just about any subject..


#8 _Martin_

_Martin_
  • Guests

Posted 10 April 2018 - 03:49 PM

I was going to say have a look at Dirtbag's threads but without the pics it's not the same.


Going to Youtube and watching half a dozen good tutorials is always helpful on just about any subject..

Thanks mate I remember Dirtbags thread from a few years a go and went back through it recently, as you said it's just not the same without the pictures.


I'll be sure to check out some videos, at the moment I'm having a look at buying a cheap Sandblast gun attachment for a compressor and giving that a go. 


#9 Rockoz

Rockoz

    Lotsa Posts!

  • Members
  • PipPipPipPipPipPip
  • 3,967 posts
  • Name:Rob
  • Location:Cowra NSW
  • Joined: 21-September 08

Posted 11 April 2018 - 10:20 AM

Try paint stripper first.

Then the strip discs.

I bought a cheap sandblaster from Supercheap.

The type with its own canister like a spray gun.

I took off all the add on bits on the nozzle end and it makes for a good spot blaster.

Better than with the attachments.

It would be ideal for the hard to get to places you cant reach with stripper and discs.


#10 Heath

Heath

    I like cars.

  • Administrators
  • PipPipPipPipPipPipPip
  • 18,314 posts
  • Name:Heath
  • Location:Eastern Suburbs, Melbourne
  • Car:Heavily Modified UC Sunbird Hatchback
  • Joined: 07-November 05
Garage View Garage

Posted 11 April 2018 - 12:51 PM

I used to avoid using paint stripper (not sure why) but I love using the aerosol paint stripper now. They work quickly (at least through part of the depth of paint) and I hit the wet paint stripper with a wire wheel. Most of it just falls off, but you'll need to do a few layers.

I'd go to a paint shop and talk to them about their products. There are some really nice epoxy kits around nowadays that are ideal for going straight over your bare metal. Do your filler work ontop of the epoxy you use, and then seal it again with that before going to high fill. That's the idea, anyway.

#11 axistr

axistr

    Forum Fixture

  • Members
  • PipPipPipPipPip
  • 1,169 posts
  • Location:North west sydney
  • Joined: 19-November 05
Garage View Garage

Posted 11 April 2018 - 06:38 PM

I just used good quality 80 grit sand paper with an air orbital sander on all my outer panels, made sure you kept it moving and not heat up the metal in one area to much. Didn't take all that long, I use paint stripping wheels inside the door openings and engine bay. I've tried paint strippers which overall  took me longer in the end and very messy. I do a couple of panels at a time and hit the bare metal panels with an epoxy primer so they don't surface rust and do any repairs straight over the epoxy prime. If you repair over epoxy primer you don't get any sink back over time. Much safer way of doing it.


#12 _Martin_

_Martin_
  • Guests

Posted 15 April 2018 - 01:13 PM

Hi Everyone, 


Thanks for the info regarding prep, I did get a chance to read it before organising a few things and it helped me a lot. So the engine bay is primered after the weekend, pretty stoked even though its just an amateur job it feels good doing it together with mates and family. 


We started by taking everything that didn't need to be there out and then taping up the engine bay and getting ready for sand blasting. We had some issues with pressure on the blaster (probably the compressor) so we switched to discs and worked with numerous tools to clear up any surface rust and atleast get the car feeling smooth before using the epoxy primer.


mTbukIK.jpg

bE9cKLY.jpg

T7JBWDF.jpg

RikoEyZ.jpg

tucU8gC.jpg

yS1vl4O.jpg


Cheers


Martin


#13 _Martin_

_Martin_
  • Guests

Posted 30 April 2018 - 05:35 PM

Hi everyone, 

A little more progress, ended up removing the seats and carpet from the car as well as the fuel tank before moving it to a mates place on Saturday. I unexpectedly got some updates late Saturday night as he and my brother in law decided to have a few drinks and test fit the engine with the mounts.


They started by taking the gearbox off and found what appears to be an upgraded clutch, believe its an Exedy Push Button Heavy Duty product that I didn't know was in it!

cIYn67m.jpg


Engine sitting in the car

S3hikrD.jpg

usIBJN2.jpg


I have a couple of questions regarding the accessories on the engine, I'm not going to be running power steering so I believe I need an Idler pulley or is it possible to high mount the alternator and just get a new belt? This looks like it does just that https://www.rodshop....gines-1569.html do I need to put something where the alternator was or can it be left as is?


#14 neglectedtorana

neglectedtorana

    Forum Fixture

  • Members
  • PipPipPipPipPip
  • 965 posts
  • Name:Tom
  • Location:Central Coast
  • Car:LX Torana Sunbird
  • Joined: 06-March 12

Posted 30 April 2018 - 08:10 PM

I used an idler where the power steer had been, mine would be better if the belt wasn't so close to where I put my remote oil filter which won't be an issue with your sump

If you move the alternator to where the power steer was I don't think it will need another idler but I would want to see a photo of one mounted to be sure and see how it sits above the chassis rail

Hopefully Rod Shop supply it with a belt and instructions

Attached File  P1100908.JPG   155.02K   13 downloads

Attached File  P1100793.JPG   171.04K   9 downloads

#15 _Martin_

_Martin_
  • Guests

Posted 30 April 2018 - 10:11 PM

I used an idler where the power steer had been, mine would be better if the belt wasn't so close to where I put my remote oil filter which won't be an issue with your sump

If you move the alternator to where the power steer was I don't think it will need another idler but I would want to see a photo of one mounted to be sure and see how it sits above the chassis rail

Hopefully Rod Shop supply it with a belt and instructions

attachicon.gif P1100908.JPG

attachicon.gif P1100793.JPG


I used an idler where the power steer had been, mine would be better if the belt wasn't so close to where I put my remote oil filter which won't be an issue with your sump

If you move the alternator to where the power steer was I don't think it will need another idler but I would want to see a photo of one mounted to be sure and see how it sits above the chassis rail

Hopefully Rod Shop supply it with a belt and instructions

[im]http://www.gmh-toran.../attachicon.gif[/img] P1100908.JPG

[im]http://www.gmh-toran.../attachicon.gif[/img] P1100793.JPG


Hey Tom,

Thanks for the info and pictures I like the colour of your car too!

That's the one thing I was looking for too a picture with it mounted on an engine. I'll give them a call tomorrow and see if they have a photo of it on a car and if they know it fits a Torana.

Thanks

Martin

Sent from my SM-G950F using Tapatalk

#16 _Martin_

_Martin_
  • Guests

Posted 07 May 2018 - 05:50 PM

Hi everyone just a quick update, did a little sand blasting over the weekend to tidy up the booster and some other items. Have the gearbox going to a transmission shop to install the malwood rear case kit.

Replaced the existing clutch with a malwood under dash kit as well.

Also got in a new Radiator to suit the Torana and l98 which looks great.

Ordered an AC compressor relocation kit today, think that I'll bypass the steering pump all together.

9fK77EN.jpg
8K94W7Y.jpg
ytuLP9A.jpg
Lq2Pz7R.jpg
dWO1kn7.jpg
B7f8vNG.jpg
jps3mnR.jpg
Pg3LcNu.jpg

Sent from my SM-G950F using Tapatalk

#17 axistr

axistr

    Forum Fixture

  • Members
  • PipPipPipPipPip
  • 1,169 posts
  • Location:North west sydney
  • Joined: 19-November 05
Garage View Garage

Posted 08 May 2018 - 09:33 AM

Might be bias, but why not just put the original power steering pump back on and run power steering.


#18 _Martin_

_Martin_
  • Guests

Posted 08 May 2018 - 09:50 AM

Might be bias, but why not just put the original power steering pump back on and run power steering.

Hi Axistr, honestly I haven't looked into setting up power steering on the car. At this point I'm not going to worry about it as i never had issues without it previously.

But you never know I might get it on the road and find I can't handle the car without it!


Sent from my SM-G950F using Tapatalk

#19 BIG KEV

BIG KEV

    Forum Fixture

  • Members
  • PipPipPipPipPip
  • 1,202 posts
  • Name:Kevin
  • Location:SYDNEY
  • Car:LHSLR5000 and The 6LT Project
  • Joined: 02-January 12

Posted 08 May 2018 - 01:26 PM

I used the original power steering pump and run power steering

#20 _Martin_

_Martin_
  • Guests

Posted 08 May 2018 - 01:30 PM

I used the original power steering pump and run power steering

Thanks Kev, I'll keep the pump for now, can always install power steering later on.

Do you have info in any of your posts about what you used to set power steering up?

Sent from my SM-G950F using Tapatalk

#21 BIG KEV

BIG KEV

    Forum Fixture

  • Members
  • PipPipPipPipPip
  • 1,202 posts
  • Name:Kevin
  • Location:SYDNEY
  • Car:LHSLR5000 and The 6LT Project
  • Joined: 02-January 12

Posted 08 May 2018 - 03:57 PM

What LS motor are you running ???


#22 _Martin_

_Martin_
  • Guests

Posted 08 May 2018 - 04:17 PM

What LS motor are you running ???

LS2

Sent from my SM-G950F using Tapatalk

#23 BIG KEV

BIG KEV

    Forum Fixture

  • Members
  • PipPipPipPipPip
  • 1,202 posts
  • Name:Kevin
  • Location:SYDNEY
  • Car:LHSLR5000 and The 6LT Project
  • Joined: 02-January 12

Posted 08 May 2018 - 05:07 PM

I have the same set up as you 

To run power steering you need to convert back to LS1 

Because the LS2 pump hits near the battery tray 

You will need to change the power steering pump ,water pump and Alt all back to LS1 

If you want more exact details Pm me your phone number and i will walk you through what i did


#24 _Martin_

_Martin_
  • Guests

Posted 08 May 2018 - 06:42 PM

I have the same set up as you
To run power steering you need to convert back to LS1
Because the LS2 pump hits near the battery tray
You will need to change the power steering pump ,water pump and Alt all back to LS1
If you want more exact details Pm me your phone number and i will walk you through what i did

Hi Kev,

Really appreciate the offer mate, I'll concentrate on getting the car running for the moment and see if I need or want power steering then. If I need it I'll be sure to take up your offer .

Cheers,

Martin

Sent from my SM-G950F using Tapatalk

#25 _Martin_

_Martin_
  • Guests

Posted 18 August 2018 - 10:23 AM

Hi Everyone


Sorry about the long delay between posts I've been busy getting things together and slowly putting them in the car. I have a lot of pictures here I will try and get through, basically at the stage now where I'm ready to get the car wired up then sort out exhaust and fix up some second hand 4-1 Headers I have.


These are the headers I picked up at a much cheaper price than getting them made new :) The two front pipes need modification to clear the K-Frame as they were running on an engine plate in an LH. 

6MTeWlF.jpg

zGs6YbT.jpg


Purchased one of the drop tanks from Ebay and had the Phantom Aeromotive Fuel pump kit built into it. Had to cut out the spare wheel well in the boot because of where it's located in the UC.

wIcPqoq.jpg

JHrnUSD.jpg

jFW3BV2.jpg


0 user(s) are reading this topic

0 members, 0 guests, 0 anonymous users