Jump to content


- - - - -

The Sally Report

LC GTR Restoration 1971 The Marty Report Girl Power

  • Please log in to reply
980 replies to this topic

#51 Potta

Potta

    Oh My, Don't you post alot

  • Members
  • PipPipPipPipPipPipPip
  • 6,026 posts
  • Name:Craig
  • Location:Gozzy, WA
  • Car:LC GTR, LC 4 door
  • Joined: 01-May 09

Posted 29 July 2019 - 01:22 PM

How's the relationship with the neighbors Marty now they have seen another project.

Sent from my SM-A520F using Tapatalk


yeah I was wondering about this too.


Also, where's the LJ while all this is happening? 


There's a spot in my shed if you need to store it somewhere.  :P


#52 sibhs

sibhs

    Lotsa Posts!

  • Members
  • PipPipPipPipPipPip
  • 2,702 posts
  • Name:Martin
  • Location:Perth
  • Car:LJ Coupe S
  • Joined: 27-July 12

Posted 04 August 2019 - 11:06 PM

Restoring a Torana is an amazing thing, especially on GMH Torana.  Just received a template and instructions from John and think it's so cool how we have these real people all over Australia willing to help out.  I keep telling Sally, this is what it's all about, the adventure and people you meet, the stuff you learn and friends you keep. This is the best part of owning a Torana.  Thanks all.


Attached File  IMG_8322.jpg   214.15K   24 downloads

Using supplied template I cut up a few bits for under guard and cowl section


Attached File  IMG_8319.jpg   146.2K   21 downloads

Made a wood template


Attached File  IMG_8318.jpg   125.6K   21 downloads

Screwed it down and made a metal template and super glued it down to metal


Attached File  IMG_8320.jpg   165K   24 downloads

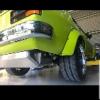
A press would have been better but I don't have one so used a jack and my car


Attached File  IMG_8325.jpg   145.5K   21 downloads

The final part


Attached File  IMG_8358.jpg   189.64K   29 downloads

Made the rear brace and got the car rolling around again, plenty more room to store stuff under car.


Attached File  IMG_8370.jpg   198.69K   21 downloads

I've made it higher than expected by accident but at least the sill welding will be easy. I can almost walk underneath it. Gene will get that one.


I knew it wouldn't be long before you started another Torana Marty.


Looking forward to seeing how this one turns out.

Hi Craig, I sold most of my resto stuff off and said I'll never do another one at home. Haha


How's the relationship with the neighbors Marty now they have seen another project.

Sent from my SM-A520F using Tapatalk

One neighbour is great and comes over to help. Mid 70's aussie farmer.  The other neighbour (wingeing pom 60ish) I've been trying to keep this car hidden from and this time the resto is done 10 metres further from his place, so time will sell.


yeah I was wondering about this too.


Also, where's the LJ while all this is happening? 


There's a spot in my shed if you need to store it somewhere.  :P

LJ is in the back work shop, but thanks for the offer.


#53 _LONA-CK_

_LONA-CK_
  • Guests

Posted 05 August 2019 - 07:30 AM

Nice job on the template. Done great with the indentation

Cheers john


#54 rodomo

rodomo

    To advertise here, call 13TORANA

  • Members
  • PipPipPipPipPipPipPip
  • 17,998 posts
  • Name:R - O - B Dammit!
  • Location:Way out west of Melbourne Awstraylya
  • Joined: 10-December 05

Posted 05 August 2019 - 11:28 AM

What part is that?


#55 claysummers

claysummers

    Lotsa Posts!

  • Members
  • PipPipPipPipPipPip
  • 3,325 posts
  • Name:Clay
  • Location:Willunga
  • Car:186 FB Ute, 3.3 EK sedan
  • Joined: 13-December 18

Posted 05 August 2019 - 11:49 AM

Great job on the 1/2 ton press Marty.


Sent from my iPhone using Tapatalk

#56 S pack

S pack

    Scrivet Counter

  • Members
  • PipPipPipPipPipPipPip
  • 15,538 posts
  • Name:Dave
  • Location:Luggage Point
  • Car:73 LJ
  • Joined: 25-January 10

Posted 05 August 2019 - 04:47 PM

What part is that?

Under the curved ends of the windscreen cowl at the top of the A pillar.


#57 rodomo

rodomo

    To advertise here, call 13TORANA

  • Members
  • PipPipPipPipPipPipPip
  • 17,998 posts
  • Name:R - O - B Dammit!
  • Location:Way out west of Melbourne Awstraylya
  • Joined: 10-December 05

Posted 05 August 2019 - 09:29 PM

Under the curved ends of the windscreen cowl at the top of the A pillar.

http://www.gmh-toran...read/?p=1022553

Coulda sent one over?

Edited by rodomo, 05 August 2019 - 09:30 PM.


#58 _LONA-CK_

_LONA-CK_
  • Guests

Posted 06 August 2019 - 08:42 AM

No not that one mate.

Its the one that is under the both ends of the scuttle panel.


Cheers gong


Edited by LONA-CK, 06 August 2019 - 08:45 AM.


#59 _LONA-CK_

_LONA-CK_
  • Guests

Posted 06 August 2019 - 08:57 AM

This part


Attached Files


#60 rodomo

rodomo

    To advertise here, call 13TORANA

  • Members
  • PipPipPipPipPipPipPip
  • 17,998 posts
  • Name:R - O - B Dammit!
  • Location:Way out west of Melbourne Awstraylya
  • Joined: 10-December 05

Posted 06 August 2019 - 09:51 PM

Ahhh……...thank you...………..fortunately I didn't have to dig that deep. :huh:


#61 sibhs

sibhs

    Lotsa Posts!

  • Members
  • PipPipPipPipPipPip
  • 2,702 posts
  • Name:Martin
  • Location:Perth
  • Car:LJ Coupe S
  • Joined: 27-July 12

Posted 16 August 2019 - 09:06 PM

Not much action on the GTR lately.  I've been converting the carport into a suitable workshop. This all started while walking through Bunnings and spotting an 870mm wide fibreglass door with glass panels for $10. Perfect to have as an entrance to the area.  So a quick wall was built to which will be a perminant improvement to the house. It's since been texture coated and painted and looks pretty good.


Attached File  IMG_8369 (1).jpg   86.98K   19 downloads


Attached File  IMG_8378.jpg   68.38K   20 downloads


Next was the otherside which was mostly blocked with old school lockers. Decided to cut one locker off each bank to leave a wider access through.  Another wall was built which Sally said requires skylights windows up the top. I'll fit one sheet of glass and leave the other opening as an air inlet which will be screened and filtered to bring in clean filtered air.  Just need to find a cheap 620mm door to finish this side off.


Attached File  IMG_8403.jpg   143.87K   20 downloads


Attached File  IMG_8406.jpg   278.11K   19 downloads


Attached File  IMG_8461.jpg   157.31K   20 downloads


Lastly was the timber slatted wall needed sealing and and exhaust fan fitted. So I removed a few cedar planks and put up some crappy pine to screw in some clear sheeting too.  I'll seal the fan to the plywood and run a long piece of ducting to another part of the property.  In front of the exhaust fan in the booth will be a boxed in section with filtering stuff as used in paint shops.


Attached File  IMG_8466.jpg   224.42K   18 downloads


Attached File  IMG_8467.jpg   299.46K   17 downloads


I then needed more light and always wanted to try these flat LED panels, so far they seem great. Two for the ceiling and one left to hang on the wall if required.


Attached File  IMG_8464.jpg   113.46K   18 downloads


Feels cosy and very spacious compared to where the LJ was restored. Also helps clearing out all the camping gear too.


Hope to get back into the car this week-end.


Marty


#62 lctriples

lctriples

    Forum Fan

  • Members
  • PipPipPipPip
  • 405 posts
  • Name:paul
  • Location:melbourne
  • Car:LC 2 door, HR prem wagon
  • Joined: 02-April 15

Posted 16 August 2019 - 10:53 PM

Marty, is there no end to your talent/s, great job! Has Sal picked out a colour yet? (apologies if it has already been mentioned in thread) Paul


#63 sibhs

sibhs

    Lotsa Posts!

  • Members
  • PipPipPipPipPipPip
  • 2,702 posts
  • Name:Martin
  • Location:Perth
  • Car:LJ Coupe S
  • Joined: 27-July 12

Posted 17 August 2019 - 10:01 AM

Hi Paul,

Yes, Sally has picked a colour and I've picked the interior. I've had a colour sample sprayed and the interior is being made at the moment.

Should be a great looking combination, very rare!

We will let everyone know a bit later on. Stay tuned!

Marty, is there no end to your talent/s, great job! Has Sal picked out a colour yet? (apologies if it has already been mentioned in thread) Paul


#64 Potta

Potta

    Oh My, Don't you post alot

  • Members
  • PipPipPipPipPipPipPip
  • 6,026 posts
  • Name:Craig
  • Location:Gozzy, WA
  • Car:LC GTR, LC 4 door
  • Joined: 01-May 09

Posted 17 August 2019 - 12:43 PM

Would be ironic if she has chosen a Gold colour....


#65 sibhs

sibhs

    Lotsa Posts!

  • Members
  • PipPipPipPipPipPip
  • 2,702 posts
  • Name:Martin
  • Location:Perth
  • Car:LJ Coupe S
  • Joined: 27-July 12

Posted 02 September 2019 - 10:56 PM

G'day,

Neighbour gave me an old door which I've fitted to garage side so now I have a closed in garage. It feels spacious and light and I'm ejoying working in much better conditions than the LJ build.


First plan of attack was to strip engine bay with paint stripper.


Attached File  IMG_8488.jpg   220.47K   20 downloads


Then hit it with the strip disc.


Attached File  IMG_8493.jpg   144.66K   18 downloads


Attached File  IMG_8495.jpg   164.1K   19 downloads


Next is sand blasting but I want to make an air dryer for the compressor.  Found a design on Youtub and copied that.  This was an expensive excersise with copper materials being about $250. Then I tried soldering with my little gas burner. Big waste of time.  Then I heard about a little Hot Devil mini oxy and gas system. $125 for that and then about two joins done before oxy ran out. Replacement was $30 so this was going to end up bad. Please note DO NOT BUY HOT DEVIL!!!!!  I managed to return the set with a loss of $33.

Decided to see if neighbour still had his oxy set, he did so borrowed it and did one join before gas started leaking out of the old hoses. Dam! Buy new hoses $45. Then two more joins done and it ran out of Oxy, Dam! Buy new bottle for $269 inc $200 deposit.

Finally got it all fitted to the compressor and bought a bigger water trap to suit. $185.


Attached File  IMG_8510.jpg   300.55K   20 downloads

These hose had seen better times.

Attached File  IMG_8524.jpg   254.25K   20 downloads


Attached File  IMG_8559.jpg   300.53K   23 downloads

Had real trouble finding a flexible hose to join the compressor to the fixed piping. In the end I've done this which will propably cause trouble later and will need changing.

Attached File  IMG_8560.jpg   88.58K   22 downloads


Attached File  IMG_8573.jpg   209.4K   23 downloads


Mostly done and again a shit storm of a mess to clean up.

Attached File  IMG_8574.jpg   155.99K   25 downloads


Marty


#66 Rockoz

Rockoz

    Lotsa Posts!

  • Members
  • PipPipPipPipPipPip
  • 3,964 posts
  • Name:Rob
  • Location:Cowra NSW
  • Joined: 21-September 08

Posted 03 September 2019 - 10:16 AM

A close up of the drier would be nice.

Poly pipe is okay if it is rated for the pressure.

Have seen many a shed plumbed for air with it.

And all take off points from the poly pipe at the top. 

The same should be done on any air line to reduce the possibility of any moisture that gets through the trap causing issues.


Im thinking of a drier assembly of sorts myself.

I was looking at a spiral of pipe.

Would be interesting to see yours a little better.


I hope you used silver solder and not lead solder.


Cheers


Rob


#67 koalasprint

koalasprint

    Forum Fan

  • Members
  • PipPipPipPip
  • 295 posts
  • Name:Steve
  • Location:Melbourne
  • Car:LX SS Hatch
  • Joined: 30-April 10

Posted 03 September 2019 - 11:45 AM

Shower is going to feel good after that job!


#68 grumpy xu1

grumpy xu1

    Lotsa Posts!

  • Members
  • PipPipPipPipPipPip
  • 2,809 posts
  • Name:Gary
  • Location:Queensland
  • Car:lj xu1
  • Joined: 01-February 10

Posted 04 September 2019 - 07:55 AM

I'm going with copper, for all my air lines, I've read about the poly fracturing, so i will be avoiding that. I go out of the compressor which has a drier built in, into a trap, into a storage tank, out at the top on the other side, water drain at the bottom & then into the copper line.

#69 Rockoz

Rockoz

    Lotsa Posts!

  • Members
  • PipPipPipPipPipPip
  • 3,964 posts
  • Name:Rob
  • Location:Cowra NSW
  • Joined: 21-September 08

Posted 04 September 2019 - 10:19 AM

I set up copper in my brothers exhaust shop.

50mm ring main fed by a small rotary compressor with its own receiver tank and drier built in.

it was a bit of an overkill for the shop, but we got it cheap at an auction at another of his properties.

Had been used by a kitchen door manufacturer. He used air tools for everything with about 20 blokes working on the floor full time.

The idea of the ring main was so that if there was a problem anywhere in the system it could be isolated without affecting too many other spots in the system.

The good poly is expensive. So are the fittings. But it still works out cheaper than copper.

I went through lots of silver solder. And araldite. I use araldite for all my air line fittings. Beats thread tape.


Cheers


Rob


#70 sibhs

sibhs

    Lotsa Posts!

  • Members
  • PipPipPipPipPipPip
  • 2,702 posts
  • Name:Martin
  • Location:Perth
  • Car:LJ Coupe S
  • Joined: 27-July 12

Posted 06 September 2019 - 09:30 PM

Here's a pic of the dryer.  You can follow the air route from the right with two drop down sections to capture some water. All other pipes are on a slope upward so any moisture can drain down.

I'm not sure if it's working that well but better than nothing.


Attached File  IMG_8527.jpg   310.76K   20 downloads


Got the crash pad back and I'm super happy with the result. Considereing the shape it was in before it is an amazing job.


Attached File  IMG_8203.jpg   176.63K   17 downloads


Attached File  IMG_8648.jpg   102.34K   18 downloads


Got stuck into the passenger door pillar by cutting out some rust on the outer skin.


Attached File  IMG_8579.jpg   151.34K   20 downloads


Attached File  IMG_8580.jpg   127.56K   21 downloads


Realised there was too much rust and decided to cut the whole skin off.


Attached File  IMG_8582.jpg   124.98K   21 downloads


Attached File  IMG_8583.jpg   138.08K   20 downloads


I'd recently seen someone was making a really good copy of the pillars so looked up the price and it was $560 a pair. Decided to have a go at making one, not much to loose as I have the metal here.


Attached File  IMG_8591.jpg   103.14K   17 downloads


Attached File  IMG_8593.jpg   102.51K   16 downloads


Attached File  IMG_8595.jpg   116.51K   18 downloads


Attached File  IMG_8609.jpg   112.49K   19 downloads


Feel like calling this car "Onion" Just so many layers to get through. Had a couple of sections around the hinge to fix.


Attached File  IMG_8622.jpg   119.33K   19 downloads


I applied "KBS Rust Blast" which treats the bare metal and turns it a golden colour.


Attached File  IMG_8667.jpg   142.97K   20 downloads


Attached File  IMG_8668.jpg   139.36K   22 downloads


I'm wrapped with how good this came out, fits sweet as.


#71 sibhs

sibhs

    Lotsa Posts!

  • Members
  • PipPipPipPipPipPip
  • 2,702 posts
  • Name:Martin
  • Location:Perth
  • Car:LJ Coupe S
  • Joined: 27-July 12

Posted 06 September 2019 - 09:51 PM

Also doing some engine bay rust removal.


Attached File  IMG_8577.jpg   95.82K   16 downloads


Attached File  IMG_8663.jpg   198.04K   19 downloads


Attached File  IMG_8664.jpg   161.78K   17 downloads


Attached File  IMG_8670.jpg   215.33K   17 downloads


Attached File  IMG_8671.jpg   134.93K   16 downloads


Attached File  IMG_8672.jpg   138.25K   16 downloads


Attached File  IMG_8673.jpg   198.12K   16 downloads


Attached File  IMG_8674.jpg   184.99K   16 downloads


Attached File  IMG_8676.jpg   161.8K   16 downloads


Attached File  IMG_8687.jpg   228.24K   16 downloads


Attached File  IMG_8689.jpg   173.06K   17 downloads


Marty


#72 rodomo

rodomo

    To advertise here, call 13TORANA

  • Members
  • PipPipPipPipPipPipPip
  • 17,998 posts
  • Name:R - O - B Dammit!
  • Location:Way out west of Melbourne Awstraylya
  • Joined: 10-December 05

Posted 06 September 2019 - 09:59 PM

Nice! :spoton:


#73 Mitchyboy

Mitchyboy

    Forum Fan

  • Members
  • PipPipPipPip
  • 390 posts
  • Name:Mitch
  • Location:Sydney
  • Car:Lh torana
  • Joined: 18-March 18

Posted 06 September 2019 - 10:05 PM

Looking good, top job on the pillar.
How good is the rust blast. So easy to use. I have been using it aswell.
I am planning to prep the entire car with it before applying the epoxy primer.


Sent from my SM-G965F using Tapatalk

#74 S pack

S pack

    Scrivet Counter

  • Members
  • PipPipPipPipPipPipPip
  • 15,538 posts
  • Name:Dave
  • Location:Luggage Point
  • Car:73 LJ
  • Joined: 25-January 10

Posted 06 September 2019 - 10:07 PM

Top work as usual Marty. :spoton: For some strange reason I have a hankering for some swiss cheese :blink:


#75 sibhs

sibhs

    Lotsa Posts!

  • Members
  • PipPipPipPipPipPip
  • 2,702 posts
  • Name:Martin
  • Location:Perth
  • Car:LJ Coupe S
  • Joined: 27-July 12

Posted 06 September 2019 - 11:05 PM

Looking good, top job on the pillar.
How good is the rust blast. So easy to use. I have been using it aswell.
I am planning to prep the entire car with it before applying the epoxy primer.


Sent from my SM-G965F using Tapatalk

Hi Mitch, Yeah I love the stuff, that's how I did my last car, applied it to a bare metaled car spinning on rotisserie so it got in every where. Then KBS Rust seal all my welds then epoxy the whole car in one go.


Top work as usual Marty. :spoton: For some strange reason I have a hankering for some swiss cheese :blink:

Thanks Dave and Rob, I'm collecting a big pile of cheese.


Nice! :spoton:


Also got the prop shaft back, all new uni's and balanced.


Attached File  IMG_8649.jpg   142.64K   17 downloads


and patched the hydraulic clutch holes.


Attached File  IMG_8677.jpg   132.82K   17 downloads


Attached File  IMG_8683.jpg   108.03K   17 downloads


Attached File  IMG_8686.jpg   115.53K   18 downloads


Used a light behind to see pin holes then welded them up.

Attached File  IMG_8684.jpg   162.43K   18 downloads


Marty


Also tagged with one or more of these keywords: LC GTR, Restoration, 1971, The Marty Report, Girl Power

1 user(s) are reading this topic

1 members, 0 guests, 0 anonymous users


    rodomo