Jump to content


Photo
- - - - -

LC GTR Resto


  • Please log in to reply
23 replies to this topic

#1 r2160

r2160

    Forum Fixture

  • Members
  • PipPipPipPipPip
  • 712 posts
  • Name:Glenn
  • Location:sydney
  • Car:2/71 LC GTR, 4/71 LC 4 'S'
  • Joined: 20-May 09

Posted 09 May 2020 - 08:25 PM

OK, so after much soul searching and being tempted to sell it and give up, I dont give up very well.


So here we go . . .


February 1971 LC GTR, original motor, pretty much terrible condition but complete.


https://www.flickr.c...6/shares/08A614


Edited by r2160, 09 May 2020 - 08:29 PM.


#2 sibhs

sibhs

    Lotsa Posts!

  • Members
  • PipPipPipPipPipPip
  • 2,702 posts
  • Name:Martin
  • Location:Perth
  • Car:LJ Coupe S
  • Joined: 27-July 12

Posted 09 May 2020 - 08:37 PM

Good on you Glenn, get stuck in to it.

It helps if you have the space, time and plenty of money, otherwise good luck.


Marty


#3 r2160

r2160

    Forum Fixture

  • Members
  • PipPipPipPipPip
  • 712 posts
  • Name:Glenn
  • Location:sydney
  • Car:2/71 LC GTR, 4/71 LC 4 'S'
  • Joined: 20-May 09

Posted 09 May 2020 - 08:39 PM

OK, just figuring out how to share photos


49873609201_a0d0d46ff0_c.jpg


Edited by r2160, 09 May 2020 - 08:40 PM.


#4 r2160

r2160

    Forum Fixture

  • Members
  • PipPipPipPipPip
  • 712 posts
  • Name:Glenn
  • Location:sydney
  • Car:2/71 LC GTR, 4/71 LC 4 'S'
  • Joined: 20-May 09

Posted 09 May 2020 - 08:44 PM

First task was to remove the front end, it was pretty ordinary


49873075413_1b9c96510a_z.jpg


Edited by r2160, 09 May 2020 - 08:45 PM.


#5 r2160

r2160

    Forum Fixture

  • Members
  • PipPipPipPipPip
  • 712 posts
  • Name:Glenn
  • Location:sydney
  • Car:2/71 LC GTR, 4/71 LC 4 'S'
  • Joined: 20-May 09

Posted 09 May 2020 - 08:49 PM

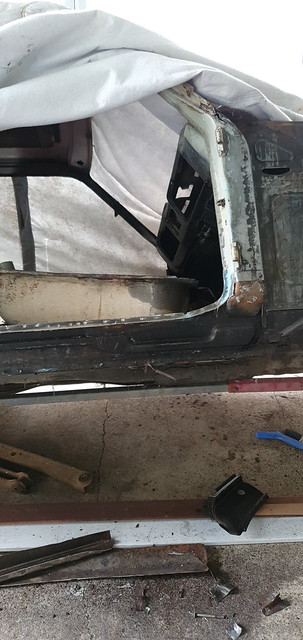
Found the front of the outer sill was missing so that was the first thing to remove


49873074698_72339b3803_z.jpg


#6 r2160

r2160

    Forum Fixture

  • Members
  • PipPipPipPipPip
  • 712 posts
  • Name:Glenn
  • Location:sydney
  • Car:2/71 LC GTR, 4/71 LC 4 'S'
  • Joined: 20-May 09

Posted 09 May 2020 - 08:59 PM

Before moving onto replacing the sill, the floor was toast so it was the first thing to be replaced.


49873074768_d97ebd2db8_z.jpg


and welded in


49874001272_bf833de41f_z.jpg[/url]


Edited by r2160, 09 May 2020 - 08:59 PM.


#7 r2160

r2160

    Forum Fixture

  • Members
  • PipPipPipPipPip
  • 712 posts
  • Name:Glenn
  • Location:sydney
  • Car:2/71 LC GTR, 4/71 LC 4 'S'
  • Joined: 20-May 09

Posted 09 May 2020 - 09:02 PM

I then had to replace the inner sill panel, however, I am currently waiting on a new guard to ensure the correct placement of the inner sill.


49873074618_e58a92ac62_z.jpg


#8 r2160

r2160

    Forum Fixture

  • Members
  • PipPipPipPipPip
  • 712 posts
  • Name:Glenn
  • Location:sydney
  • Car:2/71 LC GTR, 4/71 LC 4 'S'
  • Joined: 20-May 09

Posted 09 May 2020 - 09:05 PM

I have positioned and have the outer sill ready for Installation. I found that it didnt quite fit correctly. However, I have just purchased a shrinker stretcher set, and this enabled me to correct the sizing around the pillar. Fortunately, it appears the pillar on the drivers side is great. I also found that the bottom of the inner piece where the inner sill mounts was also rusted, so I made up a piece and replaced this also.


49873603951_df1fb74c4c_z.jpg


Edited by r2160, 09 May 2020 - 09:11 PM.


#9 r2160

r2160

    Forum Fixture

  • Members
  • PipPipPipPipPip
  • 712 posts
  • Name:Glenn
  • Location:sydney
  • Car:2/71 LC GTR, 4/71 LC 4 'S'
  • Joined: 20-May 09

Posted 09 May 2020 - 09:10 PM

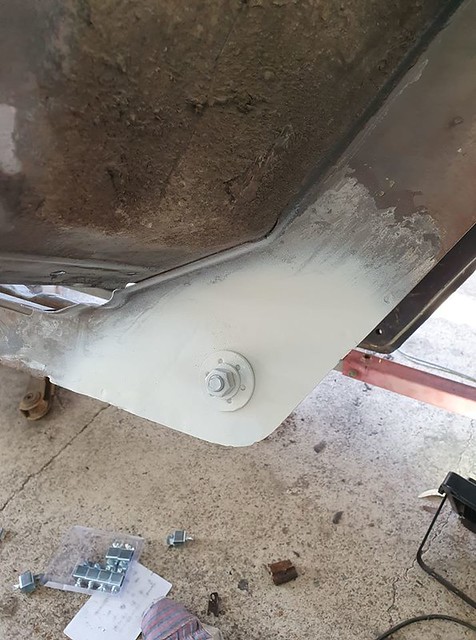
I did find that there was rust at the rear crossmember mount. I cut the side of the mount out and found the mounting tube was also rusted. I got some galvanised tube and made a new inner piece, replaced the rusted metal and rewelded the outer back into place.


[url=https://flic.kr/p/2iZaQaZ]49873715931_dfc2d06199_z.jpg


#10 r2160

r2160

    Forum Fixture

  • Members
  • PipPipPipPipPip
  • 712 posts
  • Name:Glenn
  • Location:sydney
  • Car:2/71 LC GTR, 4/71 LC 4 'S'
  • Joined: 20-May 09

Posted 09 May 2020 - 09:27 PM

While I wait for the guard to arrive, I thought I would check the drivers door. I found that the bottom of the door is pretty ordinary, so I pulled the door skin off and decided to tackle the repair of the door.


The door skin will be a pretty simple repair as it seems pretty good but I have to make a new bottom of the inner.


I bought new metal and made up a piece for the bottom. I used my new shrinker stretcher and started shaping the new piece.


49873069788_902186a9df_z.jpg


49873604221_d30840479b_z.jpg


That is the story so far. Still plenty to do . . . Did I mention I have no idea what I am doing . . .


#11 rodomo

rodomo

    To advertise here, call 13TORANA

  • Members
  • PipPipPipPipPipPipPip
  • 17,997 posts
  • Name:R - O - B Dammit!
  • Location:Way out west of Melbourne Awstraylya
  • Joined: 10-December 05

Posted 09 May 2020 - 10:17 PM

:spoton:


#12 sibhs

sibhs

    Lotsa Posts!

  • Members
  • PipPipPipPipPipPip
  • 2,702 posts
  • Name:Martin
  • Location:Perth
  • Car:LJ Coupe S
  • Joined: 27-July 12

Posted 09 May 2020 - 10:38 PM

Shrinker Stretchers are great.

How did your outer sill fit at the rear?  Mine seams a bit small and I'll have to do some work to get it lined up.


Going great guns.


Marty


#13 r2160

r2160

    Forum Fixture

  • Members
  • PipPipPipPipPip
  • 712 posts
  • Name:Glenn
  • Location:sydney
  • Car:2/71 LC GTR, 4/71 LC 4 'S'
  • Joined: 20-May 09

Posted 09 May 2020 - 11:34 PM

Apart from the inside where it fit to the A pillar, it actually fits quite well. I dont know if the Muscle Car parts are different to Rare Spares but the outer sill came from Muscle Car parts. The only thing I had to do was use the stretcher to fit the inside of the A pillar


#14 308 Sunbird

308 Sunbird

    Forum Fixture

  • Members
  • PipPipPipPipPip
  • 966 posts
  • Name:Stuart
  • Location:Melbourne
  • Car:SS Hatch, 308 Sunbird sedan-Improved Prod racer (sold), HZ Kingy wagon
  • Joined: 20-November 10

Posted 10 May 2020 - 08:59 AM

Looks like you know what you're doing to me. What is the colour and trim?

#15 r2160

r2160

    Forum Fixture

  • Members
  • PipPipPipPipPip
  • 712 posts
  • Name:Glenn
  • Location:sydney
  • Car:2/71 LC GTR, 4/71 LC 4 'S'
  • Joined: 20-May 09

Posted 10 May 2020 - 08:35 PM

It is originally a white car with black trim. Fortunately, when I bought the car, while the shell needs a lot of work, the interior is not bad. I could probably put it in as it is, however, it may well end up that I replace it all.]


The car was actually surprisingly complete when it arrived, only a few bits and pieces to collect.


I have been very lucky to know a few great guys that have helped me source mostly metal at this point.


#16 Ice

Ice

    Cool

  • Members
  • PipPipPipPipPipPipPip
  • 15,119 posts
  • Name:Gene
  • Location:Galaxy's away from Ipswich
  • Car:77 HZ Sandman Van
  • Joined: 03-January 07

Posted 10 May 2020 - 10:02 PM

You and Marty should have Rust Off see who wins lol
great work Glenn you got some skill with metal thats for sure

#17 S pack

S pack

    Scrivet Counter

  • Members
  • PipPipPipPipPipPipPip
  • 15,538 posts
  • Name:Dave
  • Location:Luggage Point
  • Car:73 LJ
  • Joined: 25-January 10

Posted 11 May 2020 - 06:53 AM

I dont know if the Muscle Car parts are different to Rare Spares but the outer sill came from Muscle Car parts.

Those repro panels come from the same manufacturer.


#18 _2ELCS_

_2ELCS_
  • Guests

Posted 11 May 2020 - 11:43 AM

It's going  well Glenn . I'm getting itchy fingers looking at what you are doing.


#19 Heath

Heath

    I like cars.

  • Administrators
  • PipPipPipPipPipPipPip
  • 18,307 posts
  • Name:Heath
  • Location:Eastern Suburbs, Melbourne
  • Car:Heavily Modified UC Sunbird Hatchback
  • Joined: 07-November 05
Garage View Garage

Posted 11 May 2020 - 01:27 PM

Nice repairs there Glenn.


#20 r2160

r2160

    Forum Fixture

  • Members
  • PipPipPipPipPip
  • 712 posts
  • Name:Glenn
  • Location:sydney
  • Car:2/71 LC GTR, 4/71 LC 4 'S'
  • Joined: 20-May 09

Posted 24 May 2020 - 07:13 PM

OK, not a lot of progress as I found I really needed a folder.


So I decided to  make one, perhaps a little too heavy duty for what I need but, what can you do. 


The base is 8mm angle and the clamp is 8mm also. In order to have a sharper angle, I have bolted a 3mm piece to the clamp.


49929327476_6384609d73_z.jpg


49928808403_57fcd329c5_z.jpg


49928808533_15afe44b92_z.jpg


#21 rodomo

rodomo

    To advertise here, call 13TORANA

  • Members
  • PipPipPipPipPipPipPip
  • 17,997 posts
  • Name:R - O - B Dammit!
  • Location:Way out west of Melbourne Awstraylya
  • Joined: 10-December 05

Posted 24 May 2020 - 10:01 PM

Top work Glen, I have been gathering bits to make one as well.


Been a bit slack on it though?


I just keep tapping up bits on the edge of the bench. :huh:


#22 r2160

r2160

    Forum Fixture

  • Members
  • PipPipPipPipPip
  • 712 posts
  • Name:Glenn
  • Location:sydney
  • Car:2/71 LC GTR, 4/71 LC 4 'S'
  • Joined: 20-May 09

Posted 25 May 2020 - 01:28 PM

The only issue I have with it at present is I need to get the bottom machined flat. I cannot get a tight bend as it is at present . . .


#23 claysummers

claysummers

    Lotsa Posts!

  • Members
  • PipPipPipPipPipPip
  • 3,317 posts
  • Name:Clay
  • Location:Willunga
  • Car:186 FB Ute, 3.3 EK sedan
  • Joined: 13-December 18

Posted 25 May 2020 - 02:09 PM

That's great. The affordable ones I've looked at have all been too short.

Sent from my SM-G973F using Tapatalk

#24 r2160

r2160

    Forum Fixture

  • Members
  • PipPipPipPipPip
  • 712 posts
  • Name:Glenn
  • Location:sydney
  • Car:2/71 LC GTR, 4/71 LC 4 'S'
  • Joined: 20-May 09

Posted 08 June 2020 - 07:55 PM

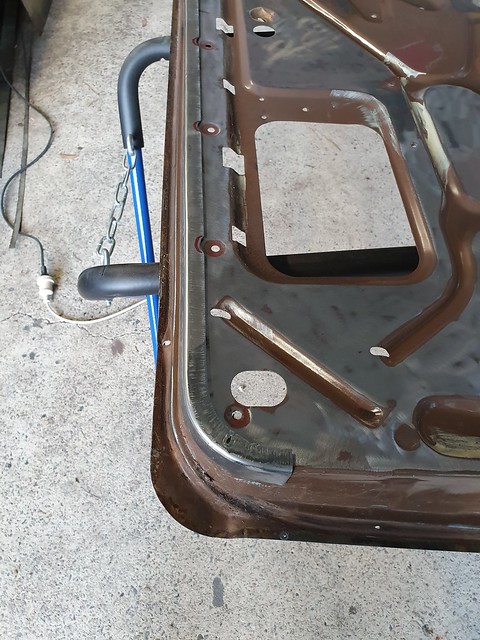
So, I have been working on the drivers door. The very bottom of the door has rust so it was time to work on this.


I am working on the bottom corner. I decideed that, given the shape is quite complex, I would break it into two pieces. 


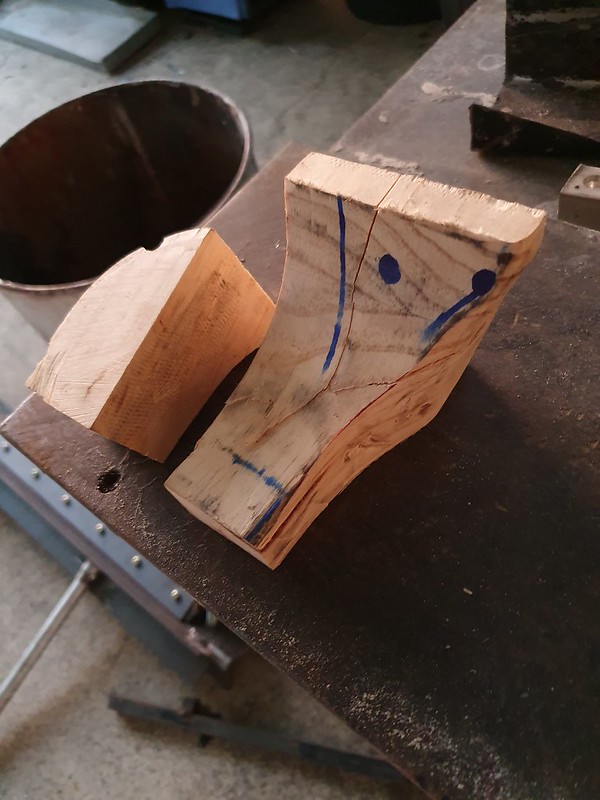
I made a wooden "mold" of the first half. I then used it to form the metal around it. It took 4 attempts, but I finally got a shape that I was able to put into place.


The piece I have to make


49983338158_5b82b58395_c.jpg


The wooden "mold"


49984119242_c4f5283413_c.jpg


49983857526_562e1de74d_c.jpg


The first half welded in place


49983338308_f60b358d08_c.jpg


49983338068_29343cf23e_c.jpg


Still requires a little adjustment for the second half of the part.


0 user(s) are reading this topic

0 members, 0 guests, 0 anonymous users