Jump to content


Photo
- - - - -

Hard road 383 build up

v8 383

  • Please log in to reply
19 replies to this topic

#1 Lima31

Lima31

    Forum Fixture

  • Members
  • PipPipPipPipPip
  • 874 posts
  • Name:Lee
  • Location:Perth WA
  • Joined: 18-April 10

Posted 16 July 2020 - 01:24 AM

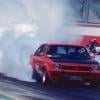
In this thread I'll share what I learned building up a red 308 into a street/strip early-headed 383.  Finished product:


Attached File  final.jpg   252.77K   13 downloads


Desired power is 400 rwhp, 450 ftlbs, optimising for mid range.  Early heads because of the sound, and not having to replace intake / headers I already had.


The easy route would have been to pay someone to do it or buy something already close to what I wanted, but having not a lot of experience I wanted to learn how to do it myself, even if that lead to some mistakes.  And I would know for sure how it went together.  So the hard road it was. 


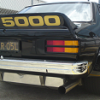
Some of these mods are not period correct; yes it is going into an L31; the car was already butchered as an 1980s track toy.  I'm not relying on the car as transport and not using savings, so am OK pushing the boundaries of what some say you should and should not do.


Anyway I started with a gumtree special 1976 QT prefix.  Dropped it straight to a machinist to be sonic checked and cleaned, then put it on a stand.  He said the bores could stay at 40 thou, and everything checked out.  I was not convinced this shop had the full deck of cards if you know what I mean.  Perhaps the first mistake was not seeking a 2nd opinion before more time and money was spent.


Attached File  20180908_103739_lr.jpg   264.96K   7 downloads


I started by cutting an annulus into the no1 cam bearing, initially with a rectangular channel then decided to use a 6mm ball to smooth it out.


Attached File  oil1.jpg   139.53K   9 downloads


Then carefully drilled to allow oil to access the other gallery faster on startup.  Added a 1.5 mm restrictor to the no4 feed via an M8 grub screw.


Attached File  oil2.jpg   310.86K   10 downloads


Attached File  oil3.jpg   283.74K   9 downloads


Sent it to machine shop #2 to deck the block (chasing 10.5:1 compression) and bore out to 40 thou and torque plate line hone, fit +2 thou cam bearings etc.  After getting started, they said it needed to go to 60 thou overbore, which is definitely not usually recommended on a stroker 308 let alone a red one, plans I neglected to tell them up front.  With now over a grand and a weekend into the motor, I decided to risk it and proceed anyway.  Brought it home, and modified the oil pump (as per the TK383 post) while I thought about whether this block will be able to handle the new hardware. 


Attached File  front.jpg   234.37K   8 downloads


Attached File  20181015.jpg   258.29K   7 downloads


 Two months later I decided stop wondering and just started clearancing the block, which is when the project started to face a few setbacks ...


Attached File  20181215.jpg   226.78K   8 downloads


Edited by Lima31, 16 July 2020 - 01:27 AM.


#2 Lima31

Lima31

    Forum Fixture

  • Members
  • PipPipPipPipPip
  • 874 posts
  • Name:Lee
  • Location:Perth WA
  • Joined: 18-April 10

Posted 16 July 2020 - 02:03 AM

3 months later after finding the time I got the block to an acceptable state.  It's not easy to see from the photos but a huge amount of material needs to be removed to allow the crank to clear everywhere with enough margin, and to not leave any sharp edges which can concentrate stress and generate cracks over time.  Note the 2 stud mains, where 4 bolt mains is usually recommended - the plan was to upgrade to 1/2 inch studs but the machinist talked me out of as he considered the block webbing could not be trusted to handle the increased tension particularly with less material around the increased hole diameter.  The money saved was needed for rescuing the block anyway.


Attached File  20190302.jpg   139.37K   9 downloads


Cast shift in the bores plus the overbore meant that wall thicknesses were razor thin.  When I thought all was done and gave what I thought would be a final clean, I saw what was a small black speck at the bottom of the no 7 bore.  Nope, it was a pin-sized hole in the bore, and just touching it with a pick collapsed it into a hole the size of a grain of rice!  Before I knew it I was looking at a pea shaped water jacket hole in a freshly machined and clearanced block.


After realising this can't be welded, and noting that it was at the bottom of the bore, the hole was opened up, tapped and a grub screw was loctited in place, not before the interior crevice around it was packed with metal epoxy.  Then, assuming all bores were too thin, the decision was to then half-Hardblok it ... and wasn't that an unpleasant experience!


The deck has to be level, and you only have several minutes to somehow funnel the rapidly setting concrete-like mixture evenly into the water jacket, stirring and pushing it through.  A vibrating buffer motor was used to help settle and remove air bubbles ... leave to set and then repeat the fun on the other bank. 


Eventually after a final checkover from the machinist to correct some of my mistakes, the block was ready for assembly. 


#3 I'm a Red Motor fiend

I'm a Red Motor fiend

    Forum Fixture

  • Members
  • PipPipPipPipPip
  • 758 posts
  • Name:Adam
  • Location:Nairne SA
  • Car:LJ 4 door, LC GTR
  • Joined: 04-January 16
Garage View Garage

Posted 16 July 2020 - 02:11 PM

How thin were the walls when it was sonic tested?

#4 yel327

yel327

    Oh My, Don't you post alot

  • Members
  • PipPipPipPipPipPipPip
  • 13,072 posts
  • Joined: 10-February 08

Posted 16 July 2020 - 02:30 PM

Nice. 388ci out of a 308. I’m building similar but out of a SBC 4 bolt block, only 40 thou though so 385ci.

Did you use Holden rods or SBC rods? I used these to minimise the material needing to be removed at the base of the bores. Bugger all to remove at all:

https://www.summitra.../make/chevrolet

#5 Lima31

Lima31

    Forum Fixture

  • Members
  • PipPipPipPipPip
  • 874 posts
  • Name:Lee
  • Location:Perth WA
  • Joined: 18-April 10

Posted 16 July 2020 - 05:04 PM

The original sonic test came back "yeah looks fine, no cracks", I figured they only used a magnet and not a probe.  if I had half a clue with what I was doing at the time, I would have sent it elsewhere.  


The only other mods to the block were to deburr the central valley and take out rough edges around the drainbacks at the top.


Now onto the parts.  A COME 383 kit - whilst it is cheaper to piece the parts elsewhere I did like that they balance the set up and check all the clearances so all I had to do was bolt it in.  Also looking to support the locals.  He said they had plenty of kits but 60thou over pistons had to be specially ordered in, which was another red flag I thought.


Attached File  crank.jpg   184.03K   5 downloads


Attached File  piston.jpg   261.68K   4 downloads


Attached File  pistons.jpg   255.47K   4 downloads


Cam is a Crow hydraulic roller 51315.


Attached File  cam.jpg   357.91K   4 downloads


Rev Range: 3200-6400
Advertised duration (Int/Ex): 303/307
Duration @ .50" (Int/Ex): 238/244
Valve Lift (Int/Ex): .516/.516"
Lobe: 108°
 
Cam went in first (very easily), then the rotating assembly.  The whole lot had to go in and out multiple times, mainly because I thought it was binding up somewhere once torqued up.  Only after removing the no5 cap and realising it was that mother-trucking rear main seal causing all the drag, I was able to sort that felt comfortable moving on.  
 
Attached File  bottom.jpg   285.41K   5 downloads
 
The cam was dialled in based on the lift at TDC which matched the card exactly without any chain gear adjustment.
 
Attached File  dialled in.jpg   216.36K   5 downloads


Edited by Lima31, 16 July 2020 - 05:05 PM.


#6 Lima31

Lima31

    Forum Fixture

  • Members
  • PipPipPipPipPip
  • 874 posts
  • Name:Lee
  • Location:Perth WA
  • Joined: 18-April 10

Posted 16 July 2020 - 05:16 PM

Heads are second hand Dave Bennett high ports (ABH-3).  I checked them with a straight edge, lapped the valves and then matched the ports to a TP dual plane.  I was quite surprised how much had to be taken out the manifold.


Attached File  heads1.jpg   117.9K   4 downloads


Attached File  lapped.jpg   149.56K   4 downloads


Attached File  ports.jpg   192.58K   4 downloads


6 months after starting with an empty block, it started looking like it might actually work one day.


Attached File  oneside.jpg   308.36K   5 downloads


#7 Lima31

Lima31

    Forum Fixture

  • Members
  • PipPipPipPipPip
  • 874 posts
  • Name:Lee
  • Location:Perth WA
  • Joined: 18-April 10

Posted 16 July 2020 - 05:24 PM

Correction to the above cam specs which came from a different website, they have .568" lift.

Attached Files


Edited by Lima31, 16 July 2020 - 05:24 PM.


#8 308 Sunbird

308 Sunbird

    Forum Fixture

  • Members
  • PipPipPipPipPip
  • 965 posts
  • Name:Stuart
  • Location:Melbourne
  • Car:SS Hatch, 308 Sunbird sedan-Improved Prod racer (sold), HZ Kingy wagon
  • Joined: 20-November 10

Posted 16 July 2020 - 05:33 PM

Will be following with interest.


#9 Lima31

Lima31

    Forum Fixture

  • Members
  • PipPipPipPipPip
  • 874 posts
  • Name:Lee
  • Location:Perth WA
  • Joined: 18-April 10

Posted 16 July 2020 - 05:46 PM

Used pushrods that have one end restricted at 40 thou, to try and keep the oil from flooding the top end.  Used a 2 thou tighter cam bearing and opened up the drainbacks in the heads slightly as well.


Head gaskets are Felpro 1076s (41 thou), which are still made apparently.


Rockers were repurposed from the old motor which to be fair didn't really have many kms on it.  The plates had to be cut to clear the taller head studs.  The only issue with the crow kit was that the valve seals didn't fit, I had to order additional ones.


#10 Com_VC

Com_VC

    Forum Fan

  • Members
  • PipPipPipPip
  • 411 posts
  • Joined: 09-January 06

Posted 16 July 2020 - 06:36 PM

What paint did you use on your rocker covers, they look good.


#11 Lima31

Lima31

    Forum Fixture

  • Members
  • PipPipPipPipPip
  • 874 posts
  • Name:Lee
  • Location:Perth WA
  • Joined: 18-April 10

Posted 16 July 2020 - 06:47 PM

What paint did you use on your rocker covers, they look good.


https://www.vhtpaint...e-plus-coatings


Baked the paint in a weber, hahaha.


Edited by Lima31, 16 July 2020 - 06:48 PM.


#12 Heath

Heath

    I like cars.

  • Administrators
  • PipPipPipPipPipPipPip
  • 18,307 posts
  • Name:Heath
  • Location:Eastern Suburbs, Melbourne
  • Car:Heavily Modified UC Sunbird Hatchback
  • Joined: 07-November 05
Garage View Garage

Posted 31 July 2020 - 12:08 PM

This is great stuff Lee.


I can read the anxiety you've got in navigating all of this uncharted territory and am familiar as hell with feeling that way on a project, hahaha. 


Thanks for sharing mate.


#13 Lima31

Lima31

    Forum Fixture

  • Members
  • PipPipPipPipPip
  • 874 posts
  • Name:Lee
  • Location:Perth WA
  • Joined: 18-April 10

Posted 02 January 2022 - 12:25 PM

Got the engine back together and once a quick drive around the block proved no leaks, onto the dyno.  I of course forgot the dizzy spanner and timing light.  Naturally the dyno shop's old timing light died after a few minutes, they only do modern diesels.


Attached File  engine-bay_1024.jpg   176.39K   7 downloads


Attached File  dynowide_2021.jpg   139.88K   8 downloads


Tune and timing was relatively safe / retarded given the lack of tools to diagnose, the timing light could confirm initial timing to be 10 deg, but the advance was down to the ignition setting.  More time was needed to improve the part throttle / low RPM stages, but there was more than enough power :


Attached File  dyno2021.jpg   137.55K   9 downloads


It's now been pulled all apart again as there was a massive issue I've overlooked, and as far as the WA government is concerned it was making too much power anyway.


Edited by Lima31, 02 January 2022 - 12:32 PM.


#14 308 Sunbird

308 Sunbird

    Forum Fixture

  • Members
  • PipPipPipPipPip
  • 965 posts
  • Name:Stuart
  • Location:Melbourne
  • Car:SS Hatch, 308 Sunbird sedan-Improved Prod racer (sold), HZ Kingy wagon
  • Joined: 20-November 10

Posted 02 January 2022 - 02:49 PM

I've been waiting to see how this was going- well done. I'm sure your all over 

any problems Lee.


#15 RallyRed

RallyRed

    Oh My, Don't you post alot

  • Members
  • PipPipPipPipPipPipPip
  • 7,836 posts
  • Name:Col
  • Location:NSW
  • Car:LC GTR etc
  • Joined: 02-October 11

Posted 02 January 2022 - 04:47 PM

Is that the flatest AFR line ever?...well done.
Love the car too.

#16 Lima31

Lima31

    Forum Fixture

  • Members
  • PipPipPipPipPip
  • 874 posts
  • Name:Lee
  • Location:Perth WA
  • Joined: 18-April 10

Posted 02 January 2022 - 07:44 PM

So there were three issues at play which meant engine out.  First, I realised I forgot to switch in a hardened steel oil pump drive gear.  Sure enough, the one in there was quickly getting eaten by the cam, if that went it would have instantly killed oil pressure:


Attached File  gear.jpg   113.55K   4 downloads


Pan off to flush out all of the oil with the potential to have drive gear pieces.  Second issue - I was wondering why it sounded louder than usual:


Attached File  pan.jpg   149.7K   7 downloads


Although the pan was self-clearancing itself, I bashed it out more and convert some of the sump bolt holes to slots.  I'm fairly sure ASR said their pan suited my setup when I asked, but it's my fault for not checking.


#17 koalasprint

koalasprint

    Forum Fan

  • Members
  • PipPipPipPip
  • 295 posts
  • Name:Steve
  • Location:Melbourne
  • Car:LX SS Hatch
  • Joined: 30-April 10

Posted 01 February 2022 - 01:23 PM

And the third issue?


I have the same heads. Actually a very similar build. 0.60 over bores. COME 355 crank. Crane flat tappet cam (CCH-314A). 246/246 @ 0.50. TP Dual plane manifold & 750 Holley DP. 2 bolt mains with studs. It's running fine, no issues with thin bores.


Only issue I have not been able to solve is oil leaking past the inlet manifold spacers. I'm not running cork, just tried various silicone gasket sealers. 3-bond, permatex, etc. I might try cork next time.


Cheers, Steve.


#18 mick_in_oz

mick_in_oz

    Forum Fixture

  • Members
  • PipPipPipPipPip
  • 666 posts
  • Name:Mick
  • Location:Western QLD
  • Car:LX Hatchback
  • Joined: 12-June 11

Posted 01 February 2022 - 05:07 PM

Steve, I drilled, tapped, and bolted my manifold spacers to the block with Loctite 515, and recessed the ends of the spacers so I could use a piece of O-Ring material. Then between the manifold and the spacers I'm using a silicon product such as Blue Max.


Its been together for several years with no leaks what so ever. I know my approach is over the top compared to what most would do or can do, but its working well so far.


#19 Lima31

Lima31

    Forum Fixture

  • Members
  • PipPipPipPipPip
  • 874 posts
  • Name:Lee
  • Location:Perth WA
  • Joined: 18-April 10

Posted 03 February 2022 - 08:49 PM

And the third issue?


Compression was too high ... and on the dyno, one of the posilocks let go on the intake for #5, meaning I only had 7 cylinders!


When I took it to the head shop, he asked where the rest of the heads were ...chambers were measured to be about 42cc, so with my set up, I had a static compression of 13.1 (!), dynamic compression ratio of 9.5 (want under 8.5), cranking pressure of 205 psi, and volume pressure index of 357 (very good)


Have now switched back to original mild ported and skimmed heads while I think of the next steps.  Presuming a cylinder volume of 58cc, static comp is much easier 10.7, dynamic is 7.8, cranking pressure is now a mild 158psi, and VPI is still OK at 283.


#20 Lima31

Lima31

    Forum Fixture

  • Members
  • PipPipPipPipPip
  • 874 posts
  • Name:Lee
  • Location:Perth WA
  • Joined: 18-April 10

Posted 03 February 2022 - 08:51 PM

Only issue I have not been able to solve is oil leaking past the inlet manifold spacers. I'm not running cork, just tried various silicone gasket sealers. 3-bond, permatex, etc. I might try cork next time.


I use a thick bead of the Wurth super RTV.  Three times now intake off and on, no leaks on all three attempts ...


Also tagged with one or more of these keywords: v8, 383

0 user(s) are reading this topic

0 members, 0 guests, 0 anonymous users