
Still got the rear disc parts ?
New HZ build thread
Started by
SHEEL
, Oct 06 2020 08:28 PM
276 replies to this topic
#26

Statler
-

- Administrators
-

- 6,338 posts
Heckler Extraordinaire
- Name:Col
- Location:Mackay Qld. Whitsundays for all you back packers!
- Joined: 20-May 06
Posted 08 October 2020 - 10:16 AM
#27
Rockoz
-

- Members
-
- 4,072 posts
Oh My, Don't you post alot
- Name:Rob
- Location:Cowra NSW
- Joined: 21-September 08
Posted 08 October 2020 - 11:44 AM
The exhaust fans dont have anything that will generate a spark in normal usage.
But however, the air compressor does have a set of contacts that will emit a spark hot enough to ignite a gaseous mixture in the right mixture range.
I started work in a coal mine 6 months after it blew up taking 14 blokes. A few of them I knew.
I saw the devastation it caused.
So it has been one of my priorities in my electrical career, and always at the back of my mind.
If you have old style fluoros with starters, they are an issue as well.
Cheers
Rob
#28
SHEEL
-
- Members
-
- 353 posts
Forum Fan
- Name:Daniel
- Location:Melbourne
- Joined: 09-October 09
Posted 08 October 2020 - 12:40 PM
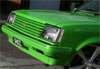
just a crappy std light bulb, is that ok?
Still got the rear disc parts ?
nah they are long gone
#29
claysummers
-

- Members
-
- 3,738 posts
Lotsa Posts!
- Name:Clay
- Location:Willunga
- Car:186 FB Ute, 3.3 EK sedan
- Joined: 13-December 18
Posted 08 October 2020 - 08:03 PM
I’ve got the old style fluros with the ballast and starter bulbs. They are always on before I start painting.
Sent from my iPad using Tapatalk
Sent from my iPad using Tapatalk
#30
Rockoz
-
- Members
-
- 4,072 posts
Oh My, Don't you post alot
- Name:Rob
- Location:Cowra NSW
- Joined: 21-September 08
Posted 09 October 2020 - 10:56 AM
Normal light globes are kind of okay. Unless you smash them, then all bets are off.
A trick used by special soldiers was to prepare a light globe by drilling a hole in the base of it then half filling with metho or other flammable substance.
The target goes into the room and turns the light on. The metho keeps the filament cold enough to not blow and heats up the metho and its gas will enter the room. Once the metho is burnt off, there should be enough to create a bang when the filament becomes exposed and goes arcs out.
There are standards and legislation regarding electrical stuff in spray booths.
Its there for a reason and it is to save lives ultimately.
Given that though, I doubt that you would spray enough to get close to explosive ranges.
But then that also depends on how much circulation you are getting in relation to the amount of thinners in the air.
There are many though that have used non compliant equipment for years without an issue.
Cheers
Rob
#31
CI 0308
 View Garage
-

- Members
-
- 737 posts
Forum Fixture
- Name:Brett
- Location:Perth W.A
- Car:77 LX SS, VX SS
- Joined: 19-January 06
View Garage
Posted 09 October 2020 - 11:46 AM
If you aren't going the intrinsic safe path replace the batten with a couple of LED flouro replacment panels. Would be a much better light output for your shed anyhow.
Sent from my SM-A705YN using Tapatalk
Sent from my SM-A705YN using Tapatalk
#32
claysummers
-
- Members
-
- 3,738 posts
Lotsa Posts!
- Name:Clay
- Location:Willunga
- Car:186 FB Ute, 3.3 EK sedan
- Joined: 13-December 18
Posted 09 October 2020 - 12:31 PM
Original comments were in relation to Epotec 408 I thought. 10% reducer only. It’s when I’m spraying top coat acrylic the riskiest as it’s 2:3 thinners and still as possible.
Sent from my iPad using Tapatalk
Sent from my iPad using Tapatalk
#33
Rockoz
-
- Members
-
- 4,072 posts
Oh My, Don't you post alot
- Name:Rob
- Location:Cowra NSW
- Joined: 21-September 08
Posted 10 October 2020 - 11:44 AM
Most flammables are most explosive around the 10% in air, and a range of 5 to 15%.
There are more exact figures around but that is a rough guide only.
You could also make it a bit safer by setting the fans to blow instead of suck.
That way they are in clear air.
From memory any electrics need to be 1.2 metres from the hazardous area with spray booths.
For those with LPG and nothing in relation to the post.
A 1kg bottle has huge potential.
Liquid LPG expands roughly 270 times in volume when it turns to gas.
So the roughly 1 litre of liquid turns into 270 litres of gas.
At a rough 10%, that gives you a volume of 2700 litres of bang.
A lot of toilets I have been in are about that size.
Thats a big lot of bang.
Cheers
Rob
#34
SHEEL
-
- Members
-
- 353 posts
Forum Fan
- Name:Daniel
- Location:Melbourne
- Joined: 09-October 09
Posted 11 October 2020 - 08:43 PM
I was making steady progress over the weekend but unfortunately ended on a bit of a frustrating job, but it happens I guess and I'm glad that I'm not settling for doing a half assed job.
Better to be fussy and get a better result in the end...
So I started yesterday by filling in a trim hole that won't be required, I've decided for now not to run the chrome trime around the bottom of the windows.
I took the passenger side window frams down to metal as I hadn't yet done that. then gave them a coat of etch primer.
I piled on yet another thick coat of high fill on the driver side rear panel and the boot lid.
The boot lid cam up sweet, the wet test shows some delicious straight reflections, I held a spirit level over the reflection so I could get a reference with a straight line. No wavy reflections - awesome.
The rear quarter was another story, it looks pretty good in the photo but the is a low spot towards the rear which I still couldn't level out with high fill, so I had to add some more filler.
Adding filler after having most other panels blocked in high fill felt like a big step back. but I guess once I hit it with more high fill I should get a postive result next time. Just need to be patient.
I'm out of high fill so I need to figure out how I can get some more whilst in lockdown! My regular paint supply shop is outside the 5 k radius. I'll figure something out...
Attached Files
#35
SHEEL
-
- Members
-
- 353 posts
Forum Fan
- Name:Daniel
- Location:Melbourne
- Joined: 09-October 09
Posted 24 October 2020 - 08:11 PM
I had almost finished smoothing the firewall but one thing bothering me was the Wiper motor. I wasn't prepared to shell out $500 plus for a cable driven conversion kit so I'd resigned to leaving it on the firewall. But then I saw an add on Facebook where a guy was fabbing up conversions using motor from a modern car and mounting it from a plate that bolts to the inside of the original motor bolt holes and hides the motor in the cavity under the windscreen. It got me thinking and I came up with my own interpretation where I welded a bracket inside the cavity.
This will allow me to completely plate over the original motor locaiton for a very smooth look.
I figured out what sort of motor was being used, sourced one and started chopping up the linkages and mating the HZ linkages to the donor car linkages.
I whipped up a simple bracket and made sure to try to locate the Motor main shaft on the same/similar axis to the original. You can see in the pics where I used the old motor centre hole to reference the mounting location.
I also made sure the primary linkage had the same throw/stroke as the original HZ arm (measured at 53mm). I also had to make sure everything had clearance for the duration of a cycle.
I'm also goig to try to retro fit a Commodore wiper switch to gain intermittent function. Should be pretty nifty.
Attached Files
#36
SHEEL
-
- Members
-
- 353 posts
Forum Fan
- Name:Daniel
- Location:Melbourne
- Joined: 09-October 09
Posted 02 November 2020 - 09:50 AM
Only got a few short hours on the car this weekend.
Now that the Wiper motor and linkages are sorted. I think it's safe to fill in the firewall recess where the original motor sits.
I made up a cardboard template, transferred to some 1mm sheet steel, carefully cut and filed into shape, prepped the area then glued it in.
As I takced in the section I put a straight edge across to make sure I was level with the existing firewall. It was pretty much spot on and I'll need very minimal filler.
I had some nice rhythm on the welder at times so I've taken a few pics to capture that before I grind them all flat!
next weekend I'll be grinding then filling and things should be looking pretty sweet
Attached Files
#37
Shiney005
View Garage
-

- Members
-
- 9,875 posts
Oh My, Don't you post alot
- Name:Laurie
- Location:Dubya Hay
- Car:L34, LH SL, LX SL, EK and some Commodores.
- Joined: 19-January 12
View Garage
Posted 02 November 2020 - 09:16 PM
Nice work with the wiper motor. What was it originally fitted to?
#38
SHEEL
-
- Members
-
- 353 posts
Forum Fan
- Name:Daniel
- Location:Melbourne
- Joined: 09-October 09
Posted 03 November 2020 - 09:54 PM
BA/BF Falcon (or same era Territory)
#39
SHEEL
-
- Members
-
- 353 posts
Forum Fan
- Name:Daniel
- Location:Melbourne
- Joined: 09-October 09
Posted 09 November 2020 - 10:01 AM
steady progress...
got the firewall mostly smooth, still got some finessing to get the lines correct on the left side of the area where I've plated over the wiper motor recess. not far off though...
whilst I had Primer in the gun I went over the rear quarter again and I reckon the boot now has it's last coat of primer, it is razor straight and ready for fine sanding in preparation for colour!
Attached Files
#40
SHEEL
-
- Members
-
- 353 posts
Forum Fan
- Name:Daniel
- Location:Melbourne
- Joined: 09-October 09
Posted 01 March 2021 - 09:38 AM
Big day on the Z yesterday.
Final sanding on the FIrewall and Wet testing, when I was wet sanding with 1200 I cut through the primer in 2 spots so I was set back by an hour or 2 having to put a little more primer on those spots.
then I drop sheeted the garage which took a few hours!
finally it was go time and I mixed up some paint and shot some colour!!
during the colour base coat stage I had 3-4 spots where dust landed in the paint so I lightly sanded with 2000 grit and some prepsol as lube, then went over with another colour coat, so I ended up doing 4 colour coats where I only really needed 3 to get good coverage.
Then I laid down 4 coats of clear. it came up really good, no runs. a couple of dust bits in the clear but off the gun in a garage it is pretty awesome. Not sure if I'll even bother wet sanding and buffing until the car is done and the paint is really hard. no rush really...
very happy.
Attached Files
-
 H126r.jpg 228.4K
8 downloads
H126r.jpg 228.4K
8 downloads
-
H125.rjpg.jpg 219.57K
8 downloads
-
H124.rjpg.jpg 183.44K
8 downloads
-
H127r.jpg 211.73K
8 downloads
-
H128r.jpg 218.68K
8 downloads
-
H129r.jpg 220.58K
7 downloads
#41
Heath
View Garage
-

- Administrators
-
- 18,403 posts
I like cars.
- Name:Heath
- Location:Eastern Suburbs, Melbourne
- Car:Heavily Modified UC Sunbird Hatchback
- Joined: 07-November 05
View Garage
Posted 01 March 2021 - 10:51 AM
Oh yeah!!!
#42
CI 0308
View Garage
-
- Members
-
- 737 posts
Forum Fixture
- Name:Brett
- Location:Perth W.A
- Car:77 LX SS, VX SS
- Joined: 19-January 06
View Garage
Posted 01 March 2021 - 11:44 AM
Nice to see some more progress pictures. Love that colour.
Sent from my SM-A705YN using Tapatalk
Sent from my SM-A705YN using Tapatalk
#43
Cook
-

- Members
-
- 1,534 posts
Forum Fixture
- Location:Melbourne
- Car:LX Hatch
- Joined: 27-February 15
Posted 01 March 2021 - 01:28 PM
Well done Daniel. Love the colour. Cheers Ron
#44
SHEEL
-
- Members
-
- 353 posts
Forum Fan
- Name:Daniel
- Location:Melbourne
- Joined: 09-October 09
Posted 15 March 2021 - 02:09 PM
Cleaned and re-fitted body tags
More sanding and wet testing, looking pretty good. Need to strip and prime the door jambs and sand the rear beaver before I can hit the shell with colour.
next update will likely show that, then hopefully the following update will have more colour!!
Attached Files
#46
purrlx
View Garage
-
- Members
-
- 1,332 posts
Forum Fixture
- Name:Danny
- Location:Gladstone
- Car:LX hatch
- Joined: 23-December 11
View Garage
Posted 15 March 2021 - 03:30 PM
Looking good nice and smooth
#47
Shiney005
View Garage
-
- Members
-
- 9,875 posts
Oh My, Don't you post alot
- Name:Laurie
- Location:Dubya Hay
- Car:L34, LH SL, LX SL, EK and some Commodores.
- Joined: 19-January 12
View Garage
Posted 16 March 2021 - 09:33 AM
If I don't say it, some other anal mongrel will. The BODY plate is supposed to be body coloured. 
You did a nice job of restoring those plates by the way. They look brand new.
#48
yel327
-

- Members
-
- 13,870 posts
Oh My, Don't you post alot
- Joined: 10-February 08
Posted 16 March 2021 - 04:05 PM
No it isn’t. Pagewood did it right and painted the car first, rather than attach one rivet and bend the tag up then put it down later. At least until a certain time during HZ when the body tag was painted.
#49
Shiney005
View Garage
-
- Members
-
- 9,875 posts
Oh My, Don't you post alot
- Name:Laurie
- Location:Dubya Hay
- Car:L34, LH SL, LX SL, EK and some Commodores.
- Joined: 19-January 12
View Garage
Posted 17 March 2021 - 09:27 AM
Well there you go. I still learn something new in here all the time. I love that about this place.
#50
yel327
-
- Members
-
- 13,870 posts
Oh My, Don't you post alot
- Joined: 10-February 08
Posted 17 March 2021 - 12:33 PM
Dandenong tracked the car through the assembly process using the BODY tag, that is why it went on early and it is why the body number is a cumulative total rater than a model total (eg 81837KR-00001-H5) like Pagewood and Elizabeth did. Pagewood used the chassis number (last two digits) until the end of HG for assembly tracking, then it became a problem as until the end of HG it was on the firewall and went on just after paint in the body plant. This is why you find 2 digit chalked numbers all over Pagewood vehicle parts. Starting with HQ the chassis number went on right at the end of the assembly plant. So they added a sequence number to the firewall just under the LH windscreen squirter pipe. It remained this way until about the middle of 1978 when Commodore came along (Pagewood was by far the highest volume Commodore plant until closure), so they needed another way to track vehicles. Around this time the BODY tag at Pagewood starts to get painted, so the assumption is they tracked via the PSN's last two digits which is what the body number became by then. BTW they went even worse than Dandenong with that method as the steel is bare under the BODY tag, other than the phosphate "body in white" coating, at least Dandenong lifted the tag so paint got underneath it. What we have yet to figure out is how Pagewood tracked the assembly of the Elizabeth bodies for vans. Sure they could have used the Elizabeth chassis number last two digits up until HG but the problem with that is there could be a Pagewood HKxxx47S and an Elizabeth HKxxx47A next to each other thus confusing it all. Body numbers were no good as they were all different sequences for different models like Pagewood was. Once Pagewood starting assembling Elizabeth vans again in 1975 all they had then was an Elizabeth body tag with an Elizabeth body sequence number (replaced by Elizabeth PSN about 8/77). Until I find a broadcast sheet for a Pagewood assembled Elizabeth body we'll not know, even a Pagewood assembled LC Torana broadcast sheet might give a clue.


0 user(s) are reading this topic
0 members, 0 guests, 0 anonymous users

