
Those arms aren't destroyed, easy to repair, they didn't use a spacer when the bush was pressed out.

 1 votes
Hawks Torana dream lives on
Started by
hawk
, Oct 25 2020 02:32 PM
389 replies to this topic
#26

warrenm
 View Garage
-

- Members
-

- 2,106 posts
Forum Fixture
- Location:Central West NSW
- Car:1972 LJ Torana
- Joined: 08-November 05
View Garage
Posted 08 November 2020 - 06:07 AM
#27
hawk
-
- Members
-
- 2,143 posts
Forum Fixture
- Name:steve
- Location:Berwick, Melbourne
- Car:UC Torana
- Joined: 16-July 09
Posted 21 November 2020 - 05:05 PM
The arms were deffinitly beyond repair, the amount of warping around the holes was hard to see in the photos. They paid for replacements.
Anyway, had the diff and rear arms sandblasted and painted in 2 Pack black. Bushes are refitted.
I will need to clean some paint off the shock threads and axle ends. Probably the wheel studs too.
Anyway, big day ahead tomorrow trying to refit most of it.
 FB_IMG_1605941855085.jpg 98.34K
10 downloads
FB_IMG_1605941855085.jpg 98.34K
10 downloads
FB_IMG_1605941858212.jpg 63.8K
10 downloads
FB_IMG_1605941862992.jpg 90.77K
10 downloads
Anyway, had the diff and rear arms sandblasted and painted in 2 Pack black. Bushes are refitted.
I will need to clean some paint off the shock threads and axle ends. Probably the wheel studs too.
Anyway, big day ahead tomorrow trying to refit most of it.
FB_IMG_1605941855085.jpg 98.34K
10 downloads
FB_IMG_1605941858212.jpg 63.8K
10 downloads
FB_IMG_1605941862992.jpg 90.77K
10 downloads
#28
hawk
-
- Members
-
- 2,143 posts
Forum Fixture
- Name:steve
- Location:Berwick, Melbourne
- Car:UC Torana
- Joined: 16-July 09
Posted 22 November 2020 - 03:33 PM
Slowly been piecing the rear back together today. All done except the brakes.
They got paint on the wheel mounting surface, will this need to be cleaned off or should it be ok?
I'll probably replace the wheel studs so not too stressed about them.
FB_IMG_1606022872270.jpg 104.4K
11 downloads
FB_IMG_1606022875588.jpg 87.14K
11 downloads
FB_IMG_1606022878777.jpg 77.52K
11 downloads
#29
Ricky Bobby
-

- Members
-
- 194 posts
Forum Member
- Name:Harvey
- Location:Hobart
- Car:LJ 2 door, UC hatch
- Joined: 25-May 14
Posted 22 November 2020 - 08:18 PM
Nice pick up Steve, smart move to start with the brakes and suspension. Spend your money where it matters
#30
Ice
-

- Members
-
- 15,122 posts
Cool
- Name:Gene
- Location:Galaxy's away from Ipswich
- Car:77 HZ Sandman Van
- Joined: 03-January 07
Posted 22 November 2020 - 09:22 PM
Paint on the wheel mounting surface will be fine so will the studs
#31
Heath
View Garage
-

- Administrators
-
- 18,309 posts
I like cars.
- Name:Heath
- Location:Eastern Suburbs, Melbourne
- Car:Heavily Modified UC Sunbird Hatchback
- Joined: 07-November 05
View Garage
Posted 23 November 2020 - 02:11 PM
Nice work Steve.
Yeah, don't worry about the paint on that hub face.
But you should consider getting your hands on an imperial tap & die set... (even just some unbranded cheapies for cleaning up threads if you don't want to spend the big bucks on a big set that'll repeatedly cut threads in stainless etc.). I use mine on everything I have apart, and certainly any hole on any part that's going to be zinc plated etc.
Just makes your car so much nicer to work on knowing that you've cleaned up all of the threads and run some anti-seize on them even just once.
Edited by Heath, 23 November 2020 - 02:17 PM.
#32
hawk
-
- Members
-
- 2,143 posts
Forum Fixture
- Name:steve
- Location:Berwick, Melbourne
- Car:UC Torana
- Joined: 16-July 09
Posted 28 November 2020 - 03:09 PM
Thanks guys.
Heath, its deffinitly on my to buy list. I'll chase them up with my next pay.
So tried assembling the brakes today with the new parts and nothing fit. the new drum shoes were the incorrect ones and the spring and clip set had nothing that fit them either.
This is the stock set up
FB_IMG_1606539944519.jpg 164.73K
11 downloads
Regardless I used the new wheel cylinders and all the old parts to reassemble the rear end.
It sits well although would be nice if it was a bit lower. Handbrake cables to reattach then fill up the diff oil.
FB_IMG_1606534106718.jpg 70.22K
12 downloads
FB_IMG_1606534109807.jpg 80.52K
10 downloads
FB_IMG_1606534113144.jpg 82.68K
10 downloads
Heath, its deffinitly on my to buy list. I'll chase them up with my next pay.
So tried assembling the brakes today with the new parts and nothing fit. the new drum shoes were the incorrect ones and the spring and clip set had nothing that fit them either.
This is the stock set up
FB_IMG_1606539944519.jpg 164.73K
11 downloadsRegardless I used the new wheel cylinders and all the old parts to reassemble the rear end.
It sits well although would be nice if it was a bit lower. Handbrake cables to reattach then fill up the diff oil.
FB_IMG_1606534106718.jpg 70.22K
12 downloads
FB_IMG_1606534109807.jpg 80.52K
10 downloads
FB_IMG_1606534113144.jpg 82.68K
10 downloads
#33
Heath
View Garage
-
- Administrators
-
- 18,309 posts
I like cars.
- Name:Heath
- Location:Eastern Suburbs, Melbourne
- Car:Heavily Modified UC Sunbird Hatchback
- Joined: 07-November 05
View Garage
Posted 30 November 2020 - 08:32 AM
Take the rear springs to somewhere like Moorabbin Spring Works and for $50 they'll reset them an inch lower. You will need to repaint them, though.
You can't buy off-the-shelf springs that sit well for a Torana. The fronts always need to be cut, and the rears always need to be reset.
Nice work so far. 
Edited by Heath, 30 November 2020 - 08:32 AM.
#34
hawk
-
- Members
-
- 2,143 posts
Forum Fixture
- Name:steve
- Location:Berwick, Melbourne
- Car:UC Torana
- Joined: 16-July 09
Posted 06 December 2020 - 02:03 PM
Cheers I'll give them a go at some point.
Pulled the front callipers off today as they are both siezed, They can wait for now.
Any recommendations on placed in Melbourne to do sandblasting and powder coating on the front end? wasn't too happy with the job done on the rear.
One thing that worries me is the front chassis rails are pretty rough. they have bulged where the top K frame mount is and are quite banged up underneath. Will grab pics when I remove the front end.
Hoping to be ready to pull the motor box and front end next weekend.
#35
hawk
-
- Members
-
- 2,143 posts
Forum Fixture
- Name:steve
- Location:Berwick, Melbourne
- Car:UC Torana
- Joined: 16-July 09
Posted 07 December 2020 - 06:59 PM
A little more done today.
FB_IMG_1607323735002.jpg 109.01K
9 downloads
Radiator support panel is free from rist at the mottom, although the battery tray will need replacing. It's the first rust I've found in it so not too stressed.
FB_IMG_1607323738565.jpg 85.88K
10 downloads
FB_IMG_1607323742060.jpg 70.27K
9 downloads
FB_IMG_1607323745770.jpg 85.97K
9 downloads
The bulging at the rails I was talking about. Is this normal? I don't remember it on my old UC.
FB_IMG_1607323749447.jpg 50.19K
10 downloads
FB_IMG_1607323752650.jpg 83.14K
11 downloads
The sump has had a hit and potentially the K frame?
FB_IMG_1607323764103.jpg 62.97K
9 downloads
I'll get the front end done then decide where I'm going with other aspects of the car.
FB_IMG_1607323735002.jpg 109.01K
9 downloadsRadiator support panel is free from rist at the mottom, although the battery tray will need replacing. It's the first rust I've found in it so not too stressed.
FB_IMG_1607323738565.jpg 85.88K
10 downloads
FB_IMG_1607323742060.jpg 70.27K
9 downloads
FB_IMG_1607323745770.jpg 85.97K
9 downloadsThe bulging at the rails I was talking about. Is this normal? I don't remember it on my old UC.
FB_IMG_1607323749447.jpg 50.19K
10 downloads
FB_IMG_1607323752650.jpg 83.14K
11 downloadsThe sump has had a hit and potentially the K frame?
FB_IMG_1607323764103.jpg 62.97K
9 downloadsI'll get the front end done then decide where I'm going with other aspects of the car.
#36
yel327
-

- Members
-
- 13,081 posts
Oh My, Don't you post alot
- Joined: 10-February 08
Posted 07 December 2020 - 08:37 PM
Looks like someone has been jumping it? Those flattened rails above the crossmember rubbers aren’t normal by my memory. My LX or LH didn’t look like that. Sump easy fixed when you pull the crossmember out to fix the rails.
#37
rodomo
-

- Members
-
- 17,998 posts
To advertise here, call 13TORANA
- Name:R - O - B Dammit!
- Location:Way out west of Melbourne Awstraylya
- Joined: 10-December 05
Posted 07 December 2020 - 09:25 PM
Maybe the crush tubes are missing? 
#38
hawk
-
- Members
-
- 2,143 posts
Forum Fixture
- Name:steve
- Location:Berwick, Melbourne
- Car:UC Torana
- Joined: 16-July 09
Posted 07 December 2020 - 09:56 PM
How would I go about fixing them? They are banged up around the gearbox crossmember too.
These dont have crush tubes do they? I don't remember any in my old one.
These dont have crush tubes do they? I don't remember any in my old one.
#39
toryman76
-

- Members
-
- 1,082 posts
Forum Fixture
- Location:Melbourne, Vic
- Joined: 16-January 06
Posted 11 December 2020 - 08:16 AM
Gday Steve. That's a ripper of a car you have mate. I'll be following this one closely.
#40
Toranamat69
-
- Members
-
- 2,117 posts
Forum R&D Officer
- Location:Brisbane
- Joined: 07-November 05
Posted 11 December 2020 - 10:13 AM
How would I go about fixing them? They are banged up around the gearbox crossmember too.
These dont have crush tubes do they? I don't remember any in my old one.
There are crush tubes with big flat washers go under and through the lower bushing half from underneath.
Id try straightening that with hammer and appropriate shaped drift from the top when xmember is out. You are trying to move 2 layers of 1.6mm welded together at that point though so might be tough to move the steel.
You may end up needing heat or cut out and weld to repair. I had rust in the driver's side between the 2 layers on mine so I had to cut out and rebuild mine and get the locating holes spot on.
Matt
#41
LHSL
-
- Members
-
- 995 posts
Forum Fixture
- Name:Phillip
- Location:SYDNEY
- Car:1974 LH SL; 2 x 1975 LH S Toranas
- Joined: 30-March 07
Posted 11 December 2020 - 12:43 PM
Keep up the great work. I have the same in red and just it registered.
As far as I can tell most radiator supports were painted black so maybe has had a front end tap or respray up front.
As far as I can tell most radiator supports were painted black so maybe has had a front end tap or respray up front.
Edited by LHSL, 11 December 2020 - 12:45 PM.
#42
hawk
-
- Members
-
- 2,143 posts
Forum Fixture
- Name:steve
- Location:Berwick, Melbourne
- Car:UC Torana
- Joined: 16-July 09
Posted 11 December 2020 - 07:15 PM
Thanks guys, I'll probably leave the rails for now. Might just replace the passengers side one completely at some point as its damaged near the gearbox crossmember pretty badly too.
I'll get a better idea of it when I get it all out. Hopefully will get through rego as is.
I'm pretty sure the UC's had body colour radiator supports. Not sure though.
I'll get a better idea of it when I get it all out. Hopefully will get through rego as is.
I'm pretty sure the UC's had body colour radiator supports. Not sure though.
#43
hawk
-
- Members
-
- 2,143 posts
Forum Fixture
- Name:steve
- Location:Berwick, Melbourne
- Car:UC Torana
- Joined: 16-July 09
Posted 12 December 2020 - 07:51 PM
Got the little guy to help pull a few more bits off today. no rust in the front guards and the bog in the passengers guard is quite thin which is good.
no rust holes behind the bonnet hinge section but looks like they'll need to be done at some point as rust has set in.
FB_IMG_1607765972536.jpg 82.24K
8 downloads
FB_IMG_1607765956930.jpg 122.99K
9 downloads
FB_IMG_1607765953793.jpg 130.39K
9 downloads
Here was the passengers side as when I bought it. The side strips had been removed and glue was still there as well as a lot of dodgy paint.
Cleaned all the glue off and gave the doors a sand with 320 grit. The doors are pretty banged up but I'll just prime the rough area and rattle pack it for now to tidy it up a bit.
FB_IMG_1607765938329.jpg 102.64K
9 downloads
FB_IMG_1607765943721.jpg 102.31K
8 downloads
Then I removed the drivers side strips to match and gave it a quick rub with some 600 grit to clean it up. Looks pretty average but will do for now.
FB_IMG_1607765948378.jpg 123.15K
8 downloads
no rust holes behind the bonnet hinge section but looks like they'll need to be done at some point as rust has set in.
FB_IMG_1607765972536.jpg 82.24K
8 downloads
FB_IMG_1607765956930.jpg 122.99K
9 downloads
FB_IMG_1607765953793.jpg 130.39K
9 downloadsHere was the passengers side as when I bought it. The side strips had been removed and glue was still there as well as a lot of dodgy paint.
Cleaned all the glue off and gave the doors a sand with 320 grit. The doors are pretty banged up but I'll just prime the rough area and rattle pack it for now to tidy it up a bit.
FB_IMG_1607765938329.jpg 102.64K
9 downloads
FB_IMG_1607765943721.jpg 102.31K
8 downloadsThen I removed the drivers side strips to match and gave it a quick rub with some 600 grit to clean it up. Looks pretty average but will do for now.
FB_IMG_1607765948378.jpg 123.15K
8 downloads
#44
yel327
-
- Members
-
- 13,081 posts
Oh My, Don't you post alot
- Joined: 10-February 08
Posted 12 December 2020 - 08:12 PM
How would I go about fixing them? They are banged up around the gearbox crossmember too.
These dont have crush tubes do they? I don't remember any in my old one.
Do you know any good beaters? Maybe get some good photos and get them to look. I reckon they could fix them but you’d have to remove the crossmember.
#45
hawk
-
- Members
-
- 2,143 posts
Forum Fixture
- Name:steve
- Location:Berwick, Melbourne
- Car:UC Torana
- Joined: 16-July 09
Posted 20 December 2020 - 05:12 PM
I'll sus it out when the K frame comes out, might just leave them alone for now.
Anyway, today I picked up a 253 and trimatic. had a 600 holley, extractors and electronic dizzy. pretty sure its QT prefix. I'm expecting it to have a cam too. Came with torana engine mounts, alloy radiator, torana? alternator bracket.
Will tidy it up and see how it goes.
FB_IMG_1608445418212.jpg 120.6K
9 downloads
FB_IMG_1608445421861.jpg 139.54K
7 downloads
FB_IMG_1608445445537.jpg 113.29K
7 downloads
FB_IMG_1608445415017.jpg 128.11K
7 downloads
#46
yel327
-
- Members
-
- 13,081 posts
Oh My, Don't you post alot
- Joined: 10-February 08
Posted 20 December 2020 - 06:22 PM
HX auto engine by the dress of it. If it’s all good the best three things you can do for it are:
Find a KIlkenny or the right Edelbrock intake.
Fit a rebuilt 4.2 blue Quadrajet.
Fit a HEI dizzy.
Here is a Kilkenny intake. Fits all Holden V8 heads from HT through to VL. This one has had its blue/black centre bolt holes welded up so ready to fit on a red. They are a copy of the blue/black V5H intake.
https://www.gumtree....opytopasteboard
Edited by yel327, 20 December 2020 - 06:27 PM.
#47
rodomo
-
- Members
-
- 17,998 posts
To advertise here, call 13TORANA
- Name:R - O - B Dammit!
- Location:Way out west of Melbourne Awstraylya
- Joined: 10-December 05
Posted 20 December 2020 - 10:31 PM
Nup. The best thing he can do is find compression and work from there. 
#48
yel327
-
- Members
-
- 13,081 posts
Oh My, Don't you post alot
- Joined: 10-February 08
Posted 21 December 2020 - 07:17 AM
True. Those early pollution red intakes are terrible though
#49
hawk
-
- Members
-
- 2,143 posts
Forum Fixture
- Name:steve
- Location:Berwick, Melbourne
- Car:UC Torana
- Joined: 16-July 09
Posted 21 December 2020 - 05:55 PM
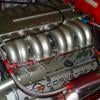
I was wrong about the prefix its a QR 253. Plan on fixing the basic things first like the Welch plugs and such.
Checked compression with an el cheapo tester and cranking it by hand with a socket on the crank. Got 55 to 60 psi on all 8 after it hit tdc twice. No idea if that gives a good indication or not.
Some corrosion on the rockers from it sitting. oil pumped out all the rockers well except one, will double check it tomorrow.
Has what looks to be double valve springs, no idea if that is standard on these or not.
FB_IMG_1608536450402.jpg 111.37K
7 downloads
FB_IMG_1608536452884.jpg 88.37K
7 downloads
FB_IMG_1608536458494.jpg 85.29K
7 downloads
FB_IMG_1608536455546.jpg 79.85K
7 downloads
#50
hawk
-
- Members
-
- 2,143 posts
Forum Fixture
- Name:steve
- Location:Berwick, Melbourne
- Car:UC Torana
- Joined: 16-July 09
Posted 22 December 2020 - 07:11 PM
Managed a proper compression test tonight and it was sitting at 120 psi on every cylinder peak at 140 to 150 when at the top of the stroke.
trying to hotwire it to run on the engine stand. But fried the coil following advice I found online.
vk style electronic dizzy
pink wire to positive on coil
green wire to negative on coil
then a constant 12v wire to the coil from the battery that can be cut to shut it off?
trying to hotwire it to run on the engine stand. But fried the coil following advice I found online.
vk style electronic dizzy
pink wire to positive on coil
green wire to negative on coil
then a constant 12v wire to the coil from the battery that can be cut to shut it off?


0 user(s) are reading this topic
0 members, 0 guests, 0 anonymous users

