Jump to content


Photo
- - - - -

hatch project


  • Please log in to reply
435 replies to this topic

#1 derrin71

derrin71

    Forum Fan

  • Members
  • PipPipPipPip
  • 491 posts
  • Name:Derrin
  • Location:Emerald Qld
  • Car:LX Hatchback, Holden Colorado. Mini Clubman S
  • Joined: 29-November 09

Posted 21 March 2010 - 10:56 AM

Hi, i'm only new to the site, here are a couple of photos of my project i have been slowly working on for the last couple of years.
When it's finished i want use it as a sunday cruiser and do the occasional car show.
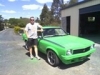
I searched a couple of years for a decent body with minimal rust and finally found one.
Proposed specs are-
  • 5.0l EFI with getrag 5 speed.
  • BW78 or 9 inch.
  • Big more modern brakes.
  • Unflared but with front and rear spoilers.
  • Painted bright green (always been a fan of Lettuce Alone HQ colour).
I have got to the stage where the engine is trial fitted, the wiring has been done, the fuel system has been modified and the engine has been started.
Next step is to find a diff, then brakes etc, etc,etc.
Plan is to trial fit all mechanicals, take the car for a test drive and then pull it down and to the bodywork. What rust that was in it has already been repaired.


Posted Image
Posted Image


#2 _cruiza_

_cruiza_
  • Guests

Posted 21 March 2010 - 12:46 PM

Welcome to the forums Derrin
and top choose of car there, your plans sound all good and solid, if you have a look around some of the stickies you have no problems finding info from those who have beenthere and done it all before, failing that just ask, there is a wealth of knowlegde here, what parts how to do its etc. and i you enjoy a bit of BS we have have that in abundance too

regards

cruiza

Edited by cruiza, 21 March 2010 - 12:46 PM.


#3 derrin71

derrin71

    Forum Fan

  • Members
  • PipPipPipPip
  • 491 posts
  • Name:Derrin
  • Location:Emerald Qld
  • Car:LX Hatchback, Holden Colorado. Mini Clubman S
  • Joined: 29-November 09

Posted 01 April 2010 - 05:31 PM

Just an update, went to the wreckers today and got a BW78 out of a skyline, got it home, cut off the old brackets and ground it up nice and clean, should give me something to do over the easter weekend!


Posted ImagePosted Image

#4 dirtbag

dirtbag

    Street Machines current Biatch!

  • Members
  • PipPipPipPipPip
  • 1,927 posts
  • Name:Tim
  • Location:Sunshine Coast
  • Car:1995 V8 2wd hilux, LH torana ute, 1970 Volksrod, MK1 2 door escort, CJ6 Jeep, VX commodore wagon.
  • Joined: 29-December 09

Posted 01 April 2010 - 07:01 PM

Looks good Derrin. Must be nice to have such a rust free shell. There's plenty of us out there who can only dream about that : )

EFI 5 litre and 5 speed is an excellent combo for a light torrie. Good choice. Keep the build pics coming :spoton:

Edited by dirtbag, 01 April 2010 - 07:02 PM.


#5 derrin71

derrin71

    Forum Fan

  • Members
  • PipPipPipPip
  • 491 posts
  • Name:Derrin
  • Location:Emerald Qld
  • Car:LX Hatchback, Holden Colorado. Mini Clubman S
  • Joined: 29-November 09

Posted 03 April 2010 - 09:43 AM

Thanks dirtbag, i searched for a long time to find a good hatch shell that hadn't completely rusted away, this one only had a little rust in the rear lower quarters,beaver panel and a couple of small 50c sized pieces in each door. I repaired the rust in the shell as soon as i got the car, stripped it down and put it in the rotissary. Will do the doors when i get around to doing the bodywork.

#6 Statler

Statler

    Heckler Extraordinaire

  • Administrators
  • PipPipPipPipPipPipPip
  • 6,282 posts
  • Name:Col
  • Location:Mackay Qld. Whitsundays for all you back packers!
  • Joined: 20-May 06

Posted 03 April 2010 - 09:58 AM

Welcome to the site.
Always good to see another CQ torana in the build.

Just curious....but why did you choose the Getrag over the T-5?

#7 dirtbag

dirtbag

    Street Machines current Biatch!

  • Members
  • PipPipPipPipPip
  • 1,927 posts
  • Name:Tim
  • Location:Sunshine Coast
  • Car:1995 V8 2wd hilux, LH torana ute, 1970 Volksrod, MK1 2 door escort, CJ6 Jeep, VX commodore wagon.
  • Joined: 29-December 09

Posted 03 April 2010 - 10:09 AM

I think from VS onwards they ran a getrag instead of a T5. Plus the getrag is a superior box in my experience. I'm just glad you're using a manual. Autos in toranas make me sad : (

#8 Statler

Statler

    Heckler Extraordinaire

  • Administrators
  • PipPipPipPipPipPipPip
  • 6,282 posts
  • Name:Col
  • Location:Mackay Qld. Whitsundays for all you back packers!
  • Joined: 20-May 06

Posted 03 April 2010 - 10:20 AM

I think from VS onwards they ran a getrag instead of a T5. Plus the getrag is a superior box in my experience. I'm just glad you're using a manual. Autos in toranas make me sad : (

Looks like a VN 304.

#9 Mort

Mort

    Lotsa Posts!

  • Members
  • PipPipPipPipPipPip
  • 2,760 posts
  • Name:Mort
  • Location:Moranbah, QLD.
  • Car:74 LH SL/R 4.2, 75 LH 4 door 186
  • Joined: 16-December 07
Garage View Garage

Posted 03 April 2010 - 11:32 AM

might be superior but don't break one, cost about $4k to get the boys pulled out ,sent away,fixed and put back in. The reverse cluster broke when he was backing out the driveway.

By the way hello Derrin and welcome to the family.


Mort

#10 derrin71

derrin71

    Forum Fan

  • Members
  • PipPipPipPip
  • 491 posts
  • Name:Derrin
  • Location:Emerald Qld
  • Car:LX Hatchback, Holden Colorado. Mini Clubman S
  • Joined: 29-November 09

Posted 03 April 2010 - 08:48 PM

Donor car VP commodore was originally an auto (ex police car) someone had put in a getrag 5 speed before i got it. Everything works all right as i drove the car around for a day before ripping it's heart out. Finished converting the diff housing today might fit it tomorrow. Need to get axles redrilled for 5 stud pattern, will get an engineering shop to do this. Gave it a light spraypack paint as all of the running gear will be removed again after i test drive it so the shell can go back on the rotissary and the mechancals can be properly painted. Engine might get warmed over as well, depending on available budget. At the rate i am going i could be doing this in 10 years time!!!!!

#11 TerrA LX

TerrA LX

    Fulcrum Fixture

  • Members
  • PipPipPipPipPipPipPip
  • 14,241 posts
  • Location:Sid 'n' knee
  • Joined: 31-May 06

Posted 03 April 2010 - 09:01 PM

Great news you have done the diff.
Any chance you will share how you went about setting the pinion angle?

#12 dirtbag

dirtbag

    Street Machines current Biatch!

  • Members
  • PipPipPipPipPip
  • 1,927 posts
  • Name:Tim
  • Location:Sunshine Coast
  • Car:1995 V8 2wd hilux, LH torana ute, 1970 Volksrod, MK1 2 door escort, CJ6 Jeep, VX commodore wagon.
  • Joined: 29-December 09

Posted 03 April 2010 - 09:43 PM

A good angle for most pinion angles is 2 degrees. Easy to set up with a spirit level and a protractor if you don't have access to anything more fancy : )

Edited by dirtbag, 03 April 2010 - 09:44 PM.


#13 TerrA LX

TerrA LX

    Fulcrum Fixture

  • Members
  • PipPipPipPipPipPipPip
  • 14,241 posts
  • Location:Sid 'n' knee
  • Joined: 31-May 06

Posted 03 April 2010 - 10:08 PM

I meant setting as in how did you jig the brackets up to align the housing, not the actual measuring of the settings sorry.

#14 derrin71

derrin71

    Forum Fan

  • Members
  • PipPipPipPip
  • 491 posts
  • Name:Derrin
  • Location:Emerald Qld
  • Car:LX Hatchback, Holden Colorado. Mini Clubman S
  • Joined: 29-November 09

Posted 04 April 2010 - 04:28 PM

Should have taken a couple of photos as i went along but i have done a couple of these over the years, here goes:

  • Sat the old banjo on my steel workbench.
  • Fabricated a couple of small axle stands and made sure the housing was set up level both ways. Set the housing up so the pinion is pointing straight up in the air. When in place tack weld the stands to the housing and the bench so it won't move. Also place stoppers each end of the axles in order to locate the new housing.
  • Used scrap pieces of steel to make up brackets that bolt onto the housing brackets with the original boltsand securely tack weld them in place to the bench. don't forget the spring pads as well.
  • Carefully remove the banjo from the jig, you need to allow for removal when building the jig.
  • Place the new diff housing in the jig, obviously with all of the skyline brackets removed, the BW78 axle tubes are only about 2mm bigger than the banjo ones close enough not to worry about, remember that the skyline housing is approx 10mm longer overall.
  • Make sure you line and level the new housing. A good spirit level will do.
  • Oxy cut the old brackets off the banjo, get nice and close to the axle tubes, don't worry about going through the axle tubes as the banjo housing will be giong to the dump anyway. Do one bracket at a time so you don't get them mixed up.
  • Clean up the brackets with a grinder and tack weld them securely onto the new housing after bolting them up in the jig brackets.
  • After you get everything tacked up carefully remove the housing from the jig.
  • Now for the tricky bit you need to be very carefull when welding thebrackets onto the housing not to warp the housing especially when welding the ears on the housing next to the centre.
  • I am a boilermaker so i have a feel for these things but the trick is to only weld in small sections, moving from one end of the diff to the other frequently, whatever you do don't let it get too hot!!! It took me all day to weld mine, i would do a little bit then have a break for a while and do something else it probably took me a dozen goes to finish welding it up over the space if 12 hours.
  • Please only use a mig welder!!!!!
  • As to the final pinion angle ? If i have any issue i could get adjustable top arms but the car is not going to be raced so it shouldn't be a big problem.

I take no responsibility for any ---- ups and don't bring it to me for help. If in doubt get a professional to do the job.

And here's the finished product.

Posted Image

#15 Mort

Mort

    Lotsa Posts!

  • Members
  • PipPipPipPipPipPip
  • 2,760 posts
  • Name:Mort
  • Location:Moranbah, QLD.
  • Car:74 LH SL/R 4.2, 75 LH 4 door 186
  • Joined: 16-December 07
Garage View Garage

Posted 04 April 2010 - 04:42 PM

stupid question maybe but can this be applied to any other diff eg.9in


Mort

#16 Heath

Heath

    I like cars.

  • Administrators
  • PipPipPipPipPipPipPip
  • 18,320 posts
  • Name:Heath
  • Location:Eastern Suburbs, Melbourne
  • Car:Heavily Modified UC Sunbird Hatchback
  • Joined: 07-November 05
Garage View Garage

Posted 04 April 2010 - 04:47 PM

Well the axle tubes will probably be a bit fatter, that's about it. But you'd be crazy to not go a Borgie

#17 _cruiza_

_cruiza_
  • Guests

Posted 04 April 2010 - 05:05 PM

Just wondering if someone has some picture of the process take Darrin instructions and make a stickie, good post Derrin

#18 Mort

Mort

    Lotsa Posts!

  • Members
  • PipPipPipPipPipPip
  • 2,760 posts
  • Name:Mort
  • Location:Moranbah, QLD.
  • Car:74 LH SL/R 4.2, 75 LH 4 door 186
  • Joined: 16-December 07
Garage View Garage

Posted 04 April 2010 - 05:46 PM

Thanks Heath just using the 9in as a referance.

Mort

#19 TerrA LX

TerrA LX

    Fulcrum Fixture

  • Members
  • PipPipPipPipPipPipPip
  • 14,241 posts
  • Location:Sid 'n' knee
  • Joined: 31-May 06

Posted 04 April 2010 - 07:32 PM

Thanx Derrin, I was thinking something similar but having problems calculating the pinion angle.
Cheers T.

#20 derrin71

derrin71

    Forum Fan

  • Members
  • PipPipPipPip
  • 491 posts
  • Name:Derrin
  • Location:Emerald Qld
  • Car:LX Hatchback, Holden Colorado. Mini Clubman S
  • Joined: 29-November 09

Posted 09 April 2010 - 09:52 PM

Spoke to a guy in town yesterday who does Qld blue mod plates and can certify vehicle modifications. He answered a lot of questions about legality issues i had and what i can and can't do. This is great, i can now forge ahead with some parts of my project i was a little unsure about. Will hopefully get the diff conversion fully completed and installed and continue on with a thousand little jobs i have started in the car and not finished. Two weeks off work so no excuses, except the wife can't believe the amount of time i spend on the car and it never seems to be getting closer to completion.

#21 derrin71

derrin71

    Forum Fan

  • Members
  • PipPipPipPip
  • 491 posts
  • Name:Derrin
  • Location:Emerald Qld
  • Car:LX Hatchback, Holden Colorado. Mini Clubman S
  • Joined: 29-November 09

Posted 13 April 2010 - 06:12 PM

Got the handbrake cabes fitted up today, easy as, great conversion fitting a skyline r31 diff. Used a floor mounted handbrake as i have always hated the torana foot activated handbrake. Next job is to fit up the two piece commodore tailshaft, will need to make up a mount for the centre bearing ensuring i leave enough space for the exhaust to pass, will then need to shorten the rear section. Also need to restud the axles and drill the rotors.
Posted Image
Posted Image
Posted Image

#22 lxsstorana

lxsstorana

    Forum Fixture

  • Members
  • PipPipPipPipPip
  • 2,499 posts
  • Name:Mick
  • Location:Eastwood, Sydney
  • Car:SS Hatchback
  • Joined: 23-March 06

Posted 13 April 2010 - 07:59 PM

Nice project you've got there. :spoton:

Will be a beauty when finished.

Cheers Mick.

#23 derrin71

derrin71

    Forum Fan

  • Members
  • PipPipPipPip
  • 491 posts
  • Name:Derrin
  • Location:Emerald Qld
  • Car:LX Hatchback, Holden Colorado. Mini Clubman S
  • Joined: 29-November 09

Posted 22 April 2010 - 09:13 AM

Back to work tomorrow, just an update on what i've achieved in the last couple of days. Shortened and fitted up commodore tailshaft, restudded axles in HQ pattern and drilled brake rotors to suit (still chasing up blank slotted and drilled or slotted rotors for a R31 skyline).
Posted Image
Posted Image

#24 _Barman_

_Barman_
  • Guests

Posted 25 April 2010 - 07:21 AM

Hey Derrin
Welcome to the site,
Can you put a couple of pics of your wiper motor set up,
cheers Baz

#25 derrin71

derrin71

    Forum Fan

  • Members
  • PipPipPipPip
  • 491 posts
  • Name:Derrin
  • Location:Emerald Qld
  • Car:LX Hatchback, Holden Colorado. Mini Clubman S
  • Joined: 29-November 09

Posted 28 April 2010 - 01:42 PM

Here you go Baz,
Used the smallest wiper motor i could find that had a similar operating mechanism as the torana one(used a F--d laser one). Mounted it behind the firewall in the plenum chamber directly behind where the original one sits in a bracket i made up. Had to trim the inside of the plenum chamber a little but this won't affect how it works. Had to modify the actuating arms to suit, bent one arm and made a whole new other one. Wired it into the original wiring loom. (a little tricky as the laser motor also runs intermittent speed but this doesn't work in my setup) Ran the wires through the plenum chamber as well as the windscreen washer squirters and mounted them so they squirt up through the cover grille. I did all of this with the windscreen still in place so i could check it's operation.
Posted Image
Posted Image
Posted Image


0 user(s) are reading this topic

0 members, 0 guests, 0 anonymous users