Jump to content


- - - - -

GTS/L34/A9X RALLY WHEEL RESTORATION


  • Please log in to reply
21 replies to this topic

#1 _LH SLR 3300_

_LH SLR 3300_
  • Guests

Posted 27 October 2012 - 11:53 AM

With the recent popularity of retro fitting GTS/L34/A9X Rally wheels to LH-LX Toranas, i thought i'd post my attempt at restoring a set for my LH Torana. With the price of new aftermarket wheels & or ready restored ones fetching high prices on the market, my best option as with alot of DIY guys & gals was to source a used set & restore them myself. The wheels i aquired were like most used steel rims on the market, old scuffed/scratched paint mixed with liberal amounts of surface rust. I didn't get any pics, but overall the wheels themselves were in good condition & ready for a refurbish. The best method IMO for the initial preperation is to have them media blasted, but i couldn't afford this so i chemicaly paint stripped each rim & hand sanded them. I treated the bare steel with deoxidine & ended up with this as the base for the restoration process.
Posted Image
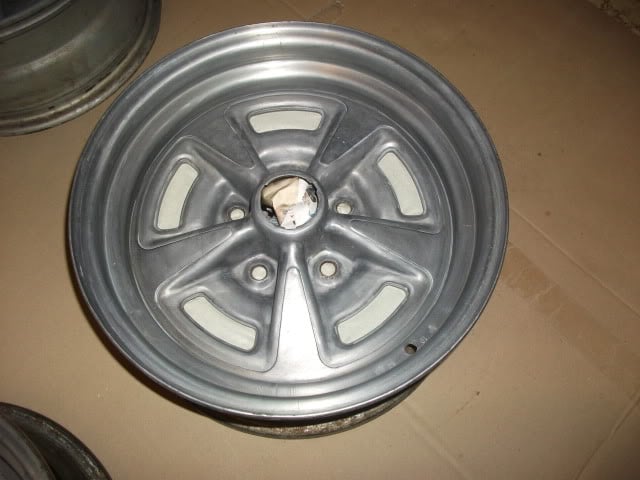
As you may notice, i masked up the openings to prevent overspray blow back onto the rims when i spray them. Material choice is up to you, i'm using 2K clear over base but the same process can be used with aerosols, acrylic, whatever suits your preference, skill etc. The results are almost identical, along with the basic procedure, the only real difference is the time frame. Anyhow, with all wheels ready for the paint process, i applied an etch primer followed by a 2K non-sand primer.
Posted Image
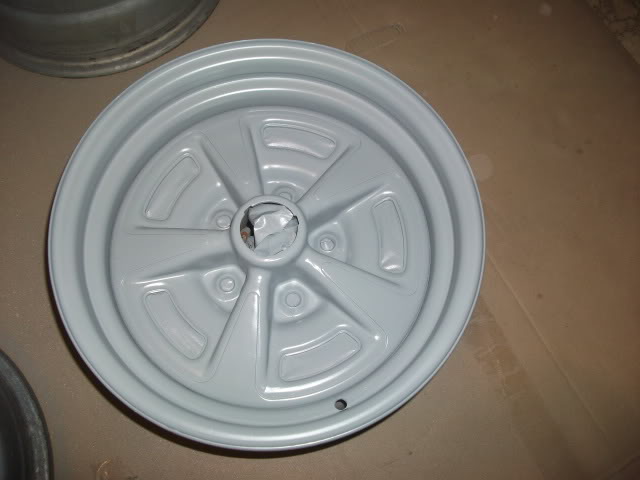
Because i'm not overly fussy with the finish, i've already been told by a well known auto magazine editor my car isn't good enough to be featured in a magazine, i decided to save time by using a paint procedure known in the trade as "wet on wet" where the colour is applied over the primer without sanding. Of course the final finsh will be slightly better if the conventional prime, sand, paint method is used but again, it comes down to personal preference. Anyhow, next step was to apply the main colour. I'm using a coarse metallic silver tinter with a dark charcoal as the second colour.
Posted Image
You don't have to follow my method to the letter, in some instances, applying the secondry colour & masking the center can be easier, whatever is easier or more comfortable for you. Be sure to cover the wheels with two to three light/medium coats rather than try to achieve coverage with heavy wet coats. Once you have finished applying the first colour, leave the paint time to flash off. I left my wheels for roughly an hour before starting the next step, masking off the first colour in preperation for applying the second. This is very time consuming & paitence is the key here. I used fineline tape for the outline/edges & conventional 3/4" & 2" masking tape for the rest.
Posted Image
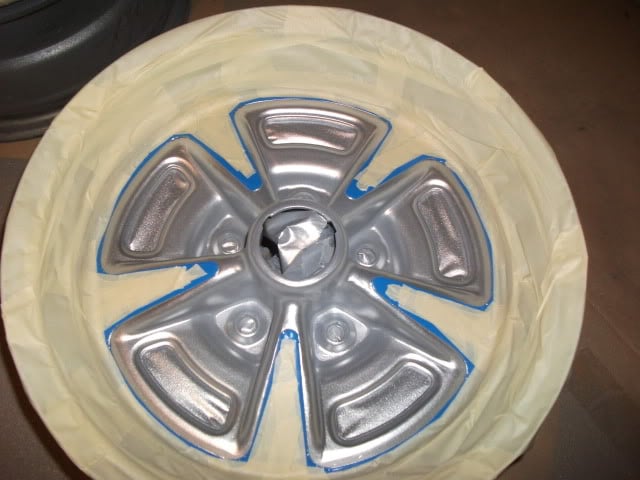
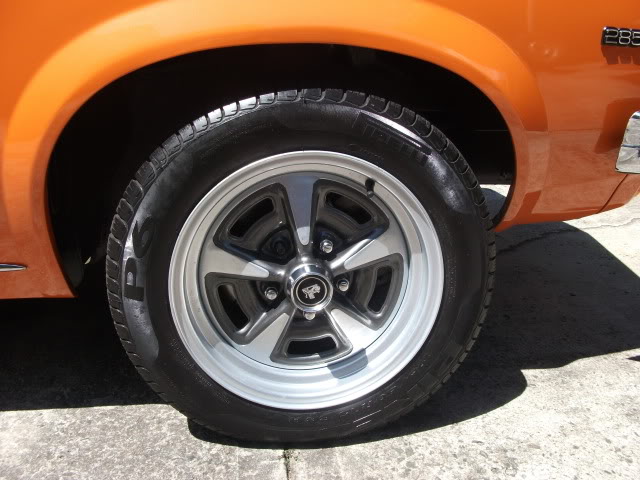
After applying the second colour & allowing plenty of time for the paint to flash off, very carefully remove the masking. This is why it is advisable to allow enough time for both colours to flash off, if the paint is too soft, you can remove either the primary colour, secondry colour or both when removing the masking tape. Another reason why i usualy apply two to three light/medium coats rather than heavy or multipule coats. Hopefully the wheels should look like this.
Posted Image
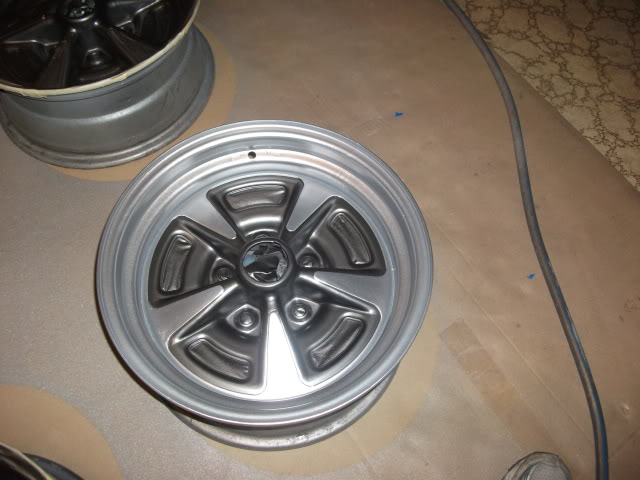
This next step is optional, but for durability, i applied a clear coat over the wheels to seal the base colour. Because i performed all prep/paintwork in my home garage, i didn't have access to matting base to "dull" off the 2K clear i used, so my wheels are sort of shiny, but again it comes down to personal preference & i don't mind them like this.
Posted Image
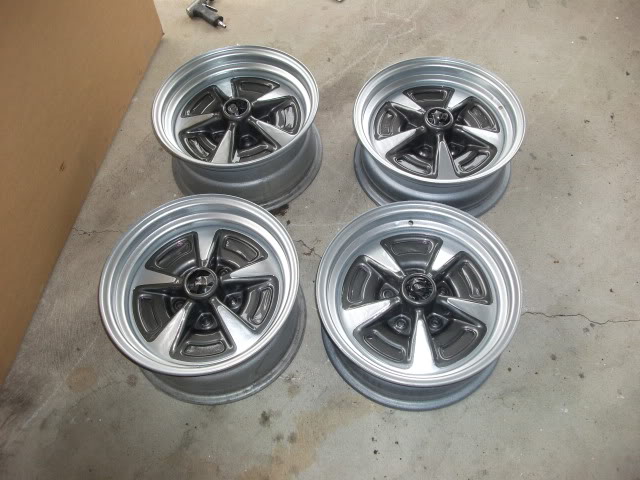
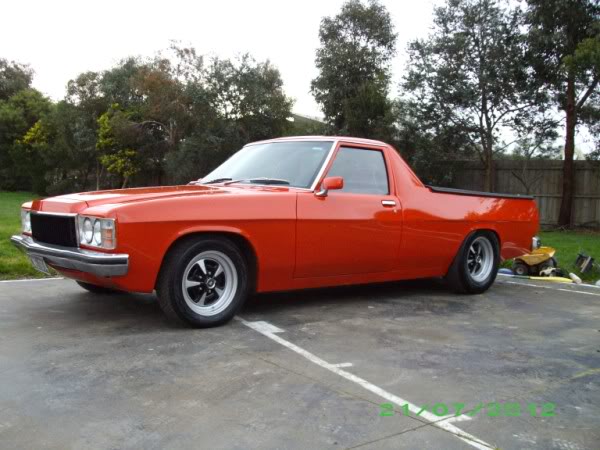
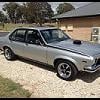
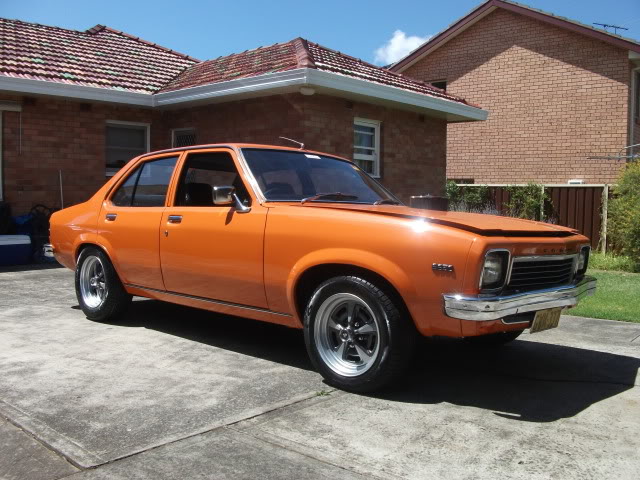
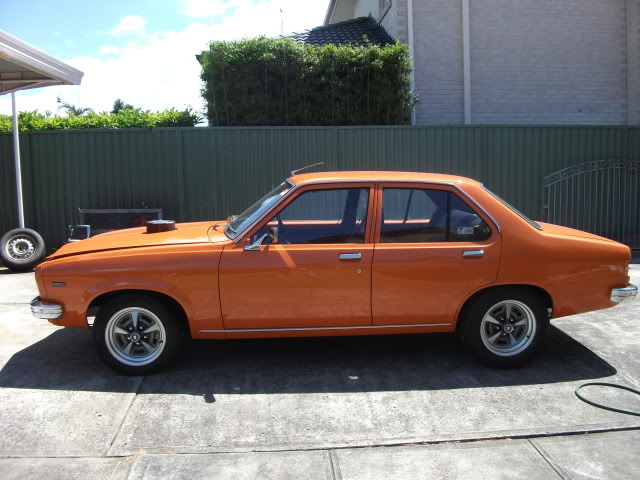
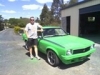
After allowing a week for the paint to fully cure, i had tyres fitted to the wheels & here is the finished product.
Posted Image
Posted Image
Posted Image
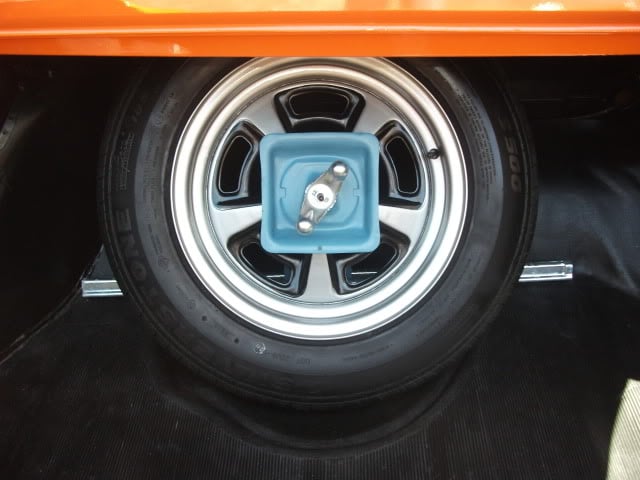
And just to show that excellent results can be achieved with basic skills & aerosols, here is a fith rim i painted a few weeks ago for a spare. While i'm no expert, i am always open to sharing my skills with anyone & always happy to help in any way i can. Cheers Matt.
Posted Image

#2 derrin71

derrin71

    Forum Fan

  • Members
  • PipPipPipPip
  • 491 posts
  • Name:Derrin
  • Location:Emerald Qld
  • Car:LX Hatchback, Holden Colorado. Mini Clubman S
  • Joined: 29-November 09

Posted 27 October 2012 - 12:00 PM

Well done mate, wheels look great.

#3 Ice

Ice

    Cool

  • Members
  • PipPipPipPipPipPipPip
  • 15,207 posts
  • Name:Gene
  • Location:Galaxy's away from Ipswich
  • Car:77 HZ Sandman Van
  • Joined: 03-January 07

Posted 27 October 2012 - 12:03 PM

Thats. a great job you done matt i kinda like those wheels and will be restoring a set real soon hope they turn out half as good as yours oh and they look shit hot on your torana to keep up the good work mate
cheers gene

#4 _LH SLR 3300_

_LH SLR 3300_
  • Guests

Posted 27 October 2012 - 12:06 PM

Thanks, before anyone with sharp eyes picks the missing wheel nut in the second to last pic, i grabbed the correct amount of new ones from the box marked with the size i needed at Bob Janes where my brother-in-law works & i had tyres fitted, only to realise when fitting the wheel that someone had placed a metric nut in the box. D'OH! Next time i'll chech each nut individualy to be sure they are all the correct ones.

#5 Ice

Ice

    Cool

  • Members
  • PipPipPipPipPipPipPip
  • 15,207 posts
  • Name:Gene
  • Location:Galaxy's away from Ipswich
  • Car:77 HZ Sandman Van
  • Joined: 03-January 07

Posted 27 October 2012 - 12:10 PM

Hey matt are those rims standard or have they been taken out to 7 inches

I bet you its spins them cheesecutters real easy hey matt

#6 _LH SLR 3300_

_LH SLR 3300_
  • Guests

Posted 27 October 2012 - 12:14 PM

Hey Gene, they are actualy factory Pontiac Rally rims, 15x7" rear & 15x6" front. Because of the larger disc brakes i've fitted all round on my LH, the minimum size wheel i can run is a 15". Cheers Matt

#7 Ice

Ice

    Cool

  • Members
  • PipPipPipPipPipPipPip
  • 15,207 posts
  • Name:Gene
  • Location:Galaxy's away from Ipswich
  • Car:77 HZ Sandman Van
  • Joined: 03-January 07

Posted 27 October 2012 - 12:24 PM

Yeah i had a set of chev rally wheels with the mexican hat caps on my van years ago but sold them now im spewn because they cost so much to buy In 15s so its get 14s widened or buy a brand new set of 15x7s and 15x8s theres $1200.00 without tyres

#8 Stinga

Stinga

    .

  • Members
  • PipPipPipPipPip
  • 2,114 posts
  • Name:Stinga
  • Location:Wollongong, NSW
  • Car:HD Holden ute, and sedan, UC torana
  • Joined: 05-December 05

Posted 27 October 2012 - 08:22 PM

car looks Awesome Matt, top job

#9 sibhs

sibhs

    Lotsa Posts!

  • Members
  • PipPipPipPipPipPip
  • 2,719 posts
  • Name:Martin
  • Location:Perth
  • Car:LJ Coupe S
  • Joined: 27-July 12

Posted 27 October 2012 - 08:38 PM

Top job Matt, excellent result.
Thanks for the write-up.
Marty

#10 tsn007

tsn007

    Forum Fixture

  • Members
  • PipPipPipPipPip
  • 1,019 posts
  • Name:Tony
  • Location:LIVERPOOL, NSW
  • Car:LX hatch, LX sedan
  • Joined: 25-April 07

Posted 27 October 2012 - 10:29 PM

Hi Matt,
wheels look great,

is in it amazing how a set of wheels can completely change the look of a car

#11 _greenmachine215_

_greenmachine215_
  • Guests

Posted 28 October 2012 - 06:12 AM

They look sweet mate,

I got one gts wheel I found years ago in hard rubbish this makes me wanna dig it out fix it up and do something cool with it.

Cheers

#12 RIM-010

RIM-010

    DON'T PANIC

  • Members
  • PipPipPipPipPipPipPip
  • 8,079 posts
  • Name:Tim
  • Location:Cowell, SA
  • Car:LJ 2 Door - HQ Premier
  • Joined: 01-March 06
Garage View Garage

Posted 28 October 2012 - 06:57 AM

I found one put the farm a while ago, with a rust hole through the bead... I painted it up with spray cans, and now it holds my garden hose :)

#13 TerrA LX

TerrA LX

    Fulcrum Fixture

  • Members
  • PipPipPipPipPipPipPip
  • 14,241 posts
  • Location:Sid 'n' knee
  • Joined: 31-May 06

Posted 28 October 2012 - 09:53 AM

Posted Image


I can really appreciate the effort you have put into getting these wheels to this stage.
Alot of work manually cleaning them.


Posted Image


frOck what the magazines say, I would rather spend 10minutes here or spend 10minutes with you in the car park then waist $10 on the crap they spew out on publications any day.

#14 _LH SLR 3300_

_LH SLR 3300_
  • Guests

Posted 28 October 2012 - 10:15 AM

Thanks for the possitive comments, they are greatly appreciated. There is alot of manual labour to prep old parts to that stage, the easier option would've been to have them blasted but like alot of folk here, what makes a hobby like this more affordable for me is to do as much work myself as possible & i posted this thread to show others what is possible to achieve with basic cheap materials, having a go at doing it yourself & good old fashioned elbow grease.

#15 _BLOWN V6HATCH_

_BLOWN V6HATCH_
  • Guests

Posted 28 October 2012 - 02:41 PM

Nice work mate, they came up a treat. I know how much work is involved in these as i restored a set for my ute a few years back, it's a bit tedious masking them up but it's certainly worth it in the end. Best Holden steel wheel ever made in my opinion. Here is how mine turned out:

Posted Image
Posted Image

I used black in the centres, just because i think they look nicer like that.

#16 _LH SLR 3300_

_LH SLR 3300_
  • Guests

Posted 28 October 2012 - 08:02 PM

Nice ute! I considered painting the centers of mine black, the spare wheel pictured in the boot of my car has a satin black center, but i decided to go with the charcoal/gunmetal grey to add a bit of individuality to the car. Plus i already had nearly a litre of the colour left over from another project which made the choice easier to.

#17 hanra

hanra

    Oh My, Don't you post alot

  • Members
  • PipPipPipPipPipPipPip
  • 10,992 posts
  • Name:Brad
  • Location:Farrrrrr North Qld
  • Car:1975 LH SL/R 5000, 1967 Morris Cooper S, E36 BMW, Toyota Corolla, Isuzu DMax
  • Joined: 24-March 11

Posted 28 October 2012 - 10:35 PM

Is there paint masking kits for this style of rim available?

#18 Ice

Ice

    Cool

  • Members
  • PipPipPipPipPipPipPip
  • 15,207 posts
  • Name:Gene
  • Location:Galaxy's away from Ipswich
  • Car:77 HZ Sandman Van
  • Joined: 03-January 07

Posted 28 October 2012 - 10:49 PM

Yes there is brad rare spares do em i think

#19 warrenm

warrenm

    Forum Fixture

  • Members
  • PipPipPipPipPip
  • 2,118 posts
  • Location:Central West NSW
  • Car:1972 LJ Torana
  • Joined: 08-November 05
Garage View Garage

Posted 29 October 2012 - 10:43 AM

Don't know if they are any good, but these are on evilbay.
www.ebay.com.au/itm/Masking-Kit-Suit-Pontiac-HQ-HJ-HX-GTS-Monaro-Wheels-15-/220885063732?pt=AU_Car_Parts_Accessories&hash=item336dc69834

#20 Redslur

Redslur

    Has been Torana owner

  • Members
  • PipPipPipPipPipPip
  • 3,536 posts
  • Name:Gerry
  • Location:Canberra
  • Car:HQ GTS Replica 350.
  • Joined: 08-November 05

Posted 29 October 2012 - 11:30 AM

As always matt, your workamanship is top class.

#21 _j.e.d._

_j.e.d._
  • Guests

Posted 29 October 2012 - 01:56 PM

Fantastic tutorial Matt, I'll definitely be following this when I get around to painting mine (gotta widen the rears to 10" first!)
Here's a link to the discussion about masking kits for these wheels for anyone interested... cheers again mate!

http://www.gmh-toran...ay/#entry707302

#22 _LH SLR 3300_

_LH SLR 3300_
  • Guests

Posted 29 October 2012 - 03:40 PM

Thanks again for positive comments. I am aware of the masking kits available, but in the spirit of saving $$ & DIY budget builds, i did mine the old fashioned way. I could've saved time by blasting the wheels along with buying a masking kit, but my time doesn't cost me & the money i saved doing the wheels the way i did will pay my food & petrol bills for the next fortnight. Just my thoughts anyway, but it is good to know a masking kit to make the job easier.


1 user(s) are reading this topic

0 members, 1 guests, 0 anonymous users