Jump to content


Photo
- - - - -

The SLR 6000 Project


  • Please log in to reply
407 replies to this topic

#1 mrlctorana

mrlctorana

    Forum Fixture

  • Members
  • PipPipPipPipPip
  • 572 posts
  • Location:North-West Tassie
  • Joined: 17-January 06

Posted 01 September 2008 - 08:24 AM

Hey guys, I thought it was about time I put up some info on our current project. The only reason I was allowed to get the car was by convincing the other half that it would be her car and she could pick and choose how she wanted it, lol. So we found a car, an LX SL 4 door in drivable condition and after coming up with all the plans, working out a budget, ect, we sent the forms into transport with all the plans for the car from one end to the other and it was all approved with the only requirement being it has to be built and registered within 2 years, sweet. So it'll be all legal when finished.

Thanks to LS1LX and LS2LXHATCH as these guys have helped me out a lot so far, sorting things out and planning.

Here's the basic plan of the car, well my side of things. We have everything on the list except the motor as I've been using a 5.7l as a dummy block.

LS2 6.0l chev and T56 6 speed Manual Box
3.5" inch driveshaft with 1350 series unis
9" LSD rear, 31 Spline axles, 4:56 gears and VS commy Panhard rod setup
Boxed Lower trailing arms
UC upper and lower contorl arms on the front and HX stubs.
330mm Hopper Stoppers big brake conversion front
300mm Hopper Stoppers Bolt on rear disk conversion
Reco'ed Booster and 1" master
17x8 and 17x10 Billet Specialites rims
245/40/17 fronts, 315/35/17 rear
Castlemaine Chassis Kit and an extra cross brace welded in the cabin.

Her plans for the car were to fit the full A9X kit, flares, scoop and spoilers, ect, Metallic Purple and Black paint with the blackouts and SLR6000 stencils on the side and the rear spoiler, Billet Specialites Legend series wheels and a droptank. Then the inside will all be redone in standard SLR trim to keep things simple, No cage or harnesses. This is a photoshop we done and roughly how shes wants it although she had decided on showwheels hammer 5's at the time and just before I rang to order them she changed her mind, So for all I know the rest of her plans could change at any time!!! NO PINK THOUGH!!!

Posted Image

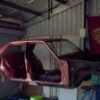
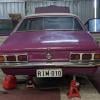
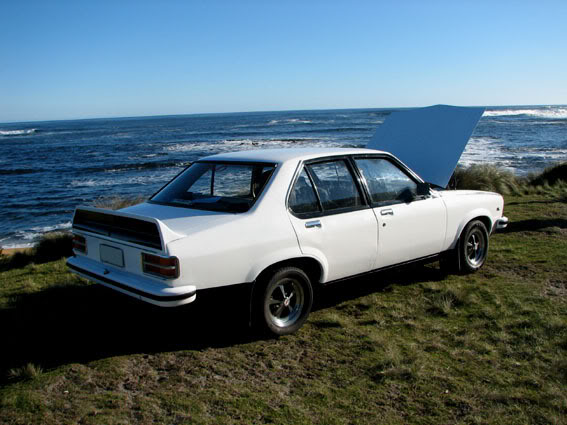
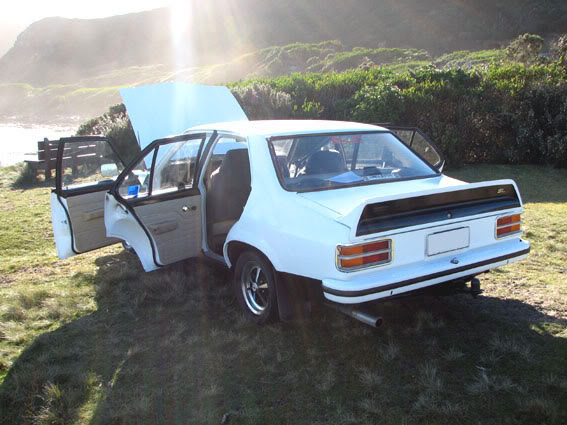
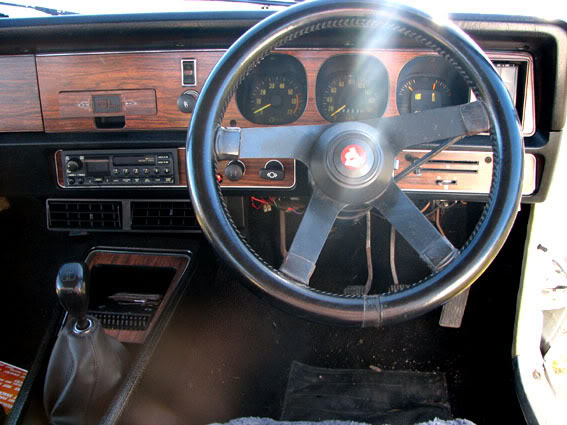
Heres a few pics of what we started with!

Posted Image

Posted Image

Posted Image

Posted Image


Theres a heap of progress pics to catch up on so I'll slowly put them up as I get time.

Cheers

#2 GML-31

GML-31

    Oh My, Don't you post alot

  • Members
  • PipPipPipPipPipPipPip
  • 5,239 posts
  • Name:Kev
  • Location:Highland Park
  • Car:too many
  • Joined: 08-November 05

Posted 01 September 2008 - 09:57 AM

looked a clean starter... keep up the pics

#3 Heath

Heath

    I like cars.

  • Administrators
  • PipPipPipPipPipPipPip
  • 18,314 posts
  • Name:Heath
  • Location:Eastern Suburbs, Melbourne
  • Car:Heavily Modified UC Sunbird Hatchback
  • Joined: 07-November 05
Garage View Garage

Posted 01 September 2008 - 02:55 PM

Six speed manual behind a 6.0L in a box Torana? Ohhhhh man I hope this all goes ahead (even for your sake!)

#4 mrlctorana

mrlctorana

    Forum Fixture

  • Members
  • PipPipPipPipPip
  • 572 posts
  • Location:North-West Tassie
  • Joined: 17-January 06

Posted 01 September 2008 - 05:18 PM

We started on the car in february so I've have had around 6 months on it so far, but working a fair bit so finding it hard to get too much done, and yeah the little fella loves to help out and get his hands dirty.


Posted Image

Posted Image

Posted Image

Posted Image

Posted Image

Posted Image

Posted Image

Posted Image

Posted Image

Posted Image

#5 _Chriskoss-79uc_

_Chriskoss-79uc_
  • Guests

Posted 01 September 2008 - 05:28 PM

That'll be a niicee looking vehicle once its done. Full steam ahead mate!

#6 mrlctorana

mrlctorana

    Forum Fixture

  • Members
  • PipPipPipPipPip
  • 572 posts
  • Location:North-West Tassie
  • Joined: 17-January 06

Posted 01 September 2008 - 07:11 PM

Heres a few more pics, where I have fitted the flare kit, ect, About a weeks work in itself as I tried to be pretty fussy with the gaps but it paid off. Most of the kit fitted pretty well although some pieces needed heating and bending slightly to get the correct gaps. Also got the rear spoiler to fit nicely, then I removed the boot rubber stops, put grease on the rear quaters and filed the spoiler till it didn't hit the body. Last thing you want is a freshly painted car and someone slams the boot and chips the paint.

Posted Image

Posted Image

Posted Image


Old banjo out and new 9inch in, all bolted up nicely without any dramas and it was actuallty the right diff. The last one I bought for my LC turned up with all the mounts to suit LX and was about an inch longer, so I had to wait another 2 months.

Posted Image

Posted Image


Heres the new brake set-up, The old front disk rotor compared to the new front and rear disks, All bolted up nicely without any problems. Rear disk set-up was very simple, press of rear wheel bearings, replace old bearing retainer plate with the hoppers one, replace wheel bearings, used new ones even thought the others hadn't been used, just piece of mind. Then slip on your disk and bolt up the caliper, too nice.

Posted Image

Posted Image

Posted Image

Posted Image

Posted Image


More pic's to come soon.

#7 _Brewster_

_Brewster_
  • Guests

Posted 01 September 2008 - 07:23 PM

Mate that is awesome progress, keep up the good work! :spoton:

#8 lxsstorana

lxsstorana

    Forum Fixture

  • Members
  • PipPipPipPipPip
  • 2,499 posts
  • Name:Mick
  • Location:Eastwood, Sydney
  • Car:SS Hatchback
  • Joined: 23-March 06

Posted 01 September 2008 - 07:53 PM

Great work! :clap:

Very well planned and organised. :spoton:

Regards Mick.

#9 _luke186_

_luke186_
  • Guests

Posted 01 September 2008 - 07:54 PM

damn! this is gonna be one hell of a beast!

well done! hope it all goes to plan!

#10 _ronaldoredsox_

_ronaldoredsox_
  • Guests

Posted 01 September 2008 - 09:13 PM

wow. Awesome. Wanna sell it to me cheap when you're done? Please?

#11 mrlctorana

mrlctorana

    Forum Fixture

  • Members
  • PipPipPipPipPip
  • 572 posts
  • Location:North-West Tassie
  • Joined: 17-January 06

Posted 02 September 2008 - 03:15 PM

Thanks a lot guys, It took a fair bit of planning but it's definately paid off.

ronaldoredsox - yeh mate no worries, glad to help, lol. We'll just wait and see what it feels like the first time I get beside one them VE GTS's, then I'll let you know. Can't see us getting rid of it as its more of a family project and something that we can all go for a cruise in.

Heres a few more progress pics of the engine bay, I have trimmed the side rail seams and also trimmed the firewall seam just to give me that little extra clearance to play with. Have also filled all the useless holes in the engine bay and the brake line holes in the guard as we'll run them another way. The battery tray and the charcol canister bracket sections were also removed and replaced with flat sections. We are going for a kind of plain and simple look in the engine bay, so the battery will be going in the boot and the wiring will be hidden under all the guards.

Posted Image

Posted Image

Posted Image

Posted Image

Posted Image

Posted Image

#12 MRLXSS

MRLXSS

    The Render Garage

  • Members
  • PipPipPipPipPipPipPip
  • 12,396 posts
  • Name:Matt
  • Location:Upwey, Melbourne
  • Car:355 LX Hatchback, DeLorean DMC-12, LX SS Hatch, VY Cross8 Crewman
  • Joined: 09-November 05

Posted 02 September 2008 - 03:26 PM

I really can't wait to see this build evolve! I have it bookmarked now! I really really want to put in a LS2 into my hatch in the future... But always scared off because it seems like a really big job and i dont have the resources to do it myself!

Great Work mate! Keep it up!!!

#13 _TJ253_

_TJ253_
  • Guests

Posted 02 September 2008 - 03:47 PM

Keep up the goodwork its coming along very nice. The thing is gonna be a animal
bet its burning a hole in the wallet

#14 mrlctorana

mrlctorana

    Forum Fixture

  • Members
  • PipPipPipPipPip
  • 572 posts
  • Location:North-West Tassie
  • Joined: 17-January 06

Posted 03 September 2008 - 12:14 PM

Matt - Your hatch is tuff as the way it is already, I would have loved a hatch, but got out voted, lol. There is a lot of info on doing the conversion and a few guys on here who are very helpful, Yeh theres a lot of work involved but it's all worth it in the end. Cost wise it's probably not too bad compared to building a 308 to get the same sort of horsepower and then it's probably not going to be as reliable, but then there's something about and old carbied V8 sitting there lumping over that gets you attention.

TJ253 - Yeh it's burning, but i guess all projects do and thats why we planned out the car on paper before we'd even bought it, so guess it's not too bad although Im struggling to see where all the $$$ have gone so far, lol.

These pics are the front passangers side floor pan which was replaced and was not a pretty job.

Posted Image

Posted Image

Posted Image

Posted Image


This is the 5.7l which I've used as a dummy block and also the T56 6 speed box. I mounted it all in there, cut the tunnel to fit the box in there and then had a mate help out with making up the new tunnel. There is still one more piece to be made and tacked in place before it gets welded in fully. The gearbox is fairly long and actualy cuts into the cross brace that runs through the middle of the car as you can see in the pics. We spoke to the engineer before we cut it out and he said that was fine as long as we made another cross brace about a foot further back to keep the strength in the body. We also modified the crossmember a little to lift the box a bit higher for some extra clearance underneath.

Posted Image

Posted Image

Posted Image

Posted Image

Posted Image

#15 MRLXSS

MRLXSS

    The Render Garage

  • Members
  • PipPipPipPipPipPipPip
  • 12,396 posts
  • Name:Matt
  • Location:Upwey, Melbourne
  • Car:355 LX Hatchback, DeLorean DMC-12, LX SS Hatch, VY Cross8 Crewman
  • Joined: 09-November 05

Posted 03 September 2008 - 12:24 PM

Nice, Looks like a big bloody gearbox! You have done a great job on the trans tunnel! Once its all carpeted up you probably won't know any different!

#16 racean69

racean69

    Forum Fixture

  • Members
  • PipPipPipPipPip
  • 781 posts
  • Name:Rod
  • Location:Central QLD
  • Car:LH sedan
  • Joined: 07-November 05

Posted 03 September 2008 - 02:15 PM

top job ....looking good

can I ask what did you do with the chassiss number along the rail?

#17 _HatchmanSS76_

_HatchmanSS76_
  • Guests

Posted 04 September 2008 - 08:52 PM

These pics are the front passangers side floor pan which was replaced and was not a pretty job.

Posted Image

Posted Image

Posted Image

Posted Image


We cut tis section out of mine last night, what a prick of a job made harder by rotten area in the bottom left corner. I noticed on yours that while the floor was rusted more than mine the left corner looks like it was in good condition or has that already been repaired. We found a lot of rotton bits that needed cutting out and require replacement in this area, inner and outer panels.
This area
Posted Image

How did the rares replacement section fit for you? We have to masarge it a bit to get a good fit.

Looking forward to seeing it completed. Excellent work so far, keep it up :clap: .

#18 _studricho_

_studricho_
  • Guests

Posted 04 September 2008 - 09:27 PM

Great project and great pictures.

#19 _STEVO_

_STEVO_
  • Guests

Posted 04 September 2008 - 10:21 PM

it will be a top looking car

#20 _doogs_

_doogs_
  • Guests

Posted 08 September 2008 - 10:37 PM

Nice project mate, I am sure the rotisserie makes things easier.

Will be watching this closely.

#21 mr5000

mr5000

    chief break-everything

  • Members
  • PipPipPipPipPipPip
  • 3,449 posts
  • Location:melbourne
  • Car:77 lx 4door
  • Joined: 08-January 06

Posted 11 September 2008 - 05:53 PM

so you have to cut the tunnel to fit a t56 in a torry wered you get the cross member what you talking bout matt that you dont have the resources you have a carport your doin better than me

#22 antelopeslr5000

antelopeslr5000

    Forum Fixture

  • Members
  • PipPipPipPipPip
  • 1,022 posts
  • Location:Toowoomba, Queensland
  • Car:1977 LX SL/R 5000
  • Joined: 10-November 05

Posted 11 September 2008 - 07:44 PM

so you have to cut the tunnel to fit a t56 in a torry


No.

#23 mrlctorana

mrlctorana

    Forum Fixture

  • Members
  • PipPipPipPipPip
  • 572 posts
  • Location:North-West Tassie
  • Joined: 17-January 06

Posted 12 September 2008 - 06:24 PM

Thanks for all the comments guys, and yeah as said by antelopeslr5000 you dont have to cut the tunnel to fit the box in, there are places that can make the t56 box smaller and fit in the tunnel without modifications. But I decided to do it the hard way.

HatchmanSS76 - We had to do a little massaging to fit the rare's floor pan, But it came up ok and your right, it's a prick of a job, lol.

doogs - Rotisserie is awesome, makes things so much easier. Can't imagine doing half the work i've done already without it.

racean69 - Let just say it's lucky I take lots of photo's, and that I spent a lot of time on the phone with transport.


The rear tyres turned up yesterday and the new rims today, they should fill the guards up nicely. Also got the tunnel nearly finished with the last piece tacked into place.


Posted Image

Posted Image

Posted Image

Posted Image

Posted Image

#24 _tyre fryer_

_tyre fryer_
  • Guests

Posted 13 September 2008 - 12:30 AM

holy shit.
this thing is going to be a damn serious car...
and in SA!!! would love to go cruising with this bullet on wheels.
good to see you are serious too, getting some serious stuff done and spending the cash too.
it's a real credit to you.

#25 RIM-010

RIM-010

    DON'T PANIC

  • Members
  • PipPipPipPipPipPipPip
  • 8,075 posts
  • Name:Tim
  • Location:Cowell, SA
  • Car:LJ 2 Door - HQ Premier
  • Joined: 01-March 06
Garage View Garage

Posted 13 September 2008 - 12:33 AM

In Tasmania actually, Matt :P Just came from SA originally. Don't worry, it got me excited aswell!

Really top quality build mate, can't wait to see it finished.

Tim


0 user(s) are reading this topic

0 members, 0 guests, 0 anonymous users