Jump to content


Photo
- - - - -

SmacT's LX Four Door build

LX Four door 304i T5

  • Please log in to reply
276 replies to this topic

#26 SmacT

SmacT

    Forum Fixture

  • Members
  • PipPipPipPipPip
  • 907 posts
  • Name:Sam
  • Location:Sydney
  • Car:LX 4dr 383, TKX, BW
  • Joined: 24-December 08

Posted 28 January 2013 - 03:12 PM

Hi Ausdev,

I used HQ engine plates on the 304 after some research on here (it sits the engine lower and still uses standard engine mounts (the rubber bits)), and just bought a standard 308 sump/dipstick/oil pickup off ebay and a new gasket.

I am doing my own cross member because I decided to cut the floor to fit the T5, but there are other options. The floor was already cut (pics below) when I discovered you can go with a shorter extension housing to reduce the need for that, but I have stuck with my plan because it was already done! I'd definitely try not to do that if I had my time again, and can always reverse it if need be. Cutting the foor wasn't too hard, I am just worried I have reduced the car's ability to withstand a side impact, hence a custom crossmember to add some more strength. My kids will ride in this car... The way we filled the floor has given it some strength, but keen to hear other's opinions. Here's what I did:

Marked and cut the floor after fitting the engine and box first.

Attached File  T5 Tunnel.jpg   33.21K   8 downloads

Used cardboard to form a template for the new metal and cut a patch

Attached File  T5 Tunnel 2.jpg   54.35K   8 downloads

Welded it in

Attached File  T5 Tunnel 3.jpg   57.05K   7 downloads

A bit of bog and tapping

Attached File  T5 Tunnel 4.jpg   49.31K   10 downloads

Primer

Attached File  T5 Tunnel 5.jpg   47.29K   7 downloads

After KBSing the floor (above), you wouldn't know it's been done, but is it strong enough? A beefy crossmember will help.

In other news, I only have to run a fuel line and wire a fuel pump in to start (or try to start) the engine. I hooked up a battery the other day and the engine turned on the key which was exciting, but by no means guarantees a fully functioning wiring harness when I go to start it. At least it didn't catch fire... I had found the missing engine plug mentioned earlier after searching through the bits the car came with, and was well pleased my first ever wiring job actually appeared to be working.

I also cut and shut the passenger side HSV header to fit, oxy sensor and all, but made a bit of a mess of it getting used to my new welder and welding "skills", so won't put pics up here until I have finished it properly.

I hope to have a Start-Up Party in the next week or two, time-dependant.

#27 _LS1 LX_

_LS1 LX_
  • Guests

Posted 28 January 2013 - 10:02 PM

Nice work mate, it good reliving all the work done on my own too, I know exactly where your at. Coming along nicely mate

#28 SmacT

SmacT

    Forum Fixture

  • Members
  • PipPipPipPipPip
  • 907 posts
  • Name:Sam
  • Location:Sydney
  • Car:LX 4dr 383, TKX, BW
  • Joined: 24-December 08

Posted 04 February 2013 - 09:11 PM

Thanks LS1 LX, I'm enjoying watching yours, and looking forward to being as far along as you.

Reading through my last post, I realise I set myself up beautifully - yep, my wiring has failed. I will put a thread in Electrical, but after the car turning over on the key above, I hooked up some temporary fuel lines, wired in the fuel pump, unplugged the computer to test fire the engine and - absolutely nothing. I plugged the computer back in, but it Still won't turn on the key, the efi pump doesn't whir, nothing. I can't believe it.

The only thing I did different was when I connected the battery, I didn't realize one of my kids has turned the key, so the ignition was "on" when I connected the battery - it wouldn't have fried anything would it?

I tried another battery out of the family car and nothing. My worst fears of doing my own wiring have been realised, and I'm not sure how to fault check. Any ideas, please let me know. I have a multimeter, no real idea how to use it.

Oh well, I am about to learn something new!! Would have preferred it just bloody turned over though.

#29 _j.e.d._

_j.e.d._
  • Guests

Posted 05 February 2013 - 02:28 AM

I have a multimeter, no real idea how to use it.


Haha, I like that line mate....sounds like me!
Someone will chime in with some helpful advise I'm sure (just not me :tease: )
But that'd have to be one of my fears as well when I get to doing it myself on my car...you'll sort it mate!!

#30 76lxhatch

76lxhatch

    That was easy!

  • Members
  • PipPipPipPipPipPipPip
  • 7,153 posts
  • Location:Unzud
  • Car:SS
  • Joined: 04-August 08
Garage View Garage

Posted 05 February 2013 - 07:19 AM

Start by using your multimeter to check all the +12V connections that should be present according to the wiring diagram. Then (with power off) switch into resistance/ohms mode and check all the earths. You'll probably find something is missing along the way.

Most people seem to talk themselves into thinking wiring is complicated, just look at it one connection at a time and it'll all make sense. The more time you spend going through it the more you'll be able to visualise the bigger picture and troubleshoot faster but its not necessary.

#31 _markymark20_

_markymark20_
  • Guests

Posted 05 February 2013 - 08:31 AM

I Dont know whether it was a column shift originally, but it could be the reverse/ neutral switch, make sure the old shifter (if auto) is in neutral. made that mistake once, ahd me scratchn my head for a little while. Also make sure your ignition coil pack thingy(cant think of the exact name at the moment) is earthed well, otherwise you will fry it. I did that, $200 for a reco one of ebay.

#32 _Broads_

_Broads_
  • Guests

Posted 05 February 2013 - 09:35 AM

Hey mate, awesome progress! Can't believe how big the boys are in that pic. I'd like to come and give you a hand with the wiring but the truth is that a mate did mine because I'm utterly useless at it :) It'll be something simple - it always is - the trick is finding it! Great to see the car coming together so nicely. It'll be mint when it's done and because you're doing everything properly it'll last you a lifetime.

Cheers,
Broads

#33 SmacT

SmacT

    Forum Fixture

  • Members
  • PipPipPipPipPip
  • 907 posts
  • Name:Sam
  • Location:Sydney
  • Car:LX 4dr 383, TKX, BW
  • Joined: 24-December 08

Posted 05 February 2013 - 10:33 AM

But that'd have to be one of my fears as well when I get to doing it myself on my car...you'll sort it mate!!


Yeah, I'll get there. I'll stress about it until I do is the problem!

Start by using your multimeter to check all the +12V connections that should be present according to the wiring diagram. Then (with power off) switch into resistance/ohms mode and check all the earths. You'll probably find something is missing along the way.

Most people seem to talk themselves into thinking wiring is complicated, just look at it one connection at a time and it'll all make sense. The more time you spend going through it the more you'll be able to visualise the bigger picture and troubleshoot faster but its not necessary.


You're right, its WAS starting to make sense to me, now this. I guess I'll learn somethign new, which is the upside. I don't have a wiring diagram, as the loom is hybrid LX/VN commodore, but will search for one on here and see if that helps. What reading do I want from a good earth? What does a bad earth read? See, green... :-)

I Dont know whether it was a column shift originally, but it could be the reverse/ neutral switch, make sure the old shifter (if auto) is in neutral. made that mistake once, ahd me scratchn my head for a little while. Also make sure your ignition coil pack thingy(cant think of the exact name at the moment) is earthed well, otherwise you will fry it. I did that, $200 for a reco one of ebay.


Good call on earthing the ignition module Mark, I hadn't yet as was only testing things, but will bloody remember if they are that much! It's a manual car, so not that problem.

Hey mate, awesome progress! Can't believe how big the boys are in that pic. I'd like to come and give you a hand with the wiring but the truth is that a mate did mine because I'm utterly useless at it :) It'll be something simple - it always is - the trick is finding it! Great to see the car coming together so nicely. It'll be mint when it's done and because you're doing everything properly it'll last you a lifetime.


Yeah, they are getting big. Dropped them off to school today, bit weird seeing them both in uniform. You should see Indie! She is talking and everything, little wrecking ball she is.

If my car turns out to the quality of yours mate, I'd be happy! Cant wait to get home and start going through the electrical mess to sort it out. Bec is sick of me moaning about it.

#34 76lxhatch

76lxhatch

    That was easy!

  • Members
  • PipPipPipPipPipPipPip
  • 7,153 posts
  • Location:Unzud
  • Car:SS
  • Joined: 04-August 08
Garage View Garage

Posted 05 February 2013 - 11:46 AM

A good 12V should be at least 11.5V (assuming your battery is well charged)

A good earth should be less than 1ohm resistance to another good earth (make sure the screw or whatever you pick to test the resistance against is clean etc, use the negative battery terminal if you're close to it).

Readings can vary a little with a cheap multimeter but generally when something is wrong the reading will be way out so you'll know.

#35 SmacT

SmacT

    Forum Fixture

  • Members
  • PipPipPipPipPip
  • 907 posts
  • Name:Sam
  • Location:Sydney
  • Car:LX 4dr 383, TKX, BW
  • Joined: 24-December 08

Posted 05 February 2013 - 11:55 AM

Thanks 76lxhatch. I just posted in the Electrical section that the reading I am getting is over 13.2V at the battery, which is too high, as it's the sort of reading I'd expect from a running engine with the battery being charged. Is that a clue? Or a cheap multimeter?

#36 SmacT

SmacT

    Forum Fixture

  • Members
  • PipPipPipPipPip
  • 907 posts
  • Name:Sam
  • Location:Sydney
  • Car:LX 4dr 383, TKX, BW
  • Joined: 24-December 08

Posted 05 February 2013 - 08:51 PM

Right, so it turns out you need to earth the battery cable to the engine AND the body - the cable must have been touching in the right place the first time, not the second. It's turning over again. Thanks for all the help.

The fuel pump isnt firing though, but now I know how to diagnose what's happening, so it was all worth it. Thanks for everyone's help, I just learnt a whole lot more, which is the whole point!

The pump relay is working, so it is probably a bad earth again.

#37 SmacT

SmacT

    Forum Fixture

  • Members
  • PipPipPipPipPip
  • 907 posts
  • Name:Sam
  • Location:Sydney
  • Car:LX 4dr 383, TKX, BW
  • Joined: 24-December 08

Posted 07 February 2013 - 09:44 AM

Further to the above - it's not the earth. The pumps (I have hooked up the VN tank to the Torana fuel line and run a hose into a can for the return line, just to get it started) dont run when I turn the key to on - they should prime for 3-5secs, then turn off again - but do run if I bypass the relay with a wire from 87 to 30 on the relay block. I have tried two other relays I know work and no joy - it seems the relay isn't being triggered for whatever reason.

It is a VN computer, so no VATS or anything, but it seems like in the act of using the Torana key with the VN engine loom, I have bypassed something that needs to switch the fuel pumps on. There is power to the relay (orange wire, #30 I think), it is earthed nicely and the purple wire (#87) carries the power to the pumps properly when I bridge the connections - but nothing happens when I turn the ignition key to on. There is a small green/white wire to the computer which is connected properly.

Any suggestions? What simple thing have I done wrong this time? I have chucked it up on a thread in electrical as well.

#38 76lxhatch

76lxhatch

    That was easy!

  • Members
  • PipPipPipPipPipPipPip
  • 7,153 posts
  • Location:Unzud
  • Car:SS
  • Joined: 04-August 08
Garage View Garage

Posted 07 February 2013 - 09:56 AM

There is also an earth or 50 to the ECU, most of them are connected to each other but I have a feeling there is two separate sets (one of them goes to the cigarette lighter on the VN if I recall correctly).

The ECU controls the fuel pump most of the time including that initial few seconds, the oil pressure switch is only a fail safe for limp home mode. So definitely look in that direction, I assume that the connection from the relay to the ECU is OK?

#39 SmacT

SmacT

    Forum Fixture

  • Members
  • PipPipPipPipPip
  • 907 posts
  • Name:Sam
  • Location:Sydney
  • Car:LX 4dr 383, TKX, BW
  • Joined: 24-December 08

Posted 07 February 2013 - 10:51 AM

There is also an earth or 50 to the ECU, most of them are connected to each other but I have a feeling there is two separate sets (one of them goes to the cigarette lighter on the VN if I recall correctly).

The ECU controls the fuel pump most of the time including that initial few seconds, the oil pressure switch is only a fail safe for limp home mode. So definitely look in that direction, I assume that the connection from the relay to the ECU is OK?


That sounds about right, that's good info. There are two plugs sitting unused in the harness leading to the ECU, perhaps one of them has that earth. I'll look into it. Thanks again!

#40 UCgazman

UCgazman

    UC's FTW!

  • Members
  • PipPipPipPipPip
  • 1,342 posts
  • Name:Garth
  • Location:Perth
  • Car:UC S̶u̶n̶b̶i̶r̶d̶ 5000!
  • Joined: 04-August 11

Posted 07 February 2013 - 12:41 PM

It sounds like the ecu isn't powering up on ignition. There should be two Orange/Black wires at the ecu with constant 12v+, a pink wire that goes from the ecu to the larger of the two 'unused' plugs should have 12v ign, and the black wire from the ecu to the smaller 'unused' plug (actually the ALDL diagnostic plug) should be earthed.

Also if the donor vehicle was fitted with an 'anti theft override switch' (key operated switch in the passenger side door frame which cut power to the pink wire above) you might have to rejoin the pink wires where this was fitted....

#41 SmacT

SmacT

    Forum Fixture

  • Members
  • PipPipPipPipPip
  • 907 posts
  • Name:Sam
  • Location:Sydney
  • Car:LX 4dr 383, TKX, BW
  • Joined: 24-December 08

Posted 07 February 2013 - 01:33 PM

Great info - I think the earth, or lack of, is the problem UCGazman. The pink wire you mention is hooked up acording to the link I posted earlier on what I was using to wire the car. I just didn't know what did what, so you saying that gives me a good lead. Thanks mate.

I'll check the killswitch option too, as that was waht I thought it was first. Another midnight in the shed coming up, hopefully accompanied by the boom of an exhaust-less engine going nuts at the end.

#42 UCgazman

UCgazman

    UC's FTW!

  • Members
  • PipPipPipPipPip
  • 1,342 posts
  • Name:Garth
  • Location:Perth
  • Car:UC S̶u̶n̶b̶i̶r̶d̶ 5000!
  • Joined: 04-August 11

Posted 07 February 2013 - 02:44 PM

I think the kill switch was optional on VN's, my harness was from a VP and had one. Just turn the ignition on and check power for the pink wire at the ecu plug, if its there you're good, if nothing just trace it back and you'll see where it needs joining.
Good luck getting it started mate.

#43 SmacT

SmacT

    Forum Fixture

  • Members
  • PipPipPipPipPip
  • 907 posts
  • Name:Sam
  • Location:Sydney
  • Car:LX 4dr 383, TKX, BW
  • Joined: 24-December 08

Posted 07 February 2013 - 08:40 PM

Brrrmmm effin brrrnmm! It's alive! Alive..!!

Thanks guys. Chasing the above I realised I had missed a fairly crucial step in the wiring process, so I hooked up a wire, added fuel, primed the line a few times and woke up my long-suffering neighbours kids with a non-mufflered V8 bursting into life.

Now to mount the relays, hide the wiring and all the rest of the jobs. Stoked. Thanks again everyone who helped, I know a lot more than I did a week ago, and that's the aim!!

#44 _Emu_

_Emu_
  • Guests

Posted 07 February 2013 - 08:59 PM

BRILLIANT!!
Snaps to the helpful gents in this and the electrical section threads....it's been fun following it :)

#45 UCgazman

UCgazman

    UC's FTW!

  • Members
  • PipPipPipPipPip
  • 1,342 posts
  • Name:Garth
  • Location:Perth
  • Car:UC S̶u̶n̶b̶i̶r̶d̶ 5000!
  • Joined: 04-August 11

Posted 07 February 2013 - 09:12 PM

Awesome well done :spoton:

#46 SmacT

SmacT

    Forum Fixture

  • Members
  • PipPipPipPipPip
  • 907 posts
  • Name:Sam
  • Location:Sydney
  • Car:LX 4dr 383, TKX, BW
  • Joined: 24-December 08

Posted 23 March 2013 - 06:10 PM

So much for my monthly updates - anyway, things have been progressing, though work and family has taken over lately as it does.


The first new thing I have added to the car was a new CRS gearbox crossmember. It fitted straight on, and as the car was a roller, with no bolts, I asked CRS (now owned by Waddington's) to supply those as well, and that wasn't a problem. The box looks in the right spot, though I will take a couple of mill off the tranny tunnel at the front to make sure.

Attached File  Crossmember.jpg   48.63K   6 downloads

Attached File  IMG_3231.jpg   54.45K   6 downloads


I have also been hiding the wiring, mounting the relays, ignition module, etc. This is taking bloody ages, and I still have the coil to mount. Then I will test fire it again to make sure nothing explodes or catches fire, then remove it all and shrink wrap, solder, etc. Looking forward to this bit being over, it sucks.

Attached File  IMG_3226.jpg   54.42K   8 downloads

Attached File  IMG_3228.jpg   52.9K   6 downloads

Attached File  IMG_3229.jpg   60.34K   6 downloads

Attached File  IMG_3230.jpg   63.98K   5 downloads


I also read somewhere that a VN V6 throttle cable will fit straight on, so filed a round hole in the firewall and fitted it - it doesn't fit. I will just modify the original VN V8 cable.


Attached File  IMG_3186.jpg   44.72K   6 downloads

Attached File  IMG_3187.jpg   28.28K   5 downloads

I also removed the donor car's pedal box, and have the clutch pedal ready to be modified, as I will run a cable set-up - I just need to do the test fire first as I need to move the petrol tank before I grind or weld in my tiny shed. Don't want to start a Torana BBQ. I found an interesting arrangement on the Torana's clutch pedal which a previous owner had done, it ran the clutch cable through the steering column plate, which will need repairing. Simple fix though.


Attached File  IMG_3180.jpg   61.78K   5 downloads


I have also a new beaver panel and lower quarter panel from Resto Rods (great service and price, will let you know on fit when I know) sitting there ready to go on once I have the driveline stuff further on. My panelbeater mate Frank will help out, as I have zero experience here, but keen to learn as ever. I'm pretty new at this, and finding a crapload of research (read: hassling forum members such as Axistr) first makes for a much easier build.


I have also removed the radiator mounts from the commodore to adapt and use the same radiator, and have cut the Commodore and Torana brake booster shafts, ready for welding, again, once the fuel tank is somewhere distant.


Glad I did this update, I feel like I'm getting nowhere, but looking at this, I'm actually progressing! More juicy stuff soon.


#47 SmacT

SmacT

    Forum Fixture

  • Members
  • PipPipPipPipPip
  • 907 posts
  • Name:Sam
  • Location:Sydney
  • Car:LX 4dr 383, TKX, BW
  • Joined: 24-December 08

Posted 29 May 2013 - 11:21 PM

The last two months have seen some good wins, so i thought I'd do it all by photos. I'm much better at restoring cars than I was two months ago, but still green as hell and loving the learning. Not as much as I'll be loving the driving, though, I'm tipping.


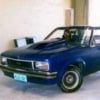
Finally got the donor car out of my life. Poor old thing looked a bit sad with nothing in it, but it served its purpose. Neighbours were happier than I was when it finally went. Wife was happier than all of us put together.


Attached File  Bommodore.jpg   73.21K   7 downloads


It has now donated its entire driveline, as Kreative Enterprises in Windsor converted the BW diff for me using my old banjo as a donor for mounts. If you need a banjo 3.08 center and axles, let me know. Due to the 17 x 9.5 rims with five inch backspace I will be running out the back (the engineer said that was ok as the backspace meant not too much load on the axles), I went for an overall length of 1485mm (axel to axel), giving me clearance for the disc brakes/shock, filling the flares and meaning no re-splining of axles (Ian used the short Commo axle and another Commo axle with 6mm taken off). He machined the LSD cone, fitted new bearings etc. I fitted it up as it came, and will paint it once the rear flares are fitted. I threw a rim on and taped on a flare, and it fits just as I measured it to which was a relief.


Attached File  Diff in.jpg   53.25K   8 downloads


Then I cut off the beaver panel, repaired the rust, rust converted the whole lot and coated it in KBS. Then my mate Frank came around, and we (I did a lot of standing and watching) fitted the beaver panel. It was a great fit - top marks to retro rods for the panel. There is still the quarter to go, that will be in two weeks or so.


Attached File  Beaver cut.jpg   45.44K   7 downloads

Attached File  Bumper support patch.jpg   45.44K   5 downloads

Attached File  KBS.jpg   44.79K   5 downloads

Attached File  Beaver on.jpg   38.04K   6 downloads


With that done, I tried out the second hand tailshaft I bought three years ago when I had the nine-inch not expecting it to fit, but it did! Don't worry, it has old unis in here and just two bolts done up to test fit. I'll fit new unis and paint it when the body is heading to the shop. I was stoked with this, it saved $400 or so.

Attached File  Tailshaft.jpg   49.48K   8 downloads


The next pic is boring but significant - to me anyway. Sitting there is the clutch cable, throttle cable and brake booster...


Attached File  Engine bay.jpg   50.46K   5 downloads


...and three working pedals. I modified the clutch pedal to suit cable using threads I found searching this site. Basically the commodore hook was welded 69mm high measuring from the center of the clutch pedal mounting bolt, and 16mm forward of the axis. I needed to remove the metal above the clutch pedal under the dash to allow it to swing, and drilled a hole with my stepped drill bit 25mm above the standard Torana hole. All this is to give proper fork movement of the T5, and when done, I had the original VN V8 clutch cable shortened to suit ($35 at Parramatta Brake and Clutch). With the pedal fully depressed the clutch fork is all the way open and lots of adjustment there. Importantly the clutch and brake pedal are dead level - I can't stand weird pedals. I won't know if this all works until I go for a drive, but so far appears to be correct. Sing out if you beg to differ!! I also had the VN V8 throttle cable shortened to suit and it fits perfectly. I had the brake rod welded professionally as I didn't want that going wrong with my kids in the car... 

Attached File  Three pedals.jpg   68.26K   5 downloads

Attached File  Clearance for clutch pedal.jpg   71.59K   5 downloads


I also started welding up the taillight holes


Attached File  Welded tailight holes.jpg   34.74K   6 downloads


I am starting at the back of the car body-wise from now on, with Frank's help of course, so fixing dents,fitting the rear quarter repair patch and the flares is all coming, as well as the file finisihed boot lid and spoiler. I dug out the Wilsons flares I had bought a few years ago, and they appear to have warped?? Or did I just rememeber them different? I was pretty sure they fitted the front guard perfectly when I first bought them  but now have a nasty twist? Anyway, looking forward to getting them on, cos I love flares.

 Attached File  Warped flare.jpg   48.49K   4 downloads

Attached File  Warper flare two.jpg   52.72K   4 downloads


Any suggestions, hit me (unless you are going to say keep it flareless) and hopefully next update will be even more exciting. Like I have said, nothing ground breaking in what I am doing, but just trying to do a good job and not get divorced/shunned by the neighbours in the process. Thanks also to Derrin71 and Axistr who have been awesome helps yet again. Just two reasons this forum is so great.


Sam


#48 UCgazman

UCgazman

    UC's FTW!

  • Members
  • PipPipPipPipPip
  • 1,342 posts
  • Name:Garth
  • Location:Perth
  • Car:UC S̶u̶n̶b̶i̶r̶d̶ 5000!
  • Joined: 04-August 11

Posted 30 May 2013 - 01:06 PM

Nice work man, the beaver panel looks like it fitted well, I'm about to do the same on our UC. Hope it fits as well as yours!


#49 SmacT

SmacT

    Forum Fixture

  • Members
  • PipPipPipPipPip
  • 907 posts
  • Name:Sam
  • Location:Sydney
  • Car:LX 4dr 383, TKX, BW
  • Joined: 24-December 08

Posted 30 May 2013 - 06:08 PM

Judging by your skills in your thread Garth, and the quality of the Retro Rods panel, you'll be right I reckon. :-) We used self tappers to hold it in place, tacked and welded. I had coated the inside with KBS, but that was a mistake, as the KBS turned into little rivers and made it harder to weld. I should have used weld thru primer. Live and learn!


Anyone else had the flares warp as above? I'll stick another thread up on it as I am not sure if my fibreglassing skills are up to fixing that. And anyway, I bought Wilson's (before he retired) so I wouldn't have to, but must have stored them wrong.


#50 76lxhatch

76lxhatch

    That was easy!

  • Members
  • PipPipPipPipPipPipPip
  • 7,153 posts
  • Location:Unzud
  • Car:SS
  • Joined: 04-August 08
Garage View Garage

Posted 30 May 2013 - 06:14 PM

I don't see the warping you're talking about, the panels have a lot of shape to them particularly at the bottom where they curl inward. Sometimes if you get the parts really green out of the mold they can tighten up as they cure but generally that happens in the really early stages so by the time you get them they're unlikely to change. If they have just moved from sitting the wrong way you should be able to coax them back easily enough.


0 user(s) are reading this topic

0 members, 0 guests, 0 anonymous users