
I'd setup to use the serpentine belt if I was to start again, so that you don't need another pulley on the front, especially in an LC/LJ, not much room from pulley to radiator.

186 Engine Rebuild
Started by
_duggan208_
, Feb 18 2015 12:34 AM
136 replies to this topic
#51

warrenm
 View Garage
-

- Members
-

- 2,107 posts
Forum Fixture
- Location:Central West NSW
- Car:1972 LJ Torana
- Joined: 08-November 05
View Garage
Posted 16 May 2015 - 07:03 AM
#52
_duggan208_
_duggan208_
-

- Guests
Posted 16 May 2015 - 11:24 PM
Yeah, i have triple core Aussie desert radiator, thick bastard, yes not alot of room and the Super damper is much lighter that I thought.
Regards
#53
warrenm
View Garage
-
- Members
-
- 2,107 posts
Forum Fixture
- Location:Central West NSW
- Car:1972 LJ Torana
- Joined: 08-November 05
View Garage
Posted 17 May 2015 - 07:40 AM
Should weigh about 3.9kg, unless you got an alloy Toyota one.
#54
_Agent 34_
_Agent 34_
-
- Guests
Posted 17 May 2015 - 11:10 AM
Warren,
can you post a picture of your set up. Also what part No is the super damper.
Jon - thanks for the photos on the panhard - I think will start to fabricate the spare diff housing i have.
#55
warrenm
View Garage
-
- Members
-
- 2,107 posts
Forum Fixture
- Location:Central West NSW
- Car:1972 LJ Torana
- Joined: 08-November 05
View Garage
Posted 18 May 2015 - 01:03 PM
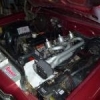
Part # 917010
 20150518_124121 (600 x 450).jpg 55.35K
6 downloads
20150518_124121 (600 x 450).jpg 55.35K
6 downloads
The bolts miss the radiator by 13mm, after I moved the radiator forward. With a std size radiator it clears about the same as it is now. Not an ideal setup for circuit racing.
Edited by warrenm, 18 May 2015 - 01:04 PM.
#56
_duggan208_
_duggan208_
-
- Guests
Posted 19 May 2015 - 01:14 AM
holy moly that is close. My damper is alloy, i have not weighed it but it sure don't weigh 4 odd Kg's. i hope i have not stuffed up with this, never thought about it being alloy. thanks for the pic, I can see just how close this is going to get.
regards
holy moly that is close. My damper is alloy, i have not weighed it but it sure don't weigh 4 odd Kg's. i hope i have not stuffed up with this, never thought about it being alloy. thanks for the pic, I can see just how close this is going to get.
regards
#57
warrenm
View Garage
-
- Members
-
- 2,107 posts
Forum Fixture
- Location:Central West NSW
- Car:1972 LJ Torana
- Joined: 08-November 05
View Garage
Posted 19 May 2015 - 08:17 AM
If you take the pully of the front you gain another 20mm.
#58
_duggan208_
_duggan208_
-
- Guests
Posted 27 May 2015 - 11:44 PM
i've now have my black crank about half way into reshaping the counterweights. Bloody time consuming job and probadly make bugger all difference, but gives me something to do while I save for grinding. Getting rid of all the casting slag and stress risers. Bullet nosing the leading edge of the counterweights. I was going to grind a wedge shape on the trailing edge but decided against that as i don't want to take too much weight off the counterweight and that the leading edge spinning at 7000 plus rpm would be following its own wake of the trailing edge. maybe leaving the trailing edge the way it is might have a vacuum effect for the leading edge. But I'm most likely clutching at straws.
100_4935.JPG 219.13K
8 downloads
Regards
#59
N/A-PWR
-

- Members
-
- 9,595 posts
CABIN ENGINE CONTROLS GALORE
- Name:Dave I
- Location:Wooroloo, 65km's East of Perth
- Car:'1969' LC RAT TORANA
- Joined: 08-December 12
Posted 28 May 2015 - 12:04 AM
Like button for trying Jon,
We need a few different types of cranks to try. 
Straightlinemick has these machined his way,
at about $700 exchange.
Good luck 

i've now have my black crank about half way into reshaping the counterweights.
Regards
#60
warrenm
View Garage
-
- Members
-
- 2,107 posts
Forum Fixture
- Location:Central West NSW
- Car:1972 LJ Torana
- Joined: 08-November 05
View Garage
Posted 28 May 2015 - 07:38 AM
i've now have my black crank about half way into reshaping the counterweights. Bloody time consuming job and probadly make bugger all difference, but gives me something to do while I save for grinding. Getting rid of all the casting slag and stress risers. Bullet nosing the leading edge of the counterweights. I was going to grind a wedge shape on the trailing edge but decided against that as i don't want to take too much weight off the counterweight and that the leading edge spinning at 7000 plus rpm would be following its own wake of the trailing edge. maybe leaving the trailing edge the way it is might have a vacuum effect for the leading edge. But I'm most likely clutching at straws.
100_4935.JPG
Regards
Think of the shape of a wing, round at the leading edge, tapers off on the trailing edge. Your on the right track.
#61
_duggan208_
_duggan208_
-
- Guests
Posted 24 June 2015 - 11:48 PM
While I wait to save up enough bloody money for my crank grind, I thought I'd get stuck into other things. I have smoothed over the throttle shafts in my throttle bodies so that they are a little thinner and the leading edge is rounded. Originally the shafts were machined down so that they were flat on the top and bottom of the shaft, leaving a hard edge so I rounded up that sharp edge. The screws that retain the butterfly valves stuck out like 'chrome ballls on a black dog' so I sanded them as flat as i dared go. they are definatly better. hopefully reducing some more turbulance and more air through the throttle bodies.
Made up a wooden jig to hold the butterfly valves at exactly WOT so I can set my throttle stops in exactly the correct position. I also took the time to work out the correct throttle arm geometry on the throttle bodies so that mid throttle is exactly in the middle of the throttle arm's rotation. I had no chance of doing that with the engine in the car.
What is the correct epoxy to use inside the inlet manifolds?
regards
Attached Files
-
100_4961.JPG 100.81K
5 downloads
-
100_4962.JPG 124.07K
2 downloads
-
100_4967.JPG 131.39K
2 downloads
-
100_5068.JPG 214.84K
2 downloads
#62
warrenm
View Garage
-
- Members
-
- 2,107 posts
Forum Fixture
- Location:Central West NSW
- Car:1972 LJ Torana
- Joined: 08-November 05
View Garage
Posted 25 June 2015 - 07:27 AM
Devcon "F" is the epoxy for aluminium. Looking good.
#64
_duggan208_
_duggan208_
-
- Guests
Posted 12 September 2015 - 12:27 AM
How about this inner guard for a bloody mess to fix. these are the lengths you have to go for an airbox. Lots of shaping and welding to do. yes there is not much room between the inner guard and the wheel.
I'm also smoothing out the crappy casting on the head on manifolds. The manifolds a hardly match up to the head. Also making a new heat plate that goes between the exhaust and the inlet manifolds, even more hammer work, shaping, grinding and welding.
Regards
Attached Files
-
100_4677.JPG 192.56K
4 downloads
-
100_5092.JPG 204.23K
4 downloads
-
100_5094.JPG 231.06K
2 downloads
#65
_duggan208_
_duggan208_
-
- Guests
Posted 21 September 2015 - 12:25 AM
Yep, much better now. It took a bit of mucking around to cut out the original numbers and weld it into to same place as original. kind of a legit rebirth. I've also started on another airbox this one will be another big improvement, this is the 3rd one and hopefully the last one. The old one was a concern due to the effect of inlet pulses interfering with each other in the airbox. I hope to dissipate these.
regards
Attached Files
-
100_5298.JPG 288.84K
5 downloads
-
100_5299.JPG 253.03K
6 downloads
-
100_5301.JPG 225.77K
2 downloads
#66
_duggan208_
_duggan208_
-
- Guests
Posted 02 September 2016 - 01:15 AM
At last i have an ATI Superdamper to suit my poor old little 186. I had a new hub machined up.
Attached Files
-
100_5672.JPG 115.97K
3 downloads
-
100_5677.JPG 147.42K
5 downloads
-
100_5680.JPG 151.06K
5 downloads
#67
_Agent 34_
_Agent 34_
-
- Guests
Posted 02 September 2016 - 06:40 PM
Jon - dedication to the cause 110 % - cuts the guard in pursuit of nirvana - nice work.
do you have the specs of the adaptor as i was talking to my engine bloke about running a super damper and this fell apart based on the adaptor spec , three kids , barking rescue dog, work shit, the list goes on !
It's the barking rescue dogs F@#$ing fault
could i be so rude as to ask if you can get one more machined up for me off your template please and i'll pay the bloke direct
g
love the way the bonnet hinge mounting points are drilled out - loosing some weight .
#68
_duggan208_
_duggan208_
-
- Guests
Posted 03 September 2016 - 01:33 AM
I'll give him a call and ask, but it cost me $250 The damper was $600. I have to muck around with the serpentine belt. I just hope that the superdamper helps my 186 rev and make all the power it can with out shaking itself to bits. There are lots of little holes everywhere, the ol Makita diet.
regards
#69
_duggan208_
_duggan208_
-
- Guests
Posted 03 September 2016 - 01:45 AM
Although, any general engineer should be able to do this. I took to the engineer the Super damper and the Toyota hub and an old Holden harmonic balancer with the belt ring pushed off. It took a bit of explaning, but it really is just a machining job with tight tolerences. If I had mics i could measure it and send the specs to you, so there's a couple of options.
Regards
#70
warrenm
View Garage
-
- Members
-
- 2,107 posts
Forum Fixture
- Location:Central West NSW
- Car:1972 LJ Torana
- Joined: 08-November 05
View Garage
Posted 06 September 2016 - 07:30 AM
The easiest way would be to do as duggan208 has said.
#71
Dave6179
-
- Members
-
- 577 posts
Forum Fixture
- Name:David
- Location:NZ
- Car:HJ, VN, VX SS
- Joined: 23-August 12
Posted 08 September 2016 - 10:26 AM
I've refitted my 6-1s!
Forgot how well they worked. And sounds so different.
PMs are on the wall, and will probly stay there for a long time.
Attached Files
-
P1010151(1).JPG 152.33K
4 downloads
-
P1010154(1).JPG 90.56K
2 downloads
-
P1010155(1).JPG 138.51K
2 downloads
#73
_duggan208_
_duggan208_
-
- Guests
Posted 10 January 2017 - 11:41 PM
100_5986.JPG 160.88K
4 downloadsI've finally fixed up the old dash, took a lot of time though. Managed to get an original tacko, however, it was stuffed so I had a guy up here in Buderim fix it all up, even readjusted the speedo.
regards
#74
_duggan208_
_duggan208_
-
- Guests
Posted 24 January 2017 - 11:34 PM
A better view of the air box.
regards
Attached Files
-
100_6001.JPG 164.64K
3 downloads
-
100_6004.JPG 166.93K
2 downloads
-
100_6005.JPG 183.27K
3 downloads
-
100_6006.JPG 172.64K
5 downloads
#75
_Bomber Watson_
_Bomber Watson_
-
- Guests
Posted 25 January 2017 - 07:57 PM
Using the panel filters like that is an awesome idea.


0 user(s) are reading this topic
0 members, 0 guests, 0 anonymous users

