
I just meant to repair it properly, as in ask how to do it. Being it is an important structural point.
 1 votes
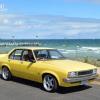
Hawks Torana dream lives on
Started by
hawk
, Oct 25 2020 02:32 PM
389 replies to this topic
#101

yel327
-

- Members
-

- 13,081 posts
Oh My, Don't you post alot
- Joined: 10-February 08
Posted 14 January 2021 - 05:23 AM
#102
warrenm
 View Garage
-

- Members
-
- 2,107 posts
Forum Fixture
- Location:Central West NSW
- Car:1972 LJ Torana
- Joined: 08-November 05
View Garage
Posted 14 January 2021 - 05:57 AM
Drill the ends of the cracks & weld them.
#103
hawk
-
- Members
-
- 2,143 posts
Forum Fixture
- Name:steve
- Location:Berwick, Melbourne
- Car:UC Torana
- Joined: 16-July 09
Posted 14 January 2021 - 08:13 AM
I plan to do it properly, seeing the rust in the crack and how thin the metal is in spots id rather put a patch in the spot instead of just welding it.
What thickness sheet metal do I buy for the patch?
What thickness sheet metal do I buy for the patch?
#104
claysummers
-

- Members
-
- 3,333 posts
Lotsa Posts!
- Name:Clay
- Location:Willunga
- Car:186 FB Ute, 3.3 EK sedan
- Joined: 13-December 18
Posted 14 January 2021 - 09:21 AM
If you are going to buy fresh sheet then for the lighter panels I've used 0.9 mm zinc anneal which approximates the old 20#. Otherwise can use unwanted panels from cars of the era. Structural pressings are the next size up generally 18# or 1.2mm.
Sent from my SM-G973F using Tapatalk
Sent from my SM-G973F using Tapatalk
#105
Toranamat69
-
- Members
-
- 2,117 posts
Forum R&D Officer
- Location:Brisbane
- Joined: 07-November 05
Posted 14 January 2021 - 09:37 AM
I always use 1.2 Zinc anneal for any panel repairs on 1mm section.
Has massively improved the quality of my repairs.
Has massively improved the quality of my repairs.
#106
Rockoz
-

- Members
-
- 3,965 posts
Lotsa Posts!
- Name:Rob
- Location:Cowra NSW
- Joined: 21-September 08
Posted 14 January 2021 - 02:50 PM
Yep same crack I had in my VB many moons ago.
Mate panel beater said it was very common.
He double skinned the area to get strength.
Cheers
Rob
#107
hawk
-
- Members
-
- 2,143 posts
Forum Fixture
- Name:steve
- Location:Berwick, Melbourne
- Car:UC Torana
- Joined: 16-July 09
Posted 14 January 2021 - 08:09 PM
Awesome thanks I'll get some when I'm ready to start welding (need to buy a welder).
Got my front end back from the blasters along with a few other bits and started painting it all.
Painting the front suspension in KBS gloss black. Just brushing it on and being outdoors, I'm getting a few bugs in it. Might have to buy the KBS kit that sprays inside cavities to get inside the K frame.
Can I leave the timing cover like this? or does it need to be painted?
 FB_IMG_1610617976825.jpg 81.21K
10 downloads
FB_IMG_1610617976825.jpg 81.21K
10 downloads
FB_IMG_1610617980467.jpg 54.93K
9 downloads
FB_IMG_1610617989022.jpg 70.47K
9 downloads
FB_IMG_1610617986207.jpg 75.77K
9 downloads
FB_IMG_1610617991815.jpg 76.12K
10 downloads
FB_IMG_1610617982922.jpg 136.86K
9 downloads
FB_IMG_1610617998674.jpg 141.49K
7 downloads
Got my front end back from the blasters along with a few other bits and started painting it all.
Painting the front suspension in KBS gloss black. Just brushing it on and being outdoors, I'm getting a few bugs in it. Might have to buy the KBS kit that sprays inside cavities to get inside the K frame.
Can I leave the timing cover like this? or does it need to be painted?
FB_IMG_1610617976825.jpg 81.21K
10 downloads
FB_IMG_1610617980467.jpg 54.93K
9 downloads
FB_IMG_1610617989022.jpg 70.47K
9 downloads
FB_IMG_1610617986207.jpg 75.77K
9 downloads
FB_IMG_1610617991815.jpg 76.12K
10 downloads
FB_IMG_1610617982922.jpg 136.86K
9 downloads
FB_IMG_1610617998674.jpg 141.49K
7 downloads
#108
toryman76
-

- Members
-
- 1,082 posts
Forum Fixture
- Location:Melbourne, Vic
- Joined: 16-January 06
Posted 14 January 2021 - 09:03 PM
Looks awesome! What did you coat the inside of the rocker covers with?
I reckon the timing cover would look nicer with a coat of paint. Maybe some KBS in silver? The motor coater stuff is good for heat and bonds really well and I think it comes in silver or grey whichever you prefer. The inside would probably be ok to leave it but the rough surface might promote further errosion.
I reckon the timing cover would look nicer with a coat of paint. Maybe some KBS in silver? The motor coater stuff is good for heat and bonds really well and I think it comes in silver or grey whichever you prefer. The inside would probably be ok to leave it but the rough surface might promote further errosion.
#109
hawk
-
- Members
-
- 2,143 posts
Forum Fixture
- Name:steve
- Location:Berwick, Melbourne
- Car:UC Torana
- Joined: 16-July 09
Posted 16 January 2021 - 07:53 AM
They are how I picked them up from the blasters, so I have no idea.
I'll paint the timing cover with some engine enamel then. I plan to use proper coolant in it so that should help minimise further erosion.
I'll paint the timing cover with some engine enamel then. I plan to use proper coolant in it so that should help minimise further erosion.
#110
hawk
-
- Members
-
- 2,143 posts
Forum Fixture
- Name:steve
- Location:Berwick, Melbourne
- Car:UC Torana
- Joined: 16-July 09
Posted 16 January 2021 - 06:16 PM
Well no turning back now, started cutting up the floor and knocking the rail straight.
Before
FB_IMG_1609295649161.jpg 61.11K
10 downloads
floor cut for access
FB_IMG_1610778404042.jpg 104.27K
9 downloads
plate removed
FB_IMG_1610778375355.jpg 108.91K
8 downloads
the cracks will need a lot more trimming to remove the damaged metal.
FB_IMG_1610779380655.jpg 63.79K
6 downloads
FB_IMG_1610779377266.jpg 45.06K
6 downloads
Knocking it straight.
FB_IMG_1610778379318.jpg 61.33K
8 downloads
Obviously it still needs a lot of work but is coming along now.
Painting also continued. All done with rattle cans as thats all I have on hand. Mixture of different paints depending on the part. Probably got some of it wrong.
FB_IMG_1610778388350.jpg 123K
7 downloads
FB_IMG_1610778384299.jpg 62.06K
7 downloads
Before
FB_IMG_1609295649161.jpg 61.11K
10 downloadsfloor cut for access
FB_IMG_1610778404042.jpg 104.27K
9 downloadsplate removed
FB_IMG_1610778375355.jpg 108.91K
8 downloadsthe cracks will need a lot more trimming to remove the damaged metal.
FB_IMG_1610779380655.jpg 63.79K
6 downloads
FB_IMG_1610779377266.jpg 45.06K
6 downloadsKnocking it straight.
FB_IMG_1610778379318.jpg 61.33K
8 downloadsObviously it still needs a lot of work but is coming along now.
Painting also continued. All done with rattle cans as thats all I have on hand. Mixture of different paints depending on the part. Probably got some of it wrong.
FB_IMG_1610778388350.jpg 123K
7 downloads
FB_IMG_1610778384299.jpg 62.06K
7 downloads
#111
hawk
-
- Members
-
- 2,143 posts
Forum Fixture
- Name:steve
- Location:Berwick, Melbourne
- Car:UC Torana
- Joined: 16-July 09
Posted 17 January 2021 - 04:17 PM
Front end is done and ready for bushes.
FB_IMG_1610856906844.jpg 111.93K
12 downloads
FB_IMG_1610856898604.jpg 76.12K
12 downloads
FB_IMG_1610856906844.jpg 111.93K
12 downloads
FB_IMG_1610856898604.jpg 76.12K
12 downloads
#112
toryman76
-
- Members
-
- 1,082 posts
Forum Fixture
- Location:Melbourne, Vic
- Joined: 16-January 06
Posted 17 January 2021 - 05:54 PM
Very nice! You're making decent headway
#113
hawk
-
- Members
-
- 2,143 posts
Forum Fixture
- Name:steve
- Location:Berwick, Melbourne
- Car:UC Torana
- Joined: 16-July 09
Posted 19 January 2021 - 09:24 PM
The upper and lower control arm bushes are pressed in and balljoints fitted.
the outrigger bushes for the Kframe as shown below, does the flange go on the rail side or the inside of the KFrame?
FB_IMG_1611054749622.jpg 73.62K
6 downloads
the outrigger bushes for the Kframe as shown below, does the flange go on the rail side or the inside of the KFrame?
FB_IMG_1611054749622.jpg 73.62K
6 downloads
#114
toryman76
-
- Members
-
- 1,082 posts
Forum Fixture
- Location:Melbourne, Vic
- Joined: 16-January 06
Posted 20 January 2021 - 06:53 AM
That's a long debated argument.... The manual says one thing but most cars were fitted the other way. I put mine back in the way they came out pretty certain it was flange against the rail.
#115
hawk
-
- Members
-
- 2,143 posts
Forum Fixture
- Name:steve
- Location:Berwick, Melbourne
- Car:UC Torana
- Joined: 16-July 09
Posted 20 January 2021 - 09:07 PM
I bought two lots, thought the hamburger kit came with rubber K frame bushes but they were actually whiteline ones with the two piece lowers so used them instead.
Its starting to come together now but will have to come back out for the rail repairs.
Was going to leave the outrigger area alone other than the crack but unsure now I see it all lined up. should I leave it as is or try to straighten it a bit?
FB_IMG_1611127191701.jpg 55.86K
9 downloads
FB_IMG_1611127188296.jpg 101.38K
8 downloads
FB_IMG_1611127185086.jpg 101.78K
7 downloads
#116
hawk
-
- Members
-
- 2,143 posts
Forum Fixture
- Name:steve
- Location:Berwick, Melbourne
- Car:UC Torana
- Joined: 16-July 09
Posted 21 January 2021 - 05:39 PM
well its a roller again.
Hopefully picking up a welder soon, a unimig 120 viper. Will that be good enough for what I'm doing?
Will be ready to rebuild the rack soon. got all the parts except for the inner bushes. nowhere seems to have a clue what they are. Does anyone have a part number or know who supplies them?
FB_IMG_1611214432988.jpg 116.62K
8 downloads
FB_IMG_1611214435807.jpg 112.43K
7 downloads
FB_IMG_1611214438800.jpg 97.9K
7 downloads
FB_IMG_1611214442128.jpg 119.8K
7 downloads
#117
toryman76
-
- Members
-
- 1,082 posts
Forum Fixture
- Location:Melbourne, Vic
- Joined: 16-January 06
Posted 22 January 2021 - 08:06 PM
Looks like your front end lines up great. I don't see the issue? I wrestled mine for a day to get it in and even then I'm still not happy how one of the top bushes sits. Not sure about steering rack. I know a few years ago I was told there were certain parts you couldn't get for them. I am sure this has changed now though as so many parts are available now compared to when I built mine. Maybe have a chat to one of the old skool steering companies they might know?
New front end looks great BTW! Nice fresh everything. Doing this first up will make the car feel much nicer on the road.
New front end looks great BTW! Nice fresh everything. Doing this first up will make the car feel much nicer on the road.
#118
Rockoz
-
- Members
-
- 3,965 posts
Lotsa Posts!
- Name:Rob
- Location:Cowra NSW
- Joined: 21-September 08
Posted 24 January 2021 - 11:35 AM
I would have gone the next sized up MIG.
Well I actually did.
I had a 2?? mig, and I just bought a 285 as well.
I decided to buy another one because it was becoming a bugger changing between mild steel and aluminium.
The other day I changed back and forth at least 4 times.
Now I dont have to bother.
It cost me a touch over 800.
It gives me MIG TIG and stick capabilities in the one machine.
I now have a MIG/Stick, an AC/DC TIG/Stick a MIG/DC only TIG/Stick and a Plasma Cutter.
All of them UNIMIG.
Cheers
Rob
Chee
#119
hawk
-
- Members
-
- 2,143 posts
Forum Fixture
- Name:steve
- Location:Berwick, Melbourne
- Car:UC Torana
- Joined: 16-July 09
Posted 30 January 2021 - 07:51 PM
Cheers guys, as for the Mig. Being on a budget meant its my only option. I'll upgrade at a later stage. Been playing around with the gassless stuff today and as usual its a shocker haha. Need to wait for more funds to buy gas and wire.
Been a slow week on the car as I've had a lot on. hopefully do a bit more tomorrow.
Anyway, reassembled the bonnet catch and fitted to get the relocated washer and overflow bottles in the right spot. Turn the Horn around for clearance and it frees the bay up a lot. Never noticed any air flow issues with this mod on my old UC
FB_IMG_1611999625474.jpg 128.49K
4 downloads
#120
UCSLE
-

- Members
-
- 702 posts
Forum Fixture
- Name:troy
- Location:perth
- Car:Goggomobil
- Joined: 23-June 09
Posted 30 January 2021 - 08:22 PM
have you tried 0.6 gasless wire ? https://www.ebay.com...CABEgJ9GvD_BwE gas is so much better but it maybe worth a look at since your on a budget .
Edited by UCSLE, 30 January 2021 - 08:23 PM.
#121
hawk
-
- Members
-
- 2,143 posts
Forum Fixture
- Name:steve
- Location:Berwick, Melbourne
- Car:UC Torana
- Joined: 16-July 09
Posted 01 February 2021 - 07:49 PM
I'll be buying gas and wire as I want the welds on the rails to be solid.
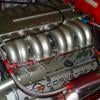
been scrubbing and wire wheeling the motor. Really temped to do a full rebuild on it.
Pulled the sump off for a look. Are these standard pistons?
FB_IMG_1612167843691.jpg 108.23K
10 downloads
FB_IMG_1612167846616.jpg 55.48K
10 downloads
been scrubbing and wire wheeling the motor. Really temped to do a full rebuild on it.
Pulled the sump off for a look. Are these standard pistons?
FB_IMG_1612167843691.jpg 108.23K
10 downloads
FB_IMG_1612167846616.jpg 55.48K
10 downloads
#122
Rockoz
-
- Members
-
- 3,965 posts
Lotsa Posts!
- Name:Rob
- Location:Cowra NSW
- Joined: 21-September 08
Posted 02 February 2021 - 11:44 AM
0.6mm wire for panels.
I would likely go up to 0.8 or 0.9 for the rails as they are heavier gauge steel.
I get lots better welds with 0.8 on thicker steel than the welds I get using 0.6 on thinner stuff.
For me I think it might be because Im not moving fast enough.
If you are tight for funds, the more expensive rental of bottles might work for you.
Get a BOC account. They were doing deals on one free refill at one stage.
Cheers
Rob
#123
toryman76
-
- Members
-
- 1,082 posts
Forum Fixture
- Location:Melbourne, Vic
- Joined: 16-January 06
Posted 02 February 2021 - 04:54 PM
Any nasty stuff in the bottom of the sump? I doubt they are std factory pistons with those markings in the casting. Check the top of the piston to id if it's std bore or oversize. I would err on the side of if it ain't broke don't fix it. 0.6mm wire plus gas and you should be on the money. Just play around with your settings and technique for the rails so you get a process nailed before doing the job. Remember to practise in the position you will be welding in ie overhead, etc as this makes a big difference to settings and technique.
#124
hawk
-
- Members
-
- 2,143 posts
Forum Fixture
- Name:steve
- Location:Berwick, Melbourne
- Car:UC Torana
- Joined: 16-July 09
Posted 03 February 2021 - 06:12 PM
Bought some gas today and 0.6 and 0.9 wire. Had a few test goes then had a crack at the rails.
Not great but filled in a lot of where I needed too. the rest will be done when the plate is welded back in. Hopefully I'll buy some weld through primer tomorrow after work.
Before
FB_IMG_1610779380655.jpg 63.79K
4 downloads
FB_IMG_1610779377266.jpg 45.06K
4 downloads
After
FB_IMG_1612339321246.jpg 86.22K
4 downloads
FB_IMG_1612339333563.jpg 57.74K
5 downloads
FB_IMG_1612339330622.jpg 42.61K
5 downloads
FB_IMG_1612339327494.jpg 64.4K
5 downloads
FB_IMG_1612339324238.jpg 61.21K
6 downloads
Not great but filled in a lot of where I needed too. the rest will be done when the plate is welded back in. Hopefully I'll buy some weld through primer tomorrow after work.
Before
FB_IMG_1610779380655.jpg 63.79K
4 downloads
FB_IMG_1610779377266.jpg 45.06K
4 downloadsAfter
FB_IMG_1612339321246.jpg 86.22K
4 downloads
FB_IMG_1612339333563.jpg 57.74K
5 downloads
FB_IMG_1612339330622.jpg 42.61K
5 downloads
FB_IMG_1612339327494.jpg 64.4K
5 downloads
FB_IMG_1612339324238.jpg 61.21K
6 downloads
#125
hawk
-
- Members
-
- 2,143 posts
Forum Fixture
- Name:steve
- Location:Berwick, Melbourne
- Car:UC Torana
- Joined: 16-July 09
Posted 04 February 2021 - 04:41 PM
Repair is finished on the rail. Next step is to weld in the floor section.
Before
FB_IMG_1612420627905.jpg 60.63K
5 downloads
Setting up
FB_IMG_1612420643247.jpg 50.16K
6 downloads
After
FB_IMG_1612420650341.jpg 66.61K
7 downloads
FB_IMG_1612420656196.jpg 26.92K
5 downloads
FB_IMG_1612420653032.jpg 37.97K
5 downloads
Before
FB_IMG_1612420627905.jpg 60.63K
5 downloadsSetting up
FB_IMG_1612420643247.jpg 50.16K
6 downloadsAfter
FB_IMG_1612420650341.jpg 66.61K
7 downloads
FB_IMG_1612420656196.jpg 26.92K
5 downloads
FB_IMG_1612420653032.jpg 37.97K
5 downloads


0 user(s) are reading this topic
0 members, 0 guests, 0 anonymous users

