
Nice job. Better than leaving it and lots better than paying big bucks for it.

 1 votes
Hawks Torana dream lives on
Started by
hawk
, Oct 25 2020 02:32 PM
430 replies to this topic
#126

yel327
-

- Members
-

- 13,769 posts
Oh My, Don't you post alot
- Joined: 10-February 08
Posted 04 February 2021 - 06:16 PM
#127
claysummers
-

- Members
-
- 3,693 posts
Lotsa Posts!
- Name:Clay
- Location:Willunga
- Car:186 FB Ute, 3.3 EK sedan
- Joined: 13-December 18
Posted 04 February 2021 - 06:29 PM
Well done Steve.
Sent from my iPad using Tapatalk
Sent from my iPad using Tapatalk
#128
hawk
-
- Members
-
- 2,211 posts
Forum Fixture
- Name:steve
- Location:Berwick, Melbourne
- Car:UC Torana
- Joined: 16-July 09
Posted 05 February 2021 - 07:43 PM
Bit more tonight. Welded the floor section back in. will need another pass to fill in the bits I missed. The lighting sucks which doesn't help with seeing the holes.
Thanks again for the advice everyone. the .6 wire worked a treat on the sheet metal and it was almost impossible to blow through after it was set in the right spot.
Test fitted a 245/60/14 I had laying around for the a few years. fits under the guard really well. Will need to roll the lip though.
 FB_IMG_1612515673313.jpg 79.76K
7 downloads
FB_IMG_1612515673313.jpg 79.76K
7 downloads
FB_IMG_1612515676315.jpg 134.91K
7 downloads
FB_IMG_1612515679440.jpg 45.67K
5 downloads
FB_IMG_1612515682402.jpg 55.28K
5 downloads
FB_IMG_1612515670424.jpg 92.05K
4 downloads
FB_IMG_1612515663867.jpg 50.96K
4 downloads
FB_IMG_1612515667176.jpg 76.99K
4 downloads
Thanks again for the advice everyone. the .6 wire worked a treat on the sheet metal and it was almost impossible to blow through after it was set in the right spot.
Test fitted a 245/60/14 I had laying around for the a few years. fits under the guard really well. Will need to roll the lip though.
FB_IMG_1612515673313.jpg 79.76K
7 downloads
FB_IMG_1612515676315.jpg 134.91K
7 downloads
FB_IMG_1612515679440.jpg 45.67K
5 downloads
FB_IMG_1612515682402.jpg 55.28K
5 downloads
FB_IMG_1612515670424.jpg 92.05K
4 downloads
FB_IMG_1612515663867.jpg 50.96K
4 downloads
FB_IMG_1612515667176.jpg 76.99K
4 downloads
#129
claysummers
-
- Members
-
- 3,693 posts
Lotsa Posts!
- Name:Clay
- Location:Willunga
- Car:186 FB Ute, 3.3 EK sedan
- Joined: 13-December 18
Posted 06 February 2021 - 04:58 AM
Sorry, but that looks like my welding. More amps me thinks. You will get better penetration and less grinding. I have the same trouble seeing. Multi focal glasses don’t help me and I got a pair of work or computer glasses that work well at 0.5 metres. Make sure your mask lens is clean and use a work light. Light behind the panel if you can also helps pick out the pinholes. Keep at it and you’ll get better.
Sent from my iPad using Tapatalk
Sent from my iPad using Tapatalk
#130
Rockoz
-

- Members
-
- 4,063 posts
Oh My, Don't you post alot
- Name:Rob
- Location:Cowra NSW
- Joined: 21-September 08
Posted 06 February 2021 - 01:45 PM
Moving faster will help flatten the weld.
Its a bugger to do sometimes.
Just keep welding and grinding until there are no holes.
Use a disc not a flapper to cut the welds down, and be careful to not cut down the steel around the weld.
No point having a 1.2mm weld on 0.4 of surrounding tin.
Cheers
Rob
#131
toryman76
-

- Members
-
- 1,082 posts
Forum Fixture
- Location:Melbourne, Vic
- Joined: 16-January 06
Posted 06 February 2021 - 06:41 PM
That's a good point. I always prefer to grind the weld down with a traditional grinding disc as you have better control to stay on the weld and not hit the parent metal. I take it down as far as possible then final finish with a flap disc still being very careful not to hit the parent metal too much.
#132
hawk
-
- Members
-
- 2,211 posts
Forum Fixture
- Name:steve
- Location:Berwick, Melbourne
- Car:UC Torana
- Joined: 16-July 09
Posted 06 February 2021 - 07:17 PM
Generally I like doing the same. Today I went over those welds and it came up way nicer.
Then I welded up the other crack. Yes I drilled the ends of it before welding. It was a prick of a spot the welder doesnt like being used upside down. figured the welds came up good enough after a bit of work. The fact the rail was bent inwards there made it a lot harder.
I then fitted the K frame for the last time. It was a lot harder to line up this time. Think I did it a bit different to last time and the was the issue.
Still undecided if I will straighten the drivers side rail where the gearbox mounts or not.
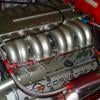
Next up I'll tackle the seat mount crack. might test fit the motor and box roughly to see if the extractors will fit with the sway bar.
FB_IMG_1612602441056.jpg 51.4K
6 downloads
FB_IMG_1612602444925.jpg 35.54K
5 downloads
FB_IMG_1612602448279.jpg 71.71K
5 downloads
FB_IMG_1612602451741.jpg 45.66K
5 downloads
FB_IMG_1612602455744.jpg 70.09K
5 downloads
FB_IMG_1612602463329.jpg 104.17K
6 downloads
FB_IMG_1612602433070.jpg 61.8K
5 downloads
FB_IMG_1612602437370.jpg 79.36K
5 downloads
Then I welded up the other crack. Yes I drilled the ends of it before welding. It was a prick of a spot the welder doesnt like being used upside down. figured the welds came up good enough after a bit of work. The fact the rail was bent inwards there made it a lot harder.
I then fitted the K frame for the last time. It was a lot harder to line up this time. Think I did it a bit different to last time and the was the issue.
Still undecided if I will straighten the drivers side rail where the gearbox mounts or not.
Next up I'll tackle the seat mount crack. might test fit the motor and box roughly to see if the extractors will fit with the sway bar.
FB_IMG_1612602441056.jpg 51.4K
6 downloads
FB_IMG_1612602444925.jpg 35.54K
5 downloads
FB_IMG_1612602448279.jpg 71.71K
5 downloads
FB_IMG_1612602451741.jpg 45.66K
5 downloads
FB_IMG_1612602455744.jpg 70.09K
5 downloads
FB_IMG_1612602463329.jpg 104.17K
6 downloads
FB_IMG_1612602433070.jpg 61.8K
5 downloads
FB_IMG_1612602437370.jpg 79.36K
5 downloads
Edited by hawk, 06 February 2021 - 07:19 PM.
#133
toryman76
-
- Members
-
- 1,082 posts
Forum Fixture
- Location:Melbourne, Vic
- Joined: 16-January 06
Posted 07 February 2021 - 03:03 PM
Well done mate looks great!! You'll be cruising in no time now 👌
#134
Heath
 View Garage
-

- Administrators
-
- 18,402 posts
I like cars.
- Name:Heath
- Location:Eastern Suburbs, Melbourne
- Car:Heavily Modified UC Sunbird Hatchback
- Joined: 07-November 05
View Garage
Posted 08 February 2021 - 09:09 AM
Great stuff Steve.
#135
hawk
-
- Members
-
- 2,211 posts
Forum Fixture
- Name:steve
- Location:Berwick, Melbourne
- Car:UC Torana
- Joined: 16-July 09
Posted 09 February 2021 - 06:50 PM
Tried to disassemble the steering rack tonight and safe to say I'm in the market for a new one.
whoever has worked on it previously had drilled a hole between the lock nut and rack end. Then they proceeded to smash a dowel pin in there damaging the threads on both ends. Had to put it in a bench vice and reef on it to undo it which did more damage.
FB_IMG_1612860388861.jpg 69.61K
5 downloads
FB_IMG_1612860384601.jpg 78.64K
5 downloads
#136
warrenm
View Garage
-

- Members
-
- 2,130 posts
Forum Fixture
- Location:Central West NSW
- Car:1972 LJ Torana
- Joined: 08-November 05
View Garage
Posted 10 February 2021 - 05:42 AM
That pin is normal, you drill them out to disassemble.
#137
308 Sunbird
-

- Members
-
- 975 posts
Forum Fixture
- Name:Stuart
- Location:Melbourne
- Car:SS Hatch, 308 Sunbird sedan-Improved Prod racer (sold), HZ Kingy wagon
- Joined: 20-November 10
Posted 10 February 2021 - 08:20 AM
Yep as Warren said-I've seen worse don't stress.
Edited by 308 Sunbird, 10 February 2021 - 08:20 AM.
#138
hawk
-
- Members
-
- 2,211 posts
Forum Fixture
- Name:steve
- Location:Berwick, Melbourne
- Car:UC Torana
- Joined: 16-July 09
Posted 10 February 2021 - 08:22 AM
It didn't do much good sadly because of the damage to the thread. The locknut is what did most of damage while coming off.
I will at least need new lock nuts and to tap the run a die over it.
What size die do I need?
I will at least need new lock nuts and to tap the run a die over it.
What size die do I need?
#139
Heath
View Garage
-
- Administrators
-
- 18,402 posts
I like cars.
- Name:Heath
- Location:Eastern Suburbs, Melbourne
- Car:Heavily Modified UC Sunbird Hatchback
- Joined: 07-November 05
View Garage
Posted 10 February 2021 - 09:12 AM
Can you just use an appropriately sized needle file to clean up the damage in that thread?
A die to suit will be probably be an expensive exercise.
#140
hawk
-
- Members
-
- 2,211 posts
Forum Fixture
- Name:steve
- Location:Berwick, Melbourne
- Car:UC Torana
- Joined: 16-July 09
Posted 10 February 2021 - 11:05 AM
My workplace manufactures CNC tool grinding machines so I'm hoping we may have something available at work. If not a file it is.
#141
Toranamat69
-
- Members
-
- 2,117 posts
Forum R&D Officer
- Location:Brisbane
- Joined: 07-November 05
#142
hawk
-
- Members
-
- 2,211 posts
Forum Fixture
- Name:steve
- Location:Berwick, Melbourne
- Car:UC Torana
- Joined: 16-July 09
Posted 10 February 2021 - 07:42 PM
I'll sort it out at some point, it can stay dissassenbled for now.
Started the seat mount repair tonight. removed the bracket, welded up the cracks. Primed with weld through primer and then ran out of mig gas.
I think I thinned out the steel in that area a bit too much in areas. Tried not too.
FB_IMG_1612949846728.jpg 99.42K
7 downloads
FB_IMG_1612949849415.jpg 50.08K
6 downloads
FB_IMG_1612949852880.jpg 82.52K
4 downloads
FB_IMG_1612949856459.jpg 87.29K
4 downloads
FB_IMG_1612949859574.jpg 61.54K
5 downloads
#143
hawk
-
- Members
-
- 2,211 posts
Forum Fixture
- Name:steve
- Location:Berwick, Melbourne
- Car:UC Torana
- Joined: 16-July 09
Posted 14 February 2021 - 05:11 PM
So the weld through primer was a bust and the plate didn't stick. After that I got frustrated and decided to redo the repair. Had a break from the car for a couple of days and got stuck back in today.
Its still far from perfect, its something I will redo at a later date. Dad did the welding on this one and the penetrative all round was a lot better.
It looks a bit rough but I decided to leave a fair bit of weld in some areas I didn't want to thin out too much.
Part of the issue was I changed from a mixed gas to straight argon as its all they had available on the day. I'll deffinitly be going back to the mixed bottle this time as I'm out of gas again.
FB_IMG_1613285380691.jpg 121.53K
4 downloads
FB_IMG_1613285383406.jpg 109.76K
4 downloads
FB_IMG_1613285387545.jpg 84.07K
4 downloads
#144
claysummers
-
- Members
-
- 3,693 posts
Lotsa Posts!
- Name:Clay
- Location:Willunga
- Car:186 FB Ute, 3.3 EK sedan
- Joined: 13-December 18
Posted 14 February 2021 - 07:36 PM
More current hawk
early Holden nut
early Holden nut
#145
warrenm
View Garage
-
- Members
-
- 2,130 posts
Forum Fixture
- Location:Central West NSW
- Car:1972 LJ Torana
- Joined: 08-November 05
View Garage
Posted 15 February 2021 - 05:24 AM
What size gas cylinder are you using? You seem to be using a lot of gas.
#146
Rockoz
-
- Members
-
- 4,063 posts
Oh My, Don't you post alot
- Name:Rob
- Location:Cowra NSW
- Joined: 21-September 08
Posted 15 February 2021 - 10:13 AM
I have found with weld through primer that you need to start the weld on an untreated section.
Normally I would fill a hole by starting in the centre and going wider as I progress.
I have found with the weld through that starting on the edge, weld straight to centre, then working out from there is required.
Or, weld straight across and do one half of the hole, then move to the other half.
Cheers
Rob
#147
claysummers
-
- Members
-
- 3,693 posts
Lotsa Posts!
- Name:Clay
- Location:Willunga
- Car:186 FB Ute, 3.3 EK sedan
- Joined: 13-December 18
Posted 15 February 2021 - 10:58 AM
And if you drill the hole in to primed and clamped panel, then you have a clean start. It is the edge of the weld that absorbs zinc or whatever to protect it.
early Holden nut
early Holden nut
#148
toryman76
-
- Members
-
- 1,082 posts
Forum Fixture
- Location:Melbourne, Vic
- Joined: 16-January 06
Posted 15 February 2021 - 12:41 PM
We actually did some trials on various weld through primers at work. We found the results from the zinc rich ones to be quite inconsistent because of the amount of "smoke" they produced making it hard to see. We ended up finding the copper rich upol one to be the best. It did not produce any "smoke" and the mechanical properties tested (nata certified lab) were equivalent to those from an unprimed raw welded plate.
#149
claysummers
-
- Members
-
- 3,693 posts
Lotsa Posts!
- Name:Clay
- Location:Willunga
- Car:186 FB Ute, 3.3 EK sedan
- Joined: 13-December 18
Posted 15 February 2021 - 01:26 PM
What about corrosion properties man?
early Holden nut
early Holden nut
Edited by claysummers, 15 February 2021 - 01:26 PM.
#150
toryman76
-
- Members
-
- 1,082 posts
Forum Fixture
- Location:Melbourne, Vic
- Joined: 16-January 06
Posted 15 February 2021 - 06:11 PM
Hey mate. We have yet to start using it in a production environment but compared to the raw steel (2 flat sections lapped that are left open to elements) it has to be better than nothing. Would be intersting to see the difference between zinc rich and copper rich. Anyone tested it?


1 user(s) are reading this topic
0 members, 1 guests, 0 anonymous users

