
Hi All,
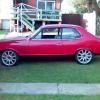
Well the original post I put up went with the old site so I have put up a new one and now added some new photos with some of the paint work done on the car. The car is now fully wet rubbed and all the panels have been put back on ready to complete the remaining paint work (Will post photos of all this stage shortly.
The car is a 72 LJ that I stripped to a bare shell, put on a rotisserie and repaired all the rust and bare metalled. All the panels have been hand straightened and then a thin layer of body filler applied and speed filed back to fill any small inperfections. I then applied 4 ltrs of polyester spray putty which was speed filed back to make every panel on the car as straight as a die. The car has had the final coat of primer which you can see from the photos has been wet rubbed.
The car will sport a fresh Fuel Injected 383 Chev (Originally from a 94 Camaro), Alloy heads, Scat Crank, Eagle Rods, Lunati Pistons, 11.1 compression and lots of shiney bits. The motor is currenty at Chevpower W.A and should be back late this month. Gearbox is a 4L60E 4 speed electronic auto which has been shift kitted and fitted with many new heavy duty parts from the US. Diff is a shortened 9" built by Phil at Final Drive in O'Conner W.A.
Some of the other things done to the car are: The steering column is from an early model Commodore that I shortened and then moved the whole column including the bracket under the dash across 3 inches so it now sits central with the dash. Not an easy job but worth the effort in the end. The only part of the column that goes into the engine bay is part of the shaft that attaches to the steering knuckle (You can see the holes for it and the bolts in the photos of the engine bay). The front end has been fully rebuilt with a Rod shop strengthening kit, nolathane bushes, HJ DBA slotted rotors and rebuilt alloy calipers and has been painted in Gun metal grey hammertone paint. I will install a full chassis strengthening kit put into the car in the near future also. There is many other small things I have done to improve the car but they would take forever to list.
Many thanks go to Sam and Cass, Dustin and Nick from Vulcan Panel and Paint for all there help so far.
The cost of the project so far has been kept to a minimum through hard work, good friends, this amazing website and Ebay. If anyone wants pointers on buying through Ebay in the USA and shipping to Australia contact me as it can save you a heap of cash.
Will post more pictures and details soon.
https://cache.gmh-to...CT/MVC-001S.jpg
https://cache.gmh-to...Sept2005019.jpg
https://cache.gmh-to...CT/DSC00385.jpg
https://cache.gmh-to...CT/DSC00393.jpg
https://cache.gmh-to...CT/DSC00391.jpg

LJ 383 PROJECT
Started by
_dags383_
, Jan 01 2006 04:30 PM
49 replies to this topic
#2
 _Flamenco_
_Flamenco_
-

- Guests
Posted 01 January 2006 - 04:37 PM
Looks really impressive so far dags350. What are the wheels?
#3
_postal_dood_
_postal_dood_
-
- Guests
Posted 01 January 2006 - 04:55 PM
HHHOOOWWWWLLLYYYY shit... that car is naked!!!,,, lol. not bad thus far...
#4
_dags383_
_dags383_
-
- Guests
Posted 01 January 2006 - 04:57 PM
The wheels on it are 16" from a Holden 2002 VU S pack ute. I like them and they should look better once stripped and polished also this rim with the new low profile tyres I have are the same diameter as the original Torana rim and tyre.
This will help when and if I try to get it Licensed in the future although I think it may be beyond that stage motor wise now.
Cheers.
This will help when and if I try to get it Licensed in the future although I think it may be beyond that stage motor wise now.
Cheers.
#5
_uglybob_
_uglybob_
-
- Guests
Posted 01 January 2006 - 06:27 PM
hey wot chassis kit did u use?? is it that 3/4 jobi from castlemaine?
#6
HSVGTS
-

- Members
-

- 279 posts
Forum Fan
- Name:HSVGTS
- Location:Cairns & Brisbane
- Joined: 18-November 05
Posted 01 January 2006 - 06:34 PM
Very nice job to say the least���.regards
#7
Heath
 View Garage
-

- Administrators
-
- 18,402 posts
I like cars.
- Name:Heath
- Location:Eastern Suburbs, Melbourne
- Car:Heavily Modified UC Sunbird Hatchback
- Joined: 07-November 05
View Garage
Posted 01 January 2006 - 06:42 PM
This is just one of those projects where you know everything has been and will be done perfectly. Looks fantastic, and I can't wait to see the finish of the paint on the whole car.
#8
_dags383_
_dags383_
-
- Guests
Posted 01 January 2006 - 08:33 PM
Hi Uglybob,hey wot chassis kit did u use?? is it that 3/4 jobi from castlemaine?
The chassis kit is from Castlemaines as was the front end strengthening kit. I bought it from this very website about 18 months ago for the bargain price of 400.00 although there were 2 missing pieces + the gearbox crossmember which I bought from Castlemaines so the whole thing cost me 680.00 not bad as I am sure that they are about 1200.00 for the full set up now.
I bought the extractors for the car from Ebay brand new jet hot coated for 550.00 + a full rubber kit for an LJ 4 Door from Ebay for 350.00 and this is every rubber used on the car.
The project has been going for almost 3 years of working on it off and on and collecting all the required parts.
I am now working with a local guy on reconditioning LJ/LC Headlight surrounds, LJ Tailight surrounds and both bumpers. I cant say exactly how much it will cost and how they will turn out but I am sure a set of LJ tailight surrounds will cost no more than 150.00 per set in better then new condition.
I have a passion for these cars and helping people out with them but I do not have a passion for people that charge ludicrus prices for these sort of items. If it works I will be having some done and selling them for what it cost me as I am sure there is plenty of people out there like me building on a budget.
Cheers all for your comments it is appreciated and i will have some further pictures up soon as the car is painted and the motor comes back.
#9
_jap-xu1_
_jap-xu1_
-
- Guests
Posted 01 January 2006 - 08:41 PM
yeah nice job for sure. that silver looks awesome
#10
_05-BROCKY-05_
_05-BROCKY-05_
-
- Guests
Posted 01 January 2006 - 11:37 PM
Man that silver pops like no tomorrow, has it got some sort of pearl through it at all???. You are doing a brilliant job. BTW, exacvtly how hard was it to move the steering column over 3 inches to completely straighten it out with the dash??? I am contemplating doing this coz it irritates me having the slight lean to the left.
#11
_dags383_
_dags383_
-
- Guests
Posted 02 January 2006 - 12:53 AM
Hi O5,Man that silver pops like no tomorrow, has it got some sort of pearl through it at all???. You are doing a brilliant job. BTW, exacvtly how hard was it to move the steering column over 3 inches to completely straighten it out with the dash??? I am contemplating doing this coz it irritates me having the slight lean to the left.
Moving the column was not easy as you also have to modify the pedal box to clear the column and to line up with the brake master cylinder but if you are like me and hate the offset it is well worth the effort.
The dash bracket is spot welded in a number of places inside the engine bay on the flat surface above the master cylinder. These all have to be drilled out with a spot weld drill bit. Then under the dash there is a few welds that need to be cut including the panel at the front to which the bracket is attached. I cut it along the edge of the lump that sticks out and then just rewelded it to the flat surface 3" along, filling in the holes that were left with some patches made from an old vehicle panel. Then once it is free just move it all over aligning the left edge of the bracket with the original right side of the bracket spotweld holes which should move the column over about 3 inches. If you still have a 6 in the car then I am not sure how much you need to move the bottom of the column if at all.
It is not a job that anyone should attempt without the proper tools and know how but then no guts no glory. I look at it this way if you have a welder, some metal plate, a grinder and some practical knowledge you can fix anything even you stuff up somewhere. I will see if I can get some photos of mine to show what I have done.
The paint was picked from a swatch at my friends panel shop and then mixed at the paint suppliers so I am not 100% sure what is in it but I do know i have not had it in the sun yet but when I do a photo will be posted.
Cheers,
#12
gtrboyy
-
- Members
-
- 3,241 posts
Lotsa Posts!
- Location:SYDNEY,NSW
- Joined: 07-November 05
Posted 02 January 2006 - 02:06 PM
Its coming along nicely,good to see that you made it back as I had been wondering about this car.Keep up the good work.
Edited by gtrboyy, 02 January 2006 - 02:08 PM.
#13
_dags383_
_dags383_
-
- Guests
Posted 02 January 2006 - 03:31 PM
Sorry guys forgot to add this photo for the whole engine bay 
https://cache.gmh-to...CT/DSC00389.jpg
Cheers,
THE MORE YOU DO YOURSELF THE MORE YOU WILL KNOW WHEN SOMETHING GOES WRONG
https://cache.gmh-to...CT/DSC00389.jpg
Cheers,
THE MORE YOU DO YOURSELF THE MORE YOU WILL KNOW WHEN SOMETHING GOES WRONG
#14
_draglc_
_draglc_
-
- Guests
Posted 02 January 2006 - 03:41 PM
looks absolutely unreal dags, i really cannot wait to see what u do with it next!
#15
_tuff30l_
_tuff30l_
-
- Guests
Posted 02 January 2006 - 09:03 PM
Mate love the paint job.Cant wait to see more pics when done.Congrats.....
#16
Racehatch
-
- Members
-
- 1,028 posts
Forum Fixture
- Location:Adelaide
- Joined: 07-November 05
Posted 02 January 2006 - 09:17 PM
Hey mate,
Nice job! Its the attention to detail that really gets my attention... keep up the good work!
Nice job! Its the attention to detail that really gets my attention... keep up the good work!
#17
_dags383_
_dags383_
-
- Guests
Posted 05 January 2006 - 12:34 AM
Thanks to all for there comments and encouragement since posting the project.
I have attached a few more photos of the car with all the panels back on albeit that I had a hell of a time getting the bonnet to line up but I finally got it sorted.
There is also some photos of some of the chrome work that has started to roll in for the car.
I am also looking for some chrome plated pieces like bonnet latches etc that are in new condition. I seen them on Ebay a few times last year but not for a while. So if anyone has something thay may want to sell let me know.
Cheers,
#18
dattoman
-

- Administrators
-
- 16,489 posts
Do I feel lucky? Well, do ya, punk?
- Name:Neil
- Location:Perth Western Australia
- Car:LX SS , 76 Cadillac , 3 x dattos
- Joined: 04-February 07
Posted 05 January 2006 - 12:43 AM
Hey Dags what stroker kit did you go with in the end ?
The one Cassie was trying to sell you ?
I'm thinking of 383 for my hatchback (datsun project on hold again)
The one Cassie was trying to sell you ?
I'm thinking of 383 for my hatchback (datsun project on hold again)
#19
_dags383_
_dags383_
-
- Guests
Posted 05 January 2006 - 12:52 AM
I ended up with the Scat 9000 crank, eagle rods and Lunati forged racing pistons. Originally it was going to be the eagle crank but they had no single piece rear main seal cranks in Australia so I had to upgrade. The only problem with the eagle rods is that the square shoulder has to be clearanced for the cam etc.Hey Dags what stroker kit did you go with in the end ?
The one Cassie was trying to sell you ?
I'm thinking of 383 for my hatchback (datsun project on hold again)
I have a question for you as i am now starting to think ahead to my braking system and need to work out which master cylinder, remote booster etc to use. I almost bought one of the new Wilwood 1" master cylinders from the US but stopped as I am not sure if it is the correct item. Should I drop around the shop?
Cheers,

#22
_dags383_
_dags383_
-
- Guests
Posted 26 January 2006 - 02:29 AM
Hi All,
Well the car got painted on the weekend and it has come up a treat as you can see from the pictures. The body is straight and the paint just blinds in the sun. It has come out so flat that i dont think it will need a wet rub to flatten it.
Next week it goes on the hoist to clean up and spray the underneath and i will fit the chassis kit. The motor is due at the end of next week with the heads and EFI manifold ready early next week also.
Cheers.
#24
_05-BROCKY-05_
_05-BROCKY-05_
-
- Guests
Posted 26 January 2006 - 10:06 AM
Thats georgious. Im so far from that sort of progress but am ready for sandblasting, just gotta save the cash).
#25
_draglc_
_draglc_
-
- Guests
Posted 26 January 2006 - 11:47 AM
hey mate the paint looks fantastic!!
there are a few chrome bits on ebay at the moment.. got some links for ya
http://cgi.ebay.com....me=STRK:MEWA:IT
http://cgi.ebay.com....me=STRK:MEWA:IT
thought there was more, have a look around.
A1
there are a few chrome bits on ebay at the moment.. got some links for ya
http://cgi.ebay.com....me=STRK:MEWA:IT
http://cgi.ebay.com....me=STRK:MEWA:IT
thought there was more, have a look around.
A1


1 user(s) are reading this topic
0 members, 1 guests, 0 anonymous users

