
I need to replace the d/s 1/4 panel on my LH. I have a mate with a UC he is wrecking, can anyone tell me if the 1/4 from the UC is the same as the LH.
cheers Rod
replaceing rear 1/4
Started by
racean69
, Sep 04 2008 08:42 PM
34 replies to this topic
#1

racean69
-
- Members
-

- 781 posts
Forum Fixture
- Name:Rod
- Location:Central QLD
- Car:LH sedan
- Joined: 07-November 05
Posted 04 September 2008 - 08:42 PM
#2
TerrA LX
-

- Members
-
- 14,241 posts
Fulcrum Fixture
- Location:Sid 'n' knee
- Joined: 31-May 06
Posted 04 September 2008 - 09:18 PM
Near the same xcept for around the tail light, the ugly tail light.
U can make it fit if you save that area on the LX.
U can make it fit if you save that area on the LX.
#3
racean69
-
- Members
-
- 781 posts
Forum Fixture
- Name:Rod
- Location:Central QLD
- Car:LH sedan
- Joined: 07-November 05
Posted 04 September 2008 - 09:37 PM
Ok thanks mate
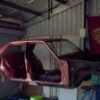
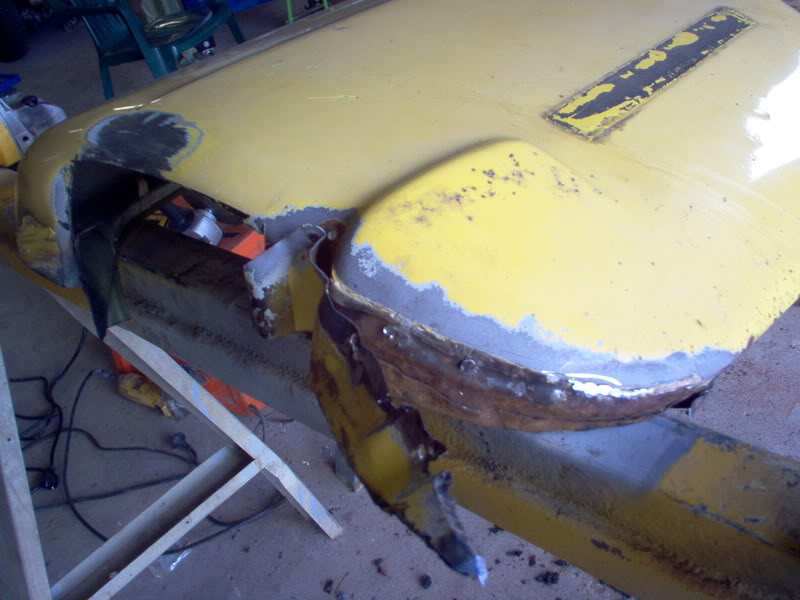
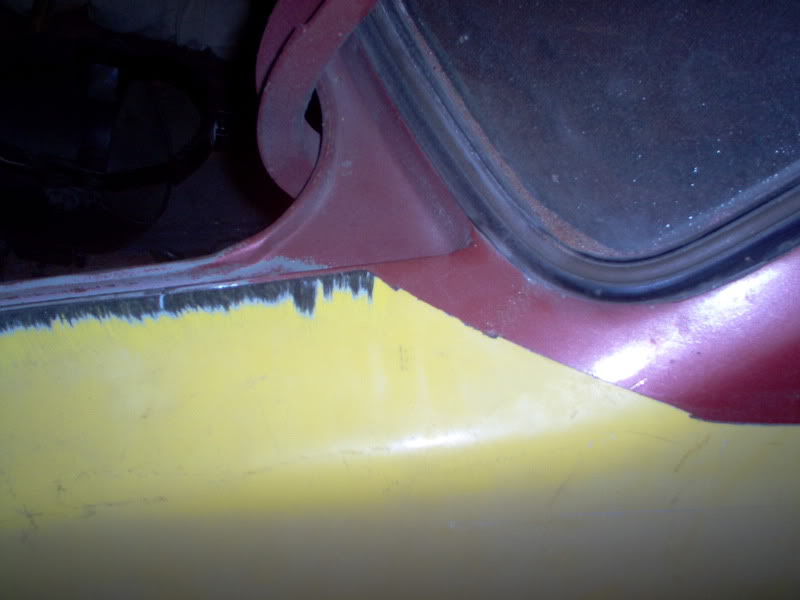
here's a pic of what i discovered under 10mm of bog today
here's a pic of what i discovered under 10mm of bog today
#4
TerrA LX
-
- Members
-
- 14,241 posts
Fulcrum Fixture
- Location:Sid 'n' knee
- Joined: 31-May 06
Posted 04 September 2008 - 09:41 PM
Yea, its scary what turns up sometimes.
Just save bout 1/2 inch around the tail light to lap upto.
They are both sedans right?
Just save bout 1/2 inch around the tail light to lap upto.
They are both sedans right?
#5
MRLXSS
-

- Members
-
- 12,396 posts
The Render Garage
- Name:Matt
- Location:Upwey, Melbourne
- Car:355 LX Hatchback, DeLorean DMC-12, LX SS Hatch, VY Cross8 Crewman
- Joined: 09-November 05
Posted 04 September 2008 - 09:49 PM
Holy Crap! How did the panel look before you took all that off?
#6
racean69
-
- Members
-
- 781 posts
Forum Fixture
- Name:Rod
- Location:Central QLD
- Car:LH sedan
- Joined: 07-November 05
Posted 04 September 2008 - 10:01 PM
yes both 4 doors
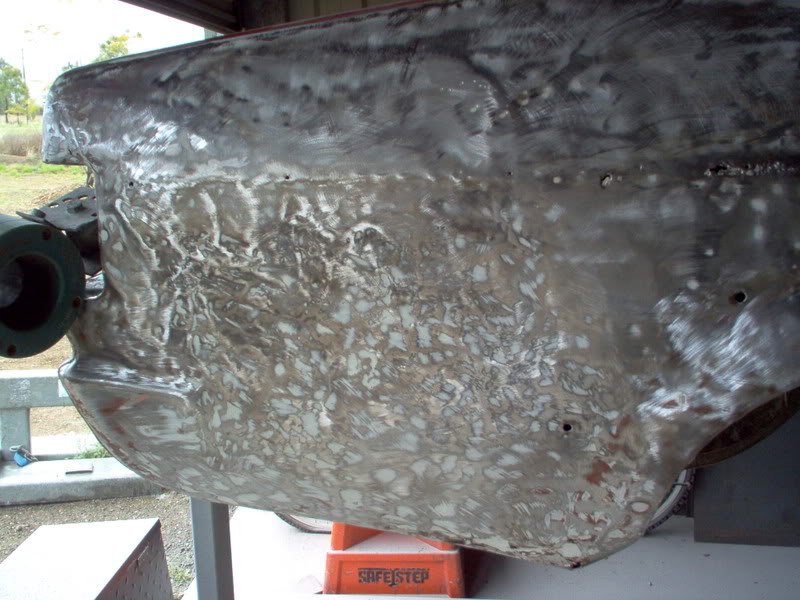
it did not look to bad actually, just a small crack in paint where rust holes on crease line are ....though I would sand a bit away and have a look ...it all went down hill from there.
it did not look to bad actually, just a small crack in paint where rust holes on crease line are ....though I would sand a bit away and have a look ...it all went down hill from there.
#7
_76S.L.R_
_76S.L.R_
-

- Guests
Posted 04 September 2008 - 10:05 PM
Yikes!,Im dreading taking mine back to metal as im pretty sure I'll find the same thing= the lower quarter panels on mine are stuffed,beaver panel rusted to shithouse,behind the rear bumper has bad rust,some around the lower part of the rear window.I got quoted $5000.000 to cut the rust out,panel+Paint but that was like 2 years ago! I cant imagine the cost these days? I dont know how Im going to fix the bodywork? we were looking for a Donner car but they all have the rust in the same spots as mine!!!!! damn I wish I was a panel beater at times like this.Ive owned my S.L.R for 8 years and its progressively got worse but I'll have to do something soon..............
#8
_LXEFI-8_
_LXEFI-8_
-
- Guests
Posted 08 September 2008 - 09:09 PM
i sandblasted my lx shell and i found the same thing breaks your heart
#9
_HatchmanSS76_
_HatchmanSS76_
-
- Guests
Posted 10 September 2008 - 07:59 AM
An all to common site with old cars sometimes. It can sap the enthusiasm when trying to get things fixed as all we want to do is drive them.
Once it's fixed right the satifaction is there, as you know exactly what you have and don't have to wonder what lies beneath.
Once it's fixed right the satifaction is there, as you know exactly what you have and don't have to wonder what lies beneath.
#10
MRLXSS
-
- Members
-
- 12,396 posts
The Render Garage
- Name:Matt
- Location:Upwey, Melbourne
- Car:355 LX Hatchback, DeLorean DMC-12, LX SS Hatch, VY Cross8 Crewman
- Joined: 09-November 05
Posted 10 September 2008 - 08:45 AM
Check out Heath's thread. He managed to fit a UC qtr to an LX... There is probably an easier way to do it than he did, but i think he got it looking good in the end!
I'm scared to take all the paint of my hatch, I reckon one of my rear qtrs looks like that underneath! Next paint job will need to go back to bare metal... I'm not looking forward to it at all!!
I'm scared to take all the paint of my hatch, I reckon one of my rear qtrs looks like that underneath! Next paint job will need to go back to bare metal... I'm not looking forward to it at all!!
#11
Mort
 View Garage
-

- Members
-
- 2,760 posts
Lotsa Posts!
- Name:Mort
- Location:Moranbah, QLD.
- Car:74 LH SL/R 4.2, 75 LH 4 door 186
- Joined: 16-December 07
View Garage
Posted 10 September 2008 - 09:38 AM
Racean69, i know your pain, had the same on the wifes Datsun 1600 only thicker, just turned my back on it and gave up most dissatisfied.
Mort
Mort
#12
racean69
-
- Members
-
- 781 posts
Forum Fixture
- Name:Rod
- Location:Central QLD
- Car:LH sedan
- Joined: 07-November 05
Posted 10 September 2008 - 01:27 PM
yeah it was a bit of a downer to find it in such a bad way
but oh well... thats cars.
but oh well... thats cars.
#13
racean69
-
- Members
-
- 781 posts
Forum Fixture
- Name:Rod
- Location:Central QLD
- Car:LH sedan
- Joined: 07-November 05
Posted 10 September 2008 - 08:20 PM
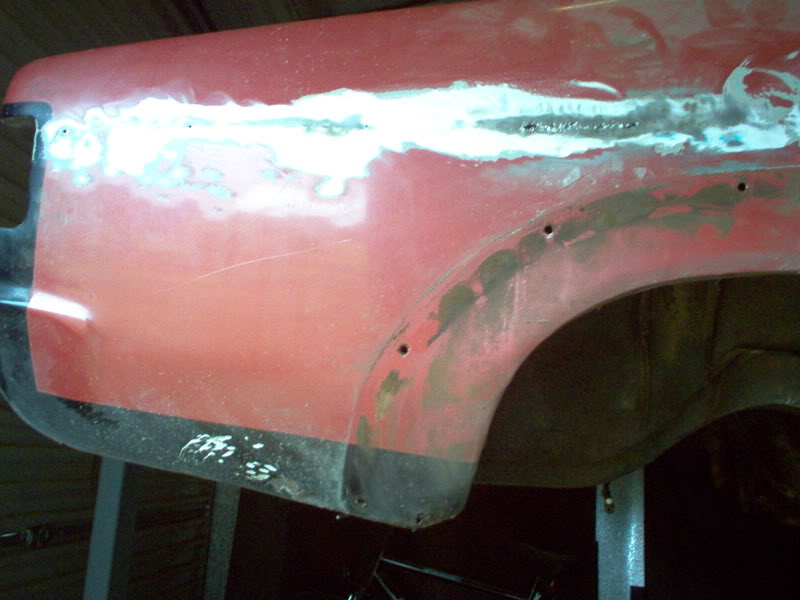
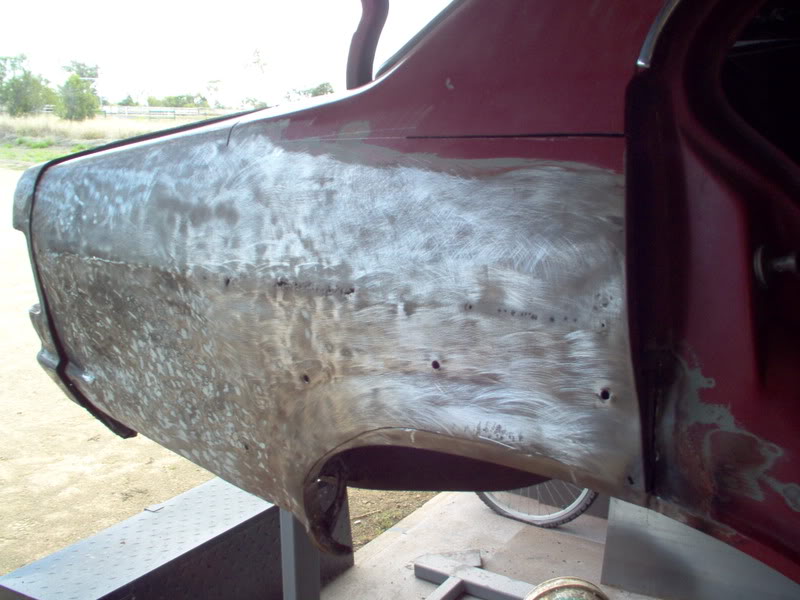
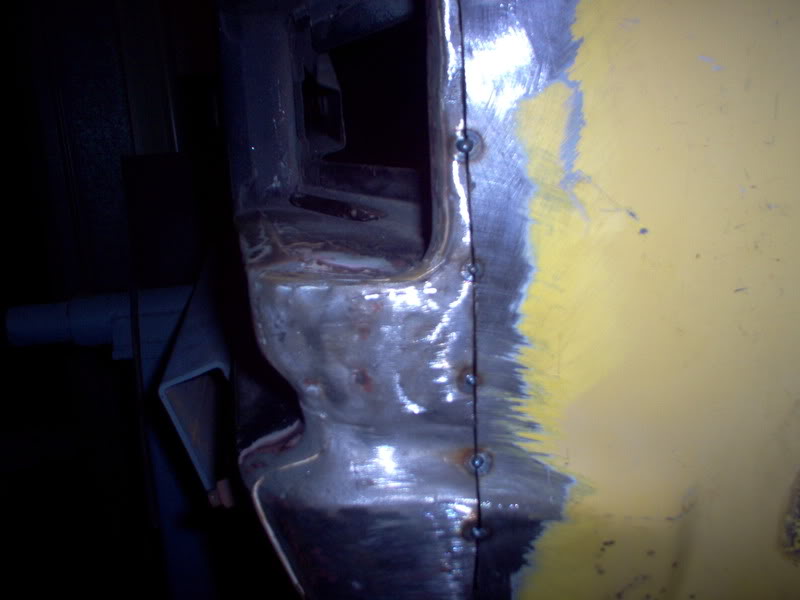
hello donor...bit of rust in the area above wheel but I am going to do a "Ruts" type tyre clearance cut out  ...also some rust in lower 1/4 area which is ok as I already have some rare spares replacement sections for this
well I have never done this job before (replaceing a large panel like this) but some advice I can give is to cut out your replacement as large as you can
then when ya get it home you can trim away the unneeded bits
out with the old
going
going
gone
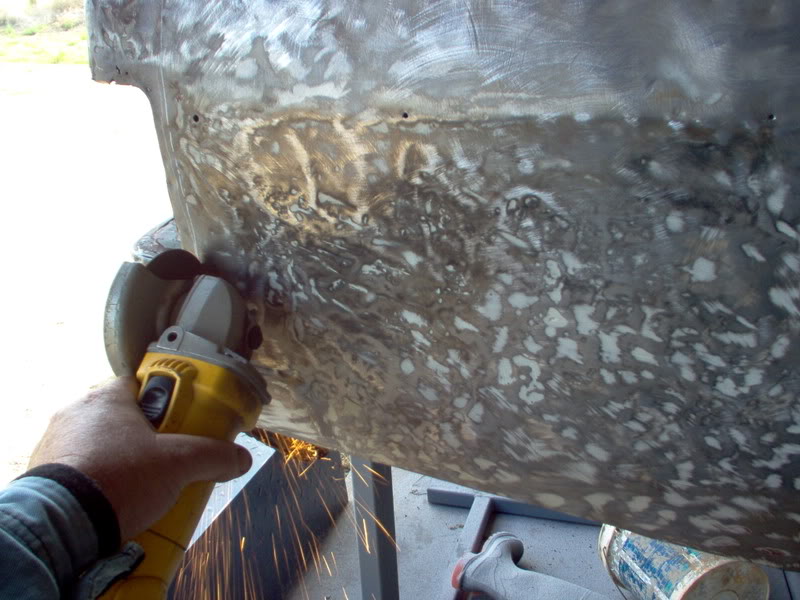
in this pic is my best helper on this job.....my speedblaster.. a great tool for cleaning up rust, sealant etc..
also this pic show's the only diff I can find (other than lights) between the UC and LH 1/4 is the support around the innear top of the LH panel....UC just finished right after boot gutter no support...if that makes sense??
...also some rust in lower 1/4 area which is ok as I already have some rare spares replacement sections for this well I have never done this job before (replaceing a large panel like this) but some advice I can give is to cut out your replacement as large as you can
then when ya get it home you can trim away the unneeded bits
out with the old
going
going
gone
in this pic is my best helper on this job.....my speedblaster.. a great tool for cleaning up rust, sealant etc..
also this pic show's the only diff I can find (other than lights) between the UC and LH 1/4 is the support around the innear top of the LH panel....UC just finished right after boot gutter no support...if that makes sense??
#14
racean69
-
- Members
-
- 781 posts
Forum Fixture
- Name:Rod
- Location:Central QLD
- Car:LH sedan
- Joined: 07-November 05
Posted 11 September 2008 - 11:34 AM
had a quick fit up/look at the rares lower 1/4... looks a bit short one end at this stage?????? 

#15
orangeLJ
-

- Members
-
- 10,259 posts
Yes, yes I do post alot!
- Joined: 02-May 06
Posted 11 September 2008 - 04:39 PM
where'd you buy the speedblaster? how much was it worth?
#16
racean69
-
- Members
-
- 781 posts
Forum Fixture
- Name:Rod
- Location:Central QLD
- Car:LH sedan
- Joined: 07-November 05
Posted 11 September 2008 - 10:21 PM
had the blaster for a couple of years so price is a bit rusty in the ole noggin but I think it was about $160 and got if from the snap-on truck (it's made by blue point).
#17
_76S.L.R_
_76S.L.R_
-
- Guests
Posted 11 September 2008 - 10:28 PM
Hmmmm, Looks like Id better keep looking for a Donor car as you have!= it'll be a damn site cheaper but I cant seem to find a good enough Donor car over here in W.A anywhere(For the Rear Quarters+behind the rear Bumper)............
#18
racean69
-
- Members
-
- 781 posts
Forum Fixture
- Name:Rod
- Location:Central QLD
- Car:LH sedan
- Joined: 07-November 05
Posted 14 September 2008 - 10:43 AM
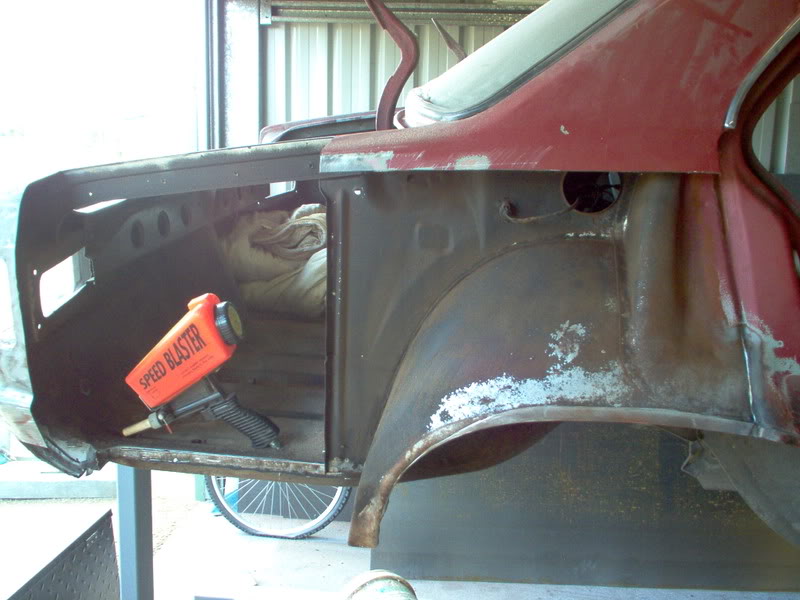
got the lower 1/4 to fit best I could...required a bit of work.
then I layed new panel over old one and cut through both.
trimed boot gutter right on edge to join new panel to.

tacked panel in.

all in just requires welding off now
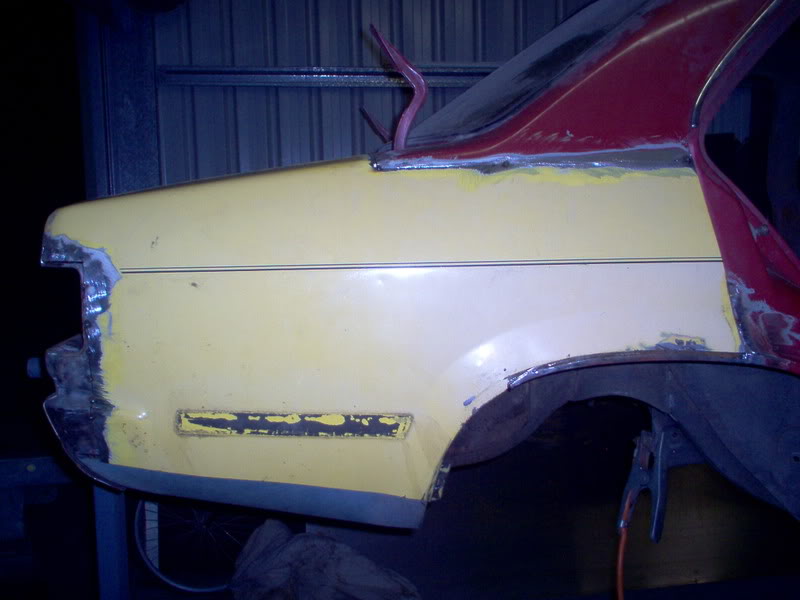
then I layed new panel over old one and cut through both.
trimed boot gutter right on edge to join new panel to.
tacked panel in.
all in just requires welding off now
#19
_2runa_
_2runa_
-
- Guests
Posted 14 September 2008 - 11:12 AM
Great job Rod
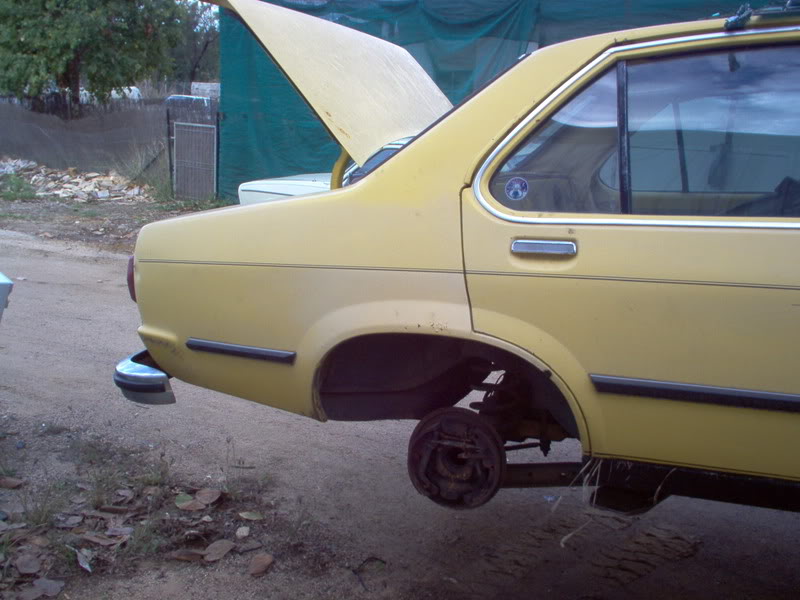
Just make sure the shape is the same as the other side before you fully weld it. I've made the error of fully welding a panel then finding it doesn't match the other side, however keep up the great work. PS whats under the yellow paint ??? lol no bog we hope.
reg
2runa
Just make sure the shape is the same as the other side before you fully weld it. I've made the error of fully welding a panel then finding it doesn't match the other side, however keep up the great work. PS whats under the yellow paint ??? lol no bog we hope.
reg
2runa
#20
racean69
-
- Members
-
- 781 posts
Forum Fixture
- Name:Rod
- Location:Central QLD
- Car:LH sedan
- Joined: 07-November 05
Posted 14 September 2008 - 07:12 PM
Haha 2runa... no this ones all good
#21
mrlctorana
-

- Members
-
- 572 posts
Forum Fixture
- Location:North-West Tassie
- Joined: 17-January 06
Posted 15 September 2008 - 09:05 AM
Excellent job, looking good, well done rod
#22
MRLXSS
-
- Members
-
- 12,396 posts
The Render Garage
- Name:Matt
- Location:Upwey, Melbourne
- Car:355 LX Hatchback, DeLorean DMC-12, LX SS Hatch, VY Cross8 Crewman
- Joined: 09-November 05
Posted 15 September 2008 - 09:36 AM
Wow! Good work 
#23
_LH SLR 3300_
_LH SLR 3300_
-
- Guests
Posted 15 September 2008 - 09:22 PM
Are you a panel beater by any chance? I am & i've seen qualified tradesmen that couldn't do as well as you have 10/10 great job. My advice to anyone attempting a job like this is trial fit things like doors lights bootlid etc before you weld,nothing worse than welding up a panel to find the bootlid or door doesn't line up, try & avoid doing sharp angled cuts/joins, curved joins are less likely to cause distortion when welding. When welding joins like wheel arches, quarter to boot floor etc apply weld thru primer to minimise rust forming between the joins. A thin bead of seam sealer applyed on the flat edge just above the guard lip can help avoid rust forming between the two panels here too as it is a common area for LH LX Torries to rust.
#24
_2runa_
_2runa_
-
- Guests
Posted 15 September 2008 - 10:18 PM
come on we want some more pics you should have it primed by now, and how did the lead wiping go LOL look forward to seeing the finished product well done
Edited by 2runa, 15 September 2008 - 10:19 PM.
#25
racean69
-
- Members
-
- 781 posts
Forum Fixture
- Name:Rod
- Location:Central QLD
- Car:LH sedan
- Joined: 07-November 05
Posted 16 September 2008 - 06:01 AM
Thanks for comments
I am fitter/welder, not a panel beater....just blessed with passion & patience I quess.
There's been no more progress at this stage. I was waiting for some feed back and other idea's. which i now have
cheers Rod
I am fitter/welder, not a panel beater....just blessed with passion & patience I quess.
There's been no more progress at this stage. I was waiting for some feed back and other idea's. which i now have
cheers Rod


1 user(s) are reading this topic
0 members, 1 guests, 0 anonymous users

