Jump to content


Photo
- - - - -

SS Hatch


  • Please log in to reply
589 replies to this topic

#226 Bigfella237

Bigfella237

    Socially Distant

  • Members
  • PipPipPipPipPipPipPip
  • 4,377 posts
  • Name:Andrew
  • Location:Far South Coast of NSW
  • Car:(s) not as many as I'd like but more than I've got space for!
  • Joined: 31-October 14

Posted 04 January 2015 - 10:50 AM

Holy crap... standard track is 1405mm and yours is 1835mm according to the wheel alignment figures above... that's 435mm or 17 inches over standard!


That can't be right can it?


#227 76lxhatch

76lxhatch

    That was easy!

  • Members
  • PipPipPipPipPipPipPip
  • 7,156 posts
  • Location:Unzud
  • Car:SS
  • Joined: 04-August 08
Garage View Garage

Posted 04 January 2015 - 12:22 PM

Haha no that's not the track width, that's well outside it - I have a three legged thingo that sits on the wheel rim and has a laser pointer attached so it shines an accurate dot on the ground/tape measure. The total distance figures themselves are arbitrary (but consistent relative to the wheel), its only the difference that matters to set the toe.

#228 76lxhatch

76lxhatch

    That was easy!

  • Members
  • PipPipPipPipPipPipPip
  • 7,156 posts
  • Location:Unzud
  • Car:SS
  • Joined: 04-August 08
Garage View Garage

Posted 19 January 2015 - 05:55 PM

Have been having issues with the odd gear clash, particularly on down shift. I wondered if this was just due to excessive clearances in the box but its very weird when it happens, the hub slides straight through the synchro as if its not there and grinds the dog gears. Its not due to worn out synchros as I've already tried replacing them. The old Toyota box used to do it occasionally too so in the end I decided that perhaps the extra backlash in the driveline due to the Lokka was causing the synchros to move out of alignment. Solution: go without food for a few weeks and buy a Harrop Truetrac.

IMAG0670_1.jpg

I was assured that it would fit without machining. So of course, it didn't. The case is bulkier than a standard one and fouls the pinion gear, necessitating the end of the pinion to be machined down a little. Apparently this is a known issue (!), also with the likes of the Kaaz LSDs too.

The pinion gear is of course hardened, so cutting tools won't touch it. Time to break out the tool post grinder on the lathe... except I don't have one. Time for Plan B.

IMAG0672_1.jpg
(the cable tie is to hold the trigger on, not to hold the tool!)

After a bit of mucking around, everything finally fits without interference. You can see how the Truetrac is bigger in diameter to the right of the crownwheel, it was contacting around the 10-11 o'clock area of the pinion gear. I also machined up a solid spacer for the pinion bearings while I was at it, since it needed to be removed and installed a couple of times to get things right.

IMAG0673_1.jpg

Haven't driven it a lot yet but I'm cautiously optimistic that the gear shift problem is resolved, it certainly feels like its pushing through the synchros correctly now and down shifts are a bit easier. I have been very happy with the Lokka otherwise but for road use I think I will have to concede that its probably not ideal behind a basic brass synchro manual gearbox. Feels a bit weird how civilised the car is to drive now!

Edited by 76lxhatch, 21 July 2017 - 11:27 PM.


#229 warrenm

warrenm

    Forum Fixture

  • Members
  • PipPipPipPipPip
  • 2,107 posts
  • Location:Central West NSW
  • Car:1972 LJ Torana
  • Joined: 08-November 05
Garage View Garage

Posted 20 January 2015 - 06:18 AM

The type of gear oil you are using can also cause "clash" problems. I went through 5 different oils in the Muncie before I found one that would let me to power shift, currently using a Fuchs TO4 transmission oil.


#230 76lxhatch

76lxhatch

    That was easy!

  • Members
  • PipPipPipPipPipPipPip
  • 7,156 posts
  • Location:Unzud
  • Car:SS
  • Joined: 04-August 08
Garage View Garage

Posted 20 January 2015 - 10:33 AM

Interesting, yeah I've been through a few as well. Currently have a Nulon 'smooth shift' SAE80, I generally like the Redline synthetic gear oils but this needs something a bit heavier.

Went for another drive this morning and still managed a couple of clashes on spirited up shifts (the clutch probably didn't get much more than a quick stab), but still vastly better going down. The box isn't too bad but its definitely not brand new either.

I must be getting old because I'm finding it nice to be able to get around tight corners and do three point turns without remembering to slip the clutch.

#231 warrenm

warrenm

    Forum Fixture

  • Members
  • PipPipPipPipPip
  • 2,107 posts
  • Location:Central West NSW
  • Car:1972 LJ Torana
  • Joined: 08-November 05
Garage View Garage

Posted 21 January 2015 - 06:00 AM

As you may already know, a synchro is actually a brake & most synthetic oils are too "slippery" to allow the synchro to do it's job when the shifts get quicker. An oil that meets GL4 appears to work in my box not GL5.


#232 76lxhatch

76lxhatch

    That was easy!

  • Members
  • PipPipPipPipPipPipPip
  • 7,156 posts
  • Location:Unzud
  • Car:SS
  • Joined: 04-August 08
Garage View Garage

Posted 21 January 2015 - 07:30 AM

The guys on the US forums go on and on about that but GL5 supersedes GL4 so it meets or exceeds the same spec, and there simply isn't anything readily available that is rated to only GL4 any more. The main difference between oils I've noticed is that a decent one doesn't have such a marked difference in shift quality between cold and hot, and as above this box needs oil slightly on the heavier end, probably mainly to take up some clearances. I've never had any issues with synthetics but they're really only available at the thinner end of the scale and there's no point in spending the extra money when the right mineral oil will work just as well.

I'm pretty happy with it for now, its clearly better without the driveshaft movement interfering with the synchro position. One day I will pull it and either rebuild it properly with new bearings etc or maybe even replace it entirely with one of the new boxes.

#233 axistr

axistr

    Forum Fixture

  • Members
  • PipPipPipPipPip
  • 1,169 posts
  • Location:North west sydney
  • Joined: 19-November 05
Garage View Garage

Posted 21 January 2015 - 08:40 AM

In most of my vehicles I just used shell Rimular X 15w40 engine oil, never had a ounce of problem, even used it in Eaton 18speed gearboxes over the last 30 years with engine torque up as high as 2,050ft pounds. In my Tremec transmissions I use auto trans fluid dextron 3 or equivalent.


#234 Heath

Heath

    I like cars.

  • Administrators
  • PipPipPipPipPipPipPip
  • 18,315 posts
  • Name:Heath
  • Location:Eastern Suburbs, Melbourne
  • Car:Heavily Modified UC Sunbird Hatchback
  • Joined: 07-November 05
Garage View Garage

Posted 21 January 2015 - 08:33 PM

I was assured that it would fit without machining. So of course, it didn't. The case is bulkier than a standard one and fouls the pinion gear, necessitating the end of the pinion to be machined down a little. Apparently this is a known issue (!), also with the likes of the Kaaz LSDs too.

Yep I had the same issue with mine. They told me they had fixed them and I got one of the old design - now I'm not so convinced.

Edited by Heath, 21 January 2015 - 08:33 PM.


#235 76lxhatch

76lxhatch

    That was easy!

  • Members
  • PipPipPipPipPipPipPip
  • 7,156 posts
  • Location:Unzud
  • Car:SS
  • Joined: 04-August 08
Garage View Garage

Posted 22 January 2015 - 01:38 PM

I'd be a bit disappointed if I just paid full price for a superseded part, but I think I agree with you, not convinced.

Oh well if we expect the worst from the beginning we won't be disappointed when it happens. Only cost me an extra day off the road which wasn't too bad.

#236 76lxhatch

76lxhatch

    That was easy!

  • Members
  • PipPipPipPipPipPipPip
  • 7,156 posts
  • Location:Unzud
  • Car:SS
  • Joined: 04-August 08
Garage View Garage

Posted 28 February 2015 - 06:30 AM

I hope this isn't a bit premature, but I think I'm at the point now where everything is going to work out with the EFI conversion.

Got the stripmaster back with a few extra holes in it, big thanks to an engineer friend who did the head scratching on how to locate them evenly and then did the actual machining
IMAG0674.jpg

Once I got my hands on it, the first step was to add a ledge so that I could locate the injector inserts without any risk of them falling through
IMAG0680.jpg

Followed by making the inserts (this one is just a test piece, the final ones are interference fit). The stripmaster has very thick runner walls which make it ideal for this. They are angled 11.3 degrees toward each other and laid back around 5.2 degrees toward the throttle body
IMAG0681.jpg

Grind a bit out of the edges so the epoxy can get some purchase and fit the inserts.
IMAG0005.jpg
I don't have access to a tig for welding them and after seeing many others welded I decided it was a horrible ugly mess (not to mention the possibility of warping things). The epoxy is more than adequate (the inserts won't move without it anyway) and much neater, I plan on painting the manifold regardless because someone has sanded it to start polishing and we can't have shiny stuff in the engine bay. Might try blasting it first to get some texture back.

After a bit of grinding on the underside they don't protrude too far into the port and have a pretty good angle into the valve
IMAG0012.jpg

Crunched my numbers and figured out what angles and spacings I needed, and started on machining the rails from a blank extrusion. Starting to become a challenge for my amateur machining skills (lack of patience is the worst part!) but I'm happy enough with how they turned out, they will accept the standard style retaining clips.
IMAG0007.jpg

Which worked out OK for the first rail. Second still to do, but this one fits nicely on both sides so I just have to replicate it.
IMAG0020.jpg
I have to add the manifold air temp sensor (probably in the plenum below the throttle body), and an extra temp sensor at the front. I will drill and tap the manifold at the rear water ports to create a crossover that feeds the heater core, so there will only be one long hose returning to the water pump at the front and no outlet on the thermostat housing. I will use the same air cleaner with a drop base to get it back to the correct height to clear the scoop, which will have the added benefit of hiding the ugly throttle body and covering some of the rails at first glance.

I will make some mounts to clamp the rails in place, probably to the side of the plenum. Once the second rail is done I need to make some inserts for the ends (the extrusion is the smallest I could find but still huge at 15mm ID) to fit the crossover pipe, inlet hose tail and pressure regulator. I will try to keep everything as small/tidy as possible so the EFI isn't immediately obvious, the whole point of this conversion is to keep the original look and feel of the engine.

I have a set of flow-matched 36lb injectors (the blue ones in the pics are just for dummy assembly) to go with. Everything will be run by a VR Commodore manual ECU and modified loom, using a Camira ignition module with the same dizzy (advance locked) and MSD, with a custom tune.

Edited by 76lxhatch, 21 July 2017 - 11:28 PM.


#237 SmacT

SmacT

    Forum Fixture

  • Members
  • PipPipPipPipPip
  • 907 posts
  • Name:Sam
  • Location:Sydney
  • Car:LX 4dr 383, TKX, BW
  • Joined: 24-December 08

Posted 28 February 2015 - 08:00 AM

Wow. Nice work!

#238 Heath

Heath

    I like cars.

  • Administrators
  • PipPipPipPipPipPipPip
  • 18,315 posts
  • Name:Heath
  • Location:Eastern Suburbs, Melbourne
  • Car:Heavily Modified UC Sunbird Hatchback
  • Joined: 07-November 05
Garage View Garage

Posted 28 February 2015 - 08:37 PM

Awesome as always.

#239 76lxhatch

76lxhatch

    That was easy!

  • Members
  • PipPipPipPipPipPipPip
  • 7,156 posts
  • Location:Unzud
  • Car:SS
  • Joined: 04-August 08
Garage View Garage

Posted 01 May 2015 - 01:40 PM

Decided to drive up to the Beach Hop at the end of March, so of course a week beforehand I decided to start cutting into the body work on the car... trying to get rid of all trace of tyre rub no matter what or who I have in the back. Each time I cut a bit more out I think its enough but every now and then get a touch - this time I cut plenty.

Its quite difficult to get good photos under the car and I can't take good photos at the best of times, so these are pretty crummy. But you should be able to see what I'm talking about.

Cut right up around 2" higher than the flare bolts and put in a mini-mini-tub on the outside, so now there is only a double layer following the outer quarter panel to just above the flare bolts. The small welds in the middle attach it to the brace section inside the quarter, which was shortened and a new flange bent into it.
IMAG0037.jpg
Ignore the ugly bits, its all cleaned up and undersealed now, but of course the camera won't show anything but black.

The piece to the outside is a 2mm thick small sheet metal flare which goes out to meet the fibreglass flare, just in case the tyre ever finds its way up there it won't meet a sharp edge.
IMAG0036.jpg

Cutting this high up means there was no panel left for the top two bolts to screw into, welded a nut to the outside of the sheet metal flare.
IMAG0043.jpg

These nuts protrude into the flare (because there is nowhere else!), so the flare needed adjusting.
IMAG0040.jpg

Although the bolt head is almost half an inch further out its hard to tell.
IMAG0058.jpg

It sits on the bump stops with clearance now :-)
gv3k5824.jpg

Most of the material cut away is for clearance when cornering and the diff moves over and tucks up a wheel on one side only, I think it misses the bump stops sometimes so might need to look at that one day.

Edited by 76lxhatch, 21 July 2017 - 11:29 PM.


#240 76lxhatch

76lxhatch

    That was easy!

  • Members
  • PipPipPipPipPipPipPip
  • 7,156 posts
  • Location:Unzud
  • Car:SS
  • Joined: 04-August 08
Garage View Garage

Posted 01 May 2015 - 01:50 PM

Another thing that was annoying me is that people kept telling me they couldn't see my indicators and brake lights in the sun, the home-made tinted lenses had to go (one was damaged anyway).

Cleaned up a good set and changed grey to black
IMAG0021.jpg

For a while now the water temps have been running a bit higher than usual after some running time, I figured it was at least partly due to the summer heat but had been keeping an eye on it. Flushed the coolant and put in fresh with distilled water etc before the trip up north which seemed to help, but after a couple of hours driving (at 3000rpm :-) ) it will start creeping up and hold a higher temp than normal. The radiator was the only part of the cooling system not replaced, I concluded that it just couldn't keep up - could have mucked around and cleaned it out but it has definitely seen better days.

IMAG0055.jpg
Its only a cheapie but it has made a big difference and temps are back where they belong. Had to replace the cap they supplied, make a right angle fitting for the overflow hose (who has an overflow hose pointing into mid air towards the engine?), and make a new fan mounting bracket that blocks minimal passive air flow. Also took the opportunity to remove the capillary thermostat in the top hose and replace it with a screw-in one in the manifold, please ignore the wiring I haven't tidied up yet. The cable-tied throttle cable will be going when the injection finds its way on there too.

Edited by 76lxhatch, 21 July 2017 - 11:30 PM.


#241 hanra

hanra

    Oh My, Don't you post alot

  • Members
  • PipPipPipPipPipPipPip
  • 10,835 posts
  • Name:Brad
  • Location:Farrrrrr North Qld
  • Car:1975 LH SL/R 5000, 1967 Morris Cooper S, E36 BMW, Toyota Corolla, Isuzu DMax
  • Joined: 24-March 11

Posted 01 May 2015 - 03:11 PM

What did you paint them tail light housing with? My RSP ones are a very light black... And it stands out against the black of the car... Looks like a fiddly job to mask up?

#242 76lxhatch

76lxhatch

    That was easy!

  • Members
  • PipPipPipPipPipPipPip
  • 7,156 posts
  • Location:Unzud
  • Car:SS
  • Joined: 04-August 08
Garage View Garage

Posted 01 May 2015 - 03:27 PM

The nearest black rattle can I could find... semi-gloss engine enamel (same colour as the fan mounting bracket by the way). And yes, fiddly.

#243 mick_in_oz

mick_in_oz

    Forum Fixture

  • Members
  • PipPipPipPipPip
  • 666 posts
  • Name:Mick
  • Location:Western QLD
  • Car:LX Hatchback
  • Joined: 12-June 11

Posted 01 May 2015 - 09:35 PM

I see a few posts up that your TB is similar to or the same as the Holley TB I have just gotten running a few weeks ago.


Does yours have a rear throttle stop screw to set the closed position?


I ask as mine did not come with one and I found that after the first time the engine was up to operating temp and let cool down that the rear throttle plates caught in the throttle bores.


My solution was to remake the rear throttle arm to include an additional arm that now has a cap screw and lock nut to be able to set the closed position to stop it catching again. The stop screw rests against the press fit pin that the rear return spring rests against.


I can provide a pic if needed.


Edited by mick_in_oz, 01 May 2015 - 09:36 PM.


#244 mick_in_oz

mick_in_oz

    Forum Fixture

  • Members
  • PipPipPipPipPip
  • 666 posts
  • Name:Mick
  • Location:Western QLD
  • Car:LX Hatchback
  • Joined: 12-June 11

Posted 02 May 2015 - 07:19 AM

Hope these help.

Attached Files


#245 308mate

308mate

    Forum Fixture

  • Members
  • PipPipPipPipPip
  • 523 posts
  • Name:scott
  • Location:Wootton - between Newcastle & Taree, NSW
  • Car:76 SS hatch (Royal Plum, Chevron Chamois interior), HQish Van (Orchid Metallic)
  • Joined: 19-May 09
Garage View Garage

Posted 02 May 2015 - 07:34 AM

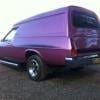
Nice work. The flare solution looks the ticket. I think big wheels look a lot better when the guards shroud the top of the tyre.


Cheers


#246 76lxhatch

76lxhatch

    That was easy!

  • Members
  • PipPipPipPipPipPipPip
  • 7,156 posts
  • Location:Unzud
  • Car:SS
  • Joined: 04-August 08
Garage View Garage

Posted 02 May 2015 - 07:44 AM

Yes I had noticed that secondaries like to stick closed a bit (doesn't have a secondary stop). I was kind of hoping that getting the linkages right would minimise the problem but I guess a heat cycle will make it worse, so far all testing has been on the bench.

Looks like a bit of a machining challenge for me making such a tiny little piece, thanks for the heads up.

Do you have a project thread, would be interested to see more?

#247 76lxhatch

76lxhatch

    That was easy!

  • Members
  • PipPipPipPipPipPipPip
  • 7,156 posts
  • Location:Unzud
  • Car:SS
  • Joined: 04-August 08
Garage View Garage

Posted 02 May 2015 - 07:51 AM

I think big wheels look a lot better when the guards shroud the top of the tyre.

You would be disappointed when its not loaded up, the top of the tyre is about level with the bottom of the flare - big gaps look a bit ugly but personally I don't really like the tyre being tucked up either.

#248 _mick74lh_

_mick74lh_
  • Guests

Posted 02 May 2015 - 09:10 AM

Loving your work mate. The diff, the manifold, the wheel arch. Every time I check this thread something impressive has been done.


#249 Redslur

Redslur

    Has been Torana owner

  • Members
  • PipPipPipPipPipPip
  • 3,535 posts
  • Name:Gerry
  • Location:Canberra
  • Car:HQ GTS Replica 350.
  • Joined: 08-November 05

Posted 02 May 2015 - 07:02 PM

You will love the reliabilty of injection.  I am so glad I went that way. Very similar set up to mine. And I am only running a VN AC Delco computer with tune.  It handles my 450hp now worries.


#250 76lxhatch

76lxhatch

    That was easy!

  • Members
  • PipPipPipPipPipPipPip
  • 7,156 posts
  • Location:Unzud
  • Car:SS
  • Joined: 04-August 08
Garage View Garage

Posted 14 May 2015 - 09:57 AM

A box just arrived...

IMAG0693.jpg

IMAG0694.jpg


Had to balance that out with something a bit less shiny and new, weighted shift knob. Mate wanted me to keep the original stamping but I think that would have been a bit much

IMAG0687.jpg

IMAG0691.jpg

Will probably paint it black :-)

Edited by 76lxhatch, 21 July 2017 - 11:31 PM.


0 user(s) are reading this topic

0 members, 0 guests, 0 anonymous users