
Mine died at Summernats, thought it was a relay, found the fuse to the fuel pump kept blowing. Turned out to be the coil had a dead short and was drawing 35 amps which blew the fuel pump fuse ( on the same circuit) bloody electrical germlins! Was scratching my head for a couple of days chasing it.


SS Hatch
Started by
76lxhatch
, Mar 17 2009 07:16 PM
633 replies to this topic
#326

myss427
 View Garage
-

- Members
-

- 1,636 posts
Forum Fixture
- Location:Canberra
- Car:427 hatch, CV8 Monaro, Ve SSV ute. Was part owner A9X sedan until he sold it without telling me!
- Joined: 17-November 05
View Garage
Posted 24 January 2016 - 04:17 PM
#327
Posted 24 January 2016 - 06:02 PM
Yeah have had issues with relays working intermittently before but took me a while to figure this one out. I got the engine started a few times and it seemed fine once started, but 99% of the time it would just start to catch, then nothing. Testing showed I had spark, and fuel! Turned out that although the relay appeared to be working, there was enough of a current/voltage drop that things were dropping out under high load which was obviously just at that point.
SmacT where is your ECU, in the glovebox?
#328
SmacT
-

- Members
-
- 1,013 posts
Forum Fixture
- Name:Sam
- Location:Sydney
- Car:LX 4dr 355, TKX, BW
- Joined: 24-December 08
Posted 24 January 2016 - 08:25 PM
I mounted mine where the VN commo had it, on the left of the passenger side footwell, where the kick panel goes. Not a good spot and will need custom kick panel!
Your spot is much neater.
Your spot is much neater.
#329
Posted 26 January 2016 - 08:47 AM
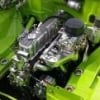
Here is a finished photo, at a quick glance you'd almost miss it if it weren't for the white injectors. Thinking about building an air box to seal the filter to the scoop, that might hide a bit more

(the bundle of wires under the blower housing is the wideband controller, that won't be staying)
(the bundle of wires under the blower housing is the wideband controller, that won't be staying)
Edited by 76lxhatch, 21 July 2017 - 11:48 PM.
#330
_j.e.d._
_j.e.d._
-

- Guests
Posted 26 January 2016 - 08:51 AM
Very nice work Karl.. when you comin up this way? I need you to do a "little" work on mine lol 
#331
RoyalPlum76SS
-

- Members
-
- 248 posts
Forum Member
- Name:John
- Location:Brisbane
- Car:SS Hatch
- Joined: 11-June 15
Posted 26 January 2016 - 10:21 AM
What fuel injection?? lol
Looks great, very factory looking. How does it drive now?
#332
Posted 26 January 2016 - 11:38 AM
Thanks, keeping it subtle was one of the main reasons I didn't go with VN heads. Still needs more tuning work but so far so good, seems to pull pretty well and shouldn't be too much drama to set it up so you can mash the pedal any time and get the best out of it.
Jase I'm planning on being in Whangamata for the Beach Hop, not sure what vehicle we'll be bringing though. Can't find enough time to work on my own projects, was supposed to have the four door done before I did all this!
#333
Posted 24 March 2016 - 07:40 AM
Time for some new rear tyres, went with Falken FK453. They seem OK so far, definitely a little better in the wet (for obvious reasons!)

Also finally got around to building a cold air box. I decided that I didn't want the air cleaner stud supporting everything, so made up some replacement nuts for the throttle body studs which incorporate mounting for the air box

Glued together this birdbath-looking thing out of sheet metal and it just screws on to the four nuts/posts

Tidy up and add a length of old Commodore boot seal (it has pinch weld built into it for easy mounting), doesn't look too out of place. Didn't really hide any of the injection stuff after all that but I didn't want it too big.

The manifold air temp drops pretty fast now when the throttle is opened so it seems to have made some difference.
Also finally got around to building a cold air box. I decided that I didn't want the air cleaner stud supporting everything, so made up some replacement nuts for the throttle body studs which incorporate mounting for the air box
Glued together this birdbath-looking thing out of sheet metal and it just screws on to the four nuts/posts
Tidy up and add a length of old Commodore boot seal (it has pinch weld built into it for easy mounting), doesn't look too out of place. Didn't really hide any of the injection stuff after all that but I didn't want it too big.
The manifold air temp drops pretty fast now when the throttle is opened so it seems to have made some difference.
Edited by 76lxhatch, 21 July 2017 - 11:49 PM.
#334
orangeLJ
-

- Members
-
- 10,261 posts
Yes, yes I do post alot!
- Joined: 02-May 06
Posted 24 March 2016 - 08:29 AM
Nice work. Small and effective.
Commodore pinch weld is handy stuff.
I used vs commodore pinchweld door seals on the race car.
Commodore pinch weld is handy stuff.
I used vs commodore pinchweld door seals on the race car.
#335
Heath
View Garage
-

- Administrators
-
- 18,403 posts
I like cars.
- Name:Heath
- Location:Eastern Suburbs, Melbourne
- Car:Heavily Modified UC Sunbird Hatchback
- Joined: 07-November 05
View Garage
Posted 31 March 2016 - 09:55 PM
Awesome! Trick work.
#336
Posted 08 May 2016 - 07:50 AM
The standard carb style lever on the throttle body worked OK but occasionally made it difficult to get smooth throttle application at low openings, the angle of the lever giving a fairly fast opening rate and more control in the middle of the travel. I've been meaning to make a pulley/cam type lever for linear application like a standard EFI throttle body, upon looking at a VN one I noticed its not actually linear at all - its the opposite, with progressive ratio giving more fine control at opening and faster movement near full throttle. There's around 10mm difference in lever length from start to finish. So, I chopped up an old VN piece and fitted that:

Was a little weird to drive initially but achieved exactly what I was looking for, now have more fine control at small throttle openings which makes it easier to cruise around smoothly at low rpm.
Was a little weird to drive initially but achieved exactly what I was looking for, now have more fine control at small throttle openings which makes it easier to cruise around smoothly at low rpm.
Edited by 76lxhatch, 21 July 2017 - 11:49 PM.
#337
Lima31
-

- Members
-
- 874 posts
Forum Fixture
- Name:Lee
- Location:Perth WA
- Joined: 18-April 10
Posted 08 May 2016 - 06:42 PM
Cool idea using the carby mount nuts as threaded risers for mounting the air box, will have to borrow that one 
#338
Posted 09 May 2016 - 03:25 PM
When I had the throttle body off I noticed that there was a little more oil coming through the PCV than I'd like which is no big surprise since the standard baffles in the alloy covers are almost non-existent. I'm sure I can improve on that so today's exercise was to remove the rocker covers and work on some better baffles. Then I popped the bonnet and remembered that its no longer possible to get the driver side rocker cover off without removing either the clutch line or the fuel rail...! You can see the hard line hanging down from the clutch master cylinder in a big loop around the brake booster hose in the photo of the air box above.
So plan A becomes plan B and the new plan A is to re-route the clutch line. Made up a banjo fitting and bolt to fit the master cylinder which gives me a low profile 90 degree into the hard line, and should just allow getting the rocker cover off with a bit of wiggling (I hope so, haven't actually tried it yet)!

Its great having the master cylinder pointing uphill creating a massive air lock, makes bleeding so much fun...
So plan A becomes plan B and the new plan A is to re-route the clutch line. Made up a banjo fitting and bolt to fit the master cylinder which gives me a low profile 90 degree into the hard line, and should just allow getting the rocker cover off with a bit of wiggling (I hope so, haven't actually tried it yet)!
Its great having the master cylinder pointing uphill creating a massive air lock, makes bleeding so much fun...
Edited by 76lxhatch, 21 July 2017 - 11:49 PM.
#339
Heath
View Garage
-
- Administrators
-
- 18,403 posts
I like cars.
- Name:Heath
- Location:Eastern Suburbs, Melbourne
- Car:Heavily Modified UC Sunbird Hatchback
- Joined: 07-November 05
View Garage
Posted 10 May 2016 - 08:03 AM
I thought a handy bloke such as yourself would have tried to remove the rocker cover and decided to do an under-dash clutch master creation instead?
#340
Posted 10 May 2016 - 10:34 AM
Haha don't tempt me, I have thought about it. This one's a pain in the neck to maintain but when working it works well enough, and I spent good money (got ripped off) on stainless sleeving it last time it needed attention. It will probably go away one day though.
#341
Posted 26 June 2016 - 08:14 AM
Had been having some issues with tuning at low pulse widths so started looking for problems and discovered that the small pulse damper was hammering (I assume it was bottoming out). So forked out for a decent one:

This one threads in so I have to remove the fuel rail and modify it, again... which eventually lead me to find another problem as when I reassembled everything it was running really rich for no apparent reason! After I let it sit for a few minutes and tried to start again it wouldn't turn over at all and it dawned on me - cylinder full of fuel due to a leaking injector! Removed the spark plug and turned it over, sure enough it pumped out fuel. After setting up a test rig on the bench it turns out that one injector is blocked beyond repair and both leaks badly and won't deliver full flow. Bugger it, at least if I get some new injectors they will be the right colour:

Have been attempting to tune with the bad injector for a little while it would seem so have to re-do some of that work but at least it reacts to changes how it should now! Unfortunately the fuel rails are looking very second hand already but will touch them up at some stage.
Oh and the alloy radiator was just outside its 12 month warranty, so of course the fins started pulling away from the tank on both sides causing a messy leak that fed coolant into the fans which in turn spread it around the engine bay. Turf that and install a new copper/brass unit, but needs modification to fit the twin 14" fans:

To round off the trifecta of leaks diff oil was coming through the spline of the pinion yoke and splattering around the underside of the car. Fixed that too.
This one threads in so I have to remove the fuel rail and modify it, again... which eventually lead me to find another problem as when I reassembled everything it was running really rich for no apparent reason! After I let it sit for a few minutes and tried to start again it wouldn't turn over at all and it dawned on me - cylinder full of fuel due to a leaking injector! Removed the spark plug and turned it over, sure enough it pumped out fuel. After setting up a test rig on the bench it turns out that one injector is blocked beyond repair and both leaks badly and won't deliver full flow. Bugger it, at least if I get some new injectors they will be the right colour:
Have been attempting to tune with the bad injector for a little while it would seem so have to re-do some of that work but at least it reacts to changes how it should now! Unfortunately the fuel rails are looking very second hand already but will touch them up at some stage.
Oh and the alloy radiator was just outside its 12 month warranty, so of course the fins started pulling away from the tank on both sides causing a messy leak that fed coolant into the fans which in turn spread it around the engine bay. Turf that and install a new copper/brass unit, but needs modification to fit the twin 14" fans:
To round off the trifecta of leaks diff oil was coming through the spline of the pinion yoke and splattering around the underside of the car. Fixed that too.
Edited by 76lxhatch, 21 July 2017 - 11:50 PM.
#342
Heath
View Garage
-
- Administrators
-
- 18,403 posts
I like cars.
- Name:Heath
- Location:Eastern Suburbs, Melbourne
- Car:Heavily Modified UC Sunbird Hatchback
- Joined: 07-November 05
View Garage
Posted 27 June 2016 - 12:56 PM
You're earning some positive karma with the car by rapidly responding to these issues!
#343
axistr
View Garage
-

- Members
-
- 1,225 posts
Forum Fixture
- Location:North west sydney
- Joined: 19-November 05
View Garage
Posted 28 June 2016 - 06:35 PM
Bugger.
I never inquired on alloy radiators for either of the torries just when straight for the copper and brass. I know alloy radiators are cheaper than the old copper units these days and they do give better heat transfer if built properly, but brass/copper are pretty much bullet proof. My radiator man loves the alloy radiators he recons he makes a fortune every year from the metal recyclers.
#344
Posted 29 June 2016 - 03:49 AM
Yeah I probably would have gone copper/brass last time if they'd at least make them without the trans cooler, something about that bugs me.
#345
Posted 10 July 2016 - 03:43 PM
As above a couple of months ago I was going to look at putting some proper baffles into the rocker covers but got sidetracked when I discovered the driver side rocker cover couldn't be removed... finally got back to this task today.
Turns out the rocker cover will just sneak out from under the clutch master with a bit of wiggling, good start.
Passenger side cover has the filler cap, which is a breather. The original baffle supplied with the covers:

New and improved version:

Driver side has the PCV at one end. Original baffle:

Now has one that runs most of the length of the cover, hopefully this will minimise any liquid oil being sucked up:

The new baffles are aluminium but I don't have the gear to weld them and I'm pretty sure it would be a nightmare to clean up all the oil contamination. So I just pop riveted them which worked fine, the covers are quite thick and the holes are stepped with the rivet head on the inside so they sit flush inside the top rib:

A dab of black paint will hide them away when I get around to it...
Turns out the rocker cover will just sneak out from under the clutch master with a bit of wiggling, good start.
Passenger side cover has the filler cap, which is a breather. The original baffle supplied with the covers:
New and improved version:
Driver side has the PCV at one end. Original baffle:
Now has one that runs most of the length of the cover, hopefully this will minimise any liquid oil being sucked up:
The new baffles are aluminium but I don't have the gear to weld them and I'm pretty sure it would be a nightmare to clean up all the oil contamination. So I just pop riveted them which worked fine, the covers are quite thick and the holes are stepped with the rivet head on the inside so they sit flush inside the top rib:
A dab of black paint will hide them away when I get around to it...
Edited by 76lxhatch, 21 July 2017 - 11:51 PM.
#346
Heath
View Garage
-
- Administrators
-
- 18,403 posts
I like cars.
- Name:Heath
- Location:Eastern Suburbs, Melbourne
- Car:Heavily Modified UC Sunbird Hatchback
- Joined: 07-November 05
View Garage
Posted 10 July 2016 - 11:50 PM
Well that's certainly one way of doing it. I put a baffle in a KC rocker cover by grinding 'slots' in the side, and making an aluminium baffle clip into the slots (distort it a little to get it in and out).
But if the pop rivets don't leak, that'll do the trick! The idea of getting a TIG torch in there doesn't sound fun.
But if the pop rivets don't leak, that'll do the trick! The idea of getting a TIG torch in there doesn't sound fun.
#347
basicgreen
-
- Members
-
- 225 posts
Forum Member
- Name:rick
- Location:adelaide
- Joined: 29-September 11
Posted 13 July 2016 - 04:23 PM
did the same thing all most on my 6.. but putting oil in takes for ever with no hole. i would put small hole to put oil in.. my 2 cents
#348
Posted 14 July 2016 - 06:08 AM
I know what you mean, the spring metal piece that comes with the covers all but blocks the filler hole off and makes putting oil in a very slow job (and messy if you're not paying attention). After putting up with that for years I made the new baffles with a triangular shape cross section that provides a lot more clearance toward the outside of the covers - in the last photo above it looks blocked off but there's a good 10-15mm vertical clearance at the bottom of the hole which will be a vast improvement.
#349
basicgreen
-
- Members
-
- 225 posts
Forum Member
- Name:rick
- Location:adelaide
- Joined: 29-September 11
Posted 14 July 2016 - 04:47 PM
looks like your all over it.. wish i put hole in mine
#350
Posted 28 July 2016 - 03:30 PM
Some of our rules regarding vehicle requirements apply to the date of manufacture, others to the date of first registration in this country. Because this car was imported and first registered here at a later date, that means it legally requires a high stop light and won't pass an inspection without one.
The standard style window mounted lights are huge and really obstruct vision out the back. The one that came with the car departed quickly, replaced by a 'slim' LED one, but still quite large on the window and annoyed me. I finally got around to plan B, made a small housing flush mounted in the spoiler with a bright red LED strip inside it (its completely white/clear when not going).

Also made a spring-loaded contact for the power supply at the left hand rear corner, uses the same spot as the compartment light switch on the right side but instead of earthing it has an insulated power wire pass through it to a contact on the lid. No more wires hanging out.
The standard style window mounted lights are huge and really obstruct vision out the back. The one that came with the car departed quickly, replaced by a 'slim' LED one, but still quite large on the window and annoyed me. I finally got around to plan B, made a small housing flush mounted in the spoiler with a bright red LED strip inside it (its completely white/clear when not going).
Also made a spring-loaded contact for the power supply at the left hand rear corner, uses the same spot as the compartment light switch on the right side but instead of earthing it has an insulated power wire pass through it to a contact on the lid. No more wires hanging out.
Edited by 76lxhatch, 21 July 2017 - 11:52 PM.


4 user(s) are reading this topic
0 members, 4 guests, 0 anonymous users

