Mig Welding Help?
#26
 _nial8r_
Posted 26 October 2009 - 08:07 PM
#27
 _Viper_
Posted 26 October 2009 - 09:12 PM
And Yea im very careful when I grind to only grind the actual weld down without touching the surrounding metal as much as possible.
#28

Posted 26 October 2009 - 09:22 PM
Dont take shortcuts in your trial,be patient and methodical and try to get every repair perfect. You will learn plenty.
All the listed methods have their application,only experience will tell you what works best for you.
Dont forget to do some trials near the edge of the panel where you have no rear access.
#29
 _lx-304_
Posted 27 October 2009 - 06:24 AM
dave
#30
 _LH SLR 3300_
Posted 27 October 2009 - 05:51 PM
Better make sure I have good welds then
Heres another question, I cut and welded in some GTS guard flutes to my Gemini Guard today using the leap frog tack cool method and was just wondering is there any way to stop/reduce the shrinkage around the welds?
Like i get both the panels perfectly level but sometimes when you weld it then grind it back flush, around the weld is a little lower like its sunken away?
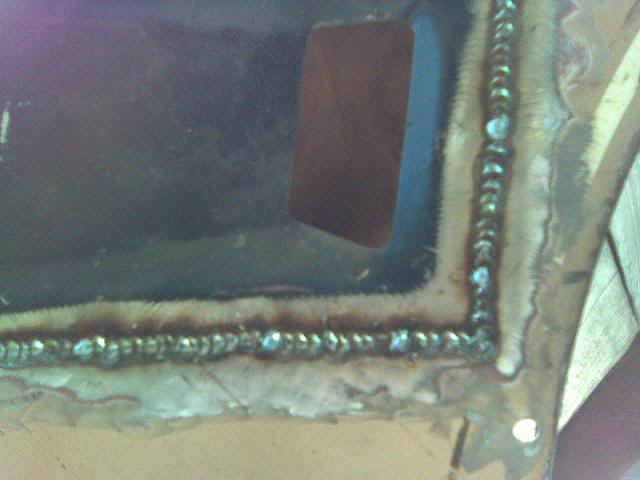
I agree with other members posts here, however i might add that i try to avoid welding sharp angled or 90 degree corners. I find if i weld slightly more curved or multiple angled joins (such as a hexagon shape instead of a square or rectanlge) i get less distortion. This weld looks good to me, but in the lower right corner, it appears to have distorted more & is slightly more depressed than the rest of the welded joins. If around half an inch of that corner had been cut off at a 45 degree angle, from my experience anyway, there wouldn't have been as much distortion & therefore less hammer & dolly work ( which can over stretch the metal if used too much ). It's all a learning curve & good on you for having a go. As with alot of pursuits in life, practise makes perfect.
#31
 _Viper_
Posted 27 October 2009 - 07:34 PM
#32
 _nial8r_
Posted 29 October 2009 - 04:58 PM
#33
 _gtr161s_
Posted 11 November 2009 - 07:11 AM
When they spot weld a panel you may not have a direct thru pin hole but there will always be a gap between the 2 panels.
If your concerned about nicky delaminating after filling sand blast all your welds..this way you have a very tenatious perfectly clean surface for the nicky to adhere
If your getting pin holes you would be butt welding.... To advoid this and achieve a stronger weld overlap the panels by 10-20mm all-round (where possible).
I know in NSW engineers require a panel to be overlapped by 20mm all-round to put structural integrity back into the pressing..ie floor pans, tunnels etc..i use this method for 2 reasons, firstly its always going to be stronger than butt welding and you wont blow through
#34
 _Viper_
Posted 15 November 2009 - 09:58 AM
#35
 _Bomber Watson_
Posted 15 November 2009 - 10:51 AM
#36

Posted 15 November 2009 - 03:02 PM
#37
 _nial8r_
Posted 16 November 2009 - 10:51 AM
#38
 _gtr161s_
Posted 22 November 2009 - 05:52 PM
This is standard practice in manufacturing.
Any panel that i overlap and welded is later flooded with a rust proofing drink.....some panel just can't be fully welded because the panel has gone through a lot of stress to formed into its current shape, adding excessive heat like welding will cause more problems so overlapping and spot welding is going to be far stronger than butt welding sheet steel.
#39

Posted 22 November 2009 - 09:34 PM
But doesnt overlapping the panels provide air gaps between the 2 and areas for water etc to get trapped and cause rust?
Yes, OEM.
or do you use seam sealer on every weld?
Ditto.
They last 30yrs+ if you did don't submerged them.
#40
 _Viper_
Posted 02 January 2010 - 07:08 PM
Any ideas?
Here's my latest effort

#41

Posted 02 January 2010 - 07:22 PM
#42
 _Viper_
Posted 02 January 2010 - 09:03 PM
I also tried pressing the trigger abit without actually creating an ark to sorta get the gas "primed" but was still the same... Im leaning towards a wire feed problem? how do you know if you got the correct tension on the feeder?
#43

Posted 02 January 2010 - 09:05 PM
#44

Posted 03 January 2010 - 01:22 AM
I also tried pressing the trigger abit without actually creating an ark to sorta get the gas "primed" but was still the same... Im leaning towards a wire feed problem? how do you know if you got the correct tension on the feeder?
I carry an old pair if side cutters on the mig and snip the end off the feed wire for a fresh start.
#45

Posted 04 January 2010 - 08:54 PM
porosity in your welds can be caused by several things.
moisture or surface contamination these i dont think so im sure your metal has been cleaned free of paint and rust,
flow rate to high or more likely to low just screw in the big black knob on your gauge until you reach say to 15 liters per minute.
excessive wind or air movement,
then again in your wire feeder there is a solinoid mind the spelling that i think will controlle open and closed on the gas, if you pull the trigger and get nothing at all then
you may need some repaires.
there are other small things that do affect gas shielding like gun angle and stick out but the welds look good enough from here.
with your wire feed as long as you pull the trigger and get wire you should be good.it should be able to handle a little resistance by hand.
hope this helps a little.
#46
 _nial8r_
Posted 05 January 2010 - 06:37 AM
#47

Posted 05 January 2010 - 01:47 PM
Hey all... Ok well been doing abit of welding of late and am getting better... just 1 problem... When Im doing the tack tack tack... cool.... tack tack tack... cool... method (buttwelded sheetmetal together) the first tack I goto do is always crap, when I pull the trigger it goes, bang bang bang (splat splat splat) then ZZzzzzzzz and does a weld... but then if I do the next tacks pretty quickly (withing say 10seconds) they just go Zzzzzzzz... Zzzzzz... Zzzzz perfectly.... but then if I wait too long, 15seconds Plus... once again the first tack goes pop pop pop zzzzz...
Any ideas?
Here's my latest effort
It could be doing the splating because the steel has cooled down, ie if you insufficient amps. if you turned the amps up this may solve your problem but then it may be too hot. You will just have to play around with the settings, turn the wire down a bit. etc.
This is a lot more noticible when mig welding aluminium. The first part of the weld is always cold. Some high end migs have hot start to compensate for it.
#48
 _Yella SLuR_
Posted 05 January 2010 - 08:55 PM
Mmmm, interesting comments on wire feed. With MIG welding, wire feed affects the amount of amps pumping through the machine. Higher the wire feed, the more amps you are pumping through.
Amps with voltage settings needs to be balanced to get a good weld window. There are some combinations of voltage and wire feed where you'll get no good welds at all.
The difference between a good and a bad weld can be a poofteenth adjustment of the wire feed (AMPS). It is a very fine adjustment.
I love playing with my MIG, although I prefer oxy.
#49

Posted 05 January 2010 - 09:47 PM
i was referring to setting the tension on the rollers.
Yes slr your amperage is set through your wire feed.
#50

Posted 05 January 2010 - 10:25 PM
the rollers slip... don't continuely do this though as it will cause an excess of wire shavings to be drawn into your liner causeing grief... this
tension setting is for solid wire not cored.. the tension for cored wire is much less. a quick check for excessive tension on cored wire is
let a bit of wire feed out of hand piece it should remain straight and not curl up in a spiral, this is called birdcageing.
another tip to to regulary remove your hand piece cable from the machine, remove contact tip, lay it out straight and blow it through with comp
air from tip end back, it will remove any fines in the liner.
When welding always keep your cable as straight and not looped as possible.
Cable/liner problems can be the cause of some hard to detect/solve problems when welding.
Always make sure you have a good earth to this can cause stabbing at the handpiece.
1 user(s) are reading this topic
0 members, 1 guests, 0 anonymous users


 View Garage


