Jump to content


Photo
* * * * * 1 votes

Fixing my brothers UC hatch


  • Please log in to reply
1690 replies to this topic

#101 _Torrie_Man_

_Torrie_Man_
  • Guests

Posted 06 January 2010 - 10:30 AM

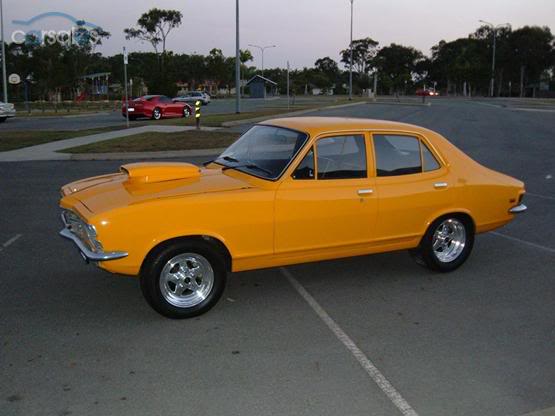
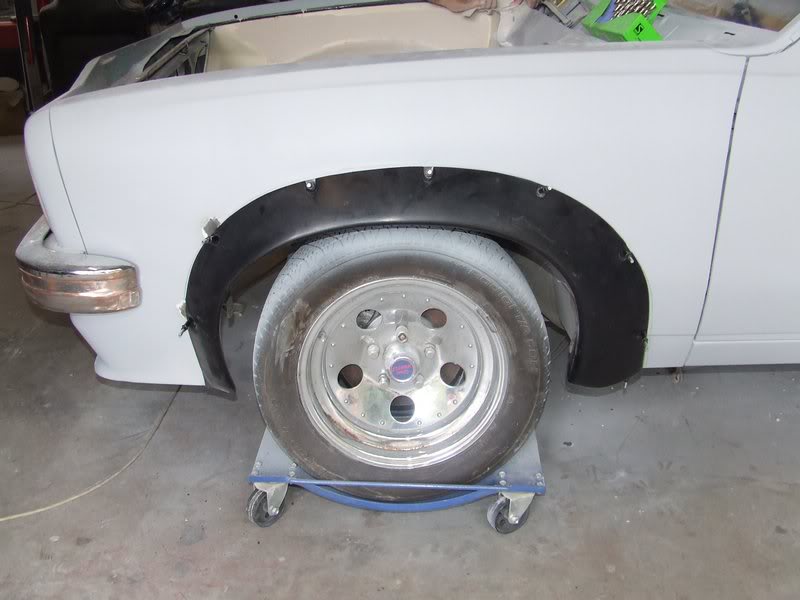
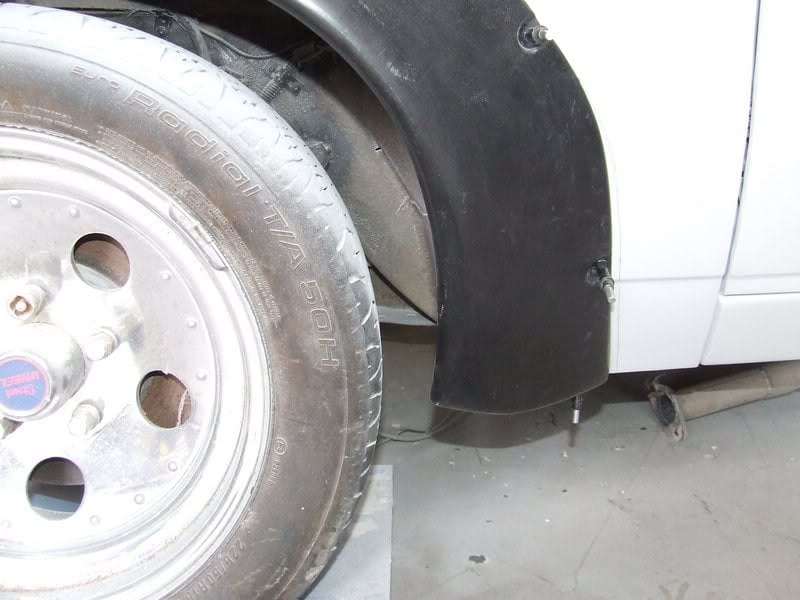
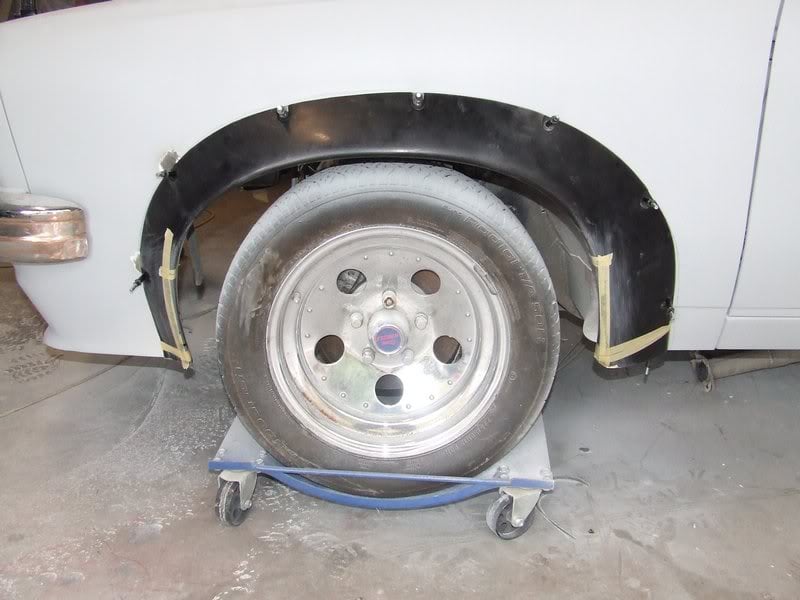
What's your opinion people? What colour?


ultra blue!!

#102 _Yella SLuR_

_Yella SLuR_
  • Guests

Posted 06 January 2010 - 10:39 AM

Yella is nice!!!

#103 _Mid Life Crisis_

_Mid Life Crisis_
  • Guests

Posted 06 January 2010 - 11:27 AM

Ultra Blue would be alright Posted Image but if you want something great "Persian Sand".... Posted Image

#104 76lxhatch

76lxhatch

    That was easy!

  • Members
  • PipPipPipPipPipPipPip
  • 7,156 posts
  • Location:Unzud
  • Car:SS
  • Joined: 04-August 08
Garage View Garage

Posted 06 January 2010 - 11:59 AM

Green's nice... go the Barbados

#105 fenz

fenz

    Forum Member

  • Members
  • PipPipPip
  • 220 posts
  • Name:Aaron
  • Location:South Australia
  • Car:LJ 2 door and UC V8 4door
  • Joined: 26-July 09

Posted 06 January 2010 - 12:07 PM

Big fan of blacking the bonnet and tops of guards/windows looks tuff.
This combo with a nice red would look pretty sweet i rekon.

#106 Stinga

Stinga

    .

  • Members
  • PipPipPipPipPip
  • 2,114 posts
  • Name:Stinga
  • Location:Wollongong, NSW
  • Car:HD Holden ute, and sedan, UC torana
  • Joined: 05-December 05

Posted 06 January 2010 - 12:36 PM

nice work,i like the front end, indicators look good as does the bar (cant wait to see that bar with fresh chrome on it) will turn alot of heads, and have torana fans taking a second look. look forward to the engine installation.

#107 _AD_75_

_AD_75_
  • Guests

Posted 06 January 2010 - 04:40 PM

Always liked Barbados green, used to own a nice 74 LH SLR in that color but i think it looks best on sedans. On a 2 door i think orange would be nicer and i found a pic of a particular car that I've been day dreaming about lately..not sure on the exact color but its some type of orange, hope the owner doesn't mind me posting it up but i think its a cool looking car/color and would suit your brothers beast perhaps.

Posted Image

#108 _LX77SL_

_LX77SL_
  • Guests

Posted 06 January 2010 - 05:54 PM

may be a bit biased but i would say orange and black. Awesome job ur doing on this car by the way

ayden

#109 dirtbag

dirtbag

    Street Machines current Biatch!

  • Members
  • PipPipPipPipPip
  • 1,927 posts
  • Name:Tim
  • Location:Sunshine Coast
  • Car:1995 V8 2wd hilux, LH torana ute, 1970 Volksrod, MK1 2 door escort, CJ6 Jeep, VX commodore wagon.
  • Joined: 29-December 09

Posted 06 January 2010 - 06:35 PM

Thanks so much guys for the ideas and kind words. i think I agree, barbados green looks better on 4 doors. Only time will tell. : )


Well today I got stuck into mounting the front flares. Originally this car wasn't going to have any flares, that's why I made the front spoiler from steel. This means the flares will need a little bit of trimming to suit. If only the rotten things would fit in the first place : )


The flares weren't even close to fitting at first. The front and back of them were at a weird angle and wouldn't follow the shape of the guard. I thought I'd just chop them up a bit, that'll fix it : )

I'm not worried about the front of the flare where the spoiler normally meets, as this is getting trimmed off.


Posted Image


What huge gap?


Posted Image


I love torries with the guards cut. Speedway style!!!!!! : )


Posted Image


Next step was to trim the front of the flare off. I don't love the look, but had no choice and it'll look fine once it's painted anyway I'm sure.


Posted Image


I really hate how the wheelarch curves back into the wheel at the front and rear of the flare. This'll need fixing.


Posted Image


Choppy choppy!!!!!!! : )


Posted Image


With the wedges cut out of the front and back of the flare, I taped it into position and fibreglassed it back together from the inside. Looks a lot better in my opinion.


Posted Image


More speedway action on the other side now : )


Posted Image


Again, this side was a mission to get into a decent position, and then needed to be cut a bit as well.


Posted Image


Make sure you sand the inside of the flare with rough paper, then clean with acetone or thinners. You can see how I've taped the flare together so there is only a very small gap where I cut the flare. I taped underneath the gap so resin didn't run all over the outside of the flare.


Posted Image


I then added the resin and matting. I ended up putting on 4 layers of resin and matting. Should be nice and strong.


Posted Image


I hate fibreglass. I should have made the flares from steel too : )

Well the front flares are now both mounted with cleco pins and actually sort of line up. Tomorrow when the resin is dry I'll finish off the flares and get on with something else : )


Posted Image


I hope to have the whole engine bay in primer tomorrow too. Fingers crossed.


Posted Image

#110 Stinga

Stinga

    .

  • Members
  • PipPipPipPipPip
  • 2,114 posts
  • Name:Stinga
  • Location:Wollongong, NSW
  • Car:HD Holden ute, and sedan, UC torana
  • Joined: 05-December 05

Posted 06 January 2010 - 06:48 PM

its getting tougher by the minute, nice work with the flares

#111 wot179

wot179

    Green Eggs and Spam

  • Members
  • PipPipPipPipPipPipPip
  • 6,784 posts
  • Name:Jesus Bloody Christ
  • Location:Sunny Santa Maria
  • Car:Goon
  • Joined: 06-February 09

Posted 06 January 2010 - 06:48 PM

You must eat nescafe with a spoon.


Nice work.

#112 dirtbag

dirtbag

    Street Machines current Biatch!

  • Members
  • PipPipPipPipPip
  • 1,927 posts
  • Name:Tim
  • Location:Sunshine Coast
  • Car:1995 V8 2wd hilux, LH torana ute, 1970 Volksrod, MK1 2 door escort, CJ6 Jeep, VX commodore wagon.
  • Joined: 29-December 09

Posted 06 January 2010 - 06:57 PM

Thanks guys. Eat nescafe with a spoon - hehehe. Love it : )

#113 Potta

Potta

    Oh My, Don't you post alot

  • Members
  • PipPipPipPipPipPipPip
  • 6,026 posts
  • Name:Craig
  • Location:Gozzy, WA
  • Car:LC GTR, LC 4 door
  • Joined: 01-May 09

Posted 06 January 2010 - 06:59 PM

Yeah, working quickly and not cutting any corners either.

Very impressive.

Can't wait to see this one finished.

I didn't like the brake ducts on the front spoiler at first but it looks pretty good with the bumper on.

#114 _doogs_

_doogs_
  • Guests

Posted 06 January 2010 - 11:02 PM

I like your different approach mate, sure looks great so far !
You have quite a skill there and your pace puts a lot of us to shame.:spoton:
If it were my car I would definitely go for a nice loud colour.

#115 _niterida_

_niterida_
  • Guests

Posted 06 January 2010 - 11:30 PM

Hi ehdave. That's an interesting idea. I can't really imagine there being much of a market for it though, considering how much work would be involved in making the moulds. I think it comes down to me being lazy : )


I think it might be one of those things were there is no market - until you start making them and then everyone who owns a UC will want one (well almost everyone - not me I prefer the UC and I'm sure I've seen a few other people on here say the same thing)

Will have to see it painted and possibly in the flesh but I'm goping to go against the trend here and say I don't like your frint end mods :-(
The bottom of the UC spoiler doesn't seem to fit too well with the different shaped LX bumper and the indicators look too old fashioned. The headlights might be round but the headlight surrounds are rectangular and I think the indicators should be rectangular too. Or put a rectangular surround around them, the same as the headlights.

I also have a question about the guards - when you cut out the piece and brought them in to match the LX front panel how did that affect the line/curve from that point back to the front door - did it end up with 2 different radius curves or is it not noticeable or did you have to smooth it out ?

Apart from that the rest of the work is amazing and first class. When are you coming to Exmouth for a holiday ??

#116 dirtbag

dirtbag

    Street Machines current Biatch!

  • Members
  • PipPipPipPipPip
  • 1,927 posts
  • Name:Tim
  • Location:Sunshine Coast
  • Car:1995 V8 2wd hilux, LH torana ute, 1970 Volksrod, MK1 2 door escort, CJ6 Jeep, VX commodore wagon.
  • Joined: 29-December 09

Posted 07 January 2010 - 06:47 AM

Oh well, you can't please all the people all the time : )

The UC guards taper in at the front more than the LX ones, where they meet the nose cone. I just split the UC guards to open them up a bit and they lined up with the nose cone no problems. It's probably only the first 8 inches or so of the guard that needed changing, from there back is stock.

#117 _Yella SLuR_

_Yella SLuR_
  • Guests

Posted 07 January 2010 - 06:48 AM

^ Aesthetics are one of those things, everybody has their own preference as to what looks good. Just cause it's not your cup of tea, doesn't make it wrong.

#118 dirtbag

dirtbag

    Street Machines current Biatch!

  • Members
  • PipPipPipPipPip
  • 1,927 posts
  • Name:Tim
  • Location:Sunshine Coast
  • Car:1995 V8 2wd hilux, LH torana ute, 1970 Volksrod, MK1 2 door escort, CJ6 Jeep, VX commodore wagon.
  • Joined: 29-December 09

Posted 07 January 2010 - 06:52 PM

Well here's a few more pics of some more progress.
The flare alterations turned out well. When I pulled the tape off the join looked really good. Just needed a tiny spot of bog to smooth them out.

Posted Image


The engine bay is finally all in it's first stage of primer. It's looking pretty good in my opinion. It's certainly been a lot of work.


Posted Image


The front flares also copped a few coats of primer filler after the filler work was done.


Posted Image


Next job was to move the new motor from the top shed down to this shed. Of course that's when it decided to pour with rain : ) Thank goodness for tarps!!!!
I used my trusty old J10 Jeep to move the motor. I always wanted a Gen3 in the Jeep : )


Posted Image


I'm just chucking this pic in for fun. I love my Jeep and volksrod : )


Posted Image


We were told by another member on this site that the LS3 sump would be too low with the CRS engine mounts. Bugger, they were right. I'll have to raise the mounts on the crossmember I think.


Posted Image


The pan hangs down a long way too.


Posted Image


Well here's a pic of the new motor in the smoothed out engine bay. It has a lot of potential. Once the motor is cleaned up it'll look sweet in there.


Posted Image


Posted Image


Posted Image


There isn't a heap of room at the back of the motor, but it's not too bad. I might end up having to trim the heater box a little, but I can live with that.

Posted Image


The flares look a lot better refitted this time. They fit better now and blend in more being the same colour as the car.


Posted Image

Posted Image

#119 Heath

Heath

    I like cars.

  • Administrators
  • PipPipPipPipPipPipPip
  • 18,322 posts
  • Name:Heath
  • Location:Eastern Suburbs, Melbourne
  • Car:Heavily Modified UC Sunbird Hatchback
  • Joined: 07-November 05
Garage View Garage

Posted 07 January 2010 - 10:37 PM

So are you as good with the mechanicals as you are the fabrication? lol

Are you going to alter the radiator panel where the headlights mount somehow? What have you got in mind there?

#120 orangeLJ

orangeLJ

    Yes, yes I do post alot!

  • Members
  • PipPipPipPipPipPipPip
  • 10,259 posts
  • Joined: 02-May 06

Posted 08 January 2010 - 06:53 AM

Steel, moulded flares would look sooooo much tougher then the bolt ons.

just whip up a few more cups of coffee and Im sure you could get it done!

Great work so far, definitely wish I had the patience for metal finishing, but my attention span is waaaay too short.

#121 dirtbag

dirtbag

    Street Machines current Biatch!

  • Members
  • PipPipPipPipPip
  • 1,927 posts
  • Name:Tim
  • Location:Sunshine Coast
  • Car:1995 V8 2wd hilux, LH torana ute, 1970 Volksrod, MK1 2 door escort, CJ6 Jeep, VX commodore wagon.
  • Joined: 29-December 09

Posted 08 January 2010 - 06:29 PM

I've seen a couple of torries with the flares moulded in, and I don't really like the look. That's my excuse for not making steel ones : ) hahaha

I didn't get a lot done today, but I did a bit.

I started on one of the rear flares. Of course it didn't fit properly, but I've come to expect that. The thing is to find the sweet spot where the flare still sits flat and needs the least amount of modification.

Just like the front ones they rear ones curl in towards the middle, so that'll get sorted out too.


Posted Image

Yeah, they're nearly the right shape!!!! : )


Posted Image


Hangs down a bit at the front too, so this will get fixed.

Posted Image


Once I'd found a spot for the flare that I was happy with and all the holes were marked out, I could mark where I'm going to cut the guard to give the tyre as much room as possible.


Posted Image


Here's the little bits I cut from the front of the flare.


Posted Image


This is how it will be once it's been fibreglassed.

Posted Image


The 'glass work is now done on this flare so tomorrow I'll untape it and see how it fits after the alterations. Then I can cut the metal : )


Posted Image

Posted Image

#122 76lxhatch

76lxhatch

    That was easy!

  • Members
  • PipPipPipPipPipPipPip
  • 7,156 posts
  • Location:Unzud
  • Car:SS
  • Joined: 04-August 08
Garage View Garage

Posted 08 January 2010 - 08:03 PM

Fixing the rear flares is something thats still on my future to-do list - do you have a pic of how you cut the larger part at the back? Thanks

#123 dirtbag

dirtbag

    Street Machines current Biatch!

  • Members
  • PipPipPipPipPip
  • 1,927 posts
  • Name:Tim
  • Location:Sunshine Coast
  • Car:1995 V8 2wd hilux, LH torana ute, 1970 Volksrod, MK1 2 door escort, CJ6 Jeep, VX commodore wagon.
  • Joined: 29-December 09

Posted 08 January 2010 - 08:48 PM

Hey there. The rear of the rear flare didn't need as much altering as the rear of the front flares.

I'll attach 2 pics. The first pic is the rear flare, and the second will be the front flare. These are the only pics I have of the flares cut.

I hope they're what you're after.


Rear flare

Posted Image

Front flare

Posted Image


If you noticed the horizontal cut at the top of the vertical cut, that's there to take the pressure off the piece I want to move. If I didn't cut it there I don't think the tape would hold it in shape and it would be under constant pressure, meaning it would probably break later.

#124 76lxhatch

76lxhatch

    That was easy!

  • Members
  • PipPipPipPipPipPipPip
  • 7,156 posts
  • Location:Unzud
  • Car:SS
  • Joined: 04-August 08
Garage View Garage

Posted 08 January 2010 - 08:59 PM

Awesome thanks

#125 _The Baron_

_The Baron_
  • Guests

Posted 08 January 2010 - 10:27 PM

You are one talented man!

Wish you had fitted up my flares.

Too late now but I wonder if a wrap around indicator like on the HG/HK/HT would look better as it would also flow with the wrap around look of the bumpers.

Edited by The Baron, 08 January 2010 - 10:40 PM.


0 user(s) are reading this topic

0 members, 0 guests, 0 anonymous users