Jump to content


Chrome Trim Dolly


  • Please log in to reply
11 replies to this topic

#1 _Yella SLuR_

_Yella SLuR_
  • Guests

Posted 14 February 2010 - 08:33 PM

Bout as exciting as watching paint dry, but today's creation from the Yella Garage. A chrome trim dolly. One end does door trims, the other does the sill trim profile. Very handy for knocking out dents in the chrome trim, or pulling it back out where the clips deform them on the back a bit.

Posted Image

Edited by Yella SLuR, 14 February 2010 - 08:39 PM.


#2 GML-31

GML-31

    Oh My, Don't you post alot

  • Members
  • PipPipPipPipPipPipPip
  • 5,239 posts
  • Name:Kev
  • Location:Highland Park
  • Car:too many
  • Joined: 08-November 05

Posted 14 February 2010 - 08:35 PM

ok so how many are you going to make for us all...c'mon Pat you have plenty of spare time

#3 _Yella SLuR_

_Yella SLuR_
  • Guests

Posted 14 February 2010 - 08:53 PM

Meh, it's been raining. Normally I hate filing, but after two days of rain, I was desperate for something to do. Trims where shitting me a bit, so I fixed em. Just waiting on Les to tool up new door belts for me.

Edited by Yella SLuR, 14 February 2010 - 08:54 PM.


#4 _Pete_

_Pete_
  • Guests

Posted 14 February 2010 - 09:21 PM

Nice tool there Pat, did you want to send me one too? :spoton:

#5 _beergut_

_beergut_
  • Guests

Posted 14 February 2010 - 09:27 PM

i want one
but seeing i lose all my tools can you not send me mine?
at least i can blame aussie post for it then lol

#6 _Yella SLuR_

_Yella SLuR_
  • Guests

Posted 15 February 2010 - 05:46 PM

Weird, I think Australia Post lost all of them!!!!

Works well, stick it in the vice and flatten out the face to the profile. Remove from vice, and fix up the back where the clips deforms them with the straight edge (back) of the plenishing hammer.

Edited by Yella SLuR, 15 February 2010 - 05:47 PM.


#7 Statler

Statler

    Heckler Extraordinaire

  • Administrators
  • PipPipPipPipPipPipPip
  • 6,282 posts
  • Name:Col
  • Location:Mackay Qld. Whitsundays for all you back packers!
  • Joined: 20-May 06

Posted 15 February 2010 - 06:20 PM

Does that make it a yella dolly?.......nice color! :)

#8 GML-31

GML-31

    Oh My, Don't you post alot

  • Members
  • PipPipPipPipPipPipPip
  • 5,239 posts
  • Name:Kev
  • Location:Highland Park
  • Car:too many
  • Joined: 08-November 05

Posted 15 February 2010 - 06:22 PM

got mine finished pat lol...

#9 _Yella SLuR_

_Yella SLuR_
  • Guests

Posted 15 February 2010 - 10:08 PM

Bah!!!

I have some Yella to paint on the other one, I could make it Yella!!!

#10 adgjl7

adgjl7

    Forum Member

  • Members
  • PipPipPip
  • 82 posts
  • Location:central qld
  • Car:lx hatch
  • Joined: 12-May 08

Posted 16 February 2010 - 01:42 AM

hi well i for 1 have trims that need fixin, any chance of showing us how it works an how to make one thanks

#11 _Yella SLuR_

_Yella SLuR_
  • Guests

Posted 16 February 2010 - 04:48 AM

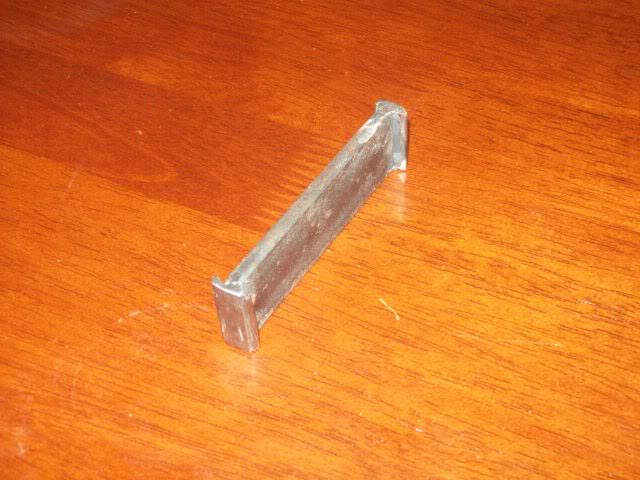
Grab a few hours and a bit of 25 x 3mm steel bar, cut off two 13mm pieces (I did it with a hack saw - confined space, so grinder was a no go), one for each trim profile, although gutter trim is better at 14mm. Place in vice, and file for about 2 hours per trim piece profile, although you will find the second one is quicker (warmed up I suppose). Hardest bit was filing a groove in the underside of the door trim bit to create the reverse angles on the back where it bends up and in (Makes sense?). Follow a process of file, trial fit, file, trial fit, file, trial fit, until pieces slide in and out of your trims through the undamaged part (I like a tightish fit, I find it plenishes better). Oxy ends only to another bit of 25x3mm steel bar so you can whack it in the vice. I didn't fully weld, as it would have burnt the edges off, and possibly reduced the width of the neck where it needs to slide through the trims. Dunno if you can see it, but the little amount of heat I did apply still discoloured the filed profile a bit. Life weren't meant to be easy.

So far, only place it doesn't slide is the tight radius on the back quarter window. I will solve that if an when I ever get a bit of trim dented there. By all rights it should be pretty strong, as it has lots of shape, but yeah, possibly a 10mm long dolly may be required for that bit.

Once finished, plenish trims by placing the dolly in the vice and using like an anvil with soft sideways motion, being careful not to cherry the trims, hitting flat, and making sure you hit over the 25mm wide bit in the vice. If you hit the dolly on the edge, you will put a crease into the trim.

Underside of door trims, slide dolly in, move to damaged back section, place on a soft block of wood, hammer with flat wedge shaped back of plenishing hammer and bring edges up to match adjoining.

Fixed trim.

Perceivably, you can also use the dolly to recurve/bend the trims as well if required, i.e. turn a spare piece of something, into a new alterntive piece. Bwahahaha, watch out UC chrome trims sitting in the shed, you are endangered!!!

There you go, easy as, just takes some time and patience.

Edited by Yella SLuR, 16 February 2010 - 04:53 AM.


#12 adgjl7

adgjl7

    Forum Member

  • Members
  • PipPipPip
  • 82 posts
  • Location:central qld
  • Car:lx hatch
  • Joined: 12-May 08

Posted 17 February 2010 - 02:20 AM

i will have a go next week when i have abit more time,fingers crossed hopefully i can make it work thanks heaps.


0 user(s) are reading this topic

0 members, 0 guests, 0 anonymous users