Jump to content


PROJECT 68 - 1968 HK Panel Van


  • Please log in to reply
22 replies to this topic

#1 _DeNMaSteR_

_DeNMaSteR_
  • Guests

Posted 15 April 2010 - 02:44 AM

Unfortunately my new project isn't a Torrie but i figured i would start a project thread anyway for those that are interested!.....Some of you may remember me from a long while back when i was building the blown Tremor LH......(which was actually before the forum got upgraded to what it is now...Posted Image)! unfortunately I haven't been on here much since then but have still had a ton of different cars including two other Torries but I will leave the explanation of what happened to Tremor for a bit later.....and if there is any interest I could post a couple of the last photos I took..

A bit of history behind the purchase........I moved to Melbourne around 3 years ago & didn't really have anywhere to build a car as i live inner city and just having a car park is a miracle let alone having your own garage so that has been a big show stopper plus it didn't help that the crew I work with in the corporate world had no interest in cars.......but the HP bug has still had me firmly in its grip and I found out that I was going to be a Dad a few months back so I decided that now is the time to get something while I have the $ and I got the Mrs to agree that it will be a good "Teaching Aid" for the bubz Posted Image
I started out looking for a new Torrie project and I was blown away by the amount of junk that is out there!!!! and even more so by what people are asking for them!Posted Image at the time the aim was to spend a bit more then i normally would and get something that had a good body and paint and I wasnt too fussed about the drive-line as I would probably change most of it anyway, so a long story short when i had almost given up looking I happened to stumble across the HK and I instantly wanted it, mainly because of how unique it is but also because the money spent in the right places and it provided a good base to work from....after a bit of negotiation I flew up to QLD picked it up and sent it back to Vic......and this is where the project starts,.

So obviously its a 1968 HK Windowless Panelvan, running a worked 308 and a heap of other good gear, the guy i bought it off did a great job of completely rebuilding it around 4-5 years ago (he had quite a few killer cars in the garage)...some may think it is pointless project as it is already had a heap of work done and is already great streetcar however the original build has started to age quite a bit and as with all streetcars its hard to maintain the original build quality when they are driven quite a bit.

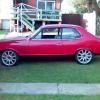
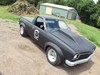
The purpose of this build is basically to take the mint body, do a complete strip down, update & refresh and then take it to the next level, I have provided some pics that were taken a while back when the van was first finished and I will provide some more details on the planned next steps soon!

Attached File  16765_182900627868_616327868_3051536_3137348_n.jpg   69.03K   94 downloads Attached File  van1web.jpg   113.84K   122 downloads Attached File  van2web.jpg   107.64K   123 downloads Attached File  van3web.jpg   152.65K   108 downloads

Edited by DeNMaSteR, 15 April 2010 - 02:51 AM.


#2 yel327

yel327

    Oh My, Don't you post alot

  • Members
  • PipPipPipPipPipPipPip
  • 13,121 posts
  • Joined: 10-February 08

Posted 15 April 2010 - 07:39 AM

Good on you. HK vans are pretty scarce today. I'd be putting it back to it's heritage with a SBC rather than a 308, and try to fins an original HOLDEN embossed tailgate.

#3 lcgtr1970

lcgtr1970

    Forum Fixture

  • Members
  • PipPipPipPipPip
  • 1,702 posts
  • Name:Jordan
  • Location:having a beer, looking at the torana
  • Joined: 13-March 06

Posted 15 April 2010 - 08:08 AM

sweet ride. whats the plans for colour etc? i like the idea of the embossed tailgate...havent seen too many of them. how hard would it be to find one or are they being re-made?

#4 yel327

yel327

    Oh My, Don't you post alot

  • Members
  • PipPipPipPipPipPipPip
  • 13,121 posts
  • Joined: 10-February 08

Posted 15 April 2010 - 08:19 AM

Head inland. We've found a few originals on complete HK utes over the years.

#5 _DeNMaSteR_

_DeNMaSteR_
  • Guests

Posted 15 April 2010 - 08:53 AM

The embossed tailgate is a great idea actually, i am assuming this is the type of thing your referring to:
Attached File  !BoMg(sQCGk~$(KGrHqQOKigEuZyO2DdRBLmjp+g(6!~~_1.JPG.jpeg   25.66K   82 downloads


The only problem is trying to find one! :)

The current colour is Silver Mink from the HK Monaro and that will be staying as it is Immac and the body is spotless. I did consider the Chev as i know it would take it back to being more of an original car but I have always had a thing for the standard stroke 308's and have had them in my last 3 cars.....The van has run an 11.50 pass with a 100 shot of the gas on it which is pretty bloody good for a little 308 in a 2.2 ton car, the aim at the moment is to run those times without the gas and once it gets to that point we will run a 150 shot just for a bit of fun ;)

Some shots of the engine bay, this one is when it was first finished:

Attached File  n574984061_1384507_7361.jpg   57.14K   116 downloads

and this one is what it currently looks like:

Attached File  Van-Wshop-1.jpg   183.88K   98 downloads


The interior when it was first done:
Attached File  interior1.jpg   77.74K   87 downloads


Attached File  interior rear.jpg   51.36K   83 downloads


So, I imagine the next question will be whats wrong with it? well that will come in the next post Posted Image

a much better example of the tailgate here:
Attached File  post-51627-1186299117529723771.jpg   117.6K   74 downloads


#6 gtrboyy

gtrboyy

    Lotsa Posts!

  • Members
  • PipPipPipPipPipPip
  • 3,145 posts
  • Location:SYDNEY,NSW
  • Joined: 07-November 05

Posted 15 April 2010 - 12:14 PM

One very nice van.

Before that van was finished the same owner built a ute almost identical but with a smaller scoop.I think that is what the driveline came out of as I remember the ute was for sale as a roller.

#7 _DeNMaSteR_

_DeNMaSteR_
  • Guests

Posted 15 April 2010 - 01:12 PM

Yeh i saw some photos of the ute, it was so similar that i actually had to check that the van part wasn't jut welded on :) and yeh the scoop on the ute was a 4' Camaro Cowl and the one on the van is a 6', i definitely don't make any claims on the existing build as the guy who built it did a great job and a lot of work has gone into it.....

The van is currently in my workshop and I have already started to strip it down, the plan is to have it back in one piece and licensed by the end of the year which should be achievable considering i don't need to worry about P&P, plus I have learnt a few expensive lessons on project planning from the past builds so this should help minimise any major delays .....fingers crossed...Posted Image

#8 _doogs_

_doogs_
  • Guests

Posted 15 April 2010 - 04:21 PM

Nice HK mate, good job.
I know what you mean about Torrie searching, I have come across some average cars at ridiculous prices
in my current search for an LX/LH for my younger brother.

#9 dirtbag

dirtbag

    Street Machines current Biatch!

  • Members
  • PipPipPipPipPip
  • 1,927 posts
  • Name:Tim
  • Location:Sunshine Coast
  • Car:1995 V8 2wd hilux, LH torana ute, 1970 Volksrod, MK1 2 door escort, CJ6 Jeep, VX commodore wagon.
  • Joined: 29-December 09

Posted 15 April 2010 - 06:42 PM

Mate, that HK van is beautiful. Can't wait to see what you do to it.

I say leave the holden motor in there. Unless you're talking big block. A nice 540 would be lovely in there : ) I know there's bigger motors around, but bang for your buck makes the 540 one of the best. Either way, I hate you for not giving that van to me : )

#10 Tiny

Tiny

    Oh My, Don't you post alot

  • Administrators
  • PipPipPipPipPipPipPip
  • 10,018 posts
  • Name:Tiny
  • Location:Sydney
  • Joined: 04-February 07

Posted 15 April 2010 - 09:15 PM

Hey Luke!

This looks TOPS mate!

Torry or not, I'm glad youve shared this with us! Cant wait to see what you do with this one :)

Congrats on the news of the new bub too!

Thanks for sharing and catch ya round the traps!

#11 wot179

wot179

    Green Eggs and Spam

  • Members
  • PipPipPipPipPipPipPip
  • 6,784 posts
  • Name:Jesus Bloody Christ
  • Location:Sunny Santa Maria
  • Car:Goon
  • Joined: 06-February 09

Posted 15 April 2010 - 10:15 PM

Looks good.I dont think there is a combo better than Silver Mink with red trim in any Holden ever built.

Im watching with interest.

#12 gtrboyy

gtrboyy

    Lotsa Posts!

  • Members
  • PipPipPipPipPipPip
  • 3,145 posts
  • Location:SYDNEY,NSW
  • Joined: 07-November 05

Posted 15 April 2010 - 10:22 PM

I liked that ute,wanted to buy it..just couldn't get my act together at the time lol.

#13 _DeNMaSteR_

_DeNMaSteR_
  • Guests

Posted 17 April 2010 - 03:08 AM

Alrighty then......so here are the basic specs as she stands today:

-----------------------------------------------------

Body: Painted in silver mink, body and paint are both in excellent condition, zero rust and need very little work,with no body mods except for the 6 inch camaro cowl its also running standard rear arches (untubbed).

Motor: Holden 308 (Standard Stroke,) Genuine Group-A Walkinshaw 4-bolt block, Steel crank, Group-A rods, Larry Perkins race series pistons (30thou), full ARP Stud kit, all balanced etc, Solid Cam.....VN Heads with extensive porting, screw in studs, guides and crane platinum series rockers, torque power manifold, 750 Mighty Demon Carb with k&n filter.

Forced: N.O.S kit installed currently running a 100 shot

Fuel System: 1) Modified tank with 1/2 feeds & lines, Holly Blue pump & Reg 2) Custom alloy C16 tank in the bay with a 2nd Holley Blue pump & reg

Ignition: MSD 6AL & MSD Adjustable timing kit.

Gearbox: Fully Manualised Traumatic, steel input shaft, steel hubs, bigger clutches etc... built by precise automatics running a 4000 Taipan converter, pro ratchet shifter

The Rear End: Shortened 9-inch, 3.7 gears with a mini spool, unsure what axels its running

Suspension: Front end - 90/10 shocks new tie rods ball joints bushes etc. Rear - Custom king leaf springs

Brakes: HQ brakes all round. it has 15 x 4 and 15 x 8.5 weld stars with a 255.60.15 rear

Exhaust: Custom pipes, twin 3 inch mandral system, twin gonzo mufflers, and twin spiral resonators

Interior: custom Interior with red leather bench, full custom 1 piece hoodling which continues thru to the back of the car, Autometer gauges etc..

Other: All mods have been engineer approved and car is Mod Plated...

Now i just realised it is friggin 3am so im getting my ass to bed ...more to come soon :)

Edited by DeNMaSteR, 17 April 2010 - 03:10 AM.


#14 _LJ355_

_LJ355_
  • Guests

Posted 17 April 2010 - 04:34 PM

Awesome van mate i have a magazine somewhere with a feature on it

Good luck with it

#15 _DeNMaSteR_

_DeNMaSteR_
  • Guests

Posted 17 April 2010 - 05:31 PM

Thanks mate, Hopefully it is only going to get better form here :) I would really love to see that article if you still have it and if its not to much trouble? here's a shot of it sitting in the w/shop ready for the strip down

Attached File  Van-workshop-1_0139.jpg   188.91K   33 downloads


Edited by DeNMaSteR, 17 April 2010 - 05:37 PM.


#16 _DeNMaSteR_

_DeNMaSteR_
  • Guests

Posted 17 April 2010 - 08:14 PM

I guess this post marks the beginning of the re-build and I figured that it would be worth sharing a bit more detail on how I go about the planning side of the project as it may be useful for people who are wondering where to start......if theres no interest in this level of detail just let me know & I will cut it back to updates only ;) its probably also worth noting that I am mildly OCD, so there will be cases where I will re-do some things several times until I am happy with it (regardless of how small they are)....so if this happens, don't worry I haven't completely lost the plot Posted Image

My first step when starting a re-build is to have a really good look over and under the car and identify/list as much of the "Stuff thats already broken, needs work, needs to be replaced or will give me grief when getting it licensed", this list remains a work-in-progress and expect it to grow as the car comes apart, initially it is only for items that are an issue or need work now, it doesn't include any new mods, improvements or customisation....yet. I find that this list is a good way of identifying area's of the build that you may have otherwise overlooked.

1) Stuff thats already broken, needs work, needs to be replaced or will give me grief when getting it licensed:
  • No Gauges - The only working ones are Fuel Pressure & Water Temp, it doesn't even have a fuel gauge
  • Gauges Under Bonnet are broken
  • No windscreen wipers - The wipers are there but have no control arm or drive, this is becuase the auto electrician decided the main arm mount would be a good place to mount the fuse box
  • No Seatbelts......?!
  • No Seals on the Tailgate or the spare tyre door...fumes fumes fumes
  • There are around 5 holes in the floor which have been left open, 2 of them are just missing drain plugs
  • No bonnet Cable - Pay attention to the red piece of wire hangin out of the grill :)
  • Split front brake line
  • No Park Brake
  • No Inspection Cover = Oily mess under car
  • The Exhaust sits around 1-inch back from the body so all of the fumes end up inside....and they are really friggin strong sometimes!
  • Right Hand Extractor has broken welds on one pipe where it enters the collectors
  • The starter is missing the propper earth clip and just has a crimp connector instead (which is supplied by the manufacturer as they don't make the clips anymore) problem is this just falls off randomly......
  • Underneath of the rear floor is full of crap including old bolds, sawdust, sandpaper old brake lines and more
  • The battery is very close to the end of its life and is starting to struggle due to the infrequent use
  • Numerous Leaks (all minor) currently coming from the box, tranny cooler, sump, fuel pickup on the tank, bottom of the water pump and possibly the rear mains (i need to have a closer look at this one)


Once I am happy with the initial list, I will then use it to create the first cut of the project work plan, the work plan outlines the actual work thats required to fix the issues listed above, this plan will generally get quite big so I will normally break it up into different sections. For this project I have broken the work into the following sections:

1) Performance - Includes the driveline and all supporting components

2) Safety, Licensing & Regulations (eg: ANDRA, CAMS etc...)

3) New Modifications - This is where you list the new plans for the car eg; blown BBc, tubs etc :)

4) Appearance & Cosmetic

It may seem like a lot of work and possibly even overkill for planning a car project however it shouldn't take more then 2-3hours to put together and can be the difference between a successful project and one that ends up being sold off half finished and in pieces. It also helps keep the project on track because you identify the roadblocks up front that would normally add months to your build and end up costing big $...I will break out the work in each section soon Posted Image

Cheers

Edited by DeNMaSteR, 17 April 2010 - 08:15 PM.


#17 _OUTLAWS_

_OUTLAWS_
  • Guests

Posted 17 April 2010 - 08:29 PM

That is Joel's old van........I have seen it on many occasions......My mate ended up with the ute.......

#18 _DeNMaSteR_

_DeNMaSteR_
  • Guests

Posted 17 April 2010 - 10:19 PM

That is Joel's old van........I have seen it on many occasions......My mate ended up with the ute.......


It sure is, I bought it off him a few months ago and sent it back to Melbourne on a truck! he has built some serious cars eh?!! He showed me a couple of the shots of the van when he bought it as a purple shell, was an amazing build and he spent the $$ in the right places, hence the reason i bought it! Posted Image I couldn't believe how similar the ute was either, was pretty much identical without the back on it...did your mate buy it as a roller? does it still look the same?

#19 _OUTLAWS_

_OUTLAWS_
  • Guests

Posted 17 April 2010 - 10:23 PM

Yeah my mate bought it as a roller........

#20 _DeNMaSteR_

_DeNMaSteR_
  • Guests

Posted 19 April 2010 - 07:34 PM

Couple of pics taken before I started ripping bits out, Its going to be hard to improve on the finish of the back of the van, its nice and simple but looks great! so the focus is on cleaning up the under flooring, soundprrofing and some new tubs.....


Posted Image


Posted Image


Underneath the two MDF panels the main floor of the van is virtually perfect, theres just a bit of rubbish and some of the original pipes & fuel lines remain...the only downside are the wheel arches...see pics below:

Posted Image


The floor has been sealed in the first section, the rear section shows the orginal fuel tank and theres no deadening or sound proofing in this area at the moment
Posted Image


Posted Image


Posted Image


Posted Image


Posted Image


Posted Image

#21 _Big T_

_Big T_
  • Guests

Posted 19 April 2010 - 11:22 PM

I like the project plan mate and will certainly take note of your method. I'm looking forward to seeing this one unfold thats for sure.

Cheers,

T

#22 _DeNMaSteR_

_DeNMaSteR_
  • Guests

Posted 10 May 2010 - 01:42 AM

I haven't been able to get out to the w/shop for the past 2 weeks....but I finally managed to spend a good couple of hours there this w/end! So here's a real quick update, will get some pics up soon.........first thing is that the workshop is finally set-up, i needed to start from scratch as all my tools are still in WA :( so it has been a slow and expensive exercise

On Fri night I got stuck into a few small things:


  • Correction to an earlier post: the Existing Battery is well F@#Ked to put it nicely and it nearly killed me when i tried to start it, I heard a hissing sound, turned around to see battery acid and fumes pouring from the breather caps of the battery.......so that has been removed along with a pair of busted/corroded terminals and the old battery box is also gone....Posted Image
  • First Rare spares order also arrived which included all new seals for the rear doors inc the spare tyre door, new bonnet cable set and a Trimatic Speedo cable to suit HK, new starter clip (amazing how such a small item can cause so much grief!)
  • Finally found a new inspection cover, which I stripped back to the tin, removed the surface rust and gave a fresh coat of paint..
  • Gave the rear of the van a full clean out and started to strip it back and prep for the seal and sound proofing....
  • Started on the engine bay....dropped the coolant, flushed the engine and removed a heap of piping...

Tonight I removed the whole exhaust which was a bit of an experience, you don't realise how much it helps to have a mate around until you have to do it on your own! :| its a twin mandrel setup with twin Gonzo mufflers and Twin Gonzo resonators and i can promise you that it weighs a fair bit, whoever did the pipes did an awesome job, they just need a good clean up + coat and I will be doing some mods on the pipes from the diff back before they get coated. During the removal of the pipes I spotted a fault that I think will be causing a lot of the grief thats happening with the electrics, the main 4G+ cable that runs most the length of the car has been cut right through to the copper in more then one place and in one section it looks like it may have been caught in a jack or a stand and has actually been cut by the main chassis which would have totally shorted the whole thing out......I have added this to the list and will be re-running the whole thing

I took one look at the extractors and decided i will tackle them next but not tonight! :)


#23 gtrboyy

gtrboyy

    Lotsa Posts!

  • Members
  • PipPipPipPipPipPip
  • 3,145 posts
  • Location:SYDNEY,NSW
  • Joined: 07-November 05

Posted 10 May 2010 - 07:53 AM

Think I've got a magazine here somwhere with a feature on it also,think it was Extreme Holdens...I'll let ya know if I find it.


0 user(s) are reading this topic

0 members, 0 guests, 0 anonymous users