Jump to content


Is this weld ok?


  • Please log in to reply
17 replies to this topic

#1 _Viper_

_Viper_
  • Guests

Posted 15 June 2010 - 06:57 PM

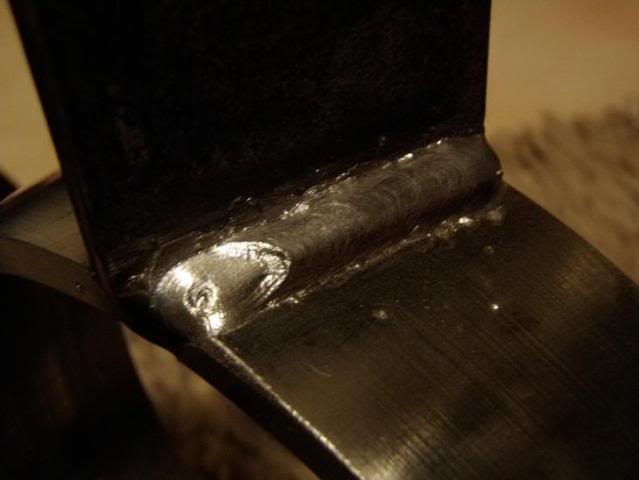
Hey guys, just wondering if anyone could give their opinion on this weld... Sorry bout the crap phone pic.. Ill get a decent pic on my gf's camera tonight if anyones interested. But this is going to be a crossmember for part of the rear suspension and it has to pass an engineers inspection plus id like to know its safe for my own peice of mind. Im getting all the other welding done professionally it was just that this part I had to do in the car and isnt easy to get the car to a workshop with no rear diff.

On this one I had actually already done a weld underneath... well I did a tack at each end then welded in the middle but I ended up with 3 seperate runs and it looked abit poo, so I ground the weld down to near on nothing then ran this bead
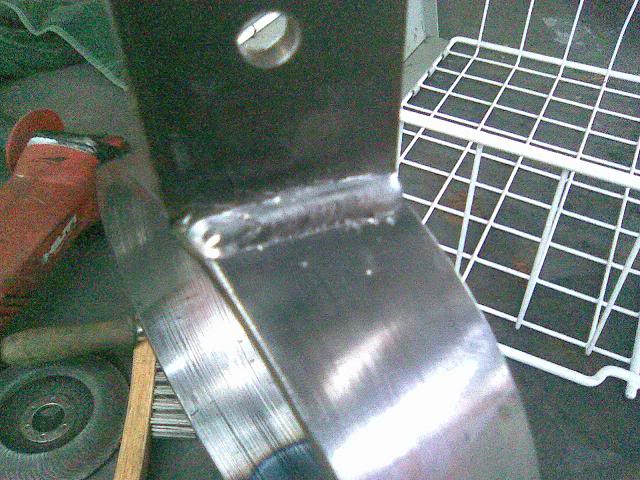
Posted Image

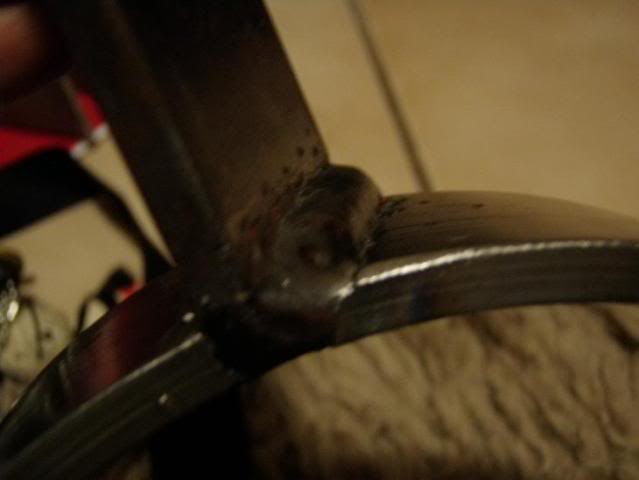
And this is a pic of the inside... The blue line on the left is from the weld in the first pic.
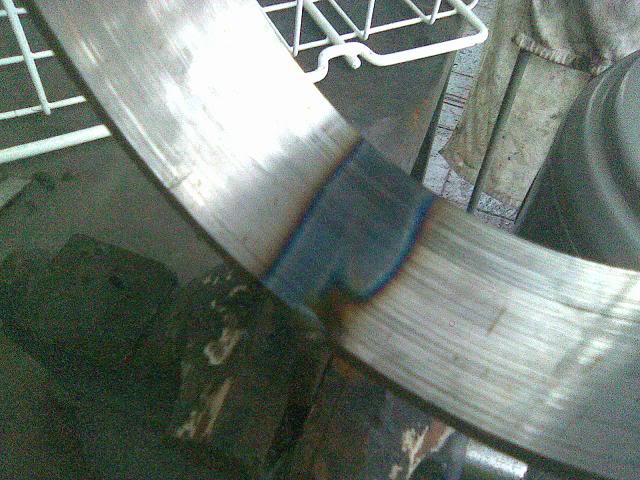
Posted Image

So does that blue line mean its got good penetration and is that how you tell if the weld is good? and you can see the line on the right the blue line stops before the end... does that mean that one doesnt have good penetration at the end?

Also in the first pic you can see at the end of the weld on the left the shape of the weld sort of changed to be more flatter... it seemed to do this every time. any idea what causes this? (ya will probly have to wait till I get a better quality pic to see what I mean.


Cheers guys.

#2 _Bomber Watson_

_Bomber Watson_
  • Guests

Posted 15 June 2010 - 07:04 PM

Mig will pretty well always start a bit domy then flatten out as you put heat into the metal, one of the down sides of cold start welding (mig and stick) opposed to hot start (oxy and tig).

thats about all i know, and will probably be told im wrong, but the weld looks ok to me...

I'd be happy with it :P

Cheers.

#3 _hutch_

_hutch_
  • Guests

Posted 15 June 2010 - 07:53 PM

looks ok apart from a bit of undercutting,to get a nice smooth weld do small circles as ya do ya run.
Phillip

#4 _BlownOutlaw_

_BlownOutlaw_
  • Guests

Posted 15 June 2010 - 08:47 PM

The top pic kinda looks like aluminium, but the blue in the bottom pic makes me think its stainless.

Need a photo looking from the side along the weld. It doesn't look to bad from what I can see. If I had to pic something from those photos I would say there is a bit to much of the weld on the round section and not enough on the vertical section. But if you have done a couple of runs its difficult to tell from the pics. Its possibly not undercut, its just that there is three separate layers.

#5 xu1kid

xu1kid

    Forum Fan

  • Members
  • PipPipPipPip
  • 364 posts
  • Name:anthony
  • Location:Albury
  • Car:lj gtr xu1
  • Joined: 30-December 08

Posted 15 June 2010 - 09:19 PM

its hard to see but if its taking some wieght id be putting another weld along the vertical plate and the weld you have already done,

#6 TerrA LX

TerrA LX

    Fulcrum Fixture

  • Members
  • PipPipPipPipPipPipPip
  • 14,241 posts
  • Location:Sid 'n' knee
  • Joined: 31-May 06

Posted 15 June 2010 - 11:00 PM

So does that blue line mean its got good penetration and is that how you tell if the weld is good? and you can see the line on the right the blue line stops before the end... does that mean that one doesnt have good penetration at the end?

Cheers guys.


Penetration means you can see the weld come thru the other side, the blue mark are only burn marks.

Also in the first pic you can see at the end of the weld on the left the shape of the weld sort of changed to be more flatter... it seemed to do this every time. any idea what causes this? (ya will probly have to wait till I get a better quality pic to see what I mean.


Cheers guys.


This is caused from less feed of the weld wire, causing the heat to rise, the weld pool is burning in further.

FWIW the welds look good but may not quite pass a test at TAFE for example due to the lack of penetration.

#7 TerrA LX

TerrA LX

    Fulcrum Fixture

  • Members
  • PipPipPipPipPipPipPip
  • 14,241 posts
  • Location:Sid 'n' knee
  • Joined: 31-May 06

Posted 15 June 2010 - 11:26 PM

FWIW the welds look good but may not quite pass a test at TAFE for example due to the lack of penetration.


I take that back, on closer inspection the weld appears to be sitting up, especially on the bracket you have welded onto the ring, this will lead to cracking or break away if it is loaded. Sorry.
Either not hot enough or really needs to be TIG welded based on not being able to eyeball it myself.

Either leave a gap for the weld to flow of chamfer the end to get the heat into the join.

#8 _Viper_

_Viper_
  • Guests

Posted 15 June 2010 - 11:27 PM

Ok here's a couple of better pics, Mmm I needa get myself a camera like this!

Posted Image

Posted Image

So There should actually be metal "bulging" thru the other side a little for 100% penetration? those burn marks would mean its pretty close tho eh? say 5mm out of the 6mm?

My welder was at its highest setting... for 6mm steel it said Power: 8 Wire feed: 16, But on the test welds I did on a scrap peice the wire speed seemed abit fast and was sounding like a machine gun, turning it down to 13 gave a nice crackle.... Higher wire speed would of given more penetration tho eh? I just have to move faster...

Oh and its all Mild steel btw.

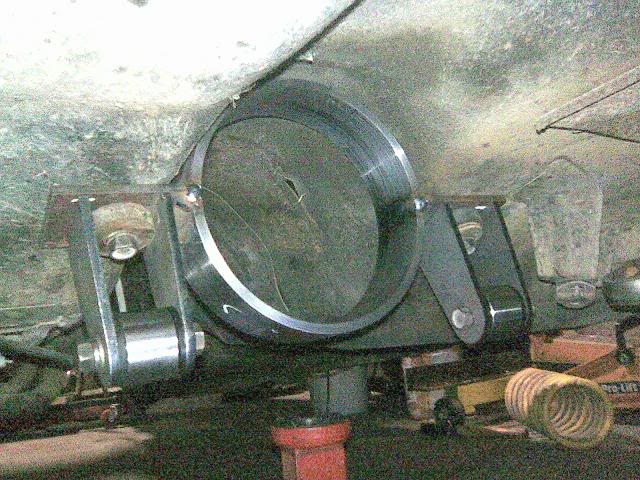
This crossmember wont really be taking much weight, more being pushed back and forth... my upper control arm mounts are being welded to this crossmember.
Posted Image

The brackets still need to be cut down abit shorter and welded on so will be abit less leverage from them.

#9 TerrA LX

TerrA LX

    Fulcrum Fixture

  • Members
  • PipPipPipPipPipPipPip
  • 14,241 posts
  • Location:Sid 'n' knee
  • Joined: 31-May 06

Posted 15 June 2010 - 11:35 PM

There is a technique that involves three welds for this application, research it, but roughly explained you have to lay one weld down in the middle first then two on top, one on the band and one on the bracket, both covering each side of the first weld. Then possible a forth on top of these two again.
Sounds overkill but thats engineering for ya.

If you grind into the present weld, concentrating on the band you should get the penetration needed.
Use a test piece.
Albeit, how it is presently may last forever, you seem to be capable enough.
You should weld it correctly for piece of mind in this application.

Edited by TerrA LX, 15 June 2010 - 11:38 PM.


#10 _Viper_

_Viper_
  • Guests

Posted 15 June 2010 - 11:57 PM

Ahh yea, when the welders weld pipes at work they weld like that... the first is a "root" run and then yea they lay another run on one side then another on the other side.

I might just take the peice down to my engineer before I paint it and see if he is happy

#11 ls2lxhatch

ls2lxhatch

  • Members
  • PipPipPipPipPipPipPip
  • 5,332 posts
  • Location:Perth
  • Car:LX Hatch
  • Joined: 29-May 06

Posted 16 June 2010 - 12:13 AM

I doubt the welds will ever be under enough stress to fail. It looks like the mounting bolts will take the bulk of the load.

Have you welded both sides of the plate to the ring?

#12 TerrA LX

TerrA LX

    Fulcrum Fixture

  • Members
  • PipPipPipPipPipPipPip
  • 14,241 posts
  • Location:Sid 'n' knee
  • Joined: 31-May 06

Posted 16 June 2010 - 01:12 AM

I doubt the welds will ever be under enough stress to fail. It looks like the mounting bolts will take the bulk of the load.


Agree with Ls2.
The weld taking the most load will be next to the bolts.

Edited by TerrA LX, 16 June 2010 - 01:13 AM.


#13 _Viper_

_Viper_
  • Guests

Posted 16 June 2010 - 07:54 AM

Yea hehe I actually thought of that this morning in the shower...

But yea was welded top and bottom... Ill get the other bits welded professionally with a higher powerd welder then :)

Cheers guys

#14 _SS Hatchback_

_SS Hatchback_
  • Guests

Posted 04 July 2010 - 11:56 PM

going by the second pic seems like plenty penetration, where you can see it has past through or welded below the surface .Does not have to go right through.

#15 _the gts_

_the gts_
  • Guests

Posted 05 July 2010 - 02:31 AM

Looks like you were a bit shy on the amps and the dimple in the end of the weld is a stress point where a crack can start.

you could throw a needle gun over it to de-stress it if you were keen

#16 wot179

wot179

    Green Eggs and Spam

  • Members
  • PipPipPipPipPipPipPip
  • 6,784 posts
  • Name:Jesus Bloody Christ
  • Location:Sunny Santa Maria
  • Car:Goon
  • Joined: 06-February 09

Posted 05 July 2010 - 05:47 AM

You could try backing the wire off just a scratch and moving a little quicker.

Just a little of both.

#17 enderwigginau

enderwigginau

    Admin Wrangler

  • Moderators
  • PipPipPipPipPipPipPip
  • 2,000,527 posts
  • Name:Grant
  • Location:Brisneyland
  • Car:76 LX Sedan, 4 seater
  • Joined: 04-February 07

Posted 06 July 2010 - 02:05 PM

I think everyone will agree, your unit should be quite capable enough with a tiny increase in technique, which you seem happy to take on board.

It is surprising what you can actually do with a home welder.

I have a hand me down from my brother - an old US unit that pumps bloody awesome running on 240V, hehehe cheaper just to "convert" them from 110V by changing plugs. Puts many other "lower" power units to shame.

If you can afford a gas-set to upgrade your own unit, do it as it will make it much easier to do even simple welding.

Grant..


#18 _Viper_

_Viper_
  • Guests

Posted 06 July 2010 - 10:38 PM

Yea mine is a Gas welder, 200amp CIG weld Transmig unit


0 user(s) are reading this topic

0 members, 0 guests, 0 anonymous users