Jump to content


First attempt at Rust repair (Pics)


  • Please log in to reply
42 replies to this topic

#1 _73LJWhiteSL_

_73LJWhiteSL_
  • Guests

Posted 03 January 2011 - 08:56 PM

Gday all,

I am still planning to get my LC 2 door running sometime, but need to learn rust repair first.

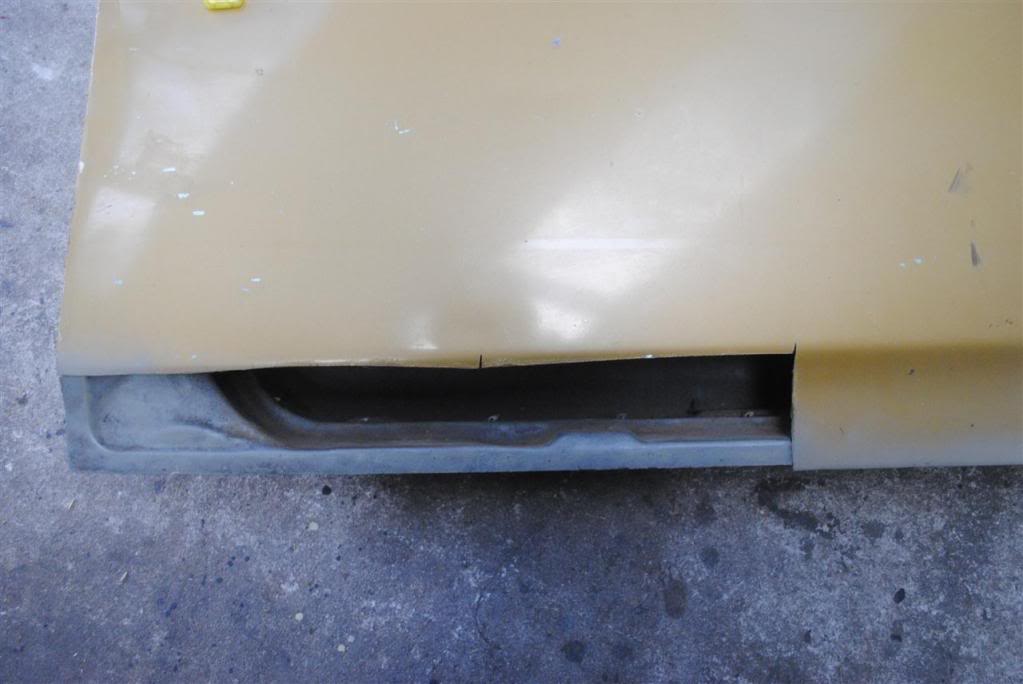
I've been playing with my housemate's Gas MIG a little over the last few months, just welding crap together but wanted to try something a bit closer to a car so I thought a car door was a good start so for $5 from evilbay I scored this:

Posted Image

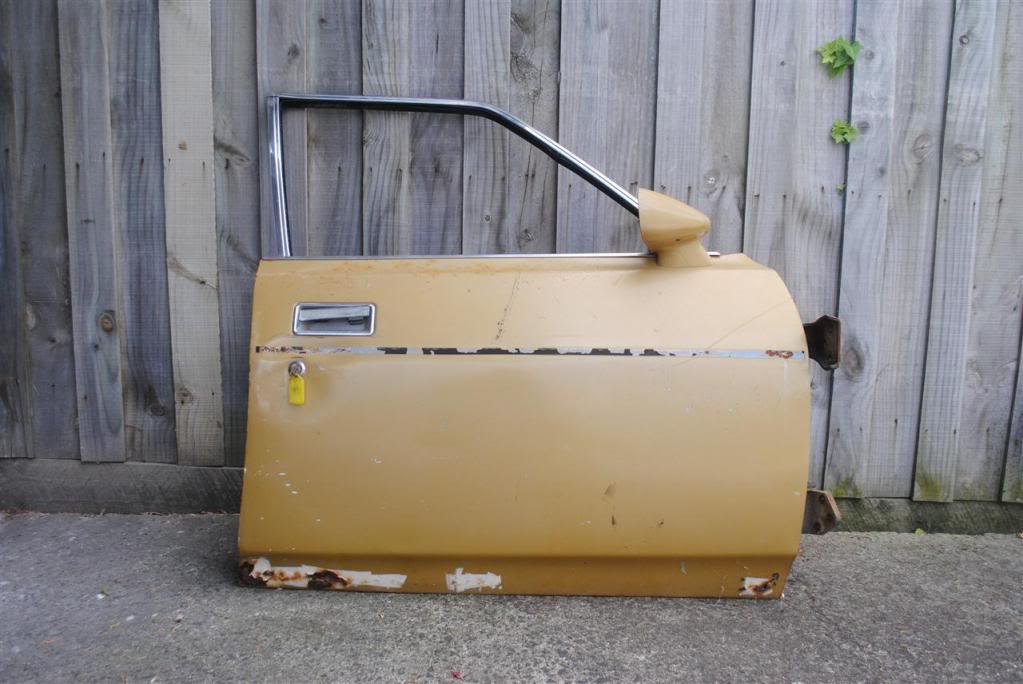
XB Falcon door (Fords are good for something, practise :stirpot: ) with a fair amount of rust.

Posted Image

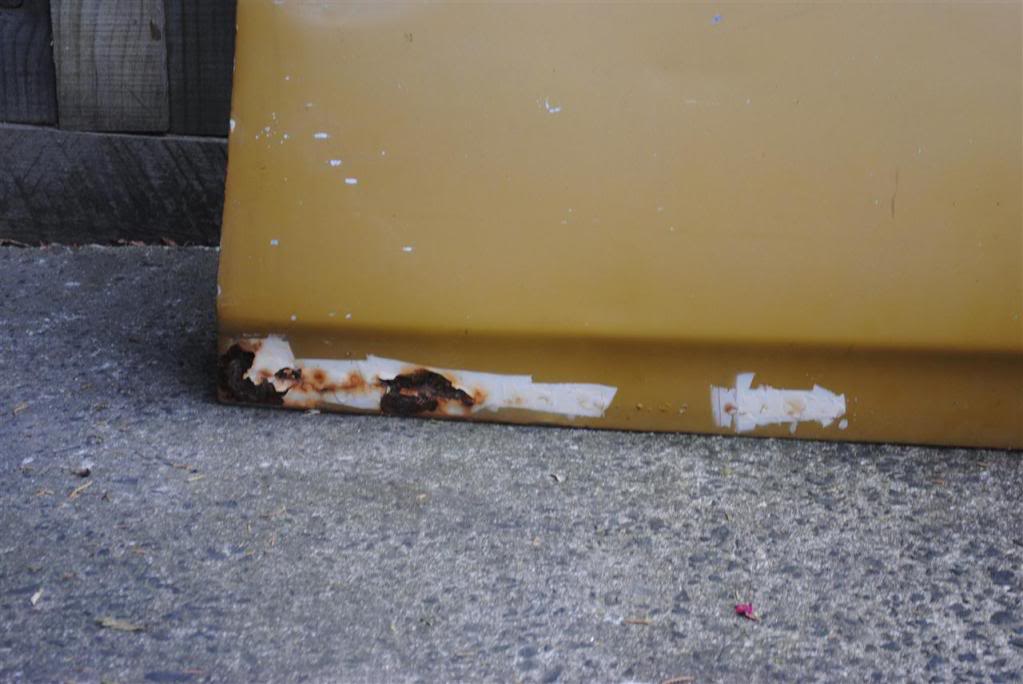
I had no trouble ripping into the door skin with the grinder and a cut off disc, and then unfolding the bottom of the doorskin, leaving the frame untouched.

Posted Image

Posted Image

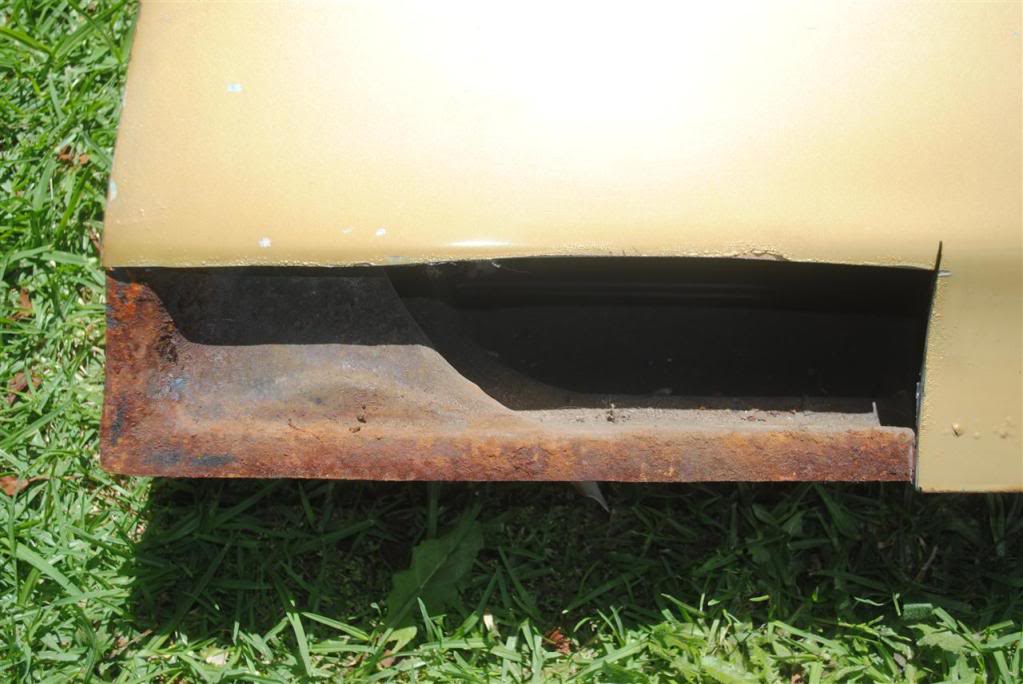
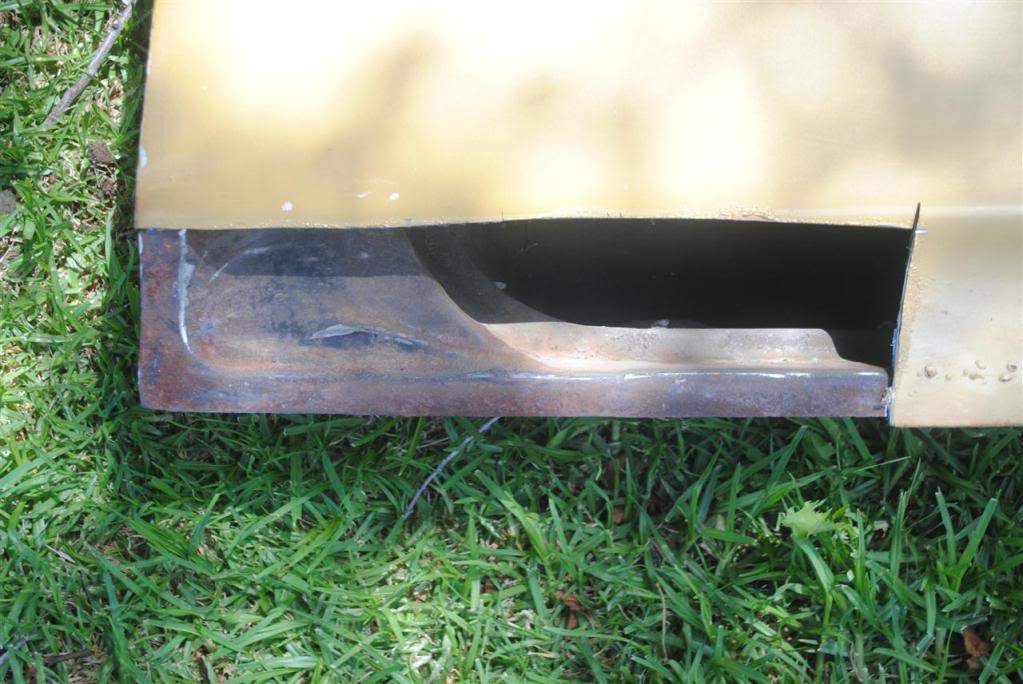
Rust treated the door frame

Posted Image

Then set about making a replacement piece from some galvanised steel sheet dad got from his sheetmetal bloke.

Posted Image

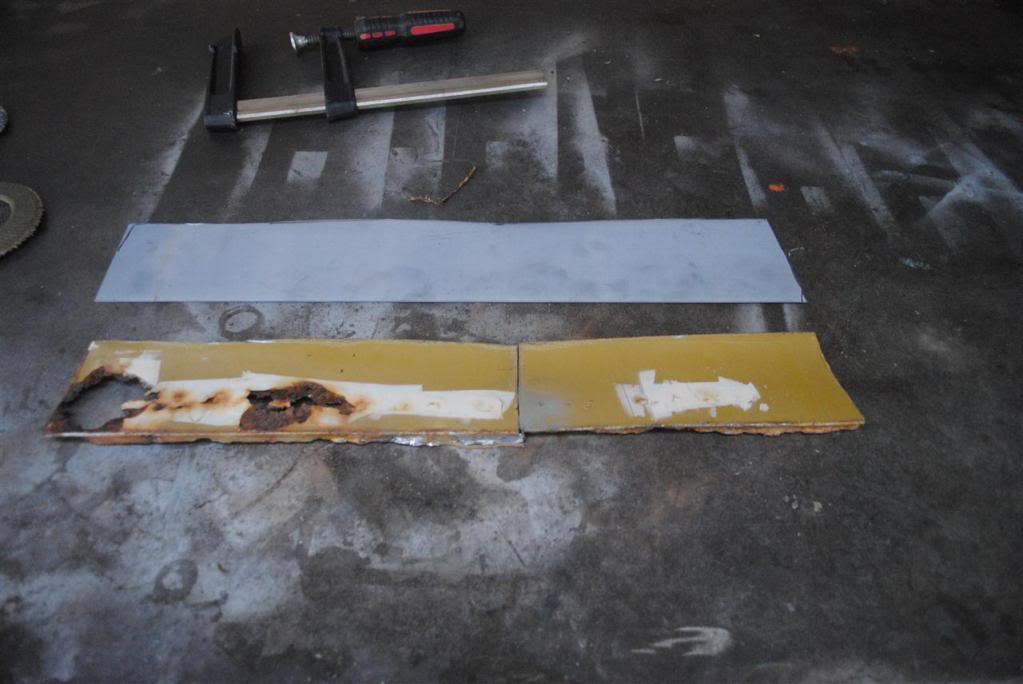
I had complicated it by cutting along the bend. Which made getting the replacement piece to fit nicely a pain in the bum.

Posted Image

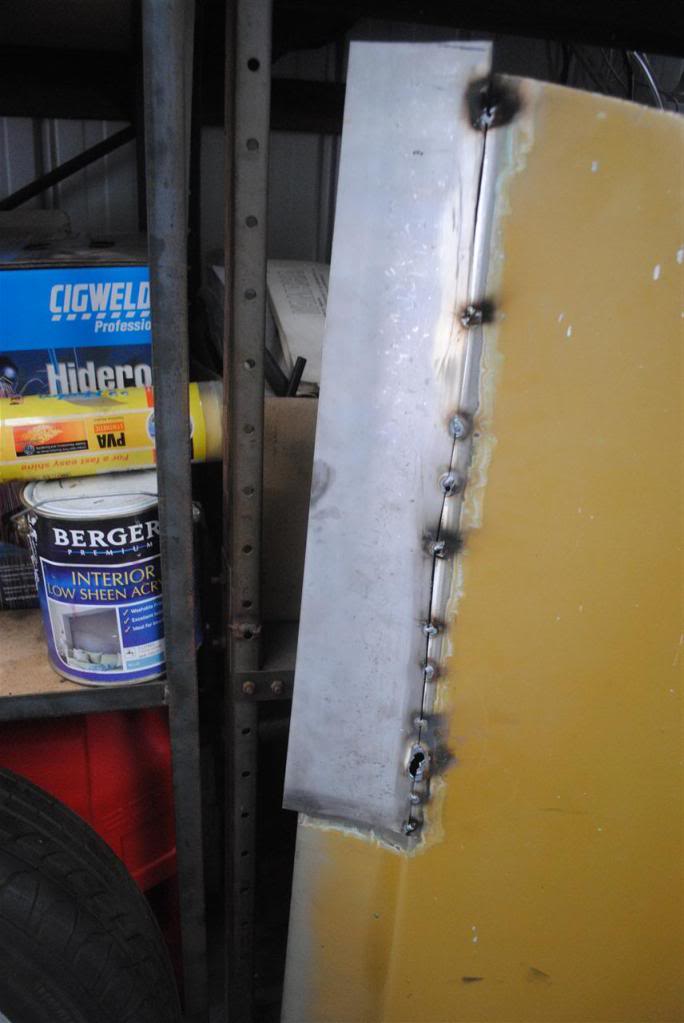
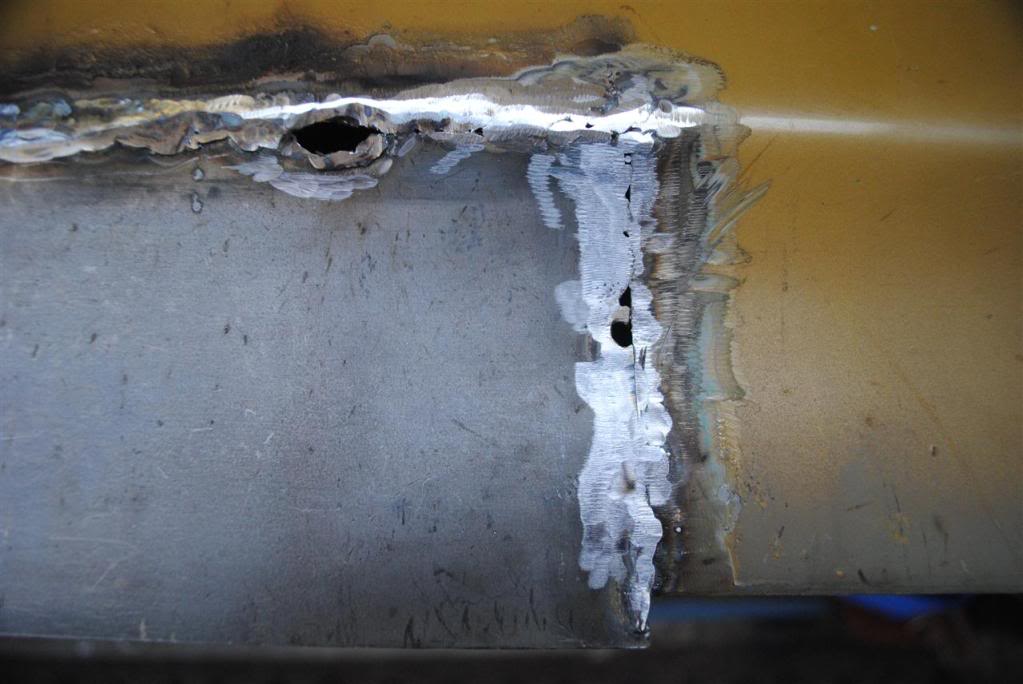
Wasn't happy with the curve in that so had to grind the tacks off and beat the panel some more.

Posted Image

Yeah a bit messy and a few holes but after playing with the settings a little on the MIG it was welding ok

Posted Image

Posted Image

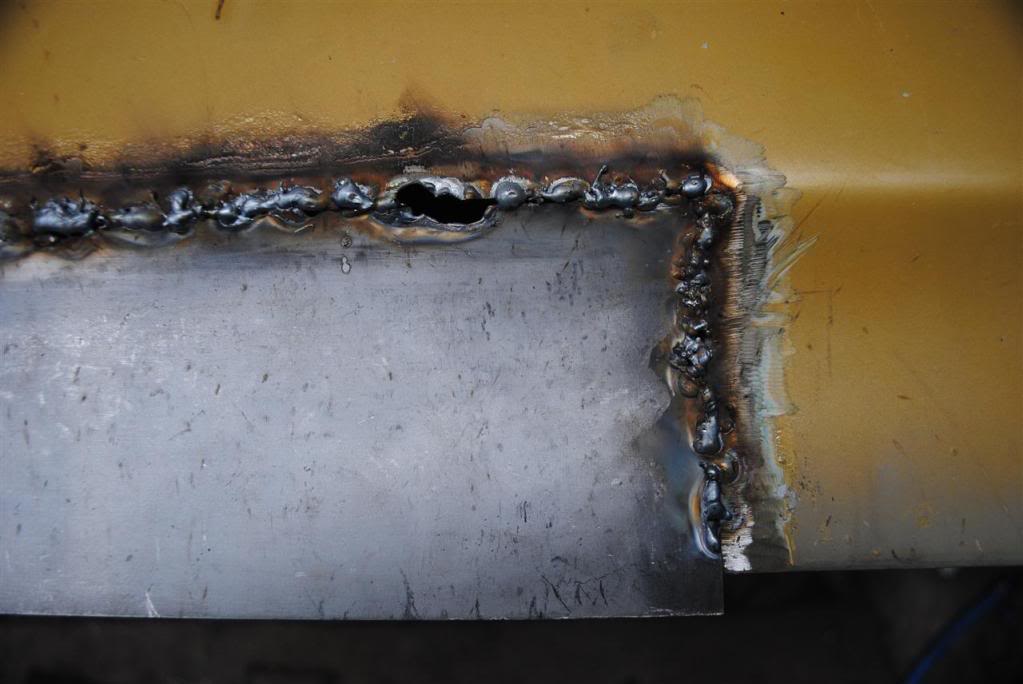
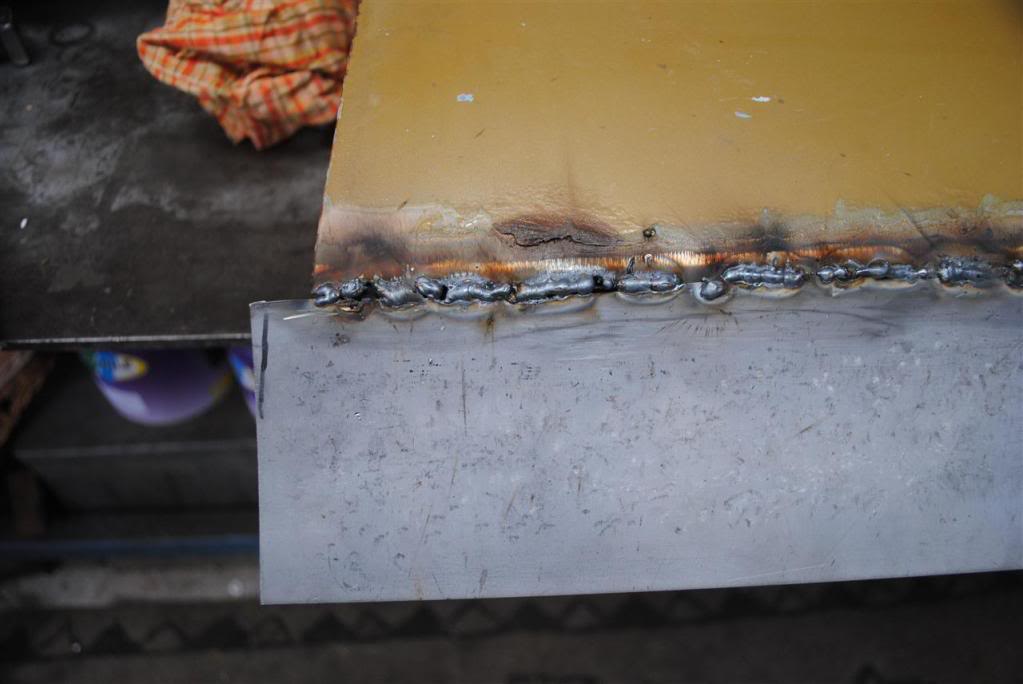
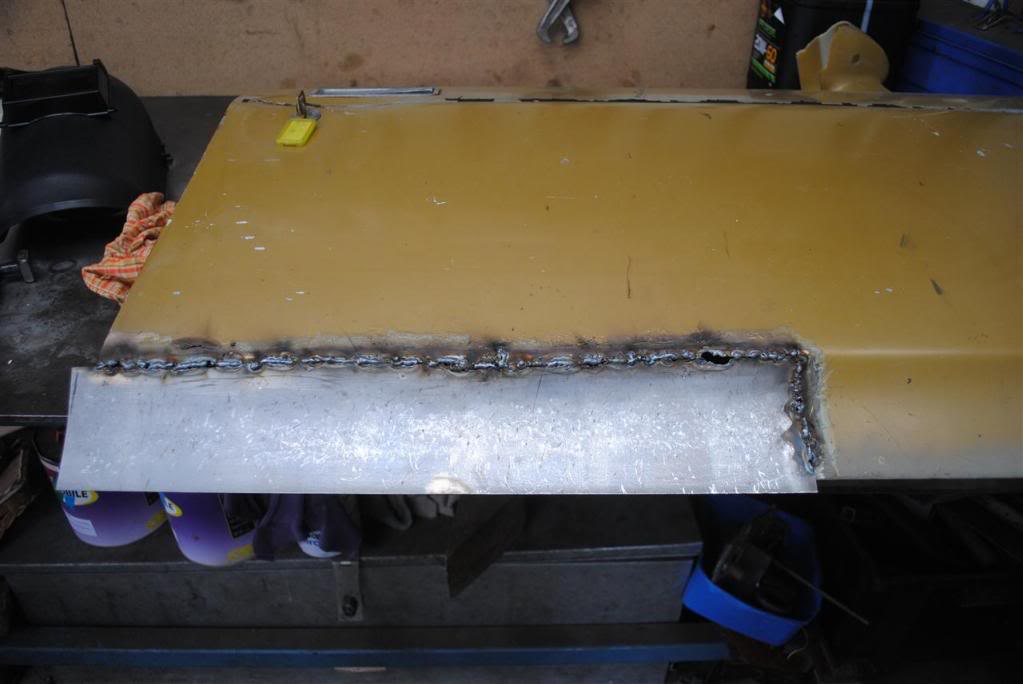
Shape is not great but ok.
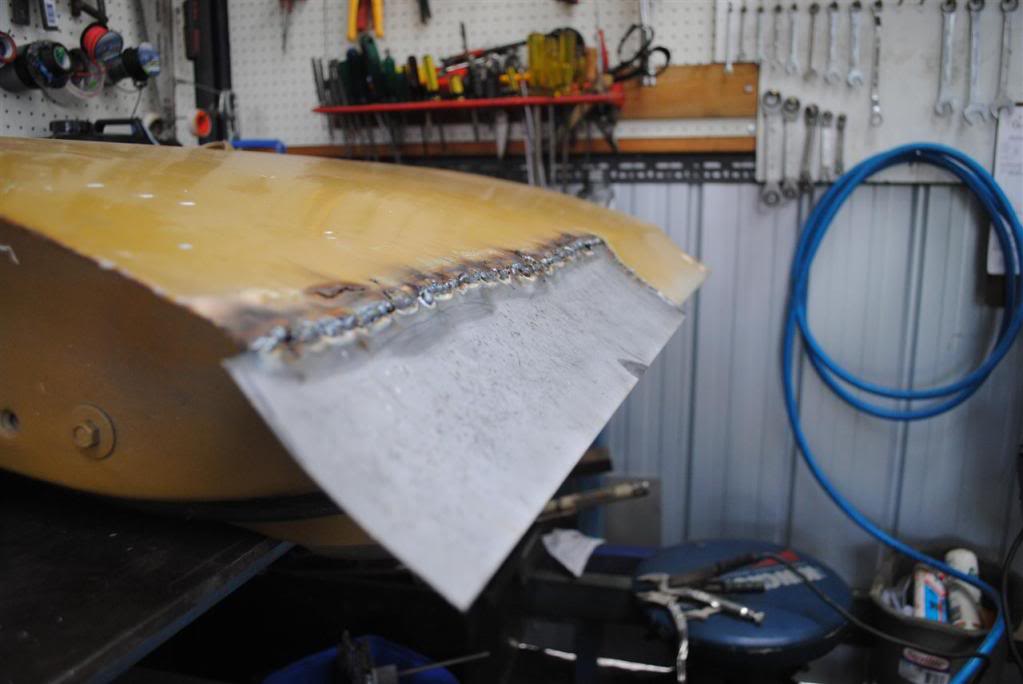
Posted Image

After first grind.

Posted Image

Posted Image

Posted Image

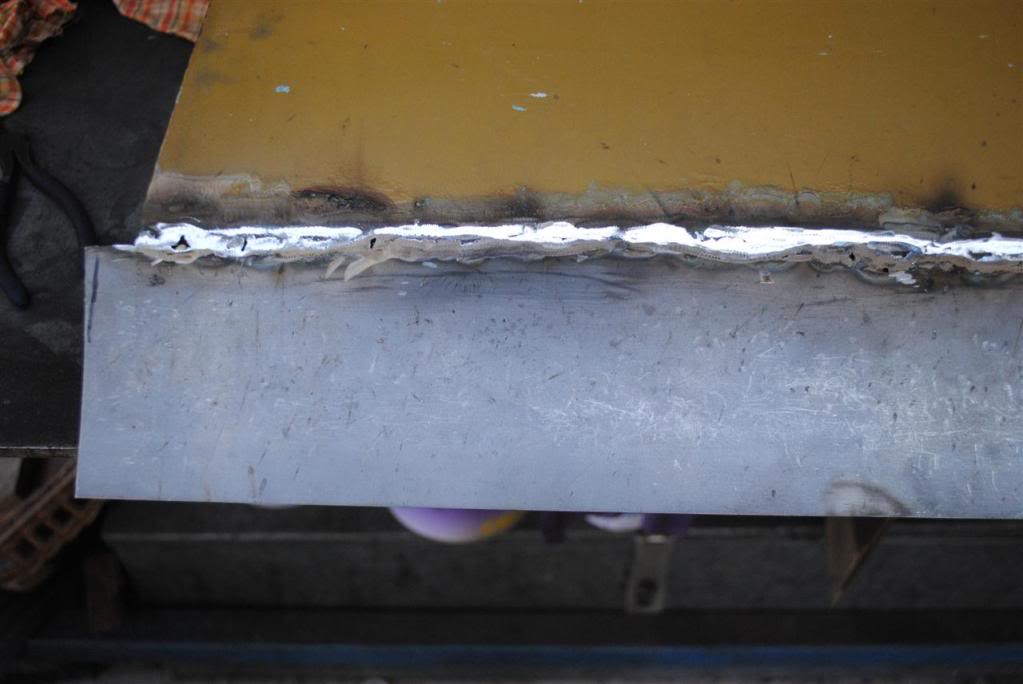
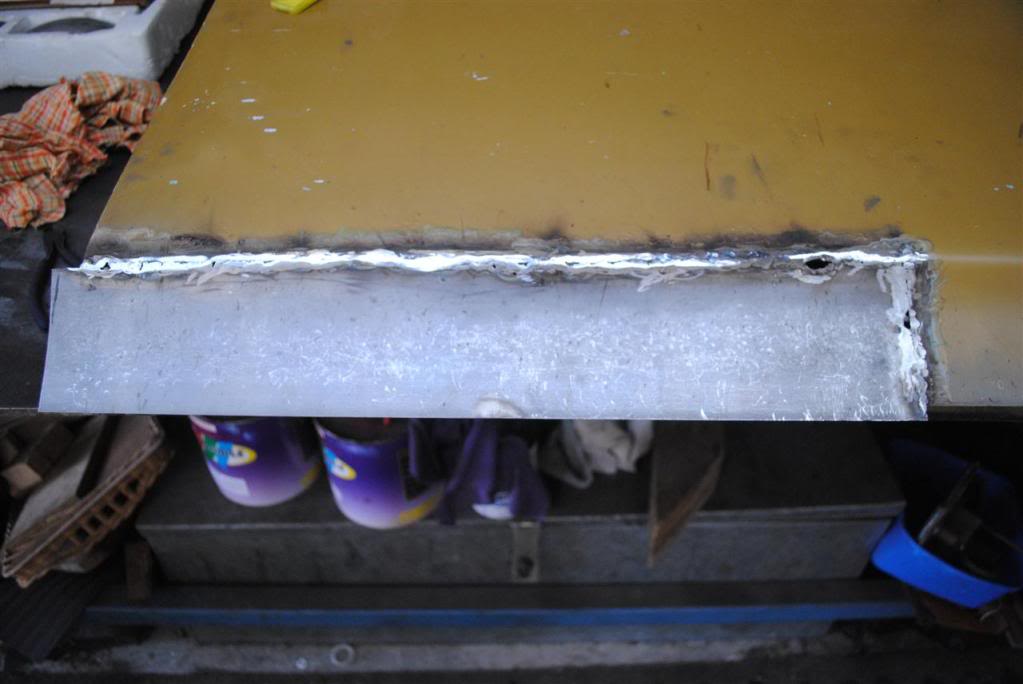
And thats where i am up too. I have been back and tacked up a few holes but still need to grind that down and fold the sheet over.

Any suggestons or tips? with the rust hole at the front of the door i am gonna make sure i cut a lot lower down to avoid having to 'shape' the patch piece. Was a nightmare using dollys and hammers and pipe and its still not quite right.

Thanks

Steve

#2 rodomo

rodomo

    To advertise here, call 13TORANA

  • Members
  • PipPipPipPipPipPipPip
  • 17,999 posts
  • Name:R - O - B Dammit!
  • Location:Way out west of Melbourne Awstraylya
  • Joined: 10-December 05

Posted 03 January 2011 - 09:39 PM

Good on you for having a crack Steve!
Grind the paint off further back and also the gal? (looks like zinc annealed?) grind it off to bare shiney metal.
Mig doesn't tolerate crap too much.

#3 its Paul

its Paul

    Formerly lx8vd77

  • Members
  • PipPipPipPipPip
  • 1,577 posts
  • Name:Paul
  • Location:Gold Coast
  • Car:LXSS, VUSS, VESSv & the mighty HB
  • Joined: 07-January 08

Posted 03 January 2011 - 09:42 PM

If that was Galvanised iron do your self a favour and use Zincanneal, a lot easier to weld, use .8mm or 1.0mm, and try doing a series of spot welds rather than a continuous weld to start off.

#4 V-SLR5000-P

V-SLR5000-P

    Forum Fixture

  • Members
  • PipPipPipPipPip
  • 1,301 posts
  • Location:Victoria
  • Car:L34 x 2
  • Joined: 14-November 06
Garage View Garage

Posted 03 January 2011 - 09:45 PM

Start by tacking your patch in as you have done and keep moving about to minimise heat build up. Aim to have a spot tack at least every 1" or so. Then you can start to join the tacks up by welding a couple of inches at a time, again moving around the panel. You should also grind the welds down as you go to allow hammer and dolly to stretch the weld as you go. Don't use a flat disc to grind but try and use the edge of a cut off wheel to get the weld bead down to the surrounding steel. The aim is to reduce the weld bead without without grinding and heating the surrounding material. I'd also have folded the door edges to at least 90 degrees before welding the patch in. Getting a even straight line at the bottom and rear of the door would be easier if you had bent the patch over a solid edge (bench, angle iron etc)rather than having to bend against the door frame. You could try easing the edge over with vice grips a bit at a time. Practice, practice, practice.

#5 _73LJWhiteSL_

_73LJWhiteSL_
  • Guests

Posted 03 January 2011 - 10:11 PM

Thanks for the comments guys.

I have ground the galvanised back with the grinder and also the paint. The advantage of the galvanised is it doesn't rust (I've had that sheet for about 2 or 3 years now) so all you have to do is grind it off. I think i need to grind more off as i set the paint alight a few times with the welder, through it was welding ok. :lol:

I'm pretty sure the sheet is Galvainsed Steel, not iron in 0.9mm I think. (its somewhere around 1.0mm anyways) ;)

I should have taken a few more pictures. I did do tacks every few inches along the door when I put the patch in the second time (like you can see in the first picture) and then joined it up.

Thanks for the tip with the cut off wheel, it must have taken me 40 minutes to grind that lot down (blunt disc maybe?) so will give the cut off disc a go with the last lot of welds i have done.

I'm not sure if it has warped or not, looks ok at the moment.

Also i've started folding the sheet with a massive shifter, but i see your point, getting the fold straight is gonna be fun.

Thanks for the comments guys. Will try and get a bit more done and updated later in the week.

Steve

#6 _Herne_

_Herne_
  • Guests

Posted 03 January 2011 - 10:12 PM

Very nice first attempt, better than I could do I reckon.
Keep practicing and take note of some of the good advice given in this forum.

Herne

#7 rodomo

rodomo

    To advertise here, call 13TORANA

  • Members
  • PipPipPipPipPipPipPip
  • 17,999 posts
  • Name:R - O - B Dammit!
  • Location:Way out west of Melbourne Awstraylya
  • Joined: 10-December 05

Posted 03 January 2011 - 10:36 PM

Tip.
This is just an example but I think you'll get the idea.
Lay your new material over your repair and overlap. (Red box) Tack it on there.
Then, cut through BOTH panels along the yellow line with a 1mm cutting disc on the angle grinder.
It has to fit? :dontknow:

Attached Files


Edited by rodomo, 03 January 2011 - 10:38 PM.


#8 _Kush_

_Kush_
  • Guests

Posted 04 January 2011 - 04:58 AM

Great first attempt!
My tips are to make cardboard templates. It makes getting the new steel to be the right size much easier.
And, when it comes to grinding, I use a flexible grinding disc. They look like a cut-off disc but have a cross-hatch pattern on the grinding face. These things are magic, you will see what I mean if you try them out. :)

#9 TerrA LX

TerrA LX

    Fulcrum Fixture

  • Members
  • PipPipPipPipPipPipPip
  • 14,241 posts
  • Location:Sid 'n' knee
  • Joined: 31-May 06

Posted 04 January 2011 - 05:24 AM

If that was Galvanised iron do your self a favour and use Zincanneal, a lot easier to weld, use .8mm or 1.0mm, and try doing a series of spot welds rather than a continuous weld to start off.


Ditto, sucking gal fumes whilst welding will slowly kill you.

#10 lxsstorana

lxsstorana

    Forum Fixture

  • Members
  • PipPipPipPipPip
  • 2,499 posts
  • Name:Mick
  • Location:Eastwood, Sydney
  • Car:SS Hatchback
  • Joined: 23-March 06

Posted 04 January 2011 - 05:57 AM

Great first attempt!
My tips are to make cardboard templates. It makes getting the new steel to be the right size much easier.....


:iagree:

Also regarding shaping the metal, I would shape it before fitting it to the door.

Use whatever you have in the garage such as a vice, hammer & dolly's, blocks of wood etc.

I would bend the edges over to 90 degrees so they are partly ready to fit to the inside of the door.

Would then put the curve into the panel. eg. put one end in a vice and pull/push it to shape, or put the panel over a round pipe or thick timber dowell and push down as you can easily shape 1mm steel.

Weld the replacement panel into position and then hammer the folds down. By doing it this way, less likely to distort the panel and door, plus it's much easier.

#11 its Paul

its Paul

    Formerly lx8vd77

  • Members
  • PipPipPipPipPip
  • 1,577 posts
  • Name:Paul
  • Location:Gold Coast
  • Car:LXSS, VUSS, VESSv & the mighty HB
  • Joined: 07-January 08

Posted 04 January 2011 - 07:36 AM

I have ground the galvanised back with the grinder and also the paint. The advantage of the galvanised is it doesn't rust (I've had that sheet for about 2 or 3 years now) so all you have to do is grind it off. I think i need to grind more off as i set the paint alight a few times with the welder, through it was welding ok. :lol:

I'm pretty sure the sheet is Galvainsed Steel, not iron in 0.9mm I think. (its somewhere around 1.0mm anyways) ;)


Galvanised Iron is what it is called, 0.9mm is generally Chinese steel, 0.95 is generally the good ol Aussie BlueScope steel and both are what you get when you order "1mm Galv".
Zincanneal is slower to rust like Galv (Galv still rusts) and Zincanneal will be there looooooong after the rest of the Torana rusts away.
Just so you can see what I mean, have a look at dirtbags thread all the steel you see him use is Zincanneal.
Galv & Zinc will both give off a poisonous gas when welding (burning), when welding you should use a dust mask as a minimum, most people don�t as there annoying to wear.

As said before keep the welded area clean from paint or anything else, if you have paint where you are welding it wont flow nice, it will just splatter every where and look like bird shit. :) Galv & Zinc will get a white oxidisation over the sheet if it gets wet or has been sitting for a long time, this will have to be sanded clean.

So practice, practice, practice, and keep every thing clean.

Cheers.

#12 _Yella SLuR_

_Yella SLuR_
  • Guests

Posted 05 January 2011 - 05:44 PM

Mmm, yeah, I would have stayed a bit further away from the fold line. I know it is only a practice panel, but your overlaps are not right, and should have been folded back at least through 90 degrees prior to placing the panel. In addition, the corner needs to be cut back at 45degrees so you can fold it over the frame, and only have a single thickness of metal at the corner.

I would have done it in reverse. Scribe out the corner of the door onto the sheet metal, measure out 13mm for the overlap (depending on how big the current overlap is +3mm for the fold around the frame, cut and shape the panel, then scribe the repair panel back onto the door to cut it out.

Other than that, a pretty good effort.

You can do all this stuff doing a vehicle restoration course at tech, but I suppose you've all heard me say that a thousand times before.

#13 _Torza_

_Torza_
  • Guests

Posted 06 January 2011 - 09:32 PM

I am yet to start my project LH and am going to need a welder anyone got a tip on what i should get? I've been looking at gasless mig's at bunnings their priced about $350 are they any good?

#14 its Paul

its Paul

    Formerly lx8vd77

  • Members
  • PipPipPipPipPip
  • 1,577 posts
  • Name:Paul
  • Location:Gold Coast
  • Car:LXSS, VUSS, VESSv & the mighty HB
  • Joined: 07-January 08

Posted 06 January 2011 - 09:35 PM

NO, go gas

#15 _Yella SLuR_

_Yella SLuR_
  • Guests

Posted 06 January 2011 - 10:13 PM

My preference is still the $245 TIG handpiece and Argon bottle hooked up to the stick welder. Fiddly, but such a precise flame. I do have a big MIG as well, and that's nice too, but you would have to quadruple your investment.

I also love using the oxy, but you have to be a bit more careful with that.

Gasless MIG has all the marbles and mess that you normally get with stick welding. Not bad though, I use it occaisionally for entertainment.

Just thinking about it, if you know somebody, cut up some sheet metal, and try doing some runs, then some butt joins and see if it is something you want to pursue further. (Thinks how many welders are sitting in sheds hardly used).

Edited by Yella SLuR, 06 January 2011 - 10:16 PM.


#16 76lxhatch

76lxhatch

    That was easy!

  • Members
  • PipPipPipPipPipPipPip
  • 7,153 posts
  • Location:Unzud
  • Car:SS
  • Joined: 04-August 08
Garage View Garage

Posted 07 January 2011 - 05:17 AM

I have a gas/gasless unit that I've only ever used gasless - it took me a long time to get a good handle on using it well but it can be done. If gas was a bit more convenient though I would have gone that way, still plan to at some point.

edit: and the best tip I would say to anyone is to get an auto darkening helmet, so much easier!

Edited by 76lxhatch, 07 January 2011 - 05:18 AM.


#17 _nzstato_

_nzstato_
  • Guests

Posted 07 January 2011 - 06:54 AM

I have a gas/gasless unit that I've only ever used gasless - it took me a long time to get a good handle on using it well but it can be done. If gas was a bit more convenient though I would have gone that way, still plan to at some point.

edit: and the best tip I would say to anyone is to get an auto darkening helmet, so much easier!


Hatch, go see these guys (they're the distributor for wedding supplies limited), they're just down the road from you. They should be able to give you a good deal on an owner-bottle and track down a gas supplier (they did for me). Cheers.

My link

#18 76lxhatch

76lxhatch

    That was easy!

  • Members
  • PipPipPipPipPipPipPip
  • 7,153 posts
  • Location:Unzud
  • Car:SS
  • Joined: 04-August 08
Garage View Garage

Posted 07 January 2011 - 09:40 AM

Did I mention when I say "more convenient" I just mean that I'm lazy? :P

I've bought a few things from Opel in the past. There are a few options, I'll get around to it one day

#19 _Yella SLuR_

_Yella SLuR_
  • Guests

Posted 07 January 2011 - 03:27 PM

Tip.
This is just an example but I think you'll get the idea.
Lay your new material over your repair and overlap. (Red box) Tack it on there.
Then, cut through BOTH panels along the yellow line with a 1mm cutting disc on the angle grinder.
It has to fit? :dontknow:

There is a tool that will put a step in a panel, one sheet metal thickness deep, for that exact purpose. Reminds me I should price one.

#20 _Yella SLuR_

_Yella SLuR_
  • Guests

Posted 07 January 2011 - 03:29 PM

edit: and the best tip I would say to anyone is to get an auto darkening helmet, so much easier!

I have to agree with that, they are magic.

#21 76lxhatch

76lxhatch

    That was easy!

  • Members
  • PipPipPipPipPipPipPip
  • 7,153 posts
  • Location:Unzud
  • Car:SS
  • Joined: 04-August 08
Garage View Garage

Posted 07 January 2011 - 03:40 PM


Tip.
This is just an example but I think you'll get the idea.
Lay your new material over your repair and overlap. (Red box) Tack it on there.
Then, cut through BOTH panels along the yellow line with a 1mm cutting disc on the angle grinder.
It has to fit? :dontknow:

There is a tool that will put a step in a panel, one sheet metal thickness deep, for that exact purpose. Reminds me I should price one.

I was looking at those the other day, flange/punch tool (they generally have a hole punch on the other side for plug welds) and they are commonly air powered. I'm definitely going to get one when the finances allow. Around $200 worth

#22 _nzstato_

_nzstato_
  • Guests

Posted 07 January 2011 - 07:22 PM


Tip.
This is just an example but I think you'll get the idea.
Lay your new material over your repair and overlap. (Red box) Tack it on there.
Then, cut through BOTH panels along the yellow line with a 1mm cutting disc on the angle grinder.
It has to fit? :dontknow:

There is a tool that will put a step in a panel, one sheet metal thickness deep, for that exact purpose. Reminds me I should price one.

I was looking at those the other day, flange/punch tool (they generally have a hole punch on the other side for plug welds) and they are commonly air powered. I'm definitely going to get one when the finances allow. Around $200 worth


joddler? is that the correct name? i'd be keen to get one in time too

#23 76lxhatch

76lxhatch

    That was easy!

  • Members
  • PipPipPipPipPipPipPip
  • 7,153 posts
  • Location:Unzud
  • Car:SS
  • Joined: 04-August 08
Garage View Garage

Posted 07 January 2011 - 07:40 PM

They all just seem to be called punch/flange tools
http://www.sulco.co....roduct_id=19751

#24 _Liam_

_Liam_
  • Guests

Posted 07 January 2011 - 09:41 PM

I am yet to start my project LH and am going to need a welder anyone got a tip on what i should get? I've been looking at gasless mig's at bunnings their priced about $350 are they any good?


No, I have just bought a Cigweld 150 AMP gas/gasless Mig Welder off of ebay for $465 brand new RRP $699 arrived today but I was at home so I couldn't take delivery. Going to get a Argon gas tank to run through it. Bought an auto darkening helmet at the same time for $65 RRP $150.

Value.

#25 _nzstato_

_nzstato_
  • Guests

Posted 08 January 2011 - 05:24 AM

Good news on the mig.

You can get hand-Joddlers ex-Uk might even be cheaper.

My link

or if you're cheap...

My link


0 user(s) are reading this topic

0 members, 0 guests, 0 anonymous users