Jump to content


Photo
- - - - -

SmacT's LX Four Door build

LX Four door 304i T5

  • Please log in to reply
276 replies to this topic

#101 SmacT

SmacT

    Forum Fixture

  • Members
  • PipPipPipPipPip
  • 907 posts
  • Name:Sam
  • Location:Sydney
  • Car:LX 4dr 383, TKX, BW
  • Joined: 24-December 08

Posted 09 March 2015 - 09:54 PM

More progress on the weekend. My wife wasn't too happy, as it took four hours on a busy Saturday morning, but then she crashed our family car into a bus, so I was off the hook (she's fine). Married guys reading this will know what I mean...


Attached File  photo (17).JPG   119.91K   7 downloads

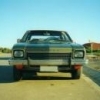
Stripped the protective primer off roof, A pillars and rear quarters/beaver and back to bare metal outside the shed with 80 grit discs (gently) on a big grinder, then 120 with an orbital. Didn't take much metal off, just cleaned it all up. 


Attached File  photo (16).JPG   91.34K   7 downloads

Used the masking paper of champions, old newspaper, to mask it up, then hit all bare metal with Protech metal conditioner/rust converter. Let it go to work, then dis-armed with water, dried it, then cleaned the whole lot with prepsol. The metal was good enough to eat off after that. You wouldn't, but you could.


Attached File  photo (15).JPG   126.82K   6 downloads

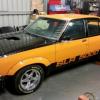
Then Hammo started on the epotech 408. I will stick to painting the door, etc, cos if I stuff it up it wont take as long to fix, but left Hammo to the turret. He loves it and does a bloody good job. I find painting the most satisfying part of the whole metalwork process, along with welding, so I am looking forward to doing the remaining panels. It was a humid day, but we did it in the morning and were very careful with the compressor filtering and metal prep.


Attached File  photo (14).JPG   78.15K   8 downloads

Cool. A fresh palette for some filler and lots of blocking. I will skim coat the roof and back of the quarters. It's a big step to have that done, just because it's so time consuming and I have none, so it can go back to doing a bit at a time, knowing the epoteched panels are rust-free and protected.


I finished welding a nut into the rear door for the flare (stuck a post in Paint and Panel), so it's ready to strip and paint and I have the scuttle panel ready to strip as well.


Still a heap to go, but getting there! Progress is progress. There was even talk in the shed of having the whole primered, blocked down and running car at Toranafest and having people vote on the colour. It would take alot of votes to sway me from Barbados, though. :-)


#102 Statler

Statler

    Heckler Extraordinaire

  • Administrators
  • PipPipPipPipPipPipPip
  • 6,282 posts
  • Name:Col
  • Location:Mackay Qld. Whitsundays for all you back packers!
  • Joined: 20-May 06

Posted 09 March 2015 - 10:09 PM

Color is a personal thing. It's your car. :)


Good to see some progress. Keep 'em coming. :spoton:


Edited by Statler, 09 March 2015 - 10:10 PM.


#103 slar

slar

    Forum Fan

  • Members
  • PipPipPipPip
  • 498 posts
  • Name:AL
  • Location:Newcastle
  • Car:Rusty the Torana......Nearly complete
  • Joined: 14-September 09
Garage View Garage

Posted 10 March 2015 - 02:00 PM

Nice Nice Nice......once you get past the prep stage it wont take to long...excellent :rockon:


#104 axistr

axistr

    Forum Fixture

  • Members
  • PipPipPipPipPip
  • 1,169 posts
  • Location:North west sydney
  • Joined: 19-November 05
Garage View Garage

Posted 11 March 2015 - 05:54 PM

Keep up the good work Sam, you will soon be at the finish line.


#105 SmacT

SmacT

    Forum Fixture

  • Members
  • PipPipPipPipPip
  • 907 posts
  • Name:Sam
  • Location:Sydney
  • Car:LX 4dr 383, TKX, BW
  • Joined: 24-December 08

Posted 11 March 2015 - 06:16 PM

Thanks guys. You've all been a big help.

Was about to head to the shed and strip a door for Epotech on the weekend, but it's about to bucket down.

Can I leave the door in bare metal, apply the Protech rust converter and just leave it on until I am ready for Epotech? I have been paranoid about painting as soon after stripping as possible, but it's not always practical. Any ideas?

#106 SmacT

SmacT

    Forum Fixture

  • Members
  • PipPipPipPipPip
  • 907 posts
  • Name:Sam
  • Location:Sydney
  • Car:LX 4dr 383, TKX, BW
  • Joined: 24-December 08

Posted 08 May 2015 - 09:29 PM

Small-ish update (lots of pics below), but things are progressing nicely and I am learning alot. The roof, easily the worst panel of the lot, has been skim coated with Rage Gold, blocked, filled, blocked, then Epoteched to seal the repairs and sprayed with Polyester. I need to block that asap - I stupidly thought I could leave it for a while but another thread confirmed I can't.


Anyway, I have a 24-in Dura-Block and 180-grit paper coming on Monday, and will block the roof, three doors and bootlid that are in Polyester then.


Part of the reason for the polyester was to get the car super straight, but also to deal with the pinholes I have in some of the panels. I used Slar's advice (thanks Al) of filling each pinhole with Dolphin Glaze, levelling it with a razor blade and then hitting the panel with ReFace polyester. Man that stuff sets fast, so you need to really, really clean our gun. I spent more timing cleaning it than painting, but you'd never know it was used for ReFace now. I bought a cheap gun to use for this purpose, with a 2.5 tip. Seemed to work great, though I could only get a small fan out of it. Pics:


Attached File  photo (7).JPG   101.31K   4 downloads

I got both side sills and door jams in Epotech. The drivers side sill needs some pull hammer action as this car has done some 4WDing at some stage. Otherwise it's ready for skim coating.


Attached File  photo (6).JPG   72.03K   4 downloads

My mate Hammo blocking the roof


Attached File  photo (5).JPG   136.86K   4 downloads

Me getting the Epotech ready for the freshly W&Ged roof


Attached File  photo (4).JPG   154.83K   5 downloads

Painting epotech - Hammo blocked, I painted. I won that deal, I reckon...


Attached File  photo (3).JPG   80.68K   4 downloads

How the roof looks now. Pretty happy, but wont really know until I block that guide coat with the big mo-fo block.


Next is to block away, a job I actually don't mind. Any tips on polyester blocking, please speak up. The pinholes certainly seem to be gone and the panels and roof look straight. I am really enjoying this stage of the build, because ever y time I walk out of the shed, it looks different to when I walked in. 


#107 slar

slar

    Forum Fan

  • Members
  • PipPipPipPip
  • 498 posts
  • Name:AL
  • Location:Newcastle
  • Car:Rusty the Torana......Nearly complete
  • Joined: 14-September 09
Garage View Garage

Posted 08 May 2015 - 10:50 PM

Hey Sam....Give it a quick block with 120 grit first just to knock the highs off it but dont go to aggressive......re guide coat then hit it with 180 grit.......always use the cross hatch pattern when sanding xxxxx never go in straight lines and keep moving over the surface to try and flatten it evenly.......guide coat regularly and dont panic if you rub through to the under lying epotect cause your going to high fill it anyway.


By the way the car looks great....you doing a good job.


#108 SmacT

SmacT

    Forum Fixture

  • Members
  • PipPipPipPipPip
  • 907 posts
  • Name:Sam
  • Location:Sydney
  • Car:LX 4dr 383, TKX, BW
  • Joined: 24-December 08

Posted 08 May 2015 - 11:28 PM

Thanks Al - can't stop looking at your car though. :-) Bloody amazing.


Thanks for the tips, At what point do I know when to stop re guide coating and blocking? I had thought I'd block through the guide coat at 180, then 220, then hi fill?


Still not sure if I can apply hi-fill in the shed (don't want that stuff anywhere near the kids or neighbours), or just epotech it to seal, then hi fill in a booth somewhere.


#109 slar

slar

    Forum Fan

  • Members
  • PipPipPipPip
  • 498 posts
  • Name:AL
  • Location:Newcastle
  • Car:Rusty the Torana......Nearly complete
  • Joined: 14-September 09
Garage View Garage

Posted 09 May 2015 - 09:26 AM

Hey Sam....when I said guide coat regularly.....I mean block the entire surface until you have no guide coat visible......then check for absolute flatness by applying guide coat and lightly blocking the area again with the same grit....you'll be surprised at how many low spots you still have......personally 180 grit to finish with is perfectly good because your going to high fill prime it you will need a good key on the polyester for the primer to stick too.


As for painting in the shed.......its a risk only you can decide.....its really a no no but we have all done it.....minimise your risks if you paint at home.


#110 SmacT

SmacT

    Forum Fixture

  • Members
  • PipPipPipPipPip
  • 907 posts
  • Name:Sam
  • Location:Sydney
  • Car:LX 4dr 383, TKX, BW
  • Joined: 24-December 08

Posted 09 May 2015 - 01:42 PM

Thanks Al. I have  mate who may let me spry high fill in his booth, I reckon I will try for that. Too many kids in our street, and my shed is right next to the neighbour's place. I'll work something out. :-)


Thanks for the blocking advice. Can't wait to get into it.


#111 LS1LX

LS1LX

    Forum Fixture

  • Members
  • PipPipPipPipPip
  • 1,931 posts
  • Location:Sydney
  • Joined: 22-November 05

Posted 10 May 2015 - 09:46 AM

Block the polyester down as much as you can til you can almost see you have gone thru, especially around edges and anywhere the body has flex or else your paint will crack in next to no time

#112 _Keiron_

_Keiron_
  • Guests

Posted 12 May 2015 - 10:37 PM

I don t know enough about polyester to dismiss it. I wont rubbish a product I have never used.

I see plenty of guys on here seem to use it.


My roof was like yours badly pitted by far the worst panel on my Torana,

I like epoxy etch primer a lot I used it on every bare strip I do.


I used Valspar epoxy 2k etch primer as its workable with sandpaper and it sets nice. And you can thin it down if you want to flow it out somewhat to make rubbing easyer.

Sunday night I primed my torana I always like to do 3 coats in one sitting leaving around ten minutes between coats,Due to the pitting in my roof I did 4 coats of epoxy on my roof and today I boarded it down and pretty much 85% of the pitting is gone and I wont have to wipe the whole roof either.

I have some small dents to fix then ill re epoxy the roof with 3 coats and I bet all the pitting is gone without having to wipe the roof with exception of a few deep ones that will need some attention.

Best part is the reduction of sink back because the epoxy is so tuff and I boarded my roof with 80 grit so it knocks the hills down.

Plus I still have to 2k primer after that.


Really allows you to get stuff strait.


Each to there own but I don t use 180 grit till after I have boarded with 80 as I find some times 180 can follow the woops in the panel and it wont pull out the ripple.


Stella job tho mate looks like a lot of time and effort has gone into your build should be a killer torry on the road when shes done.

Its good you enjoy the blocking part of the job and I agree its the best part as you can start to see your car take shape. IF you want to know how strait your panel is grab a worth spray bottle with wax and grease and wet your roof and use a good light source to see how she is.


Edited by Keiron, 12 May 2015 - 10:45 PM.


#113 SmacT

SmacT

    Forum Fixture

  • Members
  • PipPipPipPipPip
  • 907 posts
  • Name:Sam
  • Location:Sydney
  • Car:LX 4dr 383, TKX, BW
  • Joined: 24-December 08

Posted 13 May 2015 - 08:37 AM

Thanks Keiron. The good thing about this forum is there are different methods used by many people - I take it all in and steal the ideas and methods that make sense to me - this is my first attempt at any sort of body work, so I am a rank amatuer. Enjoying it.


Except for last night when I blocked back the polyester and had lows effin everywhere. I expected a few, but the panels I blocked (door and boot lid) aren't even close to the pristine white finish I was hoping for. Sorry about the pic quality, but I was having a toys out of the cot moment.


Attached File  photo (2) 2.JPG   135.82K   6 downloads

Attached File  photo (3) 2.JPG   84.33K   5 downloads


Pretty frOcking frustrating. I suspect I didn't spray the poly on correctly, not evenly enough. I had a very small fan out of the gun, so didn't get my overlap right, I think.


On the upside, the poly is very easy to block, especially with the big-ass Dura-Block I bought (24-in/610mm) and I did two panels in 45mins. 


Attached File  photo (4) 2.JPG   95.66K   4 downloads


Anyway, I am going to clean the panels/guide coat with W&G, epoxy to seal, then do again with poly - unless there is a better way? Should I just try to fill the lows with poly with the gun, then block again? Or use Dolphin Glaze? I think my first approach is the right one.


Edited by SmacT, 13 May 2015 - 08:38 AM.


#114 SmacT

SmacT

    Forum Fixture

  • Members
  • PipPipPipPipPip
  • 907 posts
  • Name:Sam
  • Location:Sydney
  • Car:LX 4dr 383, TKX, BW
  • Joined: 24-December 08

Posted 13 May 2015 - 11:27 PM

A quick update - I ended up using Dolphin glaze on the lows, guide coated and will block again tomoz. Thanks Al (Slar) for the advice. If my car turns out a fifth as good as yours I'll be stoked!

Happily, I blocked back the roof, which I painted last with the poly and therefore did it better, and it's pretty bloody good!

It's ready for high fill, but unfortunately I'm not... I will have to epoxy it til I am ready to high fill it. Same with the panels, it looks like, however at least I am a step closer.

Thanks all for te help at this stage, I can hardly believe I'm at this point. Te running gear is in and wired up, so once I get the car in high fill, she ain't far away at all. :-) another four years and it should be done...

#115 _Keiron_

_Keiron_
  • Guests

Posted 14 May 2015 - 11:28 AM

When your blocking any panel if you hit steel you have a high spot,

Rule of thumb soon as you hit bare steel stop rubbing or your just undoing the work you have already done.


You have options one is to tap the high spot down but any panel beating can be trick and by no means im not expert. Plenty of tutorials on utube about off dolly and on dolly panel beating to raise and lower a spot in steel.

Worth watching for sure.


For me in most instances I would skim that area with rage gold and reblock the said area to get it strait. 

Dynamics of a dent is as follows if you have a dent then both edges around that dent will be higher then the rest of the panel it slightly pushes up, A dent stretches the steel and when you tap that dent out you have excess steel and you need to attempt to shrink it or skim it to get the effect your chasing mate. 

There are plenty of people who panel beat and use no bog and my hats off to them to be honest its very time consuming and takes a lot of skill and practice me thinks.


You will be right mate there are plenty of skilled people on these forums that's for sure and they are only to happy to help people that help them self.

Its good to see your pushing forward mate and near enough is never good enough if your over a panel take a break from it and work on something else. Then when your refreshed go back to what you were doing. 


#116 SmacT

SmacT

    Forum Fixture

  • Members
  • PipPipPipPipPip
  • 907 posts
  • Name:Sam
  • Location:Sydney
  • Car:LX 4dr 383, TKX, BW
  • Joined: 24-December 08

Posted 14 May 2015 - 12:01 PM

Yeah, we nailed all the highs in the first pass, it was just small lows left. I think I have them sorted now. A mate showed me the basics of file finishing, and on simple panels I can get a decent result, but we still needed filler to flatten it right out.


I can't find an example of the carbon rod you mentioned in your thread earlier for shrinking - can you stick up a pic or link if you have one? I will probably need to shrink some areas on the quarters in coming weeks.


I feel alot better after the roof came up a treat - the roller coaster of car building! More blocking tonight and I will have a few panels and the roof ready for hi-fill. 


#117 _Keiron_

_Keiron_
  • Guests

Posted 14 May 2015 - 10:16 PM

Look up pultruded carbon solid rod on ebay mate. id say a bit 8mm id diameter would do it. Comes in a 2m length you wont run out in a hurry lol

The rod just lets the current go threw without welding it self to the body. If you stuck the jumper cables on the car it would weld it self :D


You just circle the spot you want to shrink with the rod in the positive end.


Another good tool you can use is a shrink disc on a grinder mate. they work a treat also.


Make sure you have a wet rag or a spray bottle with a bit of soapy water in it to cool the panel quickly


#118 _Keiron_

_Keiron_
  • Guests

Posted 14 May 2015 - 10:44 PM

So hows the dura block go.

Never seen one so looked em up just order a kit from the states I like the wet block system looks the goods


#119 slar

slar

    Forum Fan

  • Members
  • PipPipPipPip
  • 498 posts
  • Name:AL
  • Location:Newcastle
  • Car:Rusty the Torana......Nearly complete
  • Joined: 14-September 09
Garage View Garage

Posted 15 May 2015 - 10:11 AM

So hows the dura block go.
Never seen one so looked em up just order a kit from the states I like the wet block system looks the goods


You wont look back Keiron...they are the go....dont forget to order yourself PSA paper to use with them

#120 SmacT

SmacT

    Forum Fixture

  • Members
  • PipPipPipPipPip
  • 907 posts
  • Name:Sam
  • Location:Sydney
  • Car:LX 4dr 383, TKX, BW
  • Joined: 24-December 08

Posted 30 May 2015 - 06:19 PM

Well, I got ahead of myself. The roof isn't good at all, I stuffed the boot up so much I need to do it again and after a durablock went the length of the garage, I packed everything up and have had a break for a couple of weeks.

I am going to get into it again tomorrow. Bodywork is bloody hard and frustrating, but I will get there. :-)

#121 SmacT

SmacT

    Forum Fixture

  • Members
  • PipPipPipPipPip
  • 907 posts
  • Name:Sam
  • Location:Sydney
  • Car:LX 4dr 383, TKX, BW
  • Joined: 24-December 08

Posted 16 June 2015 - 09:48 PM

Right, back on track. Doors, boot lid and roof all done again, with improved blocking skills! Also, the last truly shite panel on the car, the passenger rear quarter, has been dressed up, shrunk using a butane torch, then skim coated and blocked and is ready for polyester. The area around the taillights is also done, but the beaver still needs work.


This time another panel beater mate is coming over with a 4mm poly gun and laying on the polyester, and he will block it, too. There's a few little bits needing attention before that stage. Getting there. Again. 


Another two weeks or so of bodywork, then I need to go nuts on some electrical bits to finish that side of it off so I can remove everything for paint stage.


Sorry about the shite pics - just to prove I am getting somewhere. ;-)


Attached File  FullSizeRender (2).jpg   73.7K   6 downloads

Attached File  FullSizeRender (1).jpg   84.62K   5 downloads

Attached File  FullSizeRender.jpg   89.87K   5 downloads

Attached File  FullSizeRender (3).jpg   66.81K   5 downloads


Edited by SmacT, 16 June 2015 - 09:50 PM.


#122 slar

slar

    Forum Fan

  • Members
  • PipPipPipPip
  • 498 posts
  • Name:AL
  • Location:Newcastle
  • Car:Rusty the Torana......Nearly complete
  • Joined: 14-September 09
Garage View Garage

Posted 17 June 2015 - 07:21 PM

And about time Sam lol


#123 HIBERN8

HIBERN8

    Forum Member

  • Members
  • PipPipPip
  • 121 posts
  • Name:Mark
  • Location:SA
  • Car:1974 LH S
  • Joined: 05-July 12

Posted 19 June 2015 - 01:11 AM

Looking good mate! Kudos for getting back into it despite some earlier frustrations, your hard work is paying off!

#124 SmacT

SmacT

    Forum Fixture

  • Members
  • PipPipPipPipPip
  • 907 posts
  • Name:Sam
  • Location:Sydney
  • Car:LX 4dr 383, TKX, BW
  • Joined: 24-December 08

Posted 19 June 2015 - 01:17 PM

Thanks guys - yes, was an A-Grade dummy spit. 


Anyway, last night the I pretty much took the quarters to polyester-readiness, as well as some adjustments of bits I didn't like the look of. I am still not sure how to block a clean line in, so will leave that for my panelbeater and block master mate to show me. Tips appreciated! I am happy with how the rest of the quarters, etc came up and have gotten heaps better with the Durablocks.


Having said that, can you see what's missing below? My mate got a bit carried away with the whole "blocking flat" thing and messed something up. Just working out if I can live with it or not, given it's under the flare. He's been a massive help, so I'm not grumpy, but it shows how easy it is to stuff things up doing bodywork.


Attached File  FullSizeRender (1).jpg   69.22K   9 downloads


The rest I am happy with.

Attached File  FullSizeRender (3).jpg   81.18K   7 downloads

Attached File  FullSizeRender (4).jpg   67.87K   5 downloads


I'll keep ploughing on!


#125 SmacT

SmacT

    Forum Fixture

  • Members
  • PipPipPipPipPip
  • 907 posts
  • Name:Sam
  • Location:Sydney
  • Car:LX 4dr 383, TKX, BW
  • Joined: 24-December 08

Posted 19 June 2015 - 05:19 PM

Oh, and by the way, those shadows that look like fat lows in the crapola pics above, aren't. Just the shadows from the work lights and the phone camera. :-) It's cold here in Sydney, so I was using heaters and work lights to keep everything warm for painting.


1 user(s) are reading this topic

0 members, 1 guests, 0 anonymous users