Jump to content


LH rear brake shoe change


  • Please log in to reply
38 replies to this topic

#1 _LHSL308_

_LHSL308_
  • Guests

Posted 22 October 2013 - 03:58 PM

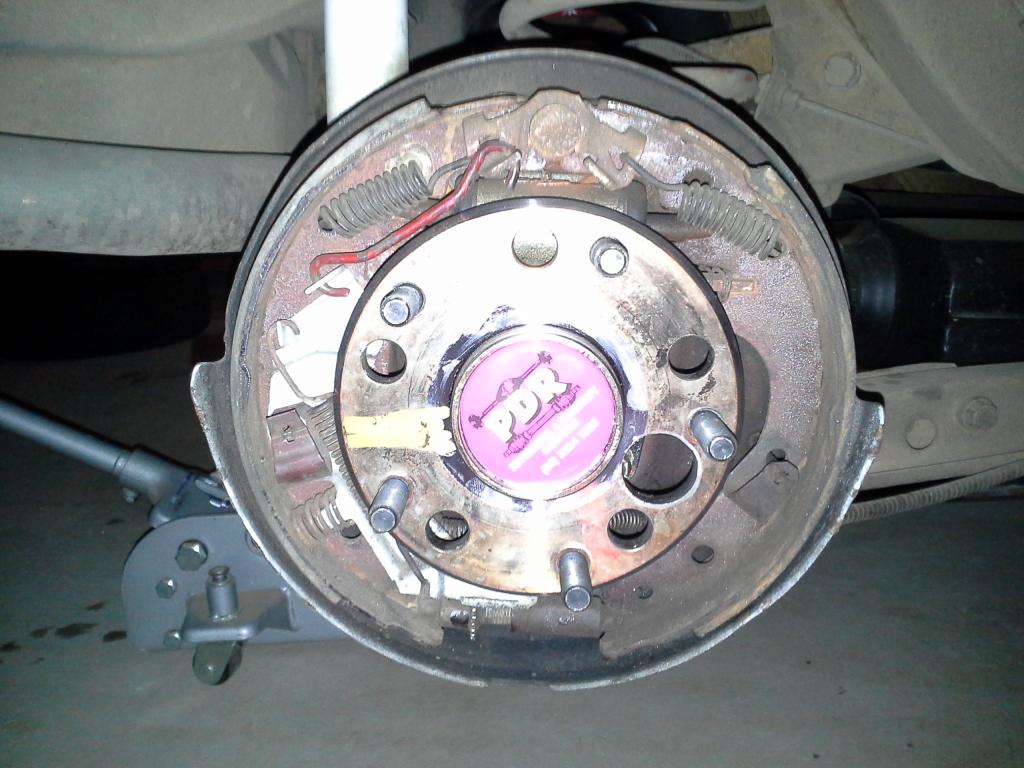
Took off the drums today as I want to change the shoes in them as they have deep gauge marks and the shoes are thin in places. Drum are being machined at Hopper Stoppers and will be picking those up tomorrow.


When I first saw the brake shoes I thought Christ where do I start, springs and clips everywhere so thought I would start here first with some advice on how to pull it apart. I have done brake shoes before but not with this much crap to remove.


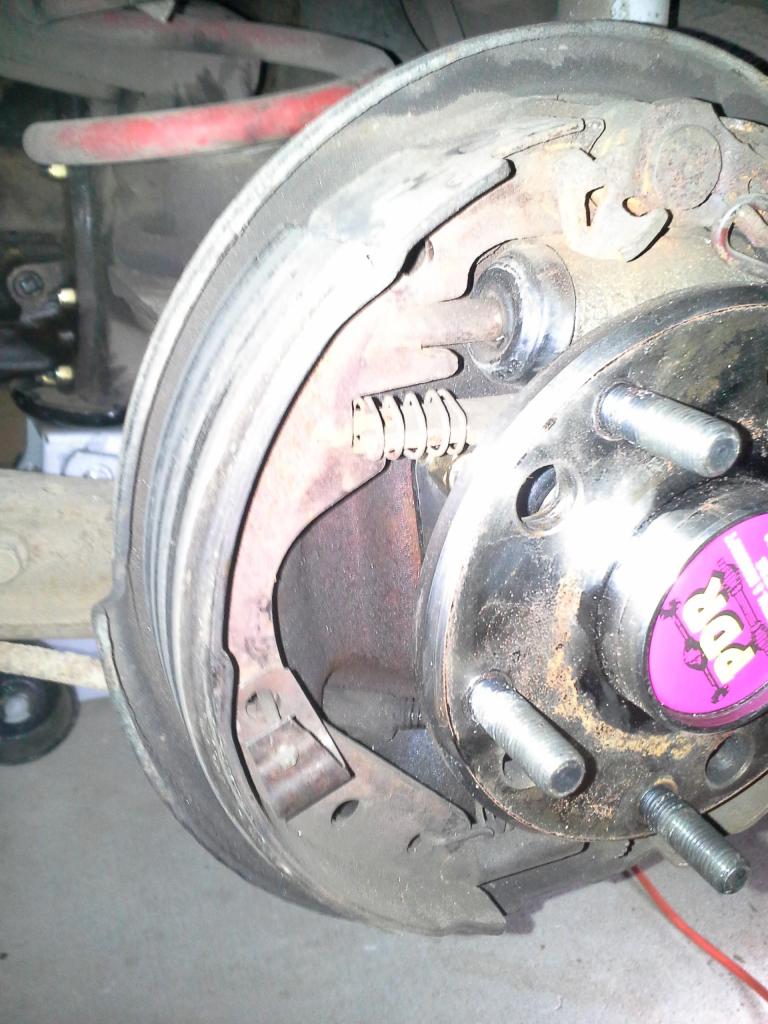
Wheel cylinders look good so wont need to change those.Planning on starting it tomorrow. Here's a pic and thanks for any help anyone can give some help.


20131022_161502_zps1bbfe390.jpg


#2 _LHSL308_

_LHSL308_
  • Guests

Posted 22 October 2013 - 04:53 PM

Looking at it, it looks like I need to remove the springs first then take those clips off which will hopefully enable the shoes to come straight off. Then putting it back together I think will give me the biggest problems. Probably something Dattoman would do in 5 minutes and thats with a blind fold on :D


#3 _mello92_

_mello92_
  • Guests

Posted 22 October 2013 - 06:07 PM

Been a while since I've done a set of these but here goes:


Remove the 2 heavy springs at the top, that long spring on the left and the red rod and their associated plate. Those clips that hold the shoes on will just push in and twist 1/4 turn to come off. Can't exactly remember how the handbrake cable comes off but once you've got the shoe off then I think you need to compress the spring along the cable and the end of it can then be worked out of the lever its attached to.


The lever will pivot on a pin that you will have to change over to the new shoe. The clip holding the pin will spread apart and squash back together (or should anyway).


Pull the boots of the wheel cylinder back to check for leaks, if it is they usually squirt straight in your face. :)


Unwind the adjuster completely, clean the thread with a wire brush or whatever you like, little bit of anti-seize and wind it nearly all the way back in.


And just as a side note, shoes aren't shoes. Someone please correct me if I'm wrong but these setups have a 'leading' and a 'trailing' shoe. You'll notice the distance from the edge of the brake shoe material to the edge of the wide section of the shoe is different from top to bottom. It is important that the replacement shoes go back in the same fashion as it will, to some extent, affect brake performance.


Always best to arrange all the components on the ground as you pull them off in the same order and place so you cant get it wrong.


Not trying to tell you what to do mate, just don't know what you know. :)


Cheers, enjoy.


#4 dattoman

dattoman

    Do I feel lucky? Well, do ya, punk?

  • Administrators
  • PipPipPipPipPipPipPip
  • 16,488 posts
  • Name:Neil
  • Location:Perth Western Australia
  • Car:LX SS , 76 Cadillac , 3 x dattos
  • Joined: 04-February 07

Posted 22 October 2013 - 07:46 PM

At least you took a pic so you know how it goes back together


Your drums might be oversized looking at that wear pattern

Make sure you get shoes to suit the drums radius... not just off the shelf standard shoes


Remove the 2 spring clips on the shoes that retain them to the backing plate

Then wiggle shoes till it all falls apart at your feet

Replace the cylinders while your at it even if they look good

They are cheap enough

Lube the adjusting wheel thread with nickle antiseize

Rinse and repeat


#5 _LHSL308_

_LHSL308_
  • Guests

Posted 22 October 2013 - 07:52 PM

Cheers for that Carmelo. I have never done a complicated shoe replacement like this one. I am glad I asked about this shoe replacement because I didnt know or might not have noticed the difference between the shoes. They all looked exactly the same to me but your right the complicated side of the shoes has a leading edge on the shoe. The trailing shoe is the one facing towards the front of the car.


I didnt think I would have to disconnect the handbrake cable though. I thought once removing the springs and shoes all I would have to do was wind back the adjustment at the bottom, put in the new shoes and springs and then just adjust them. Goes to show how much I know.


#6 dattoman

dattoman

    Do I feel lucky? Well, do ya, punk?

  • Administrators
  • PipPipPipPipPipPipPip
  • 16,488 posts
  • Name:Neil
  • Location:Perth Western Australia
  • Car:LX SS , 76 Cadillac , 3 x dattos
  • Joined: 04-February 07

Posted 22 October 2013 - 07:57 PM

Oh yeah

Leading and trailing

Long shoe to the back of the car


#7 _LHSL308_

_LHSL308_
  • Guests

Posted 22 October 2013 - 07:58 PM

At least you took a pic so you know how it goes back together


Your drums might be oversized looking at that wear pattern

Make sure you get shoes to suit the drums radius... not just off the shelf standard shoes


Remove the 2 spring clips on the shoes that retain them to the backing plate

Then wiggle shoes till it all falls apart at your feet

Replace the cylinders while your at it even if they look good

They are cheap enough

Lube the adjusting wheel thread with nickle antiseize

Rinse and repeat

Datto the wheel cylinders almost look brand new although I haven't checked behind the rubbers for any leaks. The drums were dropped off at Hopper Stoppers today and they said that the drum can be machined because they still had a bit of clearance to be machined.


I dont like the sound of it all falling apart at my feet, I am not good at puzzles lol. Any chance these old shoes have asbestos?


#8 dattoman

dattoman

    Do I feel lucky? Well, do ya, punk?

  • Administrators
  • PipPipPipPipPipPipPip
  • 16,488 posts
  • Name:Neil
  • Location:Perth Western Australia
  • Car:LX SS , 76 Cadillac , 3 x dattos
  • Joined: 04-February 07

Posted 22 October 2013 - 07:59 PM

Possibly... but only if they were fitted before 1996 or so


Not just leaks... make sure the pistons actually move

If they seem fine keep them

Saves rebleeding everything again


#9 _LHSL308_

_LHSL308_
  • Guests

Posted 22 October 2013 - 08:03 PM

Possibly... but only if they were fitted before 1996 or so


Not just leaks... make sure the pistons actually move

If they seem fine keep them

Saves rebleeding everything again

So just as easy as pressing on the pedal to see if the pistons move in and out?


#10 dattoman

dattoman

    Do I feel lucky? Well, do ya, punk?

  • Administrators
  • PipPipPipPipPipPipPip
  • 16,488 posts
  • Name:Neil
  • Location:Perth Western Australia
  • Car:LX SS , 76 Cadillac , 3 x dattos
  • Joined: 04-February 07

Posted 22 October 2013 - 08:27 PM

Or easier still... get someone else to gently press on the pedal while you watch


#11 _LHSL308_

_LHSL308_
  • Guests

Posted 22 October 2013 - 08:29 PM

Or easier still... get someone else to gently press on the pedal while you watch

Haha ok might go and do it now... wheres that misses of mine :)


I'll tackle the job tomorrow.


Forgot to thank Brad Hanra too... thanks Brad. I read up on your build thread when they gave you the wrong shoes first up, they gave you the 10 inch ones L34 or HQ type. I was also almost given the same ones but realised it straight away and got them to change it to the 9 inch ones Bendix BS1174 shoes.


Edited by Gonedeaf, 22 October 2013 - 08:33 PM.


#12 _LHSL308_

_LHSL308_
  • Guests

Posted 22 October 2013 - 08:45 PM

Just checked the wheel cylinders. They are knackered. One piston on each side doesn't even move and I peeled back one of the rubbers where the piston was moving and out leaked this brown shit which feels like dirty rusty brake fluid. Anyone got a part number for the wheel cylinder?


#13 _mello92_

_mello92_
  • Guests

Posted 22 October 2013 - 08:50 PM

They all looked exactly the same to me but your right the complicated side of the shoes has a leading edge on the shoe. The trailing shoe is the one facing towards the front of the car.


Sorry mate but the trailing shoe is the one on the rear side of the setup, the one that faces the rear of the vehicle.


Yes, ok, the roles are swapped in reverse but we all try and drive forwards as much as possible. :)


If you can imagine the drum rotating clockwise in the above picture (so driving forwards), and remembering that the bottom section (where the adjuster is) is completely floating, then as the wheel cylinder pushes the top of the leading shoe into the drum, the shoe is slightly dragged around by the rotation. This then forces the trailing shoe into the drum through the adjuster but at the same time, the trailing shoe is being forced out by the wheel.


I apologise if I come across as a know-it-all, just trying to help. Explain rather than tell. :)


Edited by mello92, 22 October 2013 - 08:51 PM.


#14 dattoman

dattoman

    Do I feel lucky? Well, do ya, punk?

  • Administrators
  • PipPipPipPipPipPipPip
  • 16,488 posts
  • Name:Neil
  • Location:Perth Western Australia
  • Car:LX SS , 76 Cadillac , 3 x dattos
  • Joined: 04-February 07

Posted 22 October 2013 - 08:52 PM

If its a stock diff... P7041


Now... if you just got standard shoes BS1174 and your drums have been machines to 1st oversize... send them back and get oversized shoes


9" is standard (228.6mm)

9 1/16" is oversize (230.1mm)

Don't put standard shoes in oversized drums

Of they have to bend to reach the drums and causes low pedal and wearing in the middle

N1174-6 is oversize shoe part number


#15 _LHSL308_

_LHSL308_
  • Guests

Posted 22 October 2013 - 08:54 PM

Sorry mate but the trailing shoe is the one on the rear side of the setup, the one that faces the rear of the vehicle.


Yes, ok, the roles are swapped in reverse but we all try and drive forwards as much as possible. :)


If you can imagine the drum rotating clockwise in the above picture (so driving forwards), and remembering that the bottom section (where the adjuster is) is completely floating, then as the wheel cylinder pushes the top of the leading shoe into the drum, the shoe is slightly dragged around by the rotation. This then forces the trailing shoe into the drum through the adjuster but at the same time, the trailing shoe is being forced out by the wheel.


I apologise if I come across as a know-it-all, just trying to help. Explain rather than tell. :)

Yes Carmelo I understand. So the trailing shoe is the longer shoe. Perfect thanks mate.


#16 hanra

hanra

    Oh My, Don't you post alot

  • Members
  • PipPipPipPipPipPipPip
  • 11,013 posts
  • Name:Brad
  • Location:Farrrrrr North Qld
  • Car:1975 LH SL/R 5000, 1967 Morris Cooper S, E36 BMW, Toyota Corolla, Isuzu DMax
  • Joined: 24-March 11

Posted 22 October 2013 - 08:56 PM

Haha ok might go and do it now... wheres that misses of mine :)

I'll tackle the job tomorrow.

Forgot to thank Brad Hanra too... thanks Brad. I read up on your build thread when they gave you the wrong shoes first up, they gave you the 10 inch ones L34 or HQ type. I was also almost given the same ones but realised it straight away and got them to change it to the 9 inch ones Bendix BS1174 shoes.


Glad it was of some assistance. I scratched my head a bit to when I pulled mine down, I just took heaps of pics. My car was missing all the auto brake adjuster mechanisms, but it looks like yours is all still there. That sort of makes things a little more complicated.

#17 _LHSL308_

_LHSL308_
  • Guests

Posted 22 October 2013 - 08:58 PM

If its a stock diff... P7041


Now... if you just got standard shoes BS1174 and your drums have been machines to 1st oversize... send them back and get oversized shoes


9" is standard (228.6mm)

9 1/16" is oversize (230.1mm)

Don't put standard shoes in oversized drums

Of they have to bend to reach the drums and causes low pedal and wearing in the middle

N1174-6 is oversize shoe part number

No its a 9 inch but everything in the brake drum area looks to be original LH. Even the front brakes which were changed a couple of weeks ago were original LH.


No worries Datto I will get the oversize shoes tomorrow. Luckily I havent opened the plastic wrapping around the shoes so it shouldn't be a problem about changing them.


Edited by Gonedeaf, 22 October 2013 - 09:02 PM.


#18 _LHSL308_

_LHSL308_
  • Guests

Posted 23 October 2013 - 12:29 PM

Ordered the oversize shoes today part no. N1174-6 Protex brand, should be in either this arvo or tomorrow. Had to order them through Supercheap as I couldn't get them through anyone else.


Also picked up new wheel cylinders today P7041 but they didn't come with the rods that go in the sides so I guess i'll just use the old ones.


Picked up the machined drum today and the oversize shoes should be almost a perfect fit, drums are now exactly 231mm in diameter.


Edited by Gonedeaf, 23 October 2013 - 12:34 PM.


#19 _walpolla_

_walpolla_
  • Guests

Posted 23 October 2013 - 04:09 PM

And a tip to grab and hold springs - use a pair of side cutters. They won't hurt the springs, and are a better option than pliers or multigrips.


 regards,Rod


#20 _LHSL308_

_LHSL308_
  • Guests

Posted 23 October 2013 - 08:05 PM

And a tip to grab and hold springs - use a pair of side cutters. They won't hurt the springs, and are a better option than pliers or multigrips.


 regards,Rod

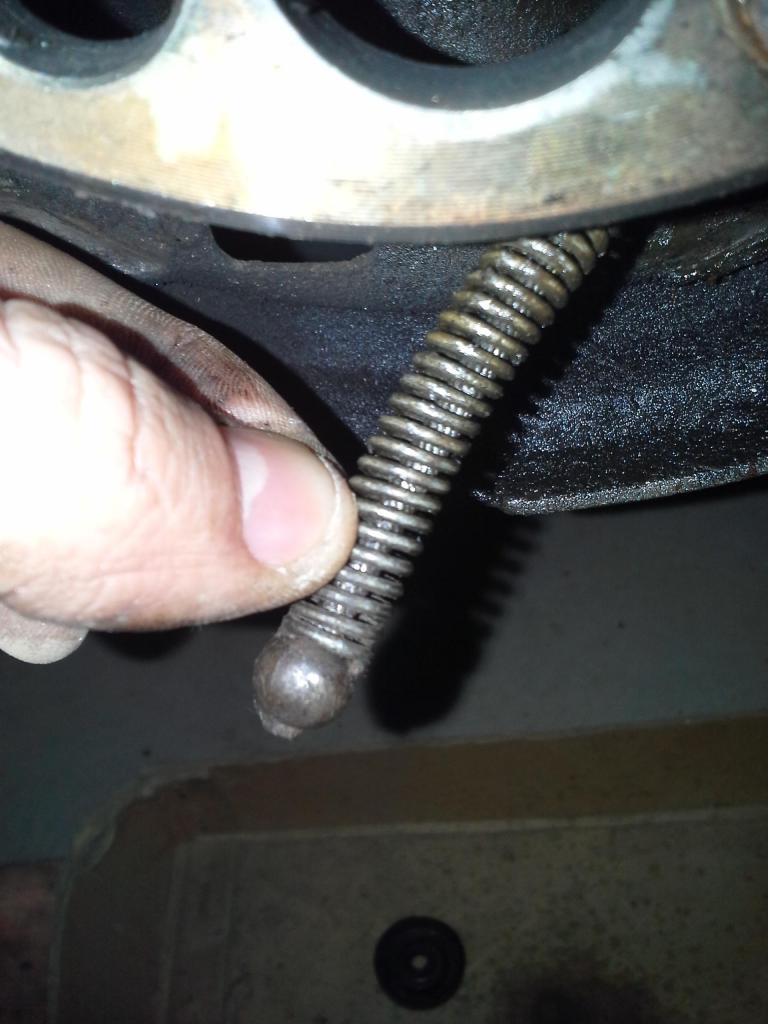
Cheers Rob for that. I have 2 questions. How the hell do I retract the handbrake spring so I can put it back on the shoe?


20131023_170909_zpscb8ea081.jpg


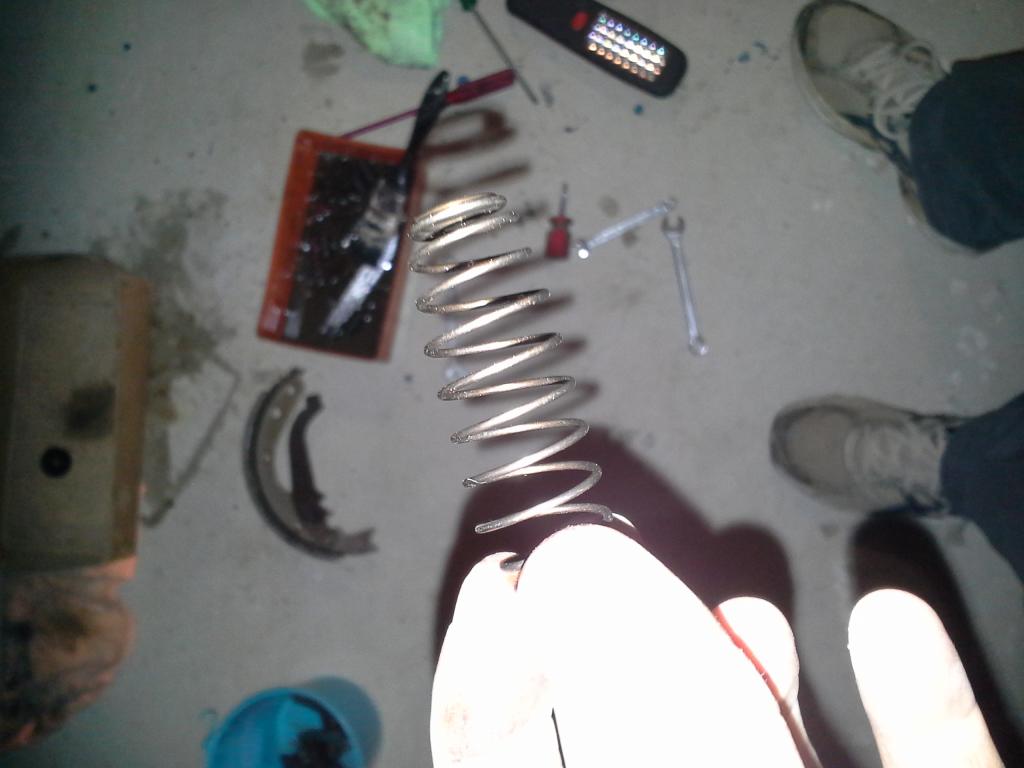
What is this spring for? This spring came out when the shoes came off but I cant find this spring in any of the photo's I have?


20131023_171038_zpsbc7bc36b.jpg


#21 _LS1 Taxi_

_LS1 Taxi_
  • Guests

Posted 23 October 2013 - 08:33 PM

Attached File  20131022_161502_zps1bbfe390.jpg   192.95K   3 downloads


Anti rattle spring?


#22 _LHSL308_

_LHSL308_
  • Guests

Posted 23 October 2013 - 08:39 PM

attachicon.gif20131022_161502_zps1bbfe390.jpg


Anti rattle spring?

Isn't that a rectangular shaped spring? This one is circular in shape. I think that one is this one, although this pic is of the other side of the car.


20131023_140436_zps1d04df5e.jpg


Edited by Gonedeaf, 23 October 2013 - 08:45 PM.


#23 hanra

hanra

    Oh My, Don't you post alot

  • Members
  • PipPipPipPipPipPipPip
  • 11,013 posts
  • Name:Brad
  • Location:Farrrrrr North Qld
  • Car:1975 LH SL/R 5000, 1967 Morris Cooper S, E36 BMW, Toyota Corolla, Isuzu DMax
  • Joined: 24-March 11

Posted 23 October 2013 - 08:41 PM

Perhaps from the auto adjuster mech at bottom left corner of the pic?

#24 _LHSL308_

_LHSL308_
  • Guests

Posted 23 October 2013 - 08:52 PM

Perhaps from the auto adjuster mech at bottom left corner of the pic?

No Brad that is a longer thinner spring. Its got me bamboozled.


#25 _mello92_

_mello92_
  • Guests

Posted 23 October 2013 - 08:58 PM

As for the handbrake cable/spring; hold the ball with a normal set of pliers/multigrips and wedge a set of side cutters between the ball and spring, then without clamping the cable slide the side cutters up the cable, pushing the spring, (will need to pull back on the multi's) then when you've gone far enough clamp the cable to hold the spring.


1 user(s) are reading this topic

0 members, 1 guests, 0 anonymous users