Jump to content


Photo
- - - - -

Yet Another UC/LX Hatch Conversion, slow but picture heavy.


  • Please log in to reply
53 replies to this topic

#1 Neils LX

Neils LX

    Forum Fixture

  • Members
  • PipPipPipPipPip
  • 2,074 posts
  • Name:a
  • Location:North west NSW
  • Joined: 18-March 07

Posted 25 August 2014 - 12:08 PM

HI There


Going to start a build thread on my UC / LX Hatch conversion which is owned by Myself and My wife and hopefully one day my Son. Hopefully wont bore you guys too much but heres the story behind it. Will update where possable and help out with any questions should anyone else attempt the same. Wont be a fast build thread but will do as much as possable


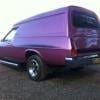
I originaly purchaced a UC hatch from Sydney which was compleate and i was fully awair it had rust. However once fully investiagated had some fairly bad rust issues in front rails and doors which while not unrepairable was just too much for me and i was going to strip it and part it out but  a mate realy wanted it so i sold it on to him for what it owed me and looked for another.


My Uncle said i could have a UC Hatch for free which had been sitting in his back paddock for the best part of 17 years including all the panels and seats ect which he kept in his shed. Its been sitting as a nearly bare shell and does have some rust in rear pillars and lower rear quarters is fairly solid in rails floors and under dash. The grand plan is to build a replica 05 Brock Hatch. The 79 car has been covered by a few people already so might go for 78 car.


Will put up pictures very soon.


Chears Neil


#2 Neils LX

Neils LX

    Forum Fixture

  • Members
  • PipPipPipPipPip
  • 2,074 posts
  • Name:a
  • Location:North west NSW
  • Joined: 18-March 07

Posted 25 August 2014 - 12:53 PM

The first car that started off the idea

2012-01-16163239.jpg


ucl3.jpg


The second as had been left sitting for years unloved and no touched.


2012-08-29125916.jpg


First job was to put a Kframe under front and make it a roller again

DSC_0022_zps84f1d8e5.jpg


DSC_0021_zps3dbfc540.jpg


So after 17 year hip hip horay it moved

DSC_0044_zps651380da.jpg


Lucky for me my wife is into cars :)

DSC_0051_zps51cf0d16.jpg


Time to start somewhere. UC dash has gotta go.

DSC_0052_zps43a1a28f.jpg


Drilling out spot welds

DSC_0056_zpsad7e6e37.jpg


Ready for my Uncle (whos helping me out ) to cut out dash

DSC_0069_zps26a7c45e.jpg


Free UC dash anyone? FREE

DSC_0071_zps09264faf.jpg


How it looks with no dash :)

DSC_0072_zps913519d9.jpg


Big thanks to my Uncle for not only letting me use his tools but his a very skilled Boiler maker and theres no way i can do i better job than him with oxy or MIG welder. But im doing okay with grinding and drilling.


#3 _berro59_

_berro59_
  • Guests

Posted 25 August 2014 - 04:16 PM

Way to go!

We can just about start a new category on gmh for UC/LX conversions.

You will have plenty of grinding and drilling with this conversion!.


#4 _Matvex_

_Matvex_
  • Guests

Posted 25 August 2014 - 04:36 PM

wish my uncle had a paddock of cars like that! 


the shell looks fairly solid.


#5 _zenburger_

_zenburger_
  • Guests

Posted 25 August 2014 - 04:41 PM

very nice! look forward to the seeing it come together.


#6 Neils LX

Neils LX

    Forum Fixture

  • Members
  • PipPipPipPipPip
  • 2,074 posts
  • Name:a
  • Location:North west NSW
  • Joined: 18-March 07

Posted 25 August 2014 - 05:40 PM

Plenty of grinding to do, it like an art. Body sealer not much fun but after heating with oxy does the trick.


I realy hate UC rear ends and cant stand them. Sorry UC fans maybe tinted lights and chrome trim helps but they still look ugly.

DSC_0115_zpse1f60ab7.jpg


So after my uncle marked out where to cut i got into it with grinder, yee haa.

DSC_0116_zpse1ca105b.jpg

lower section dented and rusty so it came off too.


Got some rusty LX rear light sections to use as a kinda template.

DSC_0117_zpsd898ec8d.jpg


Amazing looks a million times better already

DSC_0118_zps47030cd5.jpg


DSC_0121_zps7dfe22cc.jpg


Got late in the day but one side kind of sorted out

DSC_0122_zps6a145f2d.jpg


#7 purrlx

purrlx

    Forum Fixture

  • Members
  • PipPipPipPipPip
  • 1,332 posts
  • Name:Danny
  • Location:Gladstone
  • Car:LX hatch
  • Joined: 23-December 11
Garage View Garage

Posted 25 August 2014 - 05:54 PM

Looks like a 63 pontiac in one of the pics there Interested in selling any parts or whole car???

#8 Neils LX

Neils LX

    Forum Fixture

  • Members
  • PipPipPipPipPip
  • 2,074 posts
  • Name:a
  • Location:North west NSW
  • Joined: 18-March 07

Posted 25 August 2014 - 06:59 PM

HI there

The 63? has been there for just as long as the hatch, i think its been there since at least 1992 tbh. Will get photos in a sec.

Chears Neil


#9 Neils LX

Neils LX

    Forum Fixture

  • Members
  • PipPipPipPipPip
  • 2,074 posts
  • Name:a
  • Location:North west NSW
  • Joined: 18-March 07

Posted 25 August 2014 - 07:22 PM

Hey got pics, cant remember if 62 or 63. Ill go with 63 if you know your stuff. Its a Holden assembled one factory RHD no motor or box and front panels are no good. Some of the moulds have been removed since photos taken (stupid effing cows) and are placed inside it.

ponti001.jpg


ponti002.jpg


ponti003.jpg


ponti004.jpg


I dont think its accendent damaged just been used for front parts. Photos 3 years old and to answer your question im sure he would sell parts or compleate. Theres nothing in the shed that neads its parts.


#10 Ice

Ice

    Cool

  • Members
  • PipPipPipPipPipPipPip
  • 15,215 posts
  • Name:Gene
  • Location:Galaxy's away from Ipswich
  • Car:77 HZ Sandman Van
  • Joined: 03-January 07

Posted 25 August 2014 - 07:27 PM

Spotto a couple of little toranas in that paddock to

#11 308mate

308mate

    Forum Fixture

  • Members
  • PipPipPipPipPip
  • 523 posts
  • Name:scott
  • Location:Wootton - between Newcastle & Taree, NSW
  • Car:76 SS hatch (Royal Plum, Chevron Chamois interior), HQish Van (Orchid Metallic)
  • Joined: 19-May 09
Garage View Garage

Posted 25 August 2014 - 07:45 PM

Great project, heaps of fun, keep us posted.


#12 Neils LX

Neils LX

    Forum Fixture

  • Members
  • PipPipPipPipPip
  • 2,074 posts
  • Name:a
  • Location:North west NSW
  • Joined: 18-March 07

Posted 26 August 2014 - 06:24 PM

HI


Not sure i have seen much information on tailight inner panels (iv looked but maybe not hard enough!)

Anyway will have to look into giving them some attention so rear tailight globes can be changed.


Inside LX Hatch panel

DSC_0083_zps39cf8937.jpg


DSC_0082_zps9ffed94a.jpg


And now inside the UC tailight panel

DSC_0086_zpsf7ad0df6.jpg


DSC_0081_zps4d95e132.jpg


The Hatch top floor also sits higher on a UC than a LX due to different spare tyre placement and fuel tank. I wont be lowering it like an LX thou.


#13 Toranamat69

Toranamat69

    Forum R&D Officer

  • Members
  • PipPipPipPipPip
  • 2,117 posts
  • Location:Brisbane
  • Joined: 07-November 05

Posted 26 August 2014 - 07:16 PM

Mate, the UC looks to be a pretty good starting point.  


There are a lot rustier shells around than that one these days so you should get a great result.


I have a similar UC shell here that needs the same treatment.


Matt


#14 Neils LX

Neils LX

    Forum Fixture

  • Members
  • PipPipPipPipPip
  • 2,074 posts
  • Name:a
  • Location:North west NSW
  • Joined: 18-March 07

Posted 26 August 2014 - 07:39 PM

Yeah not being picky with shells but 2nd car i have while looks rougher is a solid looking shell. Hopefully when stripped not too bad. Passengers upper sill neads a patch where trim was and has typical C pillar rust which i have bought repair sections for.


#15 Neils LX

Neils LX

    Forum Fixture

  • Members
  • PipPipPipPipPip
  • 2,074 posts
  • Name:a
  • Location:North west NSW
  • Joined: 18-March 07

Posted 27 August 2014 - 10:54 AM

So Hands up whos made a mistake, Measure twice cut once hmmm. Oh well.


Everything here well to plan except accidently cutting to far into where fuel neck comes out (no biggy)

DSC_0123_zps42c29d0d.jpg


Took whole upper section inbetween tailight as wont be neading them.... well ummm.

DSC_0134_zps25b1e923.jpg


Well heres a problem. The piece now sitting in scrap pile is now neaded back and other section will nead to be remade

DSC_0144_zpsdc391dc7.jpg


So dont copy that idea lol. Is totaly fixable.

DSC_0145_zps448f6927.jpg


So thats with two tailights sitting in before donar section cut out to fit. And has fuel filler section repaired and pump up shock hole filled in

DSC_0143_zps108bff24.jpg


#16 Neils LX

Neils LX

    Forum Fixture

  • Members
  • PipPipPipPipPip
  • 2,074 posts
  • Name:a
  • Location:North west NSW
  • Joined: 18-March 07

Posted 29 August 2014 - 06:34 PM

Hi


Just an update on how My uncle and myself got around the UC inner tailight panel so access can be gained to globes


How we started.

DSC_0133_zpsd698491b.jpg


Changed the angle

DSC_0136_zps294d99fc.jpg


One globe will fit now to make the other.

DSC_0138_zps2223960f.jpg


Now other will fit.

DSC_0146_zpsdc3c4e39.jpg


Same thing now done to passengers side.

DSC_0147_zps1ade2556.jpg


Probably unexciting but a few people on Facebook were asking how to go about inner section.

Chears Neil


#17 Neils LX

Neils LX

    Forum Fixture

  • Members
  • PipPipPipPipPip
  • 2,074 posts
  • Name:a
  • Location:North west NSW
  • Joined: 18-March 07

Posted 31 August 2014 - 05:14 PM

Next bit was to sorce some Donar Cars for the best parts to go back onto UC Body.


My mate Patto had a LH Torana that he bought that had been impounded and gone rusty after sitting outside a Police yard for god knows how long. He won it on an Ebay auction but after purchasing another car and trying to sell this one (had no tags) he made the decision to cut it up for parts.


As he got it.

2013-03-02190730_zpse72e61e2.jpg


I bought front cut off Patto and while at my Uncles farm the Damm Cows have been rubbing against it but its fine to use

DSC_0023_zps708f7ce4.jpg


Had my old Torana BBQ i never finished propley and decided the rear on it looked to good to waste so decision was made to use it for rear.

toranabbq.jpg


After lead burnt off looked like it may of had a left rear quarter put on.

DSC_0175_zps87ce85c9.jpg


And after drivers side burnt off apart from dents it looks like a whole rear has been fitted. covered in bog and every time went to melt lead along boot floor spot welds kept blowing holes so decided to scrap that and find a better one.

DSC_0174_zpse2ce3374.jpg


Will update more on donar car tommorow

Chears Neil


#18 Neils LX

Neils LX

    Forum Fixture

  • Members
  • PipPipPipPipPip
  • 2,074 posts
  • Name:a
  • Location:North west NSW
  • Joined: 18-March 07

Posted 01 September 2014 - 09:54 AM

Next thing to sort out another rear donar.


I had also bought this LX rolling shell , not as a donar but as a spare body.

2013-03-02192055_zpsb2f8353e.jpg


I had already borrowed the front k frame and wheels and had no luck selling shell on so as it had best rear it was decided to use it.

DSC_0171_zps53509603.jpg


Before the chop, for one to live the other must die :(

DSC_0172_zps7fa39977.jpg


Chop Chop

DSC_0173_zps90128e48.jpg


And now to cut dash out, rusty shell had a very butchered radio area.

DSC_0176_zps0bdbe9ce.jpg


One LX dash awaiting some work to make fit.

DSC_0177_zps85bc3b24.jpg


One LX rear awaiting trimming up

DSC_0179_zpsce2a7710.jpg


Not all LX Torana sedans have the inner panel inbetween tailights. Both my BBQ and 77LX Sedan i drive dont.

DSC_0178_zps9aecd7bf.jpg


Sedan donar now a sad and sorry SWB Torana, can still use it for cuts so wont be throwing it out.

DSC_0181_zpsa3b01142.jpg


Chears Neil


#19 Neils LX

Neils LX

    Forum Fixture

  • Members
  • PipPipPipPipPip
  • 2,074 posts
  • Name:a
  • Location:North west NSW
  • Joined: 18-March 07

Posted 02 September 2014 - 01:17 PM

Hi there.


Next job was to trim up rear cut, grind down spotwelds (not drilling so can weld where want to) and get all the black sealer off and remove boot floor join.

DSC_0182_zpsa2f19159.jpg


Not much left so about ready to test fit.

DSC_0234_zpsb048eaef.jpg


Ta Da well better than looking at a UC Bum :)

DSC_0233_zps896739cc.jpg


Will still nead some work yet but getting there.

DSC_0235_zps2ce59726.jpg


Will have to repair and replace upper panel that should have stayed on.

DSC_0245_zpsa6674932.jpg


But all good as have another rear to copy off.

DSC_0236_zps00e33846.jpg


Next spot with some attention was the dash, trimmed up to test fit too.

DSC_0231_zps101668c0.jpg


Second photos bit shit but get the idea. Didnot realy take many photos as probably pleanty about.

DSC_0232_zpsa0550ede.jpg


Next spot after this will be to start on front.

Chears Neil


Edited by Neils LX, 02 September 2014 - 01:18 PM.


#20 Shiney005

Shiney005

    Oh My, Don't you post alot

  • Members
  • PipPipPipPipPipPipPip
  • 9,784 posts
  • Name:Laurie
  • Location:Dubya Hay
  • Car:L34, LH SL, LX SL, EK and some Commodores.
  • Joined: 19-January 12
Garage View Garage

Posted 02 September 2014 - 03:18 PM

Having never read a UC conversion thread I had no idea how much work is involved. 


#21 Neils LX

Neils LX

    Forum Fixture

  • Members
  • PipPipPipPipPip
  • 2,074 posts
  • Name:a
  • Location:North west NSW
  • Joined: 18-March 07

Posted 02 September 2014 - 06:29 PM

Its not too bad to do conversion just sorting thru shed for panels and hinges so after doing front might be another story.  I honestly think some rust repair work can be harder. Wont know exactly how much work body will nead til its fully stripped but so far looks okay.

Not a heap of progress to show on front. Just grinding out more spot welds atm but will update where im up to soon.


#22 _greg2240_

_greg2240_
  • Guests

Posted 02 September 2014 - 08:39 PM

Great to see you get started mate, going strong so far, keep it up, that second photo is the one you put on my thread isn't it? what are your plans as for running gear etc, I think that the join under the lead was factory but could be wrong, anyway good luck with it, good to see another uc to lx on the go, Greg


#23 Neils LX

Neils LX

    Forum Fixture

  • Members
  • PipPipPipPipPip
  • 2,074 posts
  • Name:a
  • Location:North west NSW
  • Joined: 18-March 07

Posted 02 September 2014 - 10:05 PM

I'm not 100% on join but happy with current result. I have a few 304 motors sitting around and iv got a supra 5 speed in my registed LX I'm driving atm. Will get body sorted and go from there. Yeah that picture was on your thread iv only just started working on it thou. How's your Torana Hatch going?

#24 _greg2240_

_greg2240_
  • Guests

Posted 03 September 2014 - 02:22 PM

my hatch is still here, still stock piling loads of parts (always looking), but have been working on my gtr as its more complete but probably more work, hopefully back into the hatch early 2015, will be keeping an eye on your thread thou, keep it up, Greg


#25 Neils LX

Neils LX

    Forum Fixture

  • Members
  • PipPipPipPipPip
  • 2,074 posts
  • Name:a
  • Location:North west NSW
  • Joined: 18-March 07

Posted 15 September 2014 - 09:55 PM

Time to have a little update, doing work on front now.


Bumper mounts are different on LX from UC and also inner section tapers down near Radiator support.


UC inner

DSC_0237_zps5de804ab.jpg


LH/LX inner

DSC_0238_zpsf84d7b25.jpg


So with a plan and some thinking its time to start on what to do with front.

DSC_0239_zps41f96672.jpg


Pop goes the gas axe and this bit wont be neaded.

DSC_0240_zpsd4df6074.jpg


Which leaves this bit and a lot of spot welds to grind off.

DSC_0241_zps13567532.jpg


Bit of reo to stop it flopping around

DSC_0256_zpsad60450f.jpg


Grinding of spot welds and some bonnet hinge rust.

DSC_0246_zps64755b79.jpg


Bit more progress, lower radiator support will nead attention

DSC_0257_zps9e261149.jpg


Somehow Bonnet hinge section on UC was still ok so cut it out.

DSC_0340_zps45adabe0.jpg


But ended up using fresh metal to replace LH inner section

DSC_0342_zps7c08316b.jpg


DSC_0343_zpsc7f80871.jpg


Started on removing UC inner skirts

DSC_0341_zpsb8ef8a53.jpg


So will have to finish removing UC inner skirts, cut around Body number so its not moved or altered and replace rusted metal on lower replacement radiator support panel.Then might be able to fit up replacement front.


Also got some replacement parts from Rares

DSC_0311_zps70fe4cf7.jpg


Chears Neil


1 user(s) are reading this topic

0 members, 1 guests, 0 anonymous users