
most definitely.... that's the only problem when you do a restoration... no one can really see how much work has gone into I unless they followed a thread/forum... (like marty's where you can see everything he has done and all by himself as well - and I know others as well have done) where as a conversion / modern take when you see it finished and see the changes , regardless of the starting condition of the car it is easy to appreciate the amount of work that has gone into it.... and besides... I love driving my VE commodore with all its mod cons but I just love the old school look of a Torana... so combine the best of bot h worlds I say

LoHla
Started by
Doubledip
, Nov 19 2015 08:58 PM
173 replies to this topic
#76

Doubledip
-
- Members
-

- 95 posts
Forum Member
- Name:Justin
- Location:Sydney
- Joined: 21-January 15
Posted 17 January 2016 - 08:37 PM
#77
IMORAL
 View Garage
-

- Members
-
- 2,569 posts
Bored
- Name:Paul
- Location:As far away from WA as possible
- Car:LX SS HATCH - IMORAL
- Joined: 24-February 11
View Garage
Posted 17 January 2016 - 08:50 PM
Great work. Cant wait to see it finished.
#78
Covert
-

- Members
-
- 1,987 posts
Forum Fixture
- Location:In my LH
- Car:LH
- Joined: 08-November 13
Posted 17 January 2016 - 10:19 PM
Agree with the above, looking forward to watching the build progress and the finished product.
It's great to see someone who after a couple of previous Torana builds, now has the know how and balls to progress to a build that's uncharted so to speak.
It's great to see someone who after a couple of previous Torana builds, now has the know how and balls to progress to a build that's uncharted so to speak.
#80
Doubledip
-
- Members
-
- 95 posts
Forum Member
- Name:Justin
- Location:Sydney
- Joined: 21-January 15
Posted 22 January 2016 - 05:19 PM
Just a little update... been fitting the console and adding in the pieces that we need to run , dash controls, electric handbrake button, getting the shifter into correct position, USB/Aux input mounted
Then welding in a few brackets to mount the under dash and modifying the glove box and feet ducts to fit


#81
SmacT
-

- Members
-
- 1,007 posts
Forum Fixture
- Name:Sam
- Location:Sydney
- Car:LX 4dr 355, TKX, BW
- Joined: 24-December 08
Posted 22 January 2016 - 07:34 PM
I wouldn't even know where to start fitting that up. Nice work. :-)
#82
Doubledip
-
- Members
-
- 95 posts
Forum Member
- Name:Justin
- Location:Sydney
- Joined: 21-January 15
Posted 22 January 2016 - 07:50 PM
I wouldn't even know where to start fitting that up. Nice work. :-)
Thanks SmacT - yes its a bit of a jigsaw puzzle... when it comes time to installing it the final time i will be very much relieved as its one of those processes where everything has to go in in a particular order otherwise it is take it all out and go again.....
#83
neglectedtorana
-

- Members
-
- 1,057 posts
Forum Fixture
- Name:Tom
- Location:Central Coast
- Car:LX Torana Sunbird
- Joined: 06-March 12
Posted 22 January 2016 - 10:07 PM
Great work Justin,
You're making it look easy even though it must be full of constant challenges/hurdles.
The way you are working calmly through it says it will be a great end result, I would need a much bigger hammer than the one in the foot well
Have fun,
You're making it look easy even though it must be full of constant challenges/hurdles.
The way you are working calmly through it says it will be a great end result, I would need a much bigger hammer than the one in the foot well
Have fun,
#84
_HarroLH_
_HarroLH_
-

- Guests
Posted 26 January 2016 - 01:11 AM
Awesome build mate will be a blast to drive once complete!
#85
Doubledip
-
- Members
-
- 95 posts
Forum Member
- Name:Justin
- Location:Sydney
- Joined: 21-January 15
Posted 30 January 2016 - 05:56 PM
little bit more of an update... bee trying to finish off all the little bits and pieces to do with the dash install..
first had to modify the gear shifter by moving it back . in doing so it lowered it but that was no problem as the Momo gear know needed a fatter shaft to screw into. machined up a screw on sleeve and now i have regained the height along with having a tight fit with the gear knob

then had to make up thew clutch switch setup for the VE ECU to understand what is happening for both starting (saftey) and cruise control

when mounting it had to make sure the position of the switch/pedal could be learnt into the ECU. I use a particular tuning software for the Holdens and this was used to check

All mounted up


cause the ends of the dash were now exposed made up some metal covers (which will be trimmed in leather) to finish of the ends


next on the list was to modify the factory VE window switch. It has in the centre the mirror adjusting part and i am not running the electric mirrors. Decided to mount the push button start button in there so the switch was pulled apart and modified accordingly


an overall shot of the console .. starting to come together now... wiring it up shouldn't be too far away now...

the started on the rear door... mounting in the power window regulator and getting it to work correctly ... then figuring out where and how to mount the internal VE rear door handles to keep with the modern internal loom and also housing the window switch


#86
_LS1 Taxi_
_LS1 Taxi_
-
- Guests
Posted 30 January 2016 - 06:32 PM
Now you're just showing off.
Love it!
Love it!
#87
SmacT
-
- Members
-
- 1,007 posts
Forum Fixture
- Name:Sam
- Location:Sydney
- Car:LX 4dr 355, TKX, BW
- Joined: 24-December 08
Posted 30 January 2016 - 06:50 PM
Factor 10 Awesome. Looking forward to the bodywork section, now, as it seems you're pretty handy in that department too. :-)
#88
_72yellow_
_72yellow_
-
- Guests
Posted 30 January 2016 - 07:08 PM
Loving this
Great job with the start button mod - looks like it should have lived there
Great job with the start button mod - looks like it should have lived there
#89
bullitA9X
View Garage
-

- Members
-
- 4,168 posts
Oh My, Don't you post alot
- Location:south australia
- Joined: 08-November 05
View Garage
Posted 30 January 2016 - 07:25 PM
Mate this is an absolute awesome build your doing its a work of art!! Nothing more i can say as you said you will have all the modern cons in a old torana the best of both worlds....ah and i thought building my sons hatch is a big job lol....
#90
Redzone
-

- Members
-
- 517 posts
Forum Fixture
- Name:Dave
- Location:Sunshine Coast
- Car:Mini torana's - Gemini coupe 10.787@123mph, log booked Group A DOHC Gemini under resto..
- Joined: 02-November 10
Posted 31 January 2016 - 04:14 AM
Individually Constructed Vehicle? Mad props! Love everything you've done so far.
Individually Constructed Vehicle? Mad props! Love everything you've done so far.
Individually Constructed Vehicle? Mad props! Love everything you've done so far.
#91
MARKL
-

- Members
-
- 94 posts
Forum Member
- Name:Mark
- Location:Sydney
- Car:Hatch
- Joined: 05-October 13
Posted 31 January 2016 - 03:46 PM
Very nice. Each to there own I figure, do what you want (I would probably draw the line at an A9X or L34). It is an interesting concept, I love it and you appear to be executing it really well, performance will be awesome with modern car manners and reliability. I can't wait to see the finished result.
Cheers
Edited by MARKL, 31 January 2016 - 03:47 PM.
#92
Doubledip
-
- Members
-
- 95 posts
Forum Member
- Name:Justin
- Location:Sydney
- Joined: 21-January 15
Posted 19 April 2016 - 09:53 PM
been a while since updates but work has slowly been progressing on my torana...
made new door trim cards and then modified the VE arm rests to sit flat.... more work will be done onthe door trims as in making them more modern and with more detail but a general idea is below


pulled apart, and cleaned and reconditioned my power steer rack ready for the modifications to the K frame

modified the torana boot lock to have a boot popper... and made a cover for it... the boot will be trimmed along with the cover when finished


Had the tunnel welded up and also the Plenumn chamber cover for the VE HVAC box


ordered the oiling system so we can get to fitting it to the inner guard area.. Moroso oil accumulator, remote oil filter mount and oil cooler

Lastly mounted the electric power steer pump .. using the bumper mount bracket


#93
Heath
View Garage
-

- Administrators
-
- 18,403 posts
I like cars.
- Name:Heath
- Location:Eastern Suburbs, Melbourne
- Car:Heavily Modified UC Sunbird Hatchback
- Joined: 07-November 05
View Garage
Posted 19 April 2016 - 10:07 PM
Bloody hell.
I don't actually like the concept of what you are doing with this car, but the way you are doing it is AWESOME.
Fantastic workmanship.
#94
Doubledip
-
- Members
-
- 95 posts
Forum Member
- Name:Justin
- Location:Sydney
- Joined: 21-January 15
Posted 16 May 2016 - 11:29 PM
Well its been a few weeks since the last update.. have still been steadily moving along
Installed the electric handbrake ..


made a bracket for the clutch reservoir from malwood and mounted it.. sits under the cluster...


started to make the infill panels for the smoothing of the engine bay chassis rails...


mounted the heat ex-changer pump onto the same bumper bracket as the electric power steer pump


welded in the rust replacement panels for the bonnet hinges


repaired the front apron


welded in the strengthening plates etc.. in to the parcel shelf for the rear seat belts in the parcel shelf along with removing the rust (still not finished yet)


The finally installed the rear coil overs


url=http://s1377.photobu...764l9.jpg.html]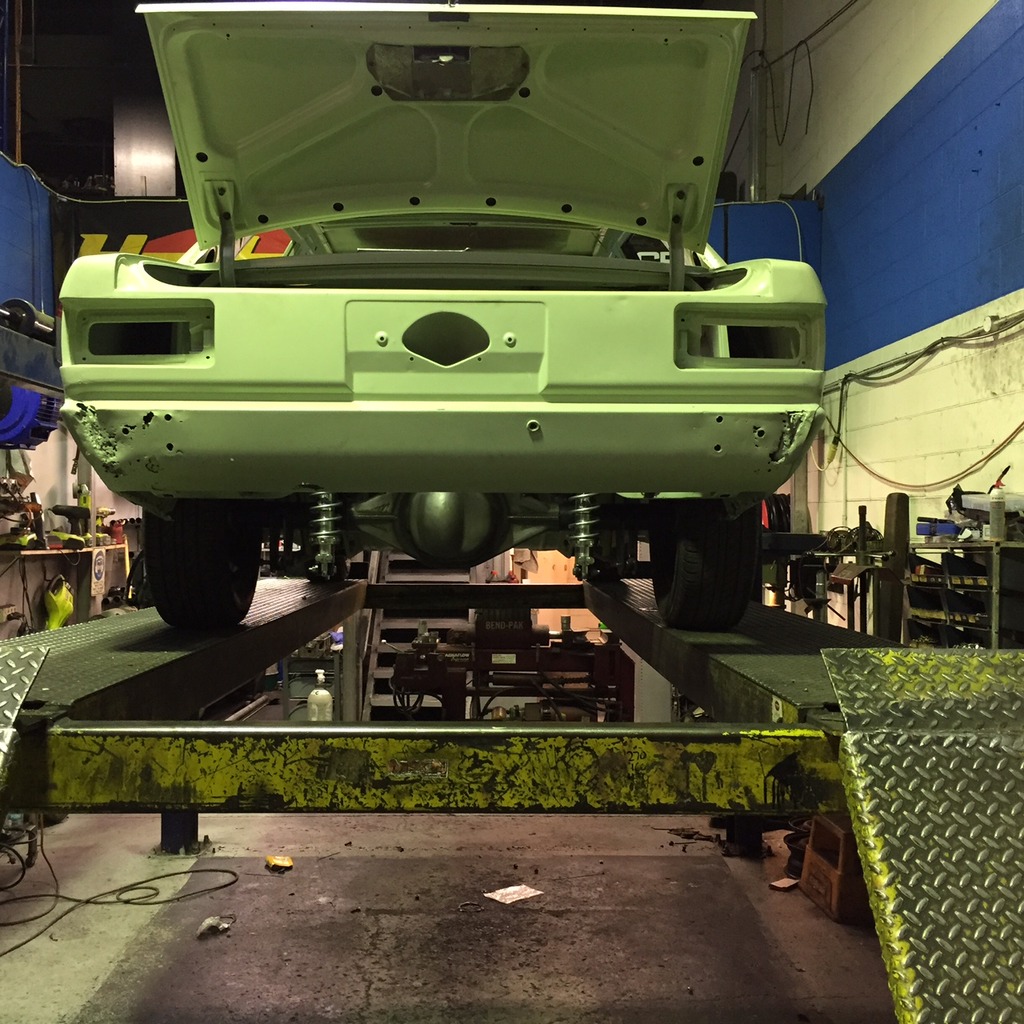 [/URL]
#95
SmacT
-
- Members
-
- 1,007 posts
Forum Fixture
- Name:Sam
- Location:Sydney
- Car:LX 4dr 355, TKX, BW
- Joined: 24-December 08
Posted 16 May 2016 - 11:55 PM
Feeling so lame right now... Ha ha - luv it.
#96
Doubledip
-
- Members
-
- 95 posts
Forum Member
- Name:Justin
- Location:Sydney
- Joined: 21-January 15
Posted 17 May 2016 - 12:11 AM
No need to feel lame. Sometimes I look at others threads and think the same. It all
Takes time. It's been a year to the day since I started this project and I look at it and it's still a bare she'll and I wonder where all the time has been spent. But then I look at the photos and realise what has been done so far and can see ...
Takes time. It's been a year to the day since I started this project and I look at it and it's still a bare she'll and I wonder where all the time has been spent. But then I look at the photos and realise what has been done so far and can see ...
#97
_Lightyear_
_Lightyear_
-
- Guests
Posted 17 May 2016 - 07:19 AM
Yep, you have done a fair bit in one year. I want to build a retro car one day. I love the look of older cars, but I love the idea of driving a new car. Only difference is, I want to do a chassis swap as well. Basically just cut the body off and drop it onto a modern chassis. I have a hatchback with no floor, and an MX5 with no body, but not the best match sadly.then again, I can get an LS conversion kit for the MX5 chassis from the states, 
Your doing an awesome job, keep the updates coming. What colour is it going to be?
Your doing an awesome job, keep the updates coming. What colour is it going to be?
#98
_Bomber Watson_
_Bomber Watson_
-
- Guests
Posted 17 May 2016 - 07:42 AM
How does the mx5 track width and wheelbase compare to the Torana?
#99
Heath
View Garage
-
- Administrators
-
- 18,403 posts
I like cars.
- Name:Heath
- Location:Eastern Suburbs, Melbourne
- Car:Heavily Modified UC Sunbird Hatchback
- Joined: 07-November 05
View Garage
Posted 17 May 2016 - 09:08 AM
More awesome work. Very nice
#100
_Lightyear_
_Lightyear_
-
- Guests
Posted 17 May 2016 - 08:28 PM
I wouldn't use an MX5 chassis on a LX Torana. It needs stretching, but the width would be close. Something a bit bigger would suit better. I like he handling of an MX5, so the $100 rolling chassis MX5 is going into storage for a future project.
Edited by Lightyear, 17 May 2016 - 08:31 PM.


1 user(s) are reading this topic
0 members, 1 guests, 0 anonymous users


![http://s1377.photobu...764l9.jpg.html]](http://s1377.photobucket.com/user/justin_stark2/media/IMG_8096_zpsylg764l9.jpg.html%5D)