Jump to content


Introduction to airflow


  • Please log in to reply
30 replies to this topic

#1 _oldjohnno_

_oldjohnno_
  • Guests

Posted 25 June 2016 - 02:51 PM

It's too cold to be in the shed today, and I've noticed in some recent threads that a lot of people still don't "get" air flow. So I thought I'd copy and paste something I did a few years ago, it's a longer version of the airflow page in the Holden six notes. I hope there's something of interest in it.


Making power is largely about airflow. Of course there's more to it than that but without adequate flow none of the other stuff really matters. It's just not possible to give any more than a brief overview in a just a few pages, but there are some very good books on the subject if you'd like to learn more and I've included links to further reading at the end of this page. But hopefully this will whet your appetite…
 
In the last section we looked at ways of maximising the quantity of air in the cylinder. But specifically, what's important is the mass of the cylinder charge. And that mass is in proportion to the temperature of the charge - there's more air in a 33cu.in. charge when it's at say 20 degrees than at 50 degrees. Cooling the intake charge is probably the quickest and easiest ways of improving the VE that you'll find. With most vehicles it's possible to arrange the intake to pick up air from a point that reduces the temperature and increases the pressure when compared to a standard under-bonnet setup.
 
What about vapourising fuel in the intake tract as a way of decreasing charge temperatures? It's currently fashionable in some circles to shift the injection nozzles upstream for this purpose. With oxygen-carrying fuels like methanol (which incidentally also has a high latent heat of vapourisation) it's pretty easy to show that early vapourisation can show a net benefit. But with fuels like petrol it isn't so clear cut. When a liquid like petrol vapourises as well as absorbing a lot of heat it also increases its volume by a huge amount. So on one hand we have a decrease in temperature helping to increase charge density, but on the other the massive increase in volume of fuel displaces some of the working fluid (air) from the charge. This may help explain why so many engines (especially those that are flow limited) are so insensitive to petrol atomisation in the intake - and in fact flow limited engines seem to make more power when the fuel is fed as a solid stream. With petrol at least, it's probably not worth the effort to encourage fuel vapourisation in the inlet.
 
Let's have a look at air. Like anything else with mass it's subject to Newton's laws of motion. In simple terms, when it's stationary it wants to stay that way and it takes work to get it moving. When it's moving it takes effort to change its speed or direction. And a moving volume of air contains some amount of kinetic energy, the energy that was invested in it to get it moving in the first place. Recovery of at least some of this energy is an important part of power production. But while air has mass it is also compressible and elastic. As a result of this it's usual for all the particles of air and fuel in a port or runner to be travelling at widely varying speeds. They might even be travelling in different directions. If you could see the air it would look more like a "Slinky" with waves bouncing back and forth than a column of incompressible liquid. Remember this; it's important and something that we'll touch on again shortly.


Pretty much everything we do to maximise flow has the same aim - we want the airflow to be smooth and controlled and within certain velocity and turbulence limits. Having said that pretty much every part of an engines ducting will carry flow that is basically turbulent; we just need to limit that turbulence to a point where it doesn't disrupt the flow too severely. In practice we might use a bellmouth on the carb intake to accelerate the air smoothly into the throat. In the carb we need to accelerate the air further so that we have a localised low pressure zone into which the fuel can be pushed by atmospheric pressure. Once the fuel is added we then need to allow the air to slow down again, hopefully in a way that lets us recover energy. Now this re-expansion phase is important to understand, not just in terms of carburation but throughout the engine as a whole. So we'll take a closer look at this process now.
 
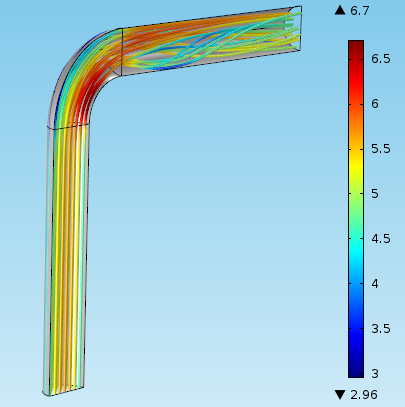
I think everyone reading this will be familiar with the shape of a venturi. Typically it will have a large inlet and outlet diameter with a smaller throat at some point in the middle, where the velocity is high and the pressure low. The inlet transition is generally a simple radius shape, and is relatively short - usually a fraction of the length of the outlet or downstream transition. There is a good reason for this; air can be accelerated into a constricted area relatively easily over a short distance without much loss of efficiency or energy. Expansion is a different story altogether though; if we try to make it happen too quickly the flow will separate from the walls and become turbulent and this in turn leads to a dramatic reduction in flow. This is a really important concept to understand; a very large proportion of the productive port work will be related to minimising flow separation. Novice builders tend to put too much effort into easing the entry side of restrictions and not enough effort into the downstream side. In simple terms the upstream approach to any high velocity zone isn't so important, the downstream side critically so.
These "flow expansion zones" are everywhere throughout the engine flow path. Some examples: the transition from throttle body to plenum with an injected engine, or carb to plenum with a carburated engine. The port throat to turn is another area, the runner to head port transition of a siamese port engine another, the valve seat to cylinder yet another. On the exhaust side the collector is a good example. As mentioned previously novice builders often seem to sweat over things like bellmouths and port matching when the real gains are to be made at the opposite end. Keep in mind though that anywhere there is wet flow you may be working with conflicting requirements. For example the turbulence created by the rapid expansion under a carb may reduce bulk flow but it may also help with fuel mixing, and which is the dominant effect may only be determined by experimentation. This would explain why "Super Sucker" style carb spacers work very well on some engines but not others.


Here’s something else to consider: the energy of air. Pressure and velocity are proportional; as the velocity goes up the pressure goes down, but the energy remains constant. As we’ve already seen, we can accelerate it across something like a valve seat pretty easily. The secret is in pressure recovery - in other words, expanding the air smoothly and without creating turbulence, in order to recover as much of its original pressure as possible.
 
So we've established that while air doesn't like to be sped up, it likes being slowed down even less. In practical terms any surface that diverges from the flow path at an angle sharper than 10 to 15 degrees will cause flow separation. This would include any port or runner walls as well as the faces of the valve and seat and any approach and departure angles. As far as wall finish goes I think it's pretty well recognized now that a highly polished finish is not what we want. I've found that for good flow a plain old carbide finish is as good as any, though most professional porters will finish with a coarse sanding roll for the sake of appearance. This doesn't seem to hurt flow, but if you have an old-style head with polished walls it will definitely hurt performance from both a flow and fuel suspension perspective.
 
We could summarise porting (whether it's head porting or manifolds etc.) in just a few lines - porting in essence is simply is an attempt to do one of the following:
 
1.To keep the air velocity within certain limits (in order to limit turbulence and the resulting flow losses)
2.To prevent the creation of turbulent flow
3.To keep the air attached to the surrounding surfaces and prevent them from becoming detached and turbulent.
 
You could further distill that summary down to just five words - we port to reduce turbulence. It’d be a whole lot easier to manage the air if we could just see it - and if we could we’d probably realise that it doesn’t behave the way most of us expect it to, and that it usually doesn’t take the path that we’d expect.


It’s time for a folksy analogy to help us visualise air - airflow as highway traffic. Let’s say we have a nice, wide freeway, ten lanes wide connecting point A to point B. Point A represents the inlet of a manifold runner, while point B is just downstream of the intake valve seat. The cars on this freeway represent the particles of air travelling down the runner. The freeway isn’t a uniform width, in places it’s twelve lanes wide, in another it’s only eight wide. There are a couple of sweeping bends and one or two sharper curves as well.
 
In the real manifold our objective is to get the greatest possible mass of air from one end to the other. On our freeway, we want to get the greatest possible number of cars from A to B. How do we do this? Obviously we want the cars to be travelling as quickly as possible, but not so fast that they spin out of control on the bends, or are unable to change lanes where the road widens or narrows without losing control and slowing all the traffic.
 
The cars are travelling swiftly but still under control. Cars in each lane might not necessarily be all travelling at the same speed but they all stay headed in the right direction so the traffic flow is pretty orderly and the volume of traffic is good. This is like laminar flow. The traffic in the two outer lanes will tend to be a bit slower (the boundary layer) while the lanes in the middle will tend to go the fastest. Laminar flow.
 
Let’s now upset things a bit. We’ll make a chicane halfway down a straight stretch by suddenly narrowing the road to three lanes and then widen it again just as suddenly. Then we’ll dig some humongous potholes here and there, plus we’ll convince the drivers to try to drive faster than they are really able.
 
The result: chaos. Cars are braking for the chicane, merging suddenly and knocking other cars into a spin. The cars are still spinning when they emerge from the chicane, into the path of other traffic. Some cars manage to maintain direction, some are barely moving, some are doing 200mph, some are spinning and some are going backwards. This is turbulent flow - there’s a hell of a lot going on but there aren’t many cars turning up at point B. Just when they’ve recovered from the chicane they hit the potholes at speed and it’s on again - cars spinning, bouncing and jumping in all directions. Their progress is badly impeded and so is that of the cars in whose path they land. Turbulent flow. It’s spectacular but not very effective.


Remove the chicane, fill the potholes and get the drivers to go back to driving as fast as they can but not faster. Now sit back and watch the traffic flow for a while. If traffic really flowed like air you’d see some surprising behaviour. For a start, whenever the cars encountered a curve they wouldn’t remain in their respective lanes lanes like normal traffic. Instead, they’d all tend to crowd over to the inside of the bend, leaving the outside couple of lanes almost empty. Basically air takes the classic racing line: hugging the apex and leaving wide. Put a couple of left and right bends in series and the air will negotiate them just like a racing driver - by clipping the apexes and straightening the path as much as possible.
 
This corner hugging behaviour is something that may surprise some. You might expect that with increasing velocity that the flow would tend to go wider and wider, just as a liquid like water does in an open channel. In reality, air can turn sharply even at quite high velocities, and the crowding of flow to the inside of the bend tends to make the flow velocity even higher at this point.
 
Another characteristic of air is its “stickiness”. A moving particle of air will tend to make the surrounding particles move along with it. To go back to our cars-on-the-freeway analogy for a minute, if we were to make the centre lane of cars travel at a certain speed, the cars in the lanes at either side would also tend to move forward, and the lanes alongside those in turn would also move at a progressively reducing speed as we approach the outer lanes. This is something that has implications for fuelling, and intake and exhaust system design, and can be used to advantage.


Now is probably a good time to mention the Coanda effect. Simply put, it’s the tendency of a moving stream of fluid (like air) to be attracted to a nearby surface. Stand at the kitchen sink and turn on a tap. Now hold a spoon so that the back of it just touches the stream. See how the water flow curves around, following the shape of the spoon? That’s the Coanda effect in action. The faster the flow, the closer the fluid will hug the surface.
 
This attachment is quite a handy phenomenon for tuners. It help us to turn mixture around the short turn radius above a valve seat for example. Providing the surrounding surfaces are smooth and don’t diverge too sharply, the air will want to remain attached, and this helps to minimise turbulence. As we saw earlier, maximising flow is all about reducing turbulence, and making the flow as laminar as possible.
 
You’ll often see head porters fill in the “dead spots” - ie. the areas of a port where the flow velocity is very low, often on the outside of a bend. Flow and performance usually improves and the man with the die grinder may say it’s because he’s reduced the cross-sectional area at this point, increasing the flow velocity. I tend to disagree - the bulk of the flow will be in exactly the same spot as it was before, so velocity will be largely unchanged. But with the outside wall crowded in, the flow is now attached to both walls and this has a guiding and stabilising effect.
 
Anytime the flow becomes detached there will be turbulence and bulk flow will suffer. If you check an old-school intake port with a velocity probe and a string you’ll probably find that the flow over the short turn radius is very fast but quite stable. The long side flow on the other hand will often be very slow, very turbulent and may even be rolling or going backwards in spots. Anything you can do to keep the flow attached will help. If you’ve never used a flowbench before you’ll soon discover a couple of things: one, most of what you thought about airflow behaviour simply isn’t true. And two, air isn’t the light, thin fluid you thought it was. Instead, it’s a heavy, springy, squishy, sticky medium.


Hopefully by now you have some idea of the way air flows through a passage and also have an understanding of laminar and turbulent flow. There is a practical aspect to these two different types of flow, and it’s essential that the tuner understands this, otherwise he could end up doing a lot of work for little or no gain.
 
This is it: when the flow is largely laminar, there is the possibility for power gains through keeping it laminar. For example, anything you can do to keep the velocity within reasonable limits, keep the flow attached to the port walls, smooth and straighten the flow path - in other words anything to prevent turbulence - will improve flow and performance.
 
The flip side to this is the way we manage turbulent flow. There are some situations in an engine - flow through the exhaust seat and port during blowdown for example - where the flow is very very turbulent. This type of flow couldn’t care less about all those niceties we spoke about with laminar flow, all that matters is that we have sufficient cross sectional area. In other words, if the flow is unavoidably turbulent, about all you can do is make sure the hole is big enough. All those other things - smoothness, straightness and so on - don’t mean a thing, the flow is already turbulent anyway.


An associated side-effect of the above is this: there’s really very little point to developing an exhaust port on a flowbench. The difference between the type of flow that the bench produces and the type that occurs when the valve opens on a running engine is totally dissimilar, so much so that flow testing the exhaust port achieves very little. Of course it follows that traditional rules-of-thumb (eg. exhaust flow should be 75% of intake flow) are basically worthless. If the cross-sectional area of the exhaust port is around 80% of the intake, and isn’t too ugly, then you’ll at least be in the ballpark.
 
Where the turbulent flowpath is fairly long - as in the case of an exhaust port and primary pipe, it’s certainly a good idea to encourage that flow to become laminar (or at least less turbulent) as soon as possible. Smooth walls and gradual changes in cross sectional area are the general idea. If you do have to have sudden changes in direction or area - where a primary pipe dives downwards from a port face perhaps - then you might as well get it over and done with as soon as possible. There’s nothing to be gained from the old ideas of having a few inches of straight pipe after the port exit; the flow is already turbulent anyway. You’ll do just as well to swing the pipe down straight away, and then worry about reducing the turbulence later.


Up til now we’ve been talking mainly in terms of flow as being steady, like that produced by a flowbench, when obviously a running engine produces flow that is very unsteady. Does this mean that a flowbench is irrelevant? Not at all. Within limits, flow gains in the entire intake tract that are made on the flowbench will translate into gains at the flywheel. The reason I said “within limits” is this: if the engine already has available to it all the flow it can use then there’s not much to be gained by increasing it further. If however the engine is flow limited - a very common situation, especially so with older 2 valve engines - then it will respond extremely well to improvements to flow capacity. Pick up 15% more intake flow and it’s likely that the engines output will increase by a similar amount. Good flow can completely fill a cylinder; by taking advantage of some unsteady-flow phenomena we can improve that even further, and that’s what we are going to look at next.

Edited by oldjohnno, 25 June 2016 - 02:52 PM.


#2 Cook

Cook

    Forum Fixture

  • Members
  • PipPipPipPipPip
  • 1,531 posts
  • Location:Melbourne
  • Car:LX Hatch
  • Joined: 27-February 15

Posted 25 June 2016 - 04:10 PM

Johnno,  Thanks for the insight and I apologise as it is over my head, but I sort of have a better appreciation of the principals. I have recently been researching catch cans for PCV returns etc. as I have a  '77 model and want it to be street legal and I'm not so much about getting the last bit of HP out of the engine.  Anyway I am now wondering how much does the return of PCV gases into the inlet have on the engine overall, not in terms of performance, although that would be interesting, but on the engine components.  To adopt the traffic scenario I assume it's like introducing a merging lane into the freeway (or am I wrong?).   I'm thinking that if we want air to flow smoothly and at consistent rates, not just for performance but also for longevity of the engine, then these influences must have adverse side effects.  The question is how material are they?


If I am way off the mark I apologise.  Cheers Ron


#3 _oldjohnno_

_oldjohnno_
  • Guests

Posted 25 June 2016 - 06:24 PM

I don't really know Ron, but I imagine that if the engine was in reasonable condition the volume of blowdown gases would be almost negligible. It'd be nice to introduce them at some point where'd they'd be shared amongst all the cylinders, but I don't know whether such a small volume is worth a lot of effort.


#4 EunUCh

EunUCh

    Lotsa Posts!

  • Members
  • PipPipPipPipPipPip
  • 2,774 posts
  • Location:not this planet
  • Car:japos
  • Joined: 23-November 06

Posted 25 June 2016 - 08:29 PM

Interesting stuff , so how nice it would be if we could see what is going on in there.

Following pic is self explanatory done some years ago.

Attached File  flow4.JPG   243.76K   4 downloads

Looks probably not too bad from base of carb. but then if we look at short to long there seems to be some scatter or slinky stuff going on?

I think what the short turn that is being spoken about refers to how well the stream can stay in contact with the skin that tends to "pull" things in and keep it all together to some point ?

A bit like how a flame reacts around a round bar , although not quite the same given what is going on an illustration of short/long radius

hence probably why "tounges" are inserted in ports to try to increase the radius ?

Short radius.

Attached File  b4.jpg   33K   0 downloads

Long radius.

Attached File  b2.jpg   39.52K   0 downloads


#5 _oldjohnno_

_oldjohnno_
  • Guests

Posted 25 June 2016 - 09:30 PM

I'm not even sure what I'm looking at with the perspex manifold. Many years ago they used to do all sorts of things to visualise flow, like pumping water with entrained bubbles in it to watch where the flow goes. Trouble is liquids flow in a completely different way to compressible fluids like air, so the water analogies were misleading. These days, thankfully, we have CFD to show very clearly velocity profiles, streamlines, pressures, temperatures, whatever you like. This one shows the flow taking the racing line around a 90 deg bend:

Pipe-elbow-model.png


#6 _Ned Loh_

_Ned Loh_
  • Guests

Posted 27 June 2016 - 07:25 AM

good stuff. I look forward to part 2.


I hope we are going to get into specifics of our little 12 ports  :D


#7 _Gunmetal LH_

_Gunmetal LH_
  • Guests

Posted 29 June 2016 - 01:36 AM

Interesting!


#8 fenz

fenz

    Forum Member

  • Members
  • PipPipPip
  • 220 posts
  • Name:Aaron
  • Location:South Australia
  • Car:LJ 2 door and UC V8 4door
  • Joined: 26-July 09

Posted 07 July 2016 - 01:42 PM

It truly would be cool to have a flow bench available to test some of your work.

I have dabbled over the years mainly with motorcycle stuff but it is interesting to read and understand the science of what is actually going on.

Quite understandable how a lot of people can make a port flow worse after swinging a die grinder.


With the holden six heads I think if your not chasing all out performance and want to have a play I don't think that it is all that hard to make some gains if you apply some of the basic principals.

Lets face it for the average joe with a mild street engine paying big bucks for a pro to do their magic is most probably not the best spend of their money  unless they intend on further upgrades.


Oldjohnno Keep the information coming I like what your doing.


#9 _oldjohnno_

_oldjohnno_
  • Guests

Posted 07 July 2016 - 08:18 PM

It truly would be cool to have a flow bench available to test some of your work.

I have dabbled over the years mainly with motorcycle stuff but it is interesting to read and understand the science of what is actually going on.

Quite understandable how a lot of people can make a port flow worse after swinging a die grinder.


With the holden six heads I think if your not chasing all out performance and want to have a play I don't think that it is all that hard to make some gains if you apply some of the basic principals.

Lets face it for the average joe with a mild street engine paying big bucks for a pro to do their magic is most probably not the best spend of their money  unless they intend on further upgrades.


Agreed on all of that.


I think the hardest part about engine building is ensuring that you get the best possible return on your time and money. And if you do the sums then it's hard not to reach the conclusion that the acceleration of development time - not to mention the solid results - that the use of a flow bench provides makes the small cost of building one an absolute bargain.


Think about it this way: you could do it by trial and error, grinding the ports, doing the valves and seats then assembling the engine and taking it to the strip or dyno and testing it. It might go faster, it might go slower, it mightn't change much at all. Then you'd take it back home, pull the head and repeat the process. When you think you've gone as far as you can with that head you might grab a fresh one, and with fresh ideas start the process all over again. You can literally fritter away years doing this - I've done it.


Or you might decide to build a flow bench instead. It doesn't have to be pretty or impressive or high-tech; it just has to measure air flow reliably. For all practical purposes an old stainless laundry tub with a vacuum motor, a plywood top and a manometer might give just as good a result as a Superflow. You could easily build it in a weekend for a grand or less. Then over the next couple of weekends, with an old junk head, a tin of bog and a die grinder you could educate yourself on just what the head off your favourite engine wants and needs to make power. Once you're satisfied with the result you'd apply what you've learnt to your good head, and know that it's gonna run well. You'd probably do some work on the manifold as well, and know that it's gonna make power.


The thing is this: you could be at the track or on the street within a couple of months, making more power for less cost than if you'd done it by trial and error. It's almost certain that you'd be going faster than you would be after a couple of years of doing it the other way. And you'd probably be thousands of dollars in front, the cost of the bench notwithstanding.


Dynos are exactly the same deal. Not long ago I built a rudimentary bike dyno, and after the first couple of runs I was sooo pissed of with myself. "You DICKHEAD!" I thought to myself, "I should have built this thing 20 years ago, then I'd be a million miles in front of where I'm at now"


In other words a few days and a grand or two spent setting yourself up will save months or years and thousands of dollars later on. Better still, you know what you're engine is going to do - there's been many hours and dollars spent on engines that disappointed with their performance.


Edited by oldjohnno, 07 July 2016 - 08:23 PM.


#10 _oldjohnno_

_oldjohnno_
  • Guests

Posted 17 July 2016 - 05:00 PM

OK, here are some further notes on air flow. As you can see it's not a 12 port cookbook (sorry Ned), it's just more about the basics of airflow, stuff that might get you off on the right foot with your own development work. I really hope that it might even get one or two of you interested enough to build your own flowbench.


We've already looked at how and why the flow quantity can vary through a port, but basically stable, laminar flow that's attached to the walls encourages a much larger mass of airflow than chaotic, turbulent flow. Sometimes it's useful to put a number on this quality of air flow, just so we know how good or bad our ports and runners really are. So what we are looking at then is a flow coefficient, or a cf number that specifies the actual flow in relation to the cross-sectional area of the port.


One that's been fairly widely used by racers from time to time uses a figure of around 140cfm for every square inch of port area. It's an arbitrary number based on the actual flow measured through a 1 square inch orifice of a certain type. So if you had a 2 square inch port that flowed 280cfm you'd say it had a flow cf of 1, if it flowed 140cfm it'd be 0.5, 210cfm would be 1.5 and so on. As it turns out it can be a handy tool in that if your port has a cf of 1 or more then it indicates that you're not doing too badly. The little 12 port intakes aren't generally known for big cfm numbers, but when you take into account their small CSA then their performance - or flow cf - isn't too shabby, especially for a port with such a sharp turn into the cylinder. And when you investigate a little closer they look even better...


Lets' backtrack for a minute. Remember the airflow/racecar analogy, where we likened the airflow to cars taking the racing line through the bends? On the track much of the surface ends up being unused with all the traffic taking much the same path. In an intake port - and a 12 port is a very good example - much of the port is basically unused with most of the flow being bunched up in a small area. Actually, the lazy part of the port might even be worse than unused, it could actually be counterproductive by slowing down flow in the active part of the port. Wouldn't it be good if you could make the whole port flow as well as the active part? You'd probably double the flow rate or maybe even achieve better than double. But with a sharply angled port this is very very hard to do in practice.


Back to the racetrack; let's pretend for a minute that you have 50 cars on the track and it's your job to have as many laps on the board as possible after a given time. After watching the cars for a bit you notice that the cars are only using a small part of the track width so surely it must be more efficient to use the whole track, wouldn't you think? So you paint some lane markers on the track surface and direct all the drivers to stay in their own lane. It only makes sense that you'll get better traffic flow if the cars are travelling four abreast than if they are only using one or two lanes, right?


Obviously, no. You might have a much better distribution of cars on the track now but unfortunately they're all going much slower because they're all forced to use a slower line. This is one of the most basic rules of porting - you can't improve flow by making the air go somewhere it doesn't "want" to go. You can put as many vanes and wings and spoilers as you like in there but the flow rate is just going to diminish if you try to make it go where it wouldn't normally flow. Or put another way: if there was a better path into the cylinder the air would already be taking it. But you can certainly make a better path, or improve the one that's there.


What to do then? You have a few options, some harder to do than others. If there is a clearly defined flow path preferred by the air - as in the case of our12 ports - then you might try to make this flow path as flow-friendly as possible. So if the flow naturally hugs the floor (and this is obviously the shortest route to the cylinder with a sharply bent port) then you might make the floor as wide as you possibly can. And if this part of the port is very very active then the velocity will also be very high, so that means you'll need to do whatever you can to keep the air attached to the floor as it dives into the cylinder. In other words you'd do whatever you can to improve the short turn as this is where you'll get the biggest flow gains.


Your second option is to straighten the port, and this can help by encouraging the air flow to be more uniform across the floor instead of being all bunched up in one corner. But, there's a good reason for that curve in the port so you want to be sure of what you're doing first. Generally speaking all 2 valve engines will be designed to create swirl in the cylinder, usually by offsetting and/or curving the intake flow path. Swirl drastically improves low rpm performance up to around 3500 - 4000rpms but at higher rpms it can tend to reduce the flow somewhat. If low rpm performance isn't an issue it can be of benefit to straighten the inlet port to try to get more uniform flow across the port width.


The third option is to try to get more uniform flow over the height of the port. This can be very difficult to do. If the lazy area of the port is quite turbulent this could be disturbing flow in the good part of the port and it may be best to simply fill it in. This has nothing to do with improving flow velocity by the way; it's all about reducing turbulence. Even better, you'd try to encourage more flow in the lazy section without sacrificing flow from the good section. This can be difficult but we'll look at ways you can try to do it in a minute.


While we're talking about velocity, don't get too hung up on it. With Holden sixes especially, you're more likely to have too-high flow velocity. And besides,the range of workable velocities is quite large and as long as you're in the ballpark everything will be fine. Keep in mind too that any formulas you may use to calculate velocity based on flow rate over port area will be basically useless if the flow rate isn't uniform over the ports area. This is certainly the case with the Holden six heads. And this is what I meant when I said the Holden 12 port head flows even better than its decent flow cf suggests - it achieves that number using only about half the port area.


Another thing about velocity - it's easy to imagine that as the velocity is increased that the air will simply shoot off the short turn and skip across the back of the valve. But air doesn't react like water, which runs wider and wider as the speed is increased. You have to remember that the local pressure of the air is inversely proportional to the velocity, so a high velocity portion of the port will have a low pressure and vice-versa. What this means in practice is that we have two forces at work: one is the mass of the air wanting to make it travel straight ahead instead of following a curve. But counterbalancing this are the forces created by pressure - the high velocity air will have a lower pressure than the lower velocity air on the long side of the port, and this pressure difference tends to hold the high speed flow firmly against the inside of the bend. The air will tend to stay attached and hug the short turn radius to quite surprising velocities.There are limits to this effect though, the pressure difference is in direct proportion to the speed while the inertial effects increase with the square of the speed. So at some point the pressure difference becomes unable to keep the flow attached; it doesn't simply shoot straight off the bend though, it just becomes detached from the surface and turbulent.


If you have a flow bench with a variable speed blower and sufficient power you can see (and hear) this happening. As you increase the pressure drop you'll see the flow rate increase. If your flow bench is able to increase the velocity to the point where the flow begins to separate from the short turn, you'll notice two things happening. One is that the port will suddenly become noisy as the flow becomes turbulent. The other is that the flow rate will stop increasing and will level off abruptly. If you can get some sort of probe in deep enough you'll see that the air isn't simply shooting off the short turn; it's just becoming very turbulent and chaotic.


A side note on the pressure:flow relationship - the flow isn't in direct proportion to the pressure drop across the port, it's closer to being proportional to the square of the pressure. So doubling the pressure drop increases the flow by a factor of about 1.4. To double the flow requires about four times the pressure. This has implications for supercharged engines too - improving the breathing of a blower motor increases the power output while also decreasing the boost pressure and the associated pumping losses. Blown engines respond even better than naturally aspirated ones to improvements in breathing.


One more thing on pressure and velocity: we can swap pressure for velocity and vice versa where the CSA changes but we need to be very careful to do this efficiently. This is especially important any time the CSA increases and we trade velocity for pressure. You may have heard the term "pressure recovery" and what this refers to is the efficient deceleration of the airflow, so that the velocity is converted back into pressure and not just burned up in turbulence.The biggest change in CSA is where the flow emerges through the valve seat (with a diameter of maybe 45mm) into the cylinder, which probably has an area approaching four times that of the valve seat. Optimising"pressure recovery" here really refers to slowing the flow into the cylinder as smoothly as possible, and with the least possible turbulence. Note that we may have conflicting requirements here with promoting mixture motion via swirl or tumble versus simply getting as much air as possible into the cylinder. The combustion phase is one time where we actually want turbulence. At any rate, configuring the valve and seat angles to maximise pressure recovery is one of those areas that separates the men from the boys, and to be honest I'm still one of the boys. It's interesting that the best results usually occur when the transitions are formed as a series of sharply defined angles rather than a curved surface or radius. For some reason the flow often tends to stay attached more firmly to a series of angles than a smooth curve. I don't fully understand why this is so, but perhaps applying this technique to the short turn would be an interesting experiment. We might look at some typical transition angles a bit later. Note also that from a pressure recovery perspective, some shrouding in the chamber isn't always a bad thing...


The area above the valve seat - the bowl - is another critical area. In a more recent design of port than the Holden six uses, the flow approaches the seat from a higher, less sharply angled position. The air is more evenly distributed around the valve, so a reduced throat (a sort of venturi shape) just above the seat sets the flow up to go out and around the valve head. The Holden six is a bit different though; the approach is low and the entrance to the seat is sharply angled to the seat. The flow is more lateral than axial if that makes sense, so a uniform throat may not be what we want, and we might sacrifice some throat for width on the short side.


On the long side it often pays to use a shallower bowl than you'd use with other engines, and use the roof of the bowl on the far side to try to kick the air out around the valve. This low, sharp port layout is why the 9 port head flows more than the 12 port - there's more of the throat exposed to this lateral flow in the 9 port.


While we're on the subject of gently expanding the air through an increasing CSA, you might remember where we mentioned how air can only cope with walls that diverge at a limited angle before it becomes detached and turbulent. What do you do when it just isn't physically possible to stay within these limits? Just make it as good as you can? No, the best thing you can do here is make the CSA expansion as short and sudden as possible. It's a bit like pulling off a Bandaid - if you can't make it painless then at least make it quick. If it has to be turbulent make it over the shortest area possible; don't make the drag worse by letting it be turbulent over a distance. This by the way is the thinking behind the Kamm tail, which despite popular opinion isn't aerodynamically slick at all. It just gets its dirty work over and done with. It pulls the Bandaid off quickly.


We've talked a lot about turbulence, uniformity of flow and velocity, but how do you assess all this in an actual port to begin with? My favourite tool on the flowbench is the good old magic wand or flag. It's just a length of thin, stiff wire with a piece of thread (preferably fluoro coloured) attached to one end. By holding this little streamer in various positions throughout the port you can see very clearly what the flow is doing and where it's going. As well as watching the thread you can also feel quite clearly through your fingers the pull of the high velocity areas and the flutter of turbulence. It's a very quick and easy tool to use and it's worth making a few of these with varying lengths of thread. Don't be surprised to find areas where a short thread is flying backwards in the port.


Some people "velocity probe" a port, using a thin tubular probe to measure the flow velocity throughout the port. By splitting the area of the port into a grid, and then measuring each square at various depths it's possible to "velocity map" the entire port, if that's what turns you on. But it takes forever and I can't really see the point when the string-on-a-stick can give you just as good a picture of the airflow in a tiny fraction of the time.


Do you need a flowbench at all to improve the engines breathing? You can get some pretty good improvements just by tidying up the short turn and correcting the obvious problem areas. But if you want or need to get close to the engines full potential then I just can't imagine being able to do so without some way of measuring the airflow. Just remember that this measuring device doesn't need to be elaborate, pretty, or expensive. It just has to do the job and you might find that even a rudimentary home-made flowbench is of enormous help in going faster. Variable speed vacuum motors are cheap, and your local wreckers probably has a paddock full of cars that have airflow meters of some sort as part of their EFI system...


And if you are considering buying or building a flowbench it's important to remember that their usefulness extends way past simply measuring airflow. If this was all they were good for then porting would still be a tedious bloody exercise - you'd test the port, try something, test again, try something else, test again and so on ad infinitum. The flow bench can provide much more information than mere cfm numbers; it can provide clues about the ports performance that will guide you and your trusty die grinder along the right track. The simple string wand can tell you in seconds where the flow is, where it's smooth and where it's turbulent. The sound of the port will tell you when the flow becomes detached and turbulent. Things like flow balls (a steel ball stuck to the end of a piece of wire) can let you reach in and influence the flow in different areas in different ways, all the time listening to the air and watching the cfm gauge for clues. Actually anything you have at hand will let you carry out quick impromptu experiments - fingers, body filler, playdoh etc. Just make sure you have a screen in the system to catch the lumps of playdoh that the bench inhales when they come unstuck... At any rate, the clue-providing function of theflowbench is at least as important as its flow measuring function.


If there is a golden rule of porting it's this - Don't Hack on Your Good Cylinder Head. Remember that you can never know how far to grind any area until you've gone too far; you don't want to be in this situation with your best head so do all your experimenting on a junk head. If you already have a head that flows well then duplicate one of its ports on your junk head and start from there. When you remove too much material - and you should - you can always replace it with body filler. Then, when you're happy with the way your experimental port is flowing you can duplicate that on your "good" head.


Lets' go back to the race track for a bit. We generally think of the racing line as entering wide, clipping the apex and exiting wide. This is true in the case of a single corner, but if you have a left followed by a right then another right immediately after it then the racing line looks a bit different for these last two curves. This highlights a really important point: the line through a section of track is strongly influenced by whatever the track does before and after that section. Back in the intake port the route the air takes through a section is determined by whatever preceded and whatever followed that section. If you understand that point then you'll also understand these points too: testing just one section of the port without the others is of limited use. And you can greatly affect the way the air flows through a section by changing the way the air approaches and leaves that section. This behaviour could be exploited with a port that has a wide variation of flow velocity from top to bottom.


Here's another racetrack example: a long straight with a kink in the middle of it, consisting of two short 45 degree curves back to back. This slight kink won't even make the cars deviate from their straight line path and it won't make them slow down in the slightest. But they might enter it close to the right hand fence and leave it close to the left side fence. Can you see how you can position a flow path with a subtle kink in the walls?


There's a bit of a Catch 22 with flow testing: testing the cylinder head port on its own doesn't give us the full picture. But in most cases it simply isn't possible to access the port with a manifold attached. The best we can do is to run the bare cylinder head on the flowbench to see how the port behaves with nothing more than a simple entry radius attached.Then, if you can find out where the active areas are, where the trouble spots are and where the likely areas of improvement are then you can look not only how you can improve the port itself but also at how you can configure your manifold runner to best work with the head port. It's usual to lose a small amount of flow with the runner attached, but then it's also entirely possible to increase flow with carefully a shaped runner in some cases. The 12 port responds well to this kind of work.


Let's look at some real world examples of upstream ducting influencing the flow path in the head port, using a 12 port 202 head as an example. These heads have the ports grouped in three pairs, and in each pair there's a left hand and a right hand port. Keep in mind these ports have a definite flow bias even when they are straightened out, and they are fairly sensitive to the exit angle of the air emerging from the manifold runner. Looking first at the single carb manifolds, we see that both the front and rear pairs of runners curve in fairly sharply, and because each pair has both a left and right hand port we could assume that at least two of the cylinders are being fed air from a runner that approaches from the wrong (or at least less than ideal) angle. And in practice these manifolds do perform worse than their triple carbed counterparts in terms of flow and fuel distribution. The factory manifold at least tries to address the issue and doesn't do to badly; however its runners are small in area so it takes a lot of grinding to get half decent flow. Even when the walls are so thin that you can read the paper through them the runners remain too small to make really good power. They're a good street manifold though.


Other manifolds - triple Webers for example - have the runners arranged in three mirror imaged pairs, just like the head ports. So even if they aren't ideal at least they're consistent. And they do make better power than the single downdraft manifolds. The VK EFI manifold is interesting; it doesn't look like it'd make power or flow well with its small, oddly shaped runners but it actually runs very well. I'm not sure if it was intentional or not but both the curve of the runners and the shape of the runner exits works very well with the head port. If you were building an EFI or a tunnel ram style manifold then it's worth taking a look at the VK EFI unit. And of course runner design also involves things like pressure wave tuning (tuned lengths) which is a different kettle of fish altogether and a subject for another time.


That'll do for now.


#11 EunUCh

EunUCh

    Lotsa Posts!

  • Members
  • PipPipPipPipPipPip
  • 2,774 posts
  • Location:not this planet
  • Car:japos
  • Joined: 23-November 06

Posted 17 July 2016 - 07:59 PM

Very informative oldjohnno.

How many vac's are needed to set up something "basic" ?


Re. the angles on the seats , just curious ? , would it have something to do with the way the cuts or edges on the cuts create

a slight "sticking effect" (coander) that creates a vac in that small area to help "pull in" the charge around that area or is there no bark left on the tree that i am looking at ?


#12 _oldjohnno_

_oldjohnno_
  • Guests

Posted 17 July 2016 - 09:13 PM

Very informative oldjohnno.

How many vac's are needed to set up something "basic" ?


Re. the angles on the seats , just curious ? , would it have something to do with the way the cuts or edges on the cuts create

a slight "sticking effect" (coander) that creates a vac in that small area to help "pull in" the charge around that area or is there no bark left on the tree that i am looking at ?


Depends on what you're testing - a single Infin-aTek 121131-00 will do almost 200cfm@28" (http://www.centralva...n/121131-00.pdf), so two of them would handle almost anything. Don't use the shitty little through-flow motors, you need a heap of them and they use a shitload of power. Better off to use one or two tangential variable speed units like the Lamb Infin-a-Teks.


As for why the angles work when a radius doesn't I have absolutely no idea.


#13 _Caustic_

_Caustic_
  • Guests

Posted 17 July 2016 - 11:14 PM

Thankyou for the simple mental picture analogy Johno.I understood that crystal clear.Your like a modern day Smokey Yunick,Not many people have a passion for the black art of airflow.A section in Power secrets was how Smokey would flow cylinder heads through an assembled motor through the sump.With the piston removed.He also mentions Tuliping the valves for unresticted flow. Awesome read.Good luck also with the land speed cob.

#14 EunUCh

EunUCh

    Lotsa Posts!

  • Members
  • PipPipPipPipPipPip
  • 2,774 posts
  • Location:not this planet
  • Car:japos
  • Joined: 23-November 06

Posted 27 July 2016 - 06:08 PM

Smokey does mention a 25 top cut on the valve to help form a "cone" but that might not be ideal on a port that comes in from

an obscure angle as compared to a port that is more or less over the valve given that as already mentioned the flow is not all that

even around the valve head given the port/bowel shape/size ?


Thanks for the links to the fans , do they need to be variable speed or can we have one big one run flat out and use a tap to control air flow?

Did a bit of a look on how to make a manometer and how easy they are to make but nothing on the "why" up to 30 feet of pipe for water

but nothing on length of pipe for Hg , is it because Hg is about 29 times heavier than water ? do we just grab a bit of pipe and fill er up 

with colored water and and use some sort of long ruler and let it self calibrate at given altitude ? , or a bit of Hg in a shorter tube ?

I don't get it , no doubt it is simple enough but i don't get it ?


#15 _oldjohnno_

_oldjohnno_
  • Guests

Posted 27 July 2016 - 07:09 PM

Mercury has a SG of 13.66, so it's 13.66 times the weight of water. An inch of mercury then is very roughly equal to about a foot of water. That's why a mercury manometer can be made so much more compact than a water manometer for the same pressure. On the other hand the water manometer will have its graduations a lot further apart so it will have better resolution and be easier to read small changes.


Remember that a manometer doesn't normally measure an absolute pressure, just the difference between the test pressure and the local atmospheric. Since the pressure drop across the port is all we're interested in there's no need to calibrate it for barometric pressure or altitude.


You don't need to mess around with water or mercury manometers though, digital manometers are as cheap as chips: http://www.ebay.com....r4AAOSw3ydVlRaU And if you use a 3 way ballvalve you can use the same gauge to set the pressure drop and then show the flow rate. The blowers don't have to be variable speed but it makes it very quick and easy to set the pressure drop just by turning a dial.


#16 LC-GTR-1969

LC-GTR-1969

    Shed tinkerer

  • Members
  • PipPipPipPipPip
  • 1,162 posts
  • Location:New South Wales
  • Car:Which one?
  • Joined: 09-March 14
Garage View Garage

Posted 27 July 2016 - 07:52 PM

I would love to build a flow bench... If I can muster up some time I might start doing some plans for one. I have a fair bit of the gear to start fabricating but time and space is my issue... Also, I think my addictive personality would not let me ever stop playing with it lol


#17 _oldjohnno_

_oldjohnno_
  • Guests

Posted 27 July 2016 - 09:36 PM

I would love to build a flow bench... If I can muster up some time I might start doing some plans for one. I have a fair bit of the gear to start fabricating but time and space is my issue... Also, I think my addictive personality would not let me ever stop playing with it lol


This is a good place to start from: http://www.flowbench...forum/index.php


#18 _Macca97_

_Macca97_
  • Guests

Posted 29 July 2016 - 08:59 PM

just read it all, and i have a much better understanding, did read it twice though, thanks for the taking the time johnno


#19 _Agent 34_

_Agent 34_
  • Guests

Posted 30 July 2016 - 06:44 PM

I'll pm neal datto  on a pinn for this topic.


it's all good stuff and think that this is worth a pin for further adding or discussion, regurgitation, a few grams, a hooker.and an apply turn over for desert.


it would be a shame to see a sharp minds thoughts lost.


Edited by Agent 34, 30 July 2016 - 06:54 PM.


#20 _oldjohnno_

_oldjohnno_
  • Guests

Posted 30 July 2016 - 06:57 PM

..a few grams, a hooker.and an apply turn over for desert.


Count me in!


If the interest is there I'll continue with the flow intro and possibly something on wave tuning?


#21 jd lj

jd lj

    Forum Fixture

  • Members
  • PipPipPipPipPip
  • 2,119 posts
  • Name:James D
  • Location:in the shed
  • Car:LJ
  • Joined: 03-December 10

Posted 30 July 2016 - 08:39 PM

Keep it coming John, I'm sure that there's plenty of us who are keen to learn anything that you are willing to teach us novices.

#22 _oldjohnno_

_oldjohnno_
  • Guests

Posted 30 July 2016 - 08:59 PM

Don't be fooled into thinking that I'm anything but a novice myself or that I know anything about anything - all I'm trying to do is present the fundamentals in a way that an ordinary person with an interest in engines can understand.


#23 _Macca97_

_Macca97_
  • Guests

Posted 31 July 2016 - 09:07 PM

is it true that, the manifold port hole should be abit smaller than the head port, to stop or slow down the wave of air that hits the back off the valve when it closes?


#24 _oldjohnno_

_oldjohnno_
  • Guests

Posted 31 July 2016 - 09:29 PM

There should be a reasonable match but you don't have to take it to extremes. I strongly suspect that most of the "anti-reversion step" theories are bullshit - a pressure wave will quite happily work its way past a ledge or step at the port face.


There are even weird anomalies - like running a BBC square port manifold with oval port heads - where everything is exactly "wrong" according to popular wisdom yet in practice work just fine.


#25 TK383

TK383

    Forum Member

  • Members
  • PipPipPip
  • 76 posts
  • Name:Tony
  • Location:SA
  • Car:Blue one
  • Joined: 30-March 11

Posted 01 August 2016 - 09:25 AM

Some weird against the grain learnings - the manifold/head interface that we always believed should either be slightly smaller at the manifold side or a perfect match is pretty much arse about.

You actually get less downstream turbulence with a manifold that is slightly bigger than the opening of the port in the head, even if there are sharp edges!

Downstream turbulence at this junction is important, any turbulence as the air approaches the short turn is detrimental.


Ideally you have a perfect match, but if you have a manifold that is a little bigger than the head port you don't sweat it.


1 user(s) are reading this topic

0 members, 1 guests, 0 anonymous users