Jump to content


RUST REPAIRS ON LJ GTR


  • Please log in to reply
96 replies to this topic

#26 RallyRed

RallyRed

    Oh My, Don't you post alot

  • Members
  • PipPipPipPipPipPipPip
  • 7,863 posts
  • Name:Col
  • Location:NSW
  • Car:LC GTR etc
  • Joined: 02-October 11

Posted 19 March 2013 - 07:52 PM

Hi Mike...been watching quitely for a few months...mate you are a genious..you must have soooooooo much patience.


p.s. I never realised how many bits and pieces the factory used to make up one of these old Toranas....and yep...every one of em looks like they rust like a beauty.


Some amazing work


#27 _mikecatts_

_mikecatts_
  • Guests

Posted 19 March 2013 - 08:05 PM

Hi Mike...been watching quitely for a few months...mate you are a genious..you must have soooooooo much patience.


p.s. I never realised how many bits and pieces the factory used to make up one of these old Toranas....and yep...every one of em looks like they rust like a beauty.


Some amazing work

Hi... Ta..

I reacon that I have fixed nearly every panel if you count all the cars that I have done so far.. except the roof inner bulkheads.. But I do have to replace the roof.. So Im bound to get there to :)


..Is it me, or do these Toranas rust too easily?.. At least I know where to look..


#28 RallyRed

RallyRed

    Oh My, Don't you post alot

  • Members
  • PipPipPipPipPipPipPip
  • 7,863 posts
  • Name:Col
  • Location:NSW
  • Car:LC GTR etc
  • Joined: 02-October 11

Posted 19 March 2013 - 08:11 PM

yeh not sure mate...I guess at 40 years of age, a little rust is to be expected...but gee wizz...


I guess we are lucky we are not F$%rd fans trying to find a nice Escort or Cortina to get into, as theres not even any rust left to repair on those cars....


#29 _mikecatts_

_mikecatts_
  • Guests

Posted 20 March 2013 - 07:05 PM

Hi all..

 I managed to get the A-pillar outer on today..

I used some panel bond to help seal it ( I lightly scuffed the POR 15 where the panel bond goes..just to make sure it stuck).

When dry, Ill then weld it up.....

  Fitted really well..

When done.. Ill hang the door to get  the bottom sill gap correct. Then put that on.


Attached File  IMG_4383.JPG   22.66K   5 downloadsAttached File  IMG_4384.JPG   33.71K   5 downloadsAttached File  IMG_4385.JPG   29.04K   6 downloadsAttached File  IMG_4386.JPG   30.39K   5 downloadsAttached File  IMG_4389.JPG   32.4K   5 downloadsAttached File  IMG_4390.JPG   18.12K   6 downloadsAttached File  IMG_4391.JPG   32.01K   8 downloadsAttached File  IMG_4392.JPG   31.65K   6 downloads


#30 _mikecatts_

_mikecatts_
  • Guests

Posted 23 March 2013 - 05:54 AM

Hi all...


I welded the A-pillar outer on.. using plugs and spot welds.

Nice and rust free.. I then panel bonded and placed the outer door sill in position..

I hung the door to get gaps, alignment ok... Gaps are even, door hangs well....

I will have to fnnish fixing this door... The LC door doesnt fit too well..

Looks good..

another job done.


Attached File  IMG_4407.JPG   27.62K   5 downloadsAttached File  IMG_4407.JPG   27.62K   5 downloadsAttached File  IMG_4408.JPG   22.65K   3 downloadsAttached File  IMG_4409.JPG   22K   3 downloadsAttached File  IMG_4412.JPG   20.89K   3 downloadsAttached File  IMG_4413.JPG   21.75K   3 downloadsAttached File  IMG_4414.JPG   26.99K   3 downloadsAttached File  IMG_4419.JPG   28.62K   4 downloadsAttached File  IMG_4420.JPG   25.89K   2 downloadsAttached File  IMG_4421.JPG   30.92K   7 downloadsAttached File  IMG_4422.JPG   28.08K   9 downloadsAttached File  IMG_4423.JPG   31.25K   6 downloadsAttached File  IMG_4425.JPG   29.4K   3 downloads


Attached Files


#31 _mikecatts_

_mikecatts_
  • Guests

Posted 25 March 2013 - 11:08 PM

Hi all..

I have managed to weld on the RH door outer sill, using a combination of spot weld and plug welds were needed....

Turned out very well..

I recommend this repo panel..

Ill use a filler rod to weld the gap..


Attached File  IMG_4431.JPG   19.85K   4 downloadsAttached File  IMG_4432.JPG   23.59K   4 downloadsAttached File  IMG_4433.JPG   23.29K   2 downloadsAttached File  IMG_4434.JPG   21.87K   3 downloadsAttached File  IMG_4435.JPG   25.61K   1 downloadsAttached File  IMG_4438.JPG   24.04K   1 downloadsAttached File  IMG_4439.JPG   20.17K   2 downloadsAttached File  IMG_4440.JPG   25.44K   4 downloadsAttached File  IMG_4442.JPG   21.87K   4 downloadsAttached File  IMG_4445.JPG   18.62K   1 downloads


#32 _mikecatts_

_mikecatts_
  • Guests

Posted 25 March 2013 - 11:20 PM

More work achieved..

The RH door again!.. and the final welds on A-pillar..

I sandblasted inside the door to see how bad the rust was.. Not as bad on bottom.. The top is gone.. I paint stripped the outer bits to get a look as well.

 I manage to weld in the repo patch for the top and I started to weld up the holes on the bottom. ...I will have to patch either end using a sedan door for the piece..


All told the owner should be happy as the door is fixed and fits very well.


When final welding is done.. Ill sandblast inside again and POR 15 the bottom and top areas..


Attached File  1.JPG   19K   4 downloadsAttached File  2.JPG   21.83K   2 downloadsAttached File  3.JPG   19.55K   6 downloadsAttached File  4.JPG   21.81K   1 downloadsAttached File  IMG_4447.JPG   23.71K   1 downloadsAttached File  IMG_4449.JPG   17.53K   1 downloadsAttached File  IMG_4450.JPG   26.19K   1 downloadsAttached File  IMG_4451.JPG   27.96K   1 downloadsAttached File  IMG_4452.JPG   28.42K   2 downloadsAttached File  IMG_4453.JPG   28.48K   2 downloadsAttached File  IMG_4456.JPG   17.63K   1 downloadsAttached File  IMG_4457.JPG   18.9K   1 downloadsAttached File  IMG_4460.JPG   18.04K   1 downloadsAttached File  IMG_4461.JPG   22.64K   2 downloadsAttached File  IMG_4463.JPG   21.65K   1 downloadsAttached File  IMG_4464.JPG   25.15K   2 downloadsAttached File  IMG_4465.JPG   21.39K   1 downloads


#33 _mikecatts_

_mikecatts_
  • Guests

Posted 29 March 2013 - 06:53 AM

Hi all..

I did some more on this old girl yesterday..


I finnshed the RH door.. Needed some patches as the rust was too bad to spot fix..

I sandblasted the rear front quarter section. Inside.


It was a mess and full of sand... Ill POR 15 these ereas before sealing up again..


Getting there slowly.. At least the car has a hanging door now.. I think its been a while since it had a door on :)


Attached File  IMG_4501.JPG   20.93K   2 downloadsAttached File  IMG_4502.JPG   22.05K   3 downloadsAttached File  IMG_4505.JPG   23.09K   2 downloadsAttached File  IMG_4506.JPG   25.07K   2 downloadsAttached File  IMG_4509.JPG   20.91K   2 downloadsAttached File  IMG_4510.JPG   25.6K   3 downloadsAttached File  IMG_4511.JPG   20.42K   6 downloadsAttached File  IMG_4512.JPG   20.8K   2 downloadsAttached File  IMG_4515.JPG   17.28K   3 downloadsAttached File  IMG_4518.JPG   22.11K   2 downloadsAttached File  IMG_4520.JPG   21.33K   2 downloadsAttached File  IMG_4521.JPG   15.31K   2 downloadsAttached File  IMG_4522.JPG   25.11K   5 downloadsAttached File  IMG_4523.JPG   16.2K   3 downloadsAttached File  IMG_4524.JPG   17.58K   1 downloadsAttached File  IMG_4526.JPG   16.86K   2 downloadsAttached File  IMG_4528.JPG   22.95K   4 downloadsAttached File  IMG_4536.JPG   23.43K   6 downloadsAttached File  IMG_4538.JPG   19.57K   3 downloads


#34 _Skapinad_

_Skapinad_
  • Guests

Posted 29 March 2013 - 07:43 AM

Awesome....

#35 _mikecatts_

_mikecatts_
  • Guests

Posted 29 March 2013 - 05:25 PM

Ta..

Awesome....


#36 _mikecatts_

_mikecatts_
  • Guests

Posted 29 March 2013 - 05:32 PM

I POR 15 the sandblasted areas.. Got right inside the rear front quarter area..should be rust proof now..


Attached File  IMG_4563.JPG   29.52K   5 downloadsAttached File  IMG_4564.JPG   28.46K   7 downloadsAttached File  IMG_4565.JPG   34.21K   2 downloadsAttached File  IMG_4566.JPG   32.36K   2 downloadsAttached File  IMG_4567.JPG   22.67K   3 downloadsAttached File  IMG_4568.JPG   18.23K   5 downloadsAttached File  IMG_4569.JPG   22.3K   3 downloadsAttached File  IMG_4570.JPG   18.1K   2 downloads


#37 _mikecatts_

_mikecatts_
  • Guests

Posted 02 April 2013 - 07:55 PM

Hi all...

After the weekend and today I have finnished the RH side rust repairs..

Fixed the spare wheel well area, and guard.

I sandblasted and POR 15ed the RH guard wet area inner and the repair patches for the rear front bottom outer sill.

Welded up some small rust holes in the side and door lip.

Driller out the inspection hole for the sill end.

 I fitted the RH rear front sill... The door still needs a little work to get nice,, Ill do that after I alinge the guard to the bonnet/ LH front guard as it hasnt been unpicked yet..

Looks good so far.. Lines look ok..

The goal is to have done in 6 more weeks..   


Getting there.. :)

Mike


Attached File  IMG_4582.JPG   12.9K   2 downloadsAttached File  IMG_4583.JPG   19.63K   2 downloadsAttached File  IMG_4584.JPG   17.36K   2 downloadsAttached File  IMG_4586.JPG   15.52K   2 downloadsAttached File  IMG_4587.JPG   22.1K   3 downloadsAttached File  IMG_4589.JPG   14.98K   2 downloadsAttached File  IMG_4590.JPG   14.88K   2 downloadsAttached File  IMG_4591.JPG   14.95K   3 downloadsAttached File  IMG_4593.JPG   19.38K   4 downloadsAttached File  IMG_4595.JPG   22.61K   1 downloadsAttached File  IMG_4599.JPG   16.08K   1 downloadsAttached File  IMG_4601.JPG   28.43K   2 downloadsAttached File  IMG_4602.JPG   26.8K   2 downloadsAttached File  IMG_4604.JPG   28.39K   2 downloadsAttached File  IMG_4605.JPG   17K   2 downloadsAttached File  IMG_4606.JPG   13.87K   2 downloadsAttached File  IMG_4607.JPG   14.19K   2 downloads


#38 RallyRed

RallyRed

    Oh My, Don't you post alot

  • Members
  • PipPipPipPipPipPipPip
  • 7,863 posts
  • Name:Col
  • Location:NSW
  • Car:LC GTR etc
  • Joined: 02-October 11

Posted 02 April 2013 - 08:02 PM

you must be gettin excited Mike...all those bits and pieces are starting to look like a Torana!!!....great stuff.


#39 _mikecatts_

_mikecatts_
  • Guests

Posted 02 April 2013 - 08:14 PM

The owner should be...

you must be gettin excited Mike...all those bits and pieces are starting to look like a Torana!!!....great stuff.


#40 _mikecatts_

_mikecatts_
  • Guests

Posted 02 April 2013 - 08:28 PM

..

on another note.. I drove for 5 hours today to look at an LC gtr... I knew it would be rusty.. I asked the guy before i left if it was registerable.. Yep he says... I pack the dog and off we go...

I have never seen a more rusty piece of junk in my life... I thought my XU-1 was bad... This IS BAD, BAD, BAD.... flared guards front and rear just hacked on and bogged up,  bonnet has holes, boot has holes, boot lid has holes, No tags, no rego plates and no rego papers...

So not only did he waste my time with a piece of rubbish.. It cant be registeerd that easy.. Pity as its a GTR.. has the identifiers... But, every single panel needs replacing/fixing.. No intereior as to say and no internal chrome door strips.. No guages, no steering wheel, no wheels, etc etc.. and Auto with 202. All the hard to get bits arnt there..

I gave it a miss.. only worth as a garden ornament. :)


and you guys know I know about rusty pieces of shit!


Pisses me when people try to upsell a piece of crap.. why dont they just tell as is? and stop wasting our time???

Could of done more on the LJ.


#41 sibhs

sibhs

    Lotsa Posts!

  • Members
  • PipPipPipPipPipPip
  • 2,703 posts
  • Name:Martin
  • Location:Perth
  • Car:LJ Coupe S
  • Joined: 27-July 12

Posted 02 April 2013 - 11:06 PM

Great work Mike, you're my inspiration, a sign writer who has the skills and patience to turn his hand to what-ever he wish's.


Hope I can do the same, coming from graphic arts and having-a-go at restoring an LJ.


Go Mike Go......


Cheers


Marty


#42 _mikecatts_

_mikecatts_
  • Guests

Posted 03 April 2013 - 06:16 AM

Hi Martin... ta for that... You never know unless you give it a go...

Yes its a bit different to making signs,, It has the same skills needed... Patience is the key me thinks..

Great work Mike, you're my inspiration, a sign writer who has the skills and patience to turn his hand to what-ever he wish's.


Hope I can do the same, coming from graphic arts and having-a-go at restoring an LJ.


Go Mike Go......


Cheers


Marty


#43 _mikecatts_

_mikecatts_
  • Guests

Posted 05 April 2013 - 05:19 PM

Hi all...

Some more progress on this car today..

 I sandblasted and fixed the rear window sill and rear parcel shelf... after all fixed I sandblasted again and POR 15 the areas that rust....


Tomm Ill fit the window sill outer panel...


Attached File  IMG_4624.JPG   19.78K   9 downloadsAttached File  IMG_4625.JPG   14.53K   7 downloadsAttached File  IMG_4626.JPG   16.85K   7 downloadsAttached File  IMG_4627.JPG   17.52K   6 downloadsAttached File  IMG_4628.JPG   18.76K   6 downloadsAttached File  IMG_4629.JPG   16.46K   6 downloadsAttached File  IMG_4631.JPG   13.89K   6 downloadsAttached File  IMG_4632.JPG   16.2K   5 downloadsAttached File  IMG_4636.JPG   11.79K   5 downloadsAttached File  IMG_4637.JPG   13.46K   6 downloadsAttached File  IMG_4642.JPG   20.88K   6 downloadsAttached File  IMG_4643.JPG   19.78K   7 downloadsAttached File  IMG_4644.JPG   18.56K   7 downloadsAttached File  IMG_4645.JPG   20.04K   6 downloadsAttached File  IMG_4646.JPG   20.34K   6 downloads


#44 _mikecatts_

_mikecatts_
  • Guests

Posted 07 April 2013 - 02:25 AM

Hi all..


I managed to get the rear window sill on today...


I panel bonded/spot welded the rear lip and panel bonded and plug welded the top as I por 15ed the underside and I dont want to destroy taking off to spot weld..

I sanded off where the spot welder is welding on the bottom lip and Zinc primed..


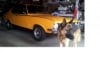
While fitting the boot lid I discovered that the rear beaver has been pushed in... As you can see with the pics of the beaver.. The gold one is undamaged and is out more with a gental curve.. Not so the Lj black one, in the pic of the inner boot lip, you can see it curves in..

Oh no I though...

 I rang the owner and he said "yes, it had had a hit at one stage in its life".. Explains heaps..

I contacted my panel beater mate and he said no probs as he can pull out... But you will have to fit the boot lid to align...

Phew.. Easy fix.. so I continued with the job.

Gaps on the side and top turned out good....


Ill gring off the plugs later.


Its on now.. and rust free :).

While i was waiting for the panel bond to dry, I took off the rear drip rails.. Lots of rust as you can see. Typical rust spot on ALL toranas.


I also did a small youtube of me spot welding the sill on.. Notice the smoke comming out due to welding through the panel bond.


Mike


Attached File  IMG_4652.JPG   24.29K   10 downloadsAttached File  IMG_4653.JPG   24.15K   12 downloadsAttached File  IMG_4662.JPG   21.19K   7 downloadsAttached File  IMG_4663.JPG   21.25K   6 downloadsAttached File  IMG_4664.JPG   26.22K   12 downloadsAttached File  IMG_4665.JPG   25.89K   6 downloadsAttached File  IMG_4666.JPG   35.75K   6 downloadsAttached File  IMG_4667.JPG   24.08K   8 downloadsAttached File  IMG_4669.JPG   32.95K   6 downloadsAttached File  IMG_4670.JPG   27.2K   7 downloadsAttached File  IMG_4672.JPG   31.53K   11 downloadsAttached File  IMG_4673.JPG   27.5K   7 downloadsAttached File  IMG_4675.JPG   22.29K   7 downloadsAttached File  IMG_4677.JPG   24.33K   8 downloadsAttached File  IMG_4679.JPG   20.02K   6 downloadsAttached File  IMG_4680.JPG   24.98K   7 downloadsAttached File  IMG_4681.JPG   26.85K   8 downloadsAttached File  IMG_4683.JPG   22.81K   8 downloadsAttached File  IMG_4686.JPG   18.98K   5 downloadsAttached File  IMG_4689.JPG   14.56K   5 downloadsAttached File  IMG_4690.JPG   13.92K   5 downloadsAttached File  IMG_4691.5.JPG   19.92K   5 downloadsAttached File  IMG_4691.6.JPG   20.85K   7 downloadsAttached File  IMG_4691.7.JPG   22.4K   6 downloadsAttached File  IMG_4691.JPG   27.86K   8 downloads


http://www.youtube.c...h?v=4G-3ZGXyhaQ


Edited by mikecatts, 07 April 2013 - 02:35 AM.


#45 frash da bucket

frash da bucket

    Forum Fixture

  • Members
  • PipPipPipPipPip
  • 1,890 posts
  • Location:NSW
  • Joined: 23-April 07

Posted 07 April 2013 - 07:11 AM

Hi Mike,


I have been reading and watching the excellent work you are doing on the old girl and saving it,you have some great refurbushing on it,keep up the great work,will be another great gtr when it goes back on the road.


Regards John.


#46 _mikecatts_

_mikecatts_
  • Guests

Posted 09 April 2013 - 05:32 PM

Ta John...

Hi Mike,


I have been reading and watching the excellent work you are doing on the old girl and saving it,you have some great refurbushing on it,keep up the great work,will be another great gtr when it goes back on the road.


Regards John.


#47 _mikecatts_

_mikecatts_
  • Guests

Posted 09 April 2013 - 05:44 PM

Hi All...

I have moved to the LH side now... The right side being done now.

I took off the bottom outer sill panel, all the way to the rear guard, I did this knowing it was stuffed and full of crap... And yep, I was right :)


The window cowl had to go.. Cant save that rusty, patched rubbish..


I Took off the old A-pillar outer. I knew it wasnt going to be as bad as the RH side.. But I was commited to taking off..


It has surface rust under it,, The usual spots , No holes and is noice and solid.

There is a rust hole in the wet area.. and it has gone to the front... I dont think I will have to take the panel off to fix, Like I did on the right side.. I think Ill fix as is.. Ill know after I sandblast it anyway..


I also managed to pull aprt the A-pillar donour outer and bits... Not too bad.. A little sanblasting and all will be good..

Tomm Ill patch and sandblast then POR 15....


I should have this all back together by the weekend.. Would be nice.. Im waiting on his donour car to arrive so I can get the window cowl off..


 Then just the roof replacement and a boot section..


Getting closer..


Attached File  IMG_4692.JPG   33.25K   9 downloadsAttached File  IMG_4697.JPG   21.83K   8 downloadsAttached File  IMG_4699.JPG   32.46K   5 downloadsAttached File  IMG_4700.5.JPG   36.07K   5 downloadsAttached File  IMG_4700.JPG   31.61K   3 downloadsAttached File  IMG_4701.JPG   23.23K   3 downloadsAttached File  IMG_4702.JPG   21.12K   3 downloadsAttached File  IMG_4706.JPG   26.92K   6 downloadsAttached File  IMG_4708.JPG   28.66K   5 downloadsAttached File  IMG_4709.JPG   26.27K   5 downloadsAttached File  IMG_4710.JPG   43.57K   5 downloadsAttached File  IMG_4710.5.JPG   43.39K   4 downloadsAttached File  IMG_4711.JPG   22.88K   4 downloadsAttached File  IMG_4712.JPG   26.2K   4 downloadsAttached File  IMG_4713.JPG   28.5K   5 downloadsAttached File  IMG_4715.JPG   26.75K   4 downloadsAttached File  IMG_4716.JPG   31.61K   4 downloadsAttached File  IMG_4724.JPG   34.75K   6 downloadsAttached File  IMG_4726.JPG   34.17K   7 downloadsAttached File  IMG_4727.JPG   34.49K   12 downloads


#48 _mikecatts_

_mikecatts_
  • Guests

Posted 11 April 2013 - 07:45 AM

Hi all...

Just a quick update..


I managed to sandblast and weld up all the holes/defects in the LH wet area and bottom inner sill.


The previouse person that did some repairs didint do to good a job a getting penetration.. Ill fix..


The wet area has holes in both lower and upper panel.. Will be tricky to fix as I dont want to pull apart... Ill think about that one..


anyway.. The welds/repairs are done , a quick sandblast then POR 15..


Mike


Attached File  IMG_4727.JPG   30.15K   5 downloadsAttached File  IMG_4728.JPG   24.61K   5 downloadsAttached File  IMG_4729.JPG   20.26K   4 downloadsAttached File  IMG_4730.JPG   18.17K   4 downloadsAttached File  IMG_4731.JPG   17.14K   4 downloadsAttached File  IMG_4732.JPG   22.28K   4 downloadsAttached File  IMG_4733.JPG   20.27K   7 downloadsAttached File  IMG_4734.JPG   21.77K   4 downloadsAttached File  IMG_4735.JPG   19.51K   3 downloadsAttached File  IMG_4736.JPG   20.34K   4 downloadsAttached File  IMG_4737.JPG   25.13K   3 downloadsAttached File  IMG_4738.JPG   22.66K   3 downloadsAttached File  IMG_4739.JPG   22.51K   4 downloadsAttached File  IMG_4740.JPG   20.88K   3 downloadsAttached File  IMG_4741.JPG   20.89K   3 downloadsAttached File  IMG_4750.JPG   23.47K   4 downloadsAttached File  IMG_4751.JPG   22.82K   4 downloadsAttached File  IMG_4752.JPG   27.37K   3 downloadsAttached File  IMG_4753.JPG   37.87K   3 downloadsAttached File  IMG_4754.JPG   22.35K   8 downloadsAttached File  IMG_4755.JPG   26.44K   5 downloads


#49 _mikecatts_

_mikecatts_
  • Guests

Posted 13 April 2013 - 10:29 PM

Hi all..


I POR 15ed/repaired the LH side yesterday...


Today I Managed to get the LH outer sill and A-pillar outer on..

I welded the 2 together OFF the car.. I wanted to try this so as not to burn through the POR 15 on the A-piller inner..

Worked out really well..


I panel bonded/seam sealed the panel.. Clamped in place for the 90minutes then spot welded on.. Worked out well..


I fitted the door previously while trial fitting the A-pillar/sill outer.. But didnt get a pic before I took it off..


Now to get the Window cowl ready and on, and this car is nearly done..


Mike


Attached File  IMG_4759.JPG   30.5K   6 downloadsAttached File  IMG_4760.JPG   23.08K   4 downloadsAttached File  IMG_4766.JPG   31.77K   5 downloadsAttached File  IMG_4767.JPG   14.38K   4 downloadsAttached File  IMG_4768.JPG   32.64K   5 downloadsAttached File  IMG_4769.JPG   26.02K   2 downloadsAttached File  IMG_4770.JPG   25.68K   2 downloadsAttached File  IMG_4773.JPG   36.6K   3 downloadsAttached File  IMG_4774.JPG   20.79K   2 downloadsAttached File  IMG_4786.JPG   31.05K   5 downloadsAttached File  IMG_4787.JPG   23.52K   3 downloadsAttached File  IMG_4788.JPG   24.42K   2 downloadsAttached File  IMG_4789.JPG   34.61K   4 downloadsAttached File  IMG_4790.JPG   29.03K   3 downloadsAttached File  IMG_4793.JPG   35.17K   2 downloadsAttached File  IMG_4794.JPG   33.92K   4 downloadsAttached File  IMG_4795.JPG   33.85K   2 downloadsAttached File  IMG_4801.JPG   31.99K   4 downloadsAttached File  IMG_4802.JPG   30.36K   6 downloadsAttached File  IMG_4803.JPG   32.15K   4 downloadsAttached File  IMG_4804.JPG   33.39K   7 downloadsAttached File  IMG_4807.JPG   30.3K   3 downloadsAttached File  IMG_4808.JPG   30.23K   3 downloadsAttached File  IMG_4809.JPG   26.09K   5 downloadsAttached File  IMG_4810.JPG   30.68K   4 downloadsAttached File  IMG_4811.JPG   34.66K   4 downloadsAttached File  IMG_4812.JPG   32K   4 downloads


#50 hawk

hawk

    Forum Fixture

  • Members
  • PipPipPipPipPip
  • 2,147 posts
  • Name:steve
  • Location:Berwick, Melbourne
  • Car:UC Torana
  • Joined: 16-July 09

Posted 13 April 2013 - 10:42 PM

Nice repairs as usual are those bars in the door frame welded for extra support?


0 user(s) are reading this topic

0 members, 0 guests, 0 anonymous users