Jump to content


Photo

Rear Pillar Rust repair


  • Please log in to reply
37 replies to this topic

#1 Orange SS

Orange SS

    Forum Fixture

  • Members
  • PipPipPipPipPip
  • 523 posts
  • Name:Matt
  • Location:Gold Coast
  • Car:1976 LX SS Hatch
  • Joined: 27-January 06

Posted 15 March 2006 - 10:24 AM

I know this topic of hatchback torana rear pillar rust repair comes up quite alot in various places in this website.
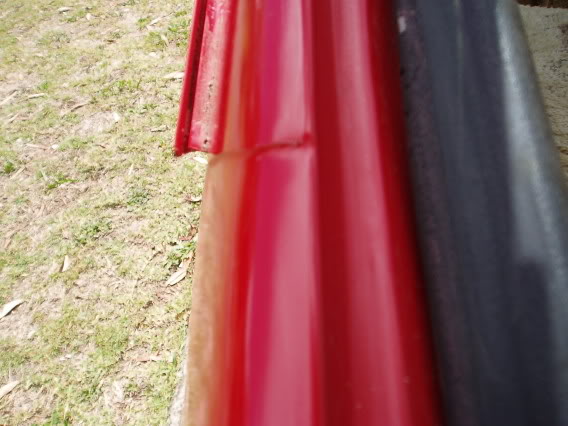
I am wondering if anyone knows of a good panel beater either back yard or shop in south east queensland that can repair these areas back to original with the seam stil visible. I really dont want to have to plate over the area as only one side of my car needs large plating.
Thanks
Matt

Edited by Orange SS, 15 March 2006 - 10:26 AM.


#2 _Yella SLuR_

_Yella SLuR_
  • Guests

Posted 15 March 2006 - 03:37 PM

There was a 'Torana Power' or such type magazine that had a really good article on how to do this repair. Maybe PM Toranavista, and see if he has this mag in his extensive collection.

#3 Toranamat69

Toranamat69

    Forum R&D Officer

  • Members
  • PipPipPipPipPip
  • 2,117 posts
  • Location:Brisbane
  • Joined: 07-November 05

Posted 15 March 2006 - 06:46 PM

I don't think that article shows how to replicate the factory seam though yella, they just plate over it.

I find it hard to get place to do rust work these days but the key to fixing this with the seam intact would really be getting the parts to replace with - otherwise you will need someone pretty tricky to get it spot on.

I just had mine redone but no seam there - I prefer the brazillian look :)

M@

#4 _Leakey_

_Leakey_
  • Guests

Posted 15 March 2006 - 07:03 PM

I'd be keen to see that article too!

Massive cancer in my baby. I would prefer to
do a 'proper' fix on it, not just a bog job, but I am
not sure about the physical make up of the pillar.

By my understanding the quarter and inner drip panel
of the pillar are one bit, the inside panel is spotted
to that, and the outer is part of the roof panel?

Not sure how that is welded?

I guess that's why RODOMO wants a rusted pillar,
to work out the geometry and make up of this damn thing!!

Love to see that article though. Worth posting in Tech section.
If whome ever has it cannot scan it, I would be happy to pay
postage to me, scan it, and send it back. (I'm in Sydney)

Only helps us all out in the long run.

- Leakey

#5 LXM21

LXM21

    Forum Fan

  • Members
  • PipPipPipPip
  • 450 posts
  • Joined: 03-December 05

Posted 15 March 2006 - 07:32 PM

Its "Torana Fever No 2" that has it, page 24. Very good procedure outlined, although no seam, just "brazilian".

#6 LXM21

LXM21

    Forum Fan

  • Members
  • PipPipPipPip
  • 450 posts
  • Joined: 03-December 05

Posted 15 March 2006 - 07:37 PM

I can scan or post for those that need it !

#7 _Yella SLuR_

_Yella SLuR_
  • Guests

Posted 15 March 2006 - 08:32 PM

Post up the article. Must say I never took much notice of it as I've never been into hatches. If we can see the article, might be able to work out how you can do it with the gap (non-brazillian).

To work out the gap, is there a similar panel diagram for the LX panels as exists in the LH manual? Helps to know how the panels fit together, I'd say from looking at a few hatches, it's just a formed step in the panel then lapped & spot welded.

Edited by Yella SLuR, 15 March 2006 - 08:34 PM.


#8 dattoman

dattoman

    Do I feel lucky? Well, do ya, punk?

  • Administrators
  • PipPipPipPipPipPipPip
  • 16,471 posts
  • Name:Neil
  • Location:Perth Western Australia
  • Car:LX SS , 76 Cadillac , 3 x dattos
  • Joined: 04-February 07

Posted 15 March 2006 - 10:46 PM

Been hosted up here for at least 6 mths

https://cache.gmh-to...attoman/torana/

#9 _Leakey_

_Leakey_
  • Guests

Posted 16 March 2006 - 09:33 AM

Awesome DATTO!!

Downloaded, saved, printed, laminated, in the garage.

Sparks are a flyin'

Cheers, Leakey

#10 Orange SS

Orange SS

    Forum Fixture

  • Members
  • PipPipPipPipPip
  • 523 posts
  • Name:Matt
  • Location:Gold Coast
  • Car:1976 LX SS Hatch
  • Joined: 27-January 06

Posted 16 March 2006 - 11:06 AM

Thanks guys for all the info, the process from datto man looks like a good way to start.
Is there anyone at all who has tried to replicate the seam after doing a rust repair?
I had a UC hatch in which we moulded and cut lines through the bog to make it look as close as possible but I am would really like to find someone who knows someone who can do an all metal repair, or show me how (pics if available) it was done on a car they know own/ know of while keeping it looking original.
I think leaky has the panel data correct there from what i saw on my last hatch.
Thanks again for the info already supplied.
Matt

#11 LXdamo

LXdamo

    Still Lurking

  • Members
  • PipPipPipPipPip
  • 521 posts
  • Name:Damo
  • Location:ADL/PER/ZNE
  • Car:bits here bits there.....
  • Joined: 22-December 05

Posted 16 March 2006 - 11:23 AM

have made a repair section on my c pillars with the seam in it.
when i was making up the outer skin, i used a set of rollers(cant remember
their proper name)with one raised lip and a hollow in the other roller.
Passed the edge of the repair section through it to form a nice little
groove the same as a seam and it came out not to bad.
Cheers Damo

#12 Orange SS

Orange SS

    Forum Fixture

  • Members
  • PipPipPipPipPip
  • 523 posts
  • Name:Matt
  • Location:Gold Coast
  • Car:1976 LX SS Hatch
  • Joined: 27-January 06

Posted 16 March 2006 - 02:01 PM

Hey Damo,
you dont have any pics of the process or 'rollers'?. I for one could use any extra help with this, and I guess so would many other hatch owners.
Cheers
Matt

#13 LXM21

LXM21

    Forum Fan

  • Members
  • PipPipPipPip
  • 450 posts
  • Joined: 03-December 05

Posted 16 March 2006 - 05:06 PM

Anyone got any pics of how this seam runs ?

#14 rodomo

rodomo

    To advertise here, call 13TORANA

  • Members
  • PipPipPipPipPipPipPip
  • 17,999 posts
  • Name:R - O - B Dammit!
  • Location:Way out west of Melbourne Awstraylya
  • Joined: 10-December 05

Posted 16 March 2006 - 06:05 PM

Posted Image

Hope this helps

RACV MAN

#15 LXM21

LXM21

    Forum Fan

  • Members
  • PipPipPipPip
  • 450 posts
  • Joined: 03-December 05

Posted 16 March 2006 - 07:37 PM

Thanks rodomo, its the overlap. Is this a distinct join line of two pieces of metal or just a fold line. Not sure about the other seam line ?.

#16 rodomo

rodomo

    To advertise here, call 13TORANA

  • Members
  • PipPipPipPipPipPipPip
  • 17,999 posts
  • Name:R - O - B Dammit!
  • Location:Way out west of Melbourne Awstraylya
  • Joined: 10-December 05

Posted 16 March 2006 - 08:09 PM

Its where the outer pillar section joins (and overlaps) the quarter panel. I'm not sure how they were originally joined as mine was bogged but I would reckon spot welds and bronze. When I repaired this one I seam welded the over lap and ground it back to shape it.
The other "seam" is like a rounded ridge that runs down the side in behind the gutter. I think that is what LXdamo is refering to.

RACV MAN

#17 LXM21

LXM21

    Forum Fan

  • Members
  • PipPipPipPip
  • 450 posts
  • Joined: 03-December 05

Posted 18 March 2006 - 11:08 AM

What is the exact location of this overlap ?, does it project on a line from the rear window sill & straight up. Does it curve around into the seal channel. Got one to repair & would prefer the overlap than the "Brazilian" look.

#18 rodomo

rodomo

    To advertise here, call 13TORANA

  • Members
  • PipPipPipPipPipPipPip
  • 17,999 posts
  • Name:R - O - B Dammit!
  • Location:Way out west of Melbourne Awstraylya
  • Joined: 10-December 05

Posted 18 March 2006 - 11:50 AM

I hope these picks help but remember mine was bogged when I got it.

Posted Image
Posted Image

The overlap follows the line of the window but starts at the end of the gutter.

RACV MAN

#19 LXM21

LXM21

    Forum Fan

  • Members
  • PipPipPipPip
  • 450 posts
  • Joined: 03-December 05

Posted 18 March 2006 - 03:52 PM

Yeh thanks rodomo, mine was full of bog also, want to get this repair exactly right !

#20 LXdamo

LXdamo

    Still Lurking

  • Members
  • PipPipPipPipPip
  • 521 posts
  • Name:Damo
  • Location:ADL/PER/ZNE
  • Car:bits here bits there.....
  • Joined: 22-December 05

Posted 18 March 2006 - 06:42 PM

It was the overlap part i was referring to.
the rain gutter i fusion welded to my repair section
because the outer skin was all rusted out.
Due to the stupid shape of the rain gutter,i didnt
want to make a new one so i had to cut it off and re-use it.
With my repair i had to cut further than the overlap to cut out
all the rust.
Will get a photo of the rollers for u guys later on when i visit my
mate.
Hopefully it will help someone!
Damo

#21 rodomo

rodomo

    To advertise here, call 13TORANA

  • Members
  • PipPipPipPipPipPipPip
  • 17,999 posts
  • Name:R - O - B Dammit!
  • Location:Way out west of Melbourne Awstraylya
  • Joined: 10-December 05

Posted 18 March 2006 - 11:25 PM

I wish I was better at using this computer and its programs as I could show you the easy way to do this repair.

RACV MAN

#22 LXM21

LXM21

    Forum Fan

  • Members
  • PipPipPipPip
  • 450 posts
  • Joined: 03-December 05

Posted 19 March 2006 - 09:28 AM

Rodomo, how much does it overlap the quarter panel by (10mm)?

Yeh I am like you, if I could post pics I would put my proposed repair up to see what my options were !! I think I am from the "old school" .

#23 _Leakey_

_Leakey_
  • Guests

Posted 19 March 2006 - 09:42 AM

Gee that's neat RODOMO. Very factory looking.

Do you have a video camera?

If you like, you could video it, with commentary, and send me the tape.

I will make a dvd of it and/or pull pics from the video and make some
annotations on each pic using your descriptions. (with arrows etc.)

Let me know if I can help. [ In my interests to!!!]

Cheers, Leakey

PS - dont forget about the laser cutting of panels I mentioned.
I am assuming the outer panel is actually a curved wedge shape
before you put the roll over in it.

#24 LXM21

LXM21

    Forum Fan

  • Members
  • PipPipPipPip
  • 450 posts
  • Joined: 03-December 05

Posted 01 April 2006 - 06:22 PM

How much does the repair section overlap the quarter panel by ?

#25 rodomo

rodomo

    To advertise here, call 13TORANA

  • Members
  • PipPipPipPipPipPipPip
  • 17,999 posts
  • Name:R - O - B Dammit!
  • Location:Way out west of Melbourne Awstraylya
  • Joined: 10-December 05

Posted 02 April 2006 - 03:31 PM

Sorry, missed that on origial post. 10mm would be close but remember mine was bogged so not totally sure.

RACV MAN


0 user(s) are reading this topic

0 members, 0 guests, 0 anonymous users