Jump to content


Photo
- - - - -

hatch project


  • Please log in to reply
435 replies to this topic

#376 derrin71

derrin71

    Forum Fan

  • Members
  • PipPipPipPip
  • 491 posts
  • Name:Derrin
  • Location:Emerald Qld
  • Car:LX Hatchback, Holden Colorado. Mini Clubman S
  • Joined: 29-November 09

Posted 22 July 2012 - 05:15 PM

I have my shine back!!!!
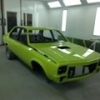
Yesterday Dad did the clear and it came out a treat. It will need a minor scuff and a buff to get rid of some orange peel and airborne rubbish in the paint.

Posted Image

Posted Image

Posted Image

Posted Image

Posted Image

Now i can really get into it and finish this thing!!

#377 torana_nick

torana_nick

    Forum Fixture

  • Members
  • PipPipPipPipPip
  • 759 posts
  • Name:Nick
  • Location:victoria
  • Car:LH Torana Project
  • Joined: 11-December 11

Posted 22 July 2012 - 05:59 PM

Looking good mate, on the home strech now!!

Cheers
Nick

#378 Rob2408

Rob2408

    Forum Fan

  • Members
  • PipPipPipPip
  • 309 posts
  • Name:Rob
  • Location:Brisbane
  • Car:1974 L32 SLR
  • Joined: 29-October 11

Posted 22 July 2012 - 08:50 PM

Green, Green is NICE. Great job Derrin, I love the way it's coming together.

Cheers

Rob

#379 Punchy

Punchy

    Forum Member

  • Members
  • PipPipPip
  • 172 posts
  • Name:Scott McCulloch
  • Location:Brisbane, Southside
  • Car:77' Lx Hatch
  • Joined: 17-May 09

Posted 23 July 2012 - 01:53 AM

Derrin, Certainly turning out the goods this car and build

With your paint system, I noticed you've used 2pack as your final coating solution..
Just a couple of quick questions if i may
  • What brand of paint or system did you use. ?
  • Is it a "C.O.B. - Clear over base system or did you just put clear over a 'solid' colour ?
  • How long was it from when you painted the 'base coat' - or green colour till you put the clear on??? - was it a while?,, like as in days etc..are you not concerned and delamination of the clear ? Is this a concern at all ?
And finally:
What style of spray gun was used for the colour and clear application..As in...was it a suction pot gun, or was it a gravity fed style gun. ( reason i ask as i saw your dad using a suction pot style when applying the hibuild.

I was of the assumption that one had to use a gravity fed H.V.L.P - High volume low pressure spray gun, to accomodate the flow and such of high build without it getting all 'splotchy' or pitted looking in the paint. to reduce sanding time.
I just put the final coats of 2 pack primers on my hatch and found even with a gravity fed gun i had to reduce or thin it down to almost 30% to get that liquid flow on ( which made final sand down easy as cake... sooooo good) Light wipe over with some 320 grit the next day and it was all done very quickly..

Keep up the good work...looks like your about 18 months in front of me, :(

#380 _evil UC hatch_

_evil UC hatch_
  • Guests

Posted 23 July 2012 - 06:07 PM

I would love to know how that exhaust sounds as I have been contemplating the same mufflers on my commodore. any chance of a vid clip?

#381 _greg2240_

_greg2240_
  • Guests

Posted 23 July 2012 - 07:03 PM

i like the look of the c pillar join filled over, looks better than original thanks for the tip, i think i will go that way also, love the colour, my last gtr was mazda lychon green, my latest hatch may go the same way, keep up the good work and thanks for the reply

#382 derrin71

derrin71

    Forum Fan

  • Members
  • PipPipPipPip
  • 491 posts
  • Name:Derrin
  • Location:Emerald Qld
  • Car:LX Hatchback, Holden Colorado. Mini Clubman S
  • Joined: 29-November 09

Posted 23 July 2012 - 09:24 PM

Hi Scott, I'm definitely not a paint expert, I leave that up to the old man but I will try to answer as best as I can.
The brand of paint we used was DuPont Centari.
The stripes were COB as they are metallic so we decided to clear over the whole lot, if it was straight green we could have just left the green as it was. Mint Julep is a straight color.
The stripes are COB , the grey goes on as a single pack similar to acrylic with no shine, the clear then goes over the top.
The time between green and clear ended up being almost 2 months due to a number of different reasons, we wet rubbed the car with 1200 prior to the COB base and clear. This will give the base and clear an excellent platform to stick to. We also cleaned it thoroughly with wax and grease remover just before spraying.
The Hi-build was sprayed with a Devibliss (spelling?) suction gun. Not a HVLP. This is Dad's old undercoat gun and is probably older than me. The green and clear were sprayed with a 10 litre STAR brand suction pot and hand piece. Dad loves this type of gun as ou can spray the whole car without having to refill the pot.
Jason, the exhaust sounds great, it is pretty quiet at idle but has a good note. It will be pretty quiet around town. Give it a bootfull though and the valves open up and it really roars! I don't mind a generally quiet car as I don't want hassles with the law just cruising town. I haven't driven the car properly yet so only time will tell.
I will try and upload a video of the engine note. Not quite sure of how to do this yet.

Edited by derrin71, 23 July 2012 - 09:26 PM.


#383 Punchy

Punchy

    Forum Member

  • Members
  • PipPipPip
  • 172 posts
  • Name:Scott McCulloch
  • Location:Brisbane, Southside
  • Car:77' Lx Hatch
  • Joined: 17-May 09

Posted 24 July 2012 - 09:52 PM

Thanx for the feed back Derrin.

As you say your dad's clearly in the know with the painting exercises. I can only assume that some of the information i have been given, and have seen, regarding time between clear going over base time frames to reduce or prevent delamination of the clear may be incorrect then
.
I have one of them remote pot style paint guns myself.Cant remember the brand but ithink it was a "supercheap" thing...... It lets you make up a mass of paint and get stuck into it for sure, just cleaning the thing out at the end is a total bummer. However my hvlp grav gun is a star brand as well. I just bought a new poofey looking spray gun as a kit that has 3 nozzle and needle assembly's come with it 1.4 mm, 2mm and 2.5mm, so clear hifill and paint are covered..ill try it on my next project.. which will be freshening up the camper trailer, and my v8 45 series landcruiser rock hopper..And then there is the mates ex rally car datsun 1600 that he wants me to do panel and prep as well....anyone would think i did paint and panel for a living...

#384 derrin71

derrin71

    Forum Fan

  • Members
  • PipPipPipPip
  • 491 posts
  • Name:Derrin
  • Location:Emerald Qld
  • Car:LX Hatchback, Holden Colorado. Mini Clubman S
  • Joined: 29-November 09

Posted 24 July 2012 - 10:26 PM

Yeah, The old fella does a great job. He did his trade when panel beating and spray painting was one apprenticeship.
Hes been out of the trade for about 10 years now but he talks to his ex apprentice all the time and keeps up to date with the new gear through him.


#385 _evil UC hatch_

_evil UC hatch_
  • Guests

Posted 25 July 2012 - 07:48 PM

those mufflers do sound like what Im after, its for my daily so needs to be reasonably quiet, especially where I live and leaving for work early hours of the morning, but I still want it to scream when I step on it. of course the note is important too

#386 derrin71

derrin71

    Forum Fan

  • Members
  • PipPipPipPip
  • 491 posts
  • Name:Derrin
  • Location:Emerald Qld
  • Car:LX Hatchback, Holden Colorado. Mini Clubman S
  • Joined: 29-November 09

Posted 04 August 2012 - 04:00 PM

Pulled the exhaust system off, painted it with KBS hi-temp paint and refitted.

Posted Image

And today i made a start with installing the interior, hood lining first. Need to keep working the wrinkles out over the next few days. Doesn't look too bad i think.

Posted Image

So for the next few weeks it's full steam ahead with interior installation and refitting the glass.
On the home straight now!!

#387 _greenmachine215_

_greenmachine215_
  • Guests

Posted 04 August 2012 - 06:46 PM

Sweet work mate, I've been keepin a tab on this build for a while now, I'm gettin exited to finally seein it running too lol.

Mind you it's all the pissy jobs left now, the ones that aren't hard but at the same time you really CBF doing, mines like that at the moment.

So about a week we should see a clip of yours running its maiden drive?

Cheers

#388 derrin71

derrin71

    Forum Fan

  • Members
  • PipPipPipPip
  • 491 posts
  • Name:Derrin
  • Location:Emerald Qld
  • Car:LX Hatchback, Holden Colorado. Mini Clubman S
  • Joined: 29-November 09

Posted 05 August 2012 - 03:23 PM

Thanks for the feedback mate.
Might be a little longer than a week. The main thing i am waiting for is the front seats. If i had these i would have taken it for a drive around the block already. It's a bit dangerous sitting on an old oil drum and holding on grimly to the steering wheel like i am when i drive it now.
Also have to re-assemble the doors. (not looking forward to that at all!!)

#389 a9x868

a9x868

    maurice mead of hatchbacks

  • Members
  • PipPipPipPipPip
  • 1,417 posts
  • Name:facebook dave
  • Location:perth miles n miles from shiney
  • Car:valencia holden torana a9x hatch ultimate improvement on the barbados L34
  • Joined: 24-July 11

Posted 05 August 2012 - 03:52 PM

derrin great work mate!
your ol mans a gun!
the best part for you is still to come
green hatch looks great
mine has taken nearly 10 years
but shit it gets some great looks on the road now
and the best part was achieving some small
addition to the rebuild when i could!
it gives me a really big smile now though!
lots of great builds on this thread
and i'm really enjoying yours!
take your time
cheers
davemc

#390 derrin71

derrin71

    Forum Fan

  • Members
  • PipPipPipPip
  • 491 posts
  • Name:Derrin
  • Location:Emerald Qld
  • Car:LX Hatchback, Holden Colorado. Mini Clubman S
  • Joined: 29-November 09

Posted 06 August 2012 - 05:23 PM

Made a little progres today.
Fitted the upper and lower dash sections. The lower section was painted in chamois to match the rest of the interior.

Posted Image

Made a start glueing the vinyl pieces to the interior.

Posted Image

and fitted the sunviors after they got a coat of chamois as well to clean them up a bit.

Posted Image

It amazes me how long the fiddly little jobs take to do. You can work in the shed for hours and it seems like you achieve next to nothing.

#391 _greenmachine215_

_greenmachine215_
  • Guests

Posted 06 August 2012 - 10:34 PM

Sweet sweet sweet! This things going to look magic once it's done, you have chosen the best exterior/interior scheme in my opinion
Plus I love how you went the extra and had the dash pad covered and French stitched,a very classy touch!

I know exactly where your coming from about spending so much time and seeing little results.
I spent about 4 hours just wiring up my alternator and waterpump on the weekend don't know how it took so much time but it did....

All worth it in the long run though.

#392 derrin71

derrin71

    Forum Fan

  • Members
  • PipPipPipPip
  • 491 posts
  • Name:Derrin
  • Location:Emerald Qld
  • Car:LX Hatchback, Holden Colorado. Mini Clubman S
  • Joined: 29-November 09

Posted 14 August 2012 - 07:33 PM

Here's a little update of what i've been up to.
Finished the hood lining.

Posted Image

Fitted the vinyl pieces around the rear windows, "door" trims beside the rear seats and some of the seat belts.

Posted Image

Yesterday some more of my interior arrived so today i fitted it up, mainly the stuff for the hatch compartment.

Posted Image

And this afternood Dad came around for a look at my progress and we fitted the hatch window.

Posted Image

#393 _woodsie_

_woodsie_
  • Guests

Posted 14 August 2012 - 09:44 PM

Looks great Derrin, great to see another hatchback getting back on the road.

#394 _Barman_

_Barman_
  • Guests

Posted 16 August 2012 - 07:46 AM

Have you got the tool for putting the chrome in the window rubber? ive got one but i cant find it, Looks good ,

#395 derrin71

derrin71

    Forum Fan

  • Members
  • PipPipPipPip
  • 491 posts
  • Name:Derrin
  • Location:Emerald Qld
  • Car:LX Hatchback, Holden Colorado. Mini Clubman S
  • Joined: 29-November 09

Posted 16 August 2012 - 07:49 AM

I'm acually after some black locking strip if anyone knows where to get some?

#396 derrin71

derrin71

    Forum Fan

  • Members
  • PipPipPipPip
  • 491 posts
  • Name:Derrin
  • Location:Emerald Qld
  • Car:LX Hatchback, Holden Colorado. Mini Clubman S
  • Joined: 29-November 09

Posted 16 August 2012 - 07:56 PM

Back to work tomorrow, here's an update of the past day or so.
Assembled the doors, the windows now wind up and down and they close and lock normally, no more g-clamps.

Posted Image

Posted Image

Today we fitted the windscreen.

Posted Image

Also noticed an interesting sticker on the new windscreen, didn't know you could get a 5 door hatchback????

Posted Image

#397 _mick74lh_

_mick74lh_
  • Guests

Posted 16 August 2012 - 09:41 PM

Love your work on this car mate. Nice touch with the LH SLR style paint around the windows in the silver. Keep the updates coming.

#398 derrin71

derrin71

    Forum Fan

  • Members
  • PipPipPipPip
  • 491 posts
  • Name:Derrin
  • Location:Emerald Qld
  • Car:LX Hatchback, Holden Colorado. Mini Clubman S
  • Joined: 29-November 09

Posted 24 August 2012 - 03:14 PM

Got the interior finished today except for the front seats.
Seats shouldn't be too far away.

Posted Image

Posted Image

Posted Image

At the moment we are finishing off the paint (rubbing back and buffing)
Once that is done i can fit the rest of the exterior, bumpers, grille, mirrors, front spoiler etc.

#399 Stinga

Stinga

    .

  • Members
  • PipPipPipPipPip
  • 2,114 posts
  • Name:Stinga
  • Location:Wollongong, NSW
  • Car:HD Holden ute, and sedan, UC torana
  • Joined: 05-December 05

Posted 24 August 2012 - 06:03 PM

interior looks great so far!

#400 _greg2240_

_greg2240_
  • Guests

Posted 24 August 2012 - 08:46 PM

very impressed, interior looks nice and neat. your gonna have a lovely car mate!


0 user(s) are reading this topic

0 members, 0 guests, 0 anonymous users